�dz���ϸ�� Docker ѧϰ�ʼ�
һ��Docker ���
Docker ������Ҫ������
- Docker: ��Դ���������⻯ƽ̨
- Docker Hub: ���ڷ��������� Docker ������ Docker SaaS ƽ̨ -- Docker Hub
docker ʹ�ÿͻ���-������ (C/S) �ܹ�ģʽ��Docker �ͻ��˻��� Docker �ػ����̽���ͨ�š�Docker �ػ����̻ᴦ�����ӷ��ص��������罨�������С�������� Docker ������Docker �ͻ��˺��ػ����̿���������ͬһ��ϵͳ�ϣ���Ȼ��Ҳ����ʹ�� Docker �ͻ���ȥ����һ��Զ�̵� Docker �ػ����̡�Docker �ͻ��˺��ػ�����֮��ͨ�� socket ���� RESTful API ����ͨ�š�
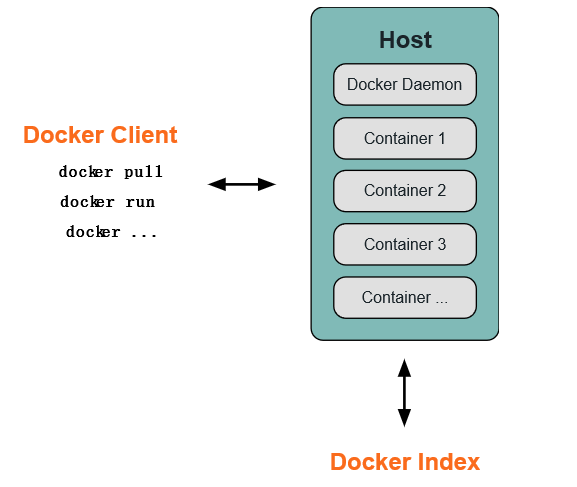
1.1 Docker �ػ�����
����ͼ��ʾ��Docker �ػ�����������һ̨�����ϡ��û�����ֱ�Ӻ��ػ����̽��н���������ͨ�� Docker �ͻ��˼�Ӻ���ͨ�š�
1.2 Docker �ͻ���
Docker �ͻ��ˣ�ʵ������ docker �Ķ����Ƴ�������Ҫ���û��� Docker ������ʽ���������û�ָ����뱳��� Docker �ػ�����ͨ�ţ��������������
1.3 Docker �ڲ�
Ҫ���� Docker �ڲ���������Ҫ�����������ֲ�����
- Docker ���� - Docker images
- Docker �ֿ� - Docker registeries
- Docker ���� - Docker containers
Docker ����
Docker ������ Docker ��������ʱ��ֻ��ģ�壬ÿһ��������һϵ�еIJ� (layers) ��ɡ�Docker ʹ�� UnionFS ������Щ�����ϵ������ľ����С�UnionFS ���������ļ�ϵͳ�е��ļ����ļ���(��֮Ϊ��֧)�������ǣ��γ�һ������������ļ�ϵͳ������Ϊ������Щ��Ĵ��ڣ�Docker ����˵�����������ı���һ�� Docker ������������ij�������µİ汾��һ���µIJ�ᱻ��������ˣ������滻����ԭ�ȵľ���������½���(��ʹ���������ʱ������ܻ���ô��)��ֻ��һ���� �IJ㱻���ӻ������ˡ������㲻�����·�����������ֻ��Ҫ��������ʹ�÷ַ� Docker �����üͿ��١�
Docker �ֿ�
Docker �ֿ��������澵��������Ϊ��������еĴ���ֿ⡣ͬ���ģ�Docker �ֿ�Ҳ�й��к�˽�еĸ�����е� Docker �ֿ������� Docker Hub��Docker Hub �ṩ���Ӵ�ľ��Ϲ�ʹ�á���Щ����������Լ������������ڱ��˵ľ�������ϴ�����Docker �ֿ��� Docker �ķַ����֡�
Docker ����
Docker �������ļ��к����ƣ�һ��Docker�������������е�ij��Ӧ����������Ҫ�Ļ�����ÿһ�� Docker �������Ǵ� Docker �����ġ�Docker �����������С���ʼ��ֹͣ���ƶ���ɾ����ÿһ�� Docker �������Ƕ����Ͱ�ȫ��Ӧ��ƽ̨��Docker ������ Docker �����в��֡�
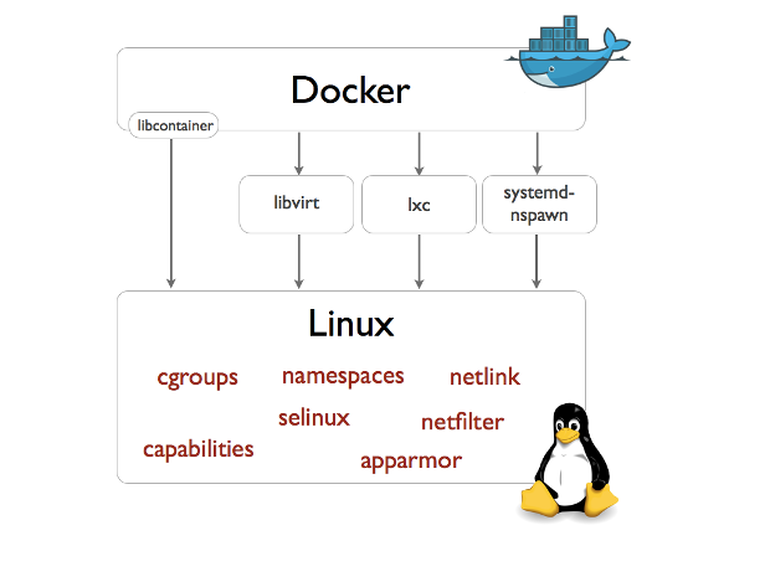
1.4 libcontainer
Docker �� 0.9 �汾��ʼʹ�� libcontainer ��� lxc��libcontainer �� Linux ϵͳ�Ľ���ͼ���£�
1.5 �����ռ䡸Namespaces��
pid namespace
��ͬ�û��Ľ��̾���ͨ�� pid namespace ���뿪�ģ��Ҳ�ͬ namespace �п�������ͬ PID��������������:
- ÿ�� namespace �е� pid �����Լ��� pid=1 �Ľ���(���� /sbin/init ����)
- ÿ�� namespace �еĽ���ֻ��Ӱ���Լ���ͬһ�� namespace ���� namespace �еĽ���
- ��Ϊ /proc �����������еĽ��̣������ container �е� pseudo-filesystem �� /proc Ŀ¼ֻ�ܿ����Լ� namespace �еĽ���
- ��Ϊ namespace ����Ƕ�ף��� namespace ����Ӱ���� namespace �Ľ��̣������� namespace �Ľ��̿����ڸ� namespace �п��������Ǿ��в�ͬ�� pid
�ο��ĵ���Introduction to Linux namespaces �C Part 3: PID
mnt namespace
���� chroot����һ�����̷ŵ�һ���ض���Ŀ¼ִ�С�mnt namespace ������ͬ namespace �Ľ��̿������ļ��ṹ��ͬ������ÿ�� namespace �еĽ������������ļ�Ŀ¼�ͱ����뿪�ˡ�ͬ chroot ��ͬ��ÿ�� namespace �е� Container �� /proc/mounts ����Ϣֻ�������� namespace �� mount point��
net namespace
���������ͨ�� net namespace ʵ�ֵģ� ÿ�� net namespace �ж����� network devices, IP addresses, IP routing tables, /proc/net Ŀ¼������ÿ�� container ��������ܸ��뿪���� docker Ĭ�ϲ��� veth �ķ�ʽ�� container �е���������ͬ host �ϵ�һ�� docker bridge ������һ��
�ο��ĵ���Introduction to Linux namespaces �C Part 5: NET
uts namespace
UTS ("UNIX Time-sharing System") namespace ����ÿ�� container ӵ�ж����� hostname �� domain name, ʹ���������Ͽ��Ա�����һ�������Ľڵ���� Host �ϵ�һ�����̡�
�ο��ĵ���Introduction to Linux namespaces �C Part 1: UTS
ipc namespace
container �н��̽������Dz��� linux �����Ľ��̼佻������ (interprocess communication - IPC), �����������ź�������Ϣ���к����ڴ档Ȼ��ͬ VM ��ͬ��container �Ľ��̼佻��ʵ���ϻ��� host �Ͼ�����ͬ pid namespace �еĽ��̼佻���������Ҫ��IPC��Դ����ʱ���� namespace ��Ϣ - ÿ�� IPC ��Դ��һ��Ψһ�� 32bit ID��
�ο��ĵ���Introduction to Linux namespaces �C Part 2: IPC
user namespace
ÿ�� container �����в�ͬ�� user �� group id, Ҳ����˵������ container �ڲ����û��� container �ڲ�ִ�г������ Host �ϵ��û���
�������� 6 �� namespace �ӽ��̡����硢IPC���ļ�ϵͳ��UTS ���û��Ƕȵĸ��룬һ�� container �Ϳ��Զ���չ�ֳ�һ����������������������Ҳ�ͬ container �� OS ����ʵ���˸��롣 Ȼ����ͬ namespace ֮����Դ����������ģ���Ȼ��Ҫ���� ulimit ������ÿ�� container ����ʹ�õ���Դ - cgroup��
Reference
1.6 ��Դ��cgroups��
cgroups ʵ���˶���Դ�����Ͷ����� cgroups ��ʹ�÷dz����ṩ�����ļ��Ľӿڣ��� /cgroup Ŀ¼���½�һ���ļ��м����½�һ�� group���ڴ��ļ������½� task �ļ������� pid д����ļ�������ʵ�ֶԸý��̵���Դ���ơ��������Դ����ѡ������ڸ��ļ������½��� subsystem ��{��ϵͳǰ}.{��Դ��} �ǵ��͵����÷����� �� memory.usageinbytes �Ͷ����˸� group �� subsystem memory �е�һ���ڴ�����ѡ� ���⣬cgroups �е� subsystem ����������ϣ�һ�� subsystem �����ڲ�ͬ�� group �У�Ҳ����һ�� group ������� subsystem - Ҳ����˵һ�� subsystem��
- memory
- �ڴ���ص�����
- cpu
- �� cgroup �У���������Ӳ�����⻯����һ���ܹ����� CPU �����������ܹ����� CPU ��ת�����ȼ�����˾��нϸ� CPU ���ȼ��Ľ��̻�����ܵõ� CPU ���㡣 ͨ��������д�� cpu.shares ,���ɶ���� cgroup �� CPU ���ȼ� - ������һ�����Ȩ�أ����Ǿ���ֵ
- blkio
- block IO ��ص�ͳ�ƺ����ƣ�byte/operation ͳ�ƺ����� (IOPS ��)����д�ٶ����Ƶȣ�����������Ҫͳ�ƵĶ���ͬ�� IO
- devices
- �豸Ȩ������
�ο��ĵ���how to use cgroup
����Docker ��װ
docker ����ذ�װ�������ﲻ�����ܣ����尲װ�ο� �ٵ�
��ȡ��ǰ docker �汾
$ sudo docker version
Client version: 1.3.2
Client API version: 1.15
Go version (client): go1.3.3
Git commit (client): 39fa2fa/1.3.2
OS/Arch (client): linux/amd64
Server version: 1.3.2
Server API version: 1.15
Go version (server): go1.3.3
Git commit (server): 39fa2fa/1.3.2
����Docker �����÷�
Docker HUB : Docker������ҳ�������ٷ������������������
��Ϊ�����ԭ�������� Docker HUB �ٷ�����ؾ���Ƚ���������ʹ�� docker.cn �����ֺٷ�һ�£��ؼ����ٶȿ飬�Ƽ�ʹ�á�
3.1 Search images
$ sudo docker search ubuntu
3.2 Pull images
$ sudo docker pull ubuntu # ��ȡ ubuntu �ٷ����� $ sudo docker images # �鿴��ǰ�����б�
3.3 Running an interactive shell
$ sudo docker run -i -t ubuntu:14.04 /bin/bash
- docker run - ����һ������
- -t - ����һ����α��tty (link is external)
- -i - ����ģʽ (so we can interact with it)
- ubuntu:14.04 - ʹ�� ubuntu �������� 14.04
- /bin/bash - �������� bash shell
ע: ubuntu ���ж���汾��ͨ��ָ�� tag �������ض��İ汾 [image]:[tag]
$ sudo docker ps # �鿴��ǰ���е�����, ps -a �г���ǰϵͳ���е����� CONTAINER ID IMAGE COMMAND CREATED STATUS PORTS NAMES 6c9129e9df10 ubuntu:14.04 /bin/bash 6 minutes ago Up 6 minutes cranky_babbage
3.4 ��ؿ�ݼ�
- �˳���Ctrl-Dorexit
- detach��Ctrl-P + Ctrl-Q
- attach:docker attach CONTAINER-ID
�ġ�Docker �������
4.1 docker help
docker command
$ sudo docker # docker �������
Commands:
attach Attach to a running container # ��ǰ shell �� attach ����ָ�����о���
build Build an image from a Dockerfile # ͨ�� Dockerfile ���ƾ���
commit Create a new image from a container's changes # �ύ��ǰ����Ϊ�µľ���
cp Copy files/folders from the containers filesystem to the host path
# �������п���ָ���ļ�����Ŀ¼����������
create Create a new container # ����һ���µ�������ͬ run��������������
diff Inspect changes on a container's filesystem # �鿴 docker �����仯
events Get real time events from the server # �� docker �����ȡ����ʵʱ�¼�
exec Run a command in an existing container # ���Ѵ��ڵ���������������
export Stream the contents of a container as a tar archive
# ������������������Ϊһ�� tar �鵵�ļ�[��Ӧ import ]
history Show the history of an image # չʾһ�������γ���ʷ
images List images # �г�ϵͳ��ǰ����
import Create a new filesystem image from the contents of a tarball
# ��tar���е����ݴ���һ���µ��ļ�ϵͳӳ��[��Ӧ export]
info Display system-wide information # ��ʾϵͳ�����Ϣ
inspect Return low-level information on a container # �鿴������ϸ��Ϣ
kill Kill a running container # kill ָ�� docker ����
load Load an image from a tar archive # ��һ�� tar ���м���һ������[��Ӧ save]
login Register or Login to the docker registry server
# ע����ߵ�½һ�� docker Դ������
logout Log out from a Docker registry server # �ӵ�ǰ Docker registry �˳�
logs Fetch the logs of a container # �����ǰ������־��Ϣ
port Lookup the public-facing port which is NAT-ed to PRIVATE_PORT
# �鿴ӳ��˿ڶ�Ӧ�������ڲ�Դ�˿�
pause Pause all processes within a container # ��ͣ����
ps List containers # �г������б�
pull Pull an image or a repository from the docker registry server
# ��docker����Դ��������ȡָ��������߿⾵��
push Push an image or a repository to the docker registry server
# ����ָ��������߿⾵����dockerԴ������
restart Restart a running container # �����������
rm Remove one or more containers # �Ƴ�һ�����߶������
rmi Remove one or more images
# �Ƴ�һ����������[������ʹ�øþ���ſ�ɾ����������ɾ����������ſɼ����� -f ǿ��ɾ��]
run Run a command in a new container
# ����һ���µ�����������һ������
save Save an image to a tar archive # ����һ������Ϊһ�� tar ��[��Ӧ load]
search Search for an image on the Docker Hub # �� docker hub ����������
start Start a stopped containers # ��������
stop Stop a running containers # ֹͣ����
tag Tag an image into a repository # ��Դ�о�����ǩ
top Lookup the running processes of a container # �鿴���������еĽ�����Ϣ
unpause Unpause a paused container # ȡ����ͣ����
version Show the docker version information # �鿴 docker �汾��
wait Block until a container stops, then print its exit code
# ��ȡ����ֹͣʱ���˳�״ֵ̬
Run 'docker COMMAND --help' for more information on a command.docker option
Usage of docker:
--api-enable-cors=false Enable CORS headers in the remote API # Զ�� API �п��� CORS ͷ
-b, --bridge="" Attach containers to a pre-existing network bridge # �Ž�����
use 'none' to disable container networking
--bip="" Use this CIDR notation address for the network bridge's IP, not compatible with -b
# �� -b ѡ����ݣ�����û�в��Թ�
-d, --daemon=false Enable daemon mode # daemon ģʽ
-D, --debug=false Enable debug mode # debug ģʽ
--dns=[] Force docker to use specific DNS servers # ǿ�� docker ʹ��ָ�� dns ������
--dns-search=[] Force Docker to use specific DNS search domains # ǿ�� docker ʹ��ָ�� dns ������
-e, --exec-driver="native" Force the docker runtime to use a specific exec driver # ǿ�� docker ����ʱʹ��ָ��ִ��������
--fixed-cidr="" IPv4 subnet for fixed IPs (ex: 10.20.0.0/16)
this subnet must be nested in the bridge subnet (which is defined by -b or --bip)
-G, --group="docker" Group to assign the unix socket specified by -H when running in daemon mode
use '' (the empty string) to disable setting of a group
-g, --graph="/var/lib/docker" Path to use as the root of the docker runtime # �������еĸ�Ŀ¼·��
-H, --host=[] The socket(s) to bind to in daemon mode # daemon ģʽ�� docker ָ����ʽ[tcp or ���� socket]
specified using one or more tcp://host:port, unix:///path/to/socket, fd://* or fd://socketfd.
--icc=true Enable inter-container communication # ������ͨ��
--insecure-registry=[] Enable insecure communication with specified registries (no certificate verification for HTTPS and enable HTTP fallback) (e.g., localhost:5000 or 10.20.0.0/16)
--ip="0.0.0.0" Default IP address to use when binding container ports # ָ��������ַ��Ĭ������ ip
--ip-forward=true Enable net.ipv4.ip_forward # ����ת��
--ip-masq=true Enable IP masquerading for bridge's IP range
--iptables=true Enable Docker's addition of iptables rules # ���Ӷ�Ӧ iptables ����
--mtu=0 Set the containers network MTU # �������� mtu
if no value is provided: default to the default route MTU or 1500 if no default route is available
-p, --pidfile="/var/run/docker.pid" Path to use for daemon PID file # ָ�� pid �ļ�λ��
--registry-mirror=[] Specify a preferred Docker registry mirror
-s, --storage-driver="" Force the docker runtime to use a specific storage driver # ǿ�� docker ����ʱʹ��ָ���洢����
--selinux-enabled=false Enable selinux support # ���� selinux ֧��
--storage-opt=[] Set storage driver options # ���ô洢����ѡ��
--tls=false Use TLS; implied by tls-verify flags # ���� tls
--tlscacert="/root/.docker/ca.pem" Trust only remotes providing a certificate signed by the CA given here
--tlscert="/root/.docker/cert.pem" Path to TLS certificate file # tls ֤���ļ�λ��
--tlskey="/root/.docker/key.pem" Path to TLS key file # tls key �ļ�λ��
--tlsverify=false Use TLS and verify the remote (daemon: verify client, client: verify daemon) # ʹ�� tls ��ȷ��Զ�̿�������
-v, --version=false Print version information and quit # ��� docker �汾��Ϣ4.2 docker search
$ sudo docker search --help Usage: docker search TERM Search the Docker Hub for images # �� Docker Hub �������� --automated=false Only show automated builds --no-trunc=false Don't truncate output -s, --stars=0 Only displays with at least xxx stars
ʾ����
$ sudo docker search -s 100 ubuntu # ���� star ������Ϊ 100 �ľ����ҳ�ֻ�йٷ����� start ������ 100��Ĭ�ϲ��� s ѡ���ҳ�������� ubuntu ���� NAME DESCRIPTION STARS OFFICIAL AUTOMATED ubuntu Official Ubuntu base image 425 [OK]
4.3 docker info
$ sudo docker info Containers: 1 # �������� Images: 22 # ������� Storage Driver: devicemapper # �洢���� Pool Name: docker-8:17-3221225728-pool Pool Blocksize: 65.54 kB Data file: /data/docker/devicemapper/devicemapper/data Metadata file: /data/docker/devicemapper/devicemapper/metadata Data Space Used: 1.83 GB Data Space Total: 107.4 GB Metadata Space Used: 2.191 MB Metadata Space Total: 2.147 GB Library Version: 1.02.84-RHEL7 (2014-03-26) Execution Driver: native-0.2 # �洢���� Kernel Version: 3.10.0-123.el7.x86_64 Operating System: CentOS Linux 7 (Core)
4.4 docker pull && docker push
$ sudo docker pull --help # pull ��ȡ���� Usage: docker pull [OPTIONS] NAME[:TAG] Pull an image or a repository from the registry -a, --all-tags=false Download all tagged images in the repository $ sudo docker push # push ����ָ������ Usage: docker push NAME[:TAG] Push an image or a repository to the registry
ʾ����
$ sudo docker pull ubuntu # ���عٷ� ubuntu docker ����Ĭ���������� ubuntu �ٷ��⾵�� $ sudo docker pull ubuntu:14.04 # ����ָ���汾 ubuntu �ٷ�����
$ sudo docker push 192.168.0.100:5000/ubuntu # ���;���˽��Դ[��ע�� docker �ٷ��˻������͵��ٷ������˻�] $ sudo docker push 192.168.0.100:5000/ubuntu:14.04 # ����ָ������˽��Դ
4.5 docker images
�г���ǰϵͳ����
$ sudo docker images --help Usage: docker images [OPTIONS] [NAME] List images -a, --all=false Show all images (by default filter out the intermediate image layers) # -a ��ʾ��ǰϵͳ�����о��������ɲ㾵��Ĭ�� docker images ��ʾ���վ����������ɲ㾵�� -f, --filter=[] Provide filter values (i.e. 'dangling=true') --no-trunc=false Don't truncate output -q, --quiet=false Only show numeric IDs
ʾ����
$ sudo docker images # ��ʾ��ǰϵͳ�����������ɲ㾵�� $ sudo docker images -a # ��ʾ��ǰϵͳ���о��������ɲ㾵�� $ sudo docker images ubuntu # ��ʾ��ǰϵͳ docker ubuntu ���е����о��� REPOSITORY TAG IMAGE ID CREATED VIRTUAL SIZE ubuntu 12.04 ebe4be4dd427 4 weeks ago 210.6 MB ubuntu 14.04 e54ca5efa2e9 4 weeks ago 276.5 MB ubuntu 14.04-ssh 6334d3ac099a 7 weeks ago 383.2 MB
4.6 docker rmi
ɾ��һ�����߶������
$ sudo docker rmi --help Usage: docker rmi IMAGE [IMAGE...] Remove one or more images -f, --force=false Force removal of the image # ǿ���Ƴ������Ƿ�������ʹ�øþ��� --no-prune=false Do not delete untagged parents # ��Ҫɾ��δ��ǵĸ�����
4.7 docker run
ʾ����$ sudo docker run --help Usage: docker run [OPTIONS] IMAGE [COMMAND] [ARG...] Run a command in a new container -a, --attach=[] Attach to stdin, stdout or stderr. -c, --cpu-shares=0 CPU shares (relative weight) # ���� cpu ʹ��Ȩ�� --cap-add=[] Add Linux capabilities --cap-drop=[] Drop Linux capabilities --cidfile="" Write the container ID to the file # ������ id д�뵽ָ���ļ� --cpuset="" CPUs in which to allow execution (0-3, 0,1) # cpu �� -d, --detach=false Detached mode: Run container in the background, print new container id # ��̨�������� --device=[] Add a host device to the container (e.g. --device=/dev/sdc:/dev/xvdc) --dns=[] Set custom dns servers # ���� dns --dns-search=[] Set custom dns search domains # ���� dns ������ -e, --env=[] Set environment variables # ���廷������ --entrypoint="" Overwrite the default entrypoint of the image # �� --env-file=[] Read in a line delimited file of ENV variables # ��ָ���ļ���ȡ����ֵ --expose=[] Expose a port from the container without publishing it to your host # ָ�������ṩ����˿� -h, --hostname="" Container host name # �������������� -i, --interactive=false Keep stdin open even if not attached # ���ֱ����������ʹû�� attached --link=[] Add link to another container (name:alias) # �������ӵ�����һ������ --lxc-conf=[] (lxc exec-driver only) Add custom lxc options --lxc-conf="lxc.cgroup.cpuset.cpus = 0,1" -m, --memory="" Memory limit (format: <number><optional unit>, where unit = b, k, m or g) # �ڴ����� --name="" Assign a name to the container # ���������� --net="bridge" Set the Network mode for the container # ������������ģʽ 'bridge': creates a new network stack for the container on the docker bridge 'none': no networking for this container 'container:<name|id>': reuses another container network stack 'host': use the host network stack inside the container. Note: the host mode gives the container full access to local system services such as D-bus and is therefore considered insecure. -P, --publish-all=false Publish all exposed ports to the host interfaces # �Զ�ӳ�����������ṩ����Ķ˿� -p, --publish=[] Publish a container's port to the host # ָ���˿�ӳ�� format: ip:hostPort:containerPort | ip::containerPort | hostPort:containerPort (use 'docker port' to see the actual mapping) --privileged=false Give extended privileges to this container # �ṩ�����Ȩ������ --restart="" Restart policy to apply when a container exits (no, on-failure[:max-retry], always) --rm=false Automatically remove the container when it exits (incompatible with -d) # ��������˳��Զ��Ƴ��� -d ѡ���ͻ --security-opt=[] Security Options --sig-proxy=true Proxify received signals to the process (even in non-tty mode). SIGCHLD is not proxied. -t, --tty=false Allocate a pseudo-tty # ����α�ն� -u, --user="" Username or UID # ָ�������������û� uid �����û��� -v, --volume=[] Bind mount a volume (e.g., from the host: -v /host:/container, from docker: -v /container) # ���ؾ� --volumes-from=[] Mount volumes from the specified container(s) # ��ָ���������ؾ� -w, --workdir="" Working directory inside the container # ָ����������Ŀ¼
$ sudo docker images ubuntu REPOSITORY TAG IMAGE ID CREATED VIRTUAL SIZE ubuntu 14.04 e54ca5efa2e9 4 weeks ago 276.5 MB ... ... $ sudo docker run -t -i -c 100 -m 512MB -h test1 -d --name="docker_test1" ubuntu /bin/bash # ����һ�� cpu ���ȼ�Ϊ 100���ڴ����� 512MB��������Ϊ test1����Ϊ docker_test1 ��̨���� bash ������ a424ca613c9f2247cd3ede95adfbaf8d28400cbcb1d5f9b69a7b56f97b2b52e5 $ sudo docker ps CONTAINER ID IMAGE COMMAND CREATED STATUS PORTS NAMES a424ca613c9f ubuntu:14.04 /bin/bash 6 seconds ago Up 5 seconds docker_test1 $ sudo docker attach docker_test1 root@test1:/# pwd / root@test1:/# exit exit
����cpu���ȼ�:
By default all groups have 1024 shares. A group with 100 shares will get a ~10% portion of the CPU time - archlinux cgroups
4.8 docker start|stop|kill... ...
dockerstart|stop|kill|restart|pause|unpause|rm|commit|inspect|logs
- docker start CONTAINER [CONTAINER...]
- # ����һ������ֹͣ������
- docker stop CONTAINER [CONTAINER...]
- # ͣ��һ���������е�����-tѡ���ָ����ʱʱ��
- docker kill [OPTIONS] CONTAINER [CONTAINER...]
- # Ĭ�� kill ���� SIGKILL �ź�-s����ָ������ kill �ź�����
- docker restart [OPTIONS] CONTAINER [CONTAINER...]
- # ����һ���������е�����-tѡ���ָ����ʱʱ��
- docker pause CONTAINER
- # ��ͣһ������������ commit
- docker unpause CONTAINER
- # ������ͣ������
- docker rm [OPTIONS] CONTAINER [CONTAINER...]
- # �Ƴ�һ����������
- -f, --force=false Force removal of running container
- -l, --link=false Remove the specified link and not the underlying container
- -v, --volumes=false Remove the volumes associated with the container
- docker commit [OPTIONS] CONTAINER [REPOSITORY[:TAG]]
- # �ύָ������Ϊ����
- -a, --author="" Author (e.g., "John Hannibal Smith hannibal@a-team.com")
- -m, --message="" Commit message
- -p, --pause=true Pause container during commit
- # Ĭ�� commit ����ͣ״̬
- docker inspect CONTAINER|IMAGE [CONTAINER|IMAGE...]
- # �鿴�������߾������ϸ��Ϣ
- docker logs CONTAINER
- # ���ָ��������־��Ϣ
- -f, --follow=false Follow log output
- # ���� tail -f
- -t, --timestamps=false Show timestamps
- --tail="all" Output the specified number of lines at the end of logs (defaults to all logs)
�ο��ĵ���Docker Run Reference
4.9 Docker 1.3 �������Ժ�����
Digital Signature Verification
Docker 1.3 �汾��ʹ������ǩ���Զ���֤���йٷ������Դ�������ԣ����һ���ٷ����۸Ļ��߱��ƻ���Ŀǰ Docker ֻ�������������������������ֹ���������С�
Inject new processes withdocker exec
docker exec --help

Usage: docker exec [OPTIONS] CONTAINER COMMAND [ARG...] Run a command in an existing container

  -d, --detach=false Detached mode: run command in the background
  -i, --interactive=false Keep STDIN open even if not attached
  -t, --tty=false Allocate a pseudo-TTY
Ϊ�˼��ԣ�����ʹ��docker exec����ͨ�� Docker API �� CLI �����е����������г���
$ docker exec -it ubuntu_bash bash
������������ ubuntu_bash �д���һ���µ� Bash �Ự��
Tune container lifecycles withdocker create
���ǿ���ͨ��docker run <image name>�����һ���������������еij�����Ϊ�кܶ��û�Ҫ��������ʱ����������������docker createӦ�˶����ˡ�
$ docker create -t -i fedora bash
6d8af538ec541dd581ebc2a24153a28329acb5268abe5ef868c1f1a261221752
����������һ����д�������� (���Ҵ�ӡ������ ID)�����Dz���������������ʹ�������������и�������
$ docker start -a -i 6d8af538ec5
bash-4.2#
Security Options
ͨ��--security-optѡ���������ʱ�û����Զ��� SELinux �� AppArmor ��������á�
$ docker run --security-opt label:type:svirt_apache -i -t centos \ bash
����ֻ�������������� Apache �˿ڣ����ѡ��ĺô����û�����Ҫ���� docker ��ʱ��ָ��--privilegedѡ����Ͱ�ȫ���ա�
�ο��ĵ���Docker 1.3: signed images, process injection, security options, Mac shared directories
4.10 Docker 1.5 ������
�ο��ĵ���Docker 1.5 ������