Redis主从+Sentinel+Haproxy哨兵集群-自动选master部署
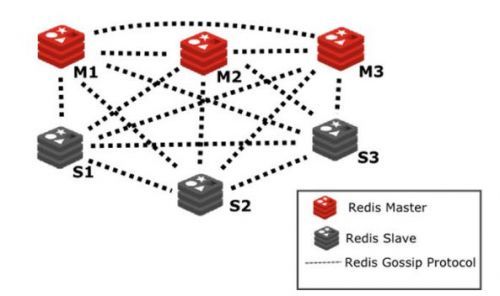
配置前题:
redis主从以及哨兵模式已配置完成
哨兵环境:
IP 主机名 类型
172.16.1.200 node200 master
172.16.1.201 node201 slave
172.16.1.202 node202 slave
1、安装Haproxy
YUM快速安装:
[root@node200 ~]# yum install haproxy -y
[root@node200 ~]# rpm -qa | grep haproxy
haproxy-1.5.18-9.el7.x86_64
+++++++++++++++++++++++++++++++++++++++
源码编译安装:
#下载
wget http://fossies.org/linux/misc/haproxy-1.8.12.tar.gz
#解压
tar -zxvf haproxy-1.8.12.tar.gz
cd haproxy-1.8.12
#安装
make TARGET=linux2628 ARCH=x86_64 PREFIX=/usr/local/haproxy
make install PREFIX=/usr/local/haproxy
#参数说明
TARGET=linux26 #内核版本,使用uname -r查看内核,如:2.6.18-371.el5,此时该参数就为linux26;kernel 大于2.6.28的用:TARGET=linux2628
ARCH=x86_64 #系统位数
PREFIX=/usr/local/haprpxy #/usr/local/haprpxy为haprpxy安装路径
+++++++++++++++++++++++++++++++++++++++++++++++
2、配置Haproxy
vim /etc/haproxy/haproxy.cfg
#---------------------------------------------------------------------
# Example configuration for a possible web application. See the
# full configuration options online.
#
# http://haproxy.1wt.eu/download/1.4/doc/configuration.txt
#
#---------------------------------------------------------------------
#---------------------------------------------------------------------
# Global settings
#---------------------------------------------------------------------
global
# to have these messages end up in /var/log/haproxy.log you will
# need to:
#
# 1) configure syslog to accept network log events. This is done
# by adding the '-r' option to the SYSLOGD_OPTIONS in
# /etc/sysconfig/syslog
#
# 2) configure local2 events to go to the /var/log/haproxy.log
# file. A line like the following can be added to
# /etc/sysconfig/syslog
#
# local2.* /var/log/haproxy.log
#
log 127.0.0.1 local0
chroot /var/lib/haproxy
pidfile /var/run/haproxy.pid
maxconn 4000
user haproxy
group haproxy
daemon
# turn on stats unix socket
stats socket /var/lib/haproxy/stats
#---------------------------------------------------------------------
# common defaults that all the 'listen' and 'backend' sections will
# use if not designated in their block
#---------------------------------------------------------------------
defaults
log 127.0.0.1 local3
mode tcp
retries 3
option redispatch
timeout connect 600s
timeout client 600s
timeout server 600s
maxconn 20000
listen redis 0.0.0.0:16379
mode tcp
balance roundrobin
option tcp-check
tcp-check connect port 6379
tcp-check send AUTH\ 123456\r\n
tcp-check expect string +OK
tcp-check send PING\r\n
tcp-check expect string +PONG
tcp-check send INFO\ REPLICATION\r\n
tcp-check expect string role:master
tcp-check send QUIT\r\n
tcp-check expect string +OK
server redis1_6379 172.16.1.200:6379 check inter 1s
server redis2_6379 172.16.1.201:6379 check inter 1s
server redis3_6379 172.16.1.202:6379 check inter 1s
tcp-check发送一个字符串,期望一个匹配的字符串应答。上面的配置是在一个TCP会话中顺序执行,反斜杠需要在空格的前面。AUTH命令发送密码,一旦正确会应答一个OK,发送包含PING的字符串,会应答PONG, 发送INFO REPLICATION会应答包含OK字符串的Master,你可以看到一个活着的Master。如果不需要认证及PING,也可以不发送它们。
3、检查
[root@localhost ~]# redis-cli -p 16379 set a 2
OK
[root@localhost ~]# redis-cli -p 16379 set get a
OK
总结
上面的内容可以解决redis高可用的问题,但是Haproxy还是单点。如果服务器是物理机,Haproxy可以通过Keepalived解决单点问题,实现高可用;但是服务器是云主机ECS的情况下不能使用Keepalived(也可以通过配置云主机的网卡解决)。