CentOS上使用Squid+Stunnel搭建翻墙代理服务器教程
一、网络环境
主机A :192.168.99.11 CentOS 6.9 在公司局域网,这台服务器安装stunnel客户端stunnelclient,配置完成后局域网电脑通过这台主机的IP就可以代理上网
主机B:123.145.123.123:4567 CentOS 7.2.1511 香港服务器,可以访问google等国外网站 squid服务端和stunnel server服务端
主机A和B互通,主机A不可以访问google,B主机可以访问google 可以通过stunnel+squid代理跳转访问。
二、在主机B上配置squid 安装配置
squid和stunnel可以在主机B上配置,也可在不同主机配置实现网络跳转。这里squid和stunnel server在主机B配置,stunnel client 在客户端主机A配置
・ 安装 yum install squid
・ 配置 vim/etc/squid/squid.conf,主要配置如下两处
acllocalnet src 66.0.0.6/32 # 根据实际情况修改,添加允许stunnel-client 的ip地址,也可以不配置,允许所有的访问
http_access allow all #允许所有的访问
http_port6100 #squid监听端口
启动服务 service squid start
防火墙打开:6100
[root@123.145.123.123:4567_c7 squid]# pwd
/var/log/squid
[root@123.145.123.123:4567_c7 squid]# ls
access.log:访问日志文件 cache.log squidGuard.log
三、在主机B上配置stunnel服务端配置
・ 安装yum -y install stunnel openssl openssl-devel
1、stunnel server 配置
cd /etc/stunnel
・ 生成证书认证文件
・ opensslreq -new -x509 -days 365 -nodes -outstunnel.pem -keyout stunnel.pem
Generating a 2048 bit RSA private key
..................+++
...............+++
writingnew private key to '/etc/stunnel4/stunnel.pem'
-----
Youare about to be asked to enter information that will be incorporated
intoyour certificate request.
Whatyou are about to enter is what is called a Distinguished Name or a DN.
Thereare quite a few fields but you can leave some blank
Forsome fields there will be a default value,
Ifyou enter '.', the field will be left blank.
-----
CountryName (2 letter code) [XX]:CN
Stateor Province Name (full name) []:fj
LocalityName (eg, city) [Default City]:xm
OrganizationName (eg, company) [Default Company Ltd]:hexin
OrganizationalUnit Name (eg, section) []:hexincorp
CommonName (eg, your name or your server's hostname) []:rscpass
EmailAddress []:rscpass@163.com
opensslgendh 512>> stunnel.pem #不是必须的
[root@123.145.123.123:4567_c7 stunnel]# pwd
/etc/stunnel
[root@123.145.123.123:4567_c7 stunnel]# ls
stunnel.conf:配置文件 stunnel.log:日志文件 stunnel.pem #认证文件,客户端和服务端一样
・ 配置
vim /etc/stunnel/stunnel.conf (;;; 注释形式)
cert= /etc/stunnel/stunnel.pem ;;;# 认证文件
CAfile= /etc/stunnel/stunnel.pem ;;;# 认证文件
socket = l:TCP_NODELAY=1
socket= r:TCP_NODELAY=1
pid= /var/lib/stunnel4/stunnel.pid
verify= 3
setuid= root
setgid= root
client=no ;;;# 服务端
delay= no
sslVersion= TLSv1
debug= 7
syslog= yes
output= stunnel.log
[sproxy]
accept= 0.0.0.0:4567 ;;;# 监听端口
connect= 123.145.123.123:6100 ;;;#squid服务连接端口
[root@47_75_77_179_c7 stunnel]# ls
stunnel.conf stunnel.log stunnel.pem
・ 启动服务 stunnel/etc/stunnel/stunnel_ser.conf
防火墙开启端口:4567
2、在主机A上配置squid client 客户端安装配置
yum-y install stunnel openssl openssl-devel
复制sever端的stunnel.pem到本地的/etc/stunnel目录下
vim /etc/stunnel/stunnel.conf
cert = /etc/stunnel/stunnel.pem ;;;#步骤1中生成的stunnel.pem,文件从服务器复制过来
CAfile = /etc/stunnel/stunnel.pem ;;;#步骤1中生成的stunnel.pem,文件从服务器复制过来
socket = l:TCP_NODELAY=1
socket = r:TCP_NODELAY=1
pid = stunnel.pid
verify = 3
setuid = root
setgid = root
client= yes ;;;# 客户端
delay = no
sslVersion = TLSv1
debug = 7
syslog = yes
output = stunnel.log ;;;访问日志文件
[sproxy]
accept = 0.0.0.0:8001 ;;;# 监听地址
connect = 123.145.123.123:4567 ;;;# stunnel服务端地址
启动服务 stunnel/etc/stunnel/stunnel.conf
防火墙开启8001端口
局域网其它电脑通过配置代理服务器(A主机)IP地址和端口就可以上国外网站:
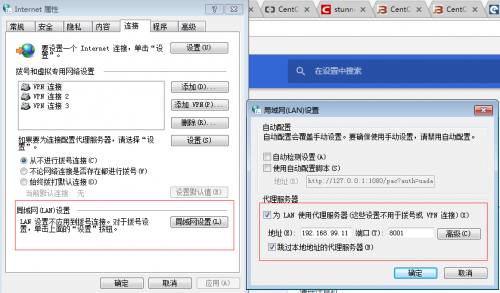
四、测试及错误解决
・ 测试:配置代理服务器地址:192.168.99.11,端口8001后,可以访问国外网站
・ 错误解决:
stunnel 报错:CERT:Verification error: certificate has expired
stunnel客户端连不上服务端,连上几秒就断开了,具体报错信息如下
#stunnel 客户端:
2017.09.2510:16:19LOG7[13955:140155381970688]:Starting certificate verification: depth=0,/C=CN/L=Default City/O=Default Company Ltd
2017.09.2510:16:19LOG4[13955:140155381970688]:CERT: Verification error: certificate has expired
2017.09.2510:16:19LOG4[13955:140155381970688]:Certificate check failed: depth=0,/C=CN/L=Default City/O=Default Company Ltd
2017.09.2510:16:19LOG7[13955:140155381970688]:SSL alert (write): fatal: certificate expired
2017.09.2510:16:19LOG3[13955:140155381970688]:SSL_connect: 14090086: error:14090086:SSLroutines:ssl3_get_server_certificate:certificate verify failed
2017.09.2510:16:19LOG5[13955:140155381970688]:Connection reset: 0byte(s)sent to SSL, 0byte(s)sent tosocket
2017.09.2510:16:19LOG7[13955:140155381970688]:Remote socket (FD=13)closed
2017.09.2510:16:19LOG7[13955:140155381970688]:Local socket (FD=3)closed
2017.09.2510:16:19LOG7[13955:140155381970688]:Service [sproxy] finished (0 left)
#stunnel 服务端:
2017.09.2510:13:24LOG7[15546:140344803059456]:SSL state (accept): SSLv3 flush data
2017.09.2510:13:24LOG7[15546:140344803059456]:SSL alert (read): fatal: certificate expired
2017.09.2510:13:24LOG3[15546:140344803059456]:SSL_accept: 14094415: error:14094415:SSLroutines:SSL3_READ_BYTES:sslv3 alert certificate expired
2017.09.2510:13:24LOG5[15546:140344803059456]:Connection reset: 0bytessent to SSL, 0bytessent tosocket
2017.09.2510:13:24LOG7[15546:140344803059456]:sproxy finished (0 left)
需要安装上面的证书生成命令,重新生成证书后手动更新
opensslreq -new -x509 -days 365 -nodes -outstunnel.pem -keyout stunnel.pem