Table of Contents
- 22.1 NDB Cluster Overview
- 22.1.1 NDB Cluster Core Concepts
- 22.1.2 NDB Cluster Nodes, Node Groups, Replicas, and Partitions
- 22.1.3 NDB Cluster Hardware, Software, and Networking Requirements
- 22.1.4 What is New in NDB Cluster
- 22.1.5 Options, Variables, and Parameters Added, Deprecated or Removed in NDB 8.0
- 22.1.6 MySQL Server Using InnoDB Compared with NDB Cluster
- 22.1.7 Known Limitations of NDB Cluster
- 22.2 NDB Cluster Installation
- 22.2.1 The NDB Cluster Auto-Installer
- 22.2.2 Installation of NDB Cluster on Linux
- 22.2.3 Installing NDB Cluster on Windows
- 22.2.4 Initial Configuration of NDB Cluster
- 22.2.5 Initial Startup of NDB Cluster
- 22.2.6 NDB Cluster Example with Tables and Data
- 22.2.7 Safe Shutdown and Restart of NDB Cluster
- 22.2.8 Upgrading and Downgrading NDB Cluster
- 22.3 Configuration of NDB Cluster
- 22.4 NDB Cluster Programs
- 22.4.1 ndbd — The NDB Cluster Data Node Daemon
- 22.4.2 ndbinfo_select_all — Select From ndbinfo Tables
- 22.4.3 ndbmtd — The NDB Cluster Data Node Daemon (Multi-Threaded)
- 22.4.4 ndb_mgmd — The NDB Cluster Management Server Daemon
- 22.4.5 ndb_mgm — The NDB Cluster Management Client
- 22.4.6 ndb_blob_tool — Check and Repair BLOB and TEXT columns of NDB Cluster Tables
- 22.4.7 ndb_config — Extract NDB Cluster Configuration Information
- 22.4.8 ndb_delete_all — Delete All Rows from an NDB Table
- 22.4.9 ndb_desc — Describe NDB Tables
- 22.4.10 ndb_drop_index — Drop Index from an NDB Table
- 22.4.11 ndb_drop_table — Drop an NDB Table
- 22.4.12 ndb_error_reporter — NDB Error-Reporting Utility
- 22.4.13 ndb_import — Import CSV Data Into NDB
- 22.4.14 ndb_index_stat — NDB Index Statistics Utility
- 22.4.15 ndb_move_data — NDB Data Copy Utility
- 22.4.16 ndb_perror — Obtain NDB Error Message Information
- 22.4.17 ndb_print_backup_file — Print NDB Backup File Contents
- 22.4.18 ndb_print_file — Print NDB Disk Data File Contents
- 22.4.19 ndb_print_frag_file — Print NDB Fragment List File Contents
- 22.4.20 ndb_print_schema_file — Print NDB Schema File Contents
- 22.4.21 ndb_print_sys_file — Print NDB System File Contents
- 22.4.22 ndb_redo_log_reader — Check and Print Content of Cluster Redo Log
- 22.4.23 ndb_restore — Restore an NDB Cluster Backup
- 22.4.24 ndb_select_all — Print Rows from an NDB Table
- 22.4.25 ndb_select_count — Print Row Counts for NDB Tables
- 22.4.26 ndb_setup.py — Start browser-based Auto-Installer for NDB Cluster
- 22.4.27 ndb_show_tables — Display List of NDB Tables
- 22.4.28 ndb_size.pl — NDBCLUSTER Size Requirement Estimator
- 22.4.29 ndb_top — View CPU usage information for NDB threads
- 22.4.30 ndb_waiter — Wait for NDB Cluster to Reach a Given Status
- 22.4.31 Options Common to NDB Cluster Programs — Options Common to NDB Cluster Programs
- 22.5 Management of NDB Cluster
- 22.5.1 Commands in the NDB Cluster Management Client
- 22.5.2 NDB Cluster Log Messages
- 22.5.3 Event Reports Generated in NDB Cluster
- 22.5.4 Summary of NDB Cluster Start Phases
- 22.5.5 Performing a Rolling Restart of an NDB Cluster
- 22.5.6 NDB Cluster Single User Mode
- 22.5.7 Adding NDB Cluster Data Nodes Online
- 22.5.8 Online Backup of NDB Cluster
- 22.5.9 MySQL Server Usage for NDB Cluster
- 22.5.10 NDB Cluster Disk Data Tables
- 22.5.11 Online Operations with ALTER TABLE in NDB Cluster
- 22.5.12 Distributed MySQL Privileges with NDB_STORED_USER
- 22.5.13 NDB API Statistics Counters and Variables
- 22.5.14 ndbinfo: The NDB Cluster Information Database
- 22.5.15 INFORMATION_SCHEMA Tables for NDB Cluster
- 22.5.16 Quick Reference: NDB Cluster SQL Statements
- 22.5.17 NDB Cluster Security Issues
- 22.6 NDB Cluster Replication
- 22.6.1 NDB Cluster Replication: Abbreviations and Symbols
- 22.6.2 General Requirements for NDB Cluster Replication
- 22.6.3 Known Issues in NDB Cluster Replication
- 22.6.4 NDB Cluster Replication Schema and Tables
- 22.6.5 Preparing the NDB Cluster for Replication
- 22.6.6 Starting NDB Cluster Replication (Single Replication Channel)
- 22.6.7 Using Two Replication Channels for NDB Cluster Replication
- 22.6.8 Implementing Failover with NDB Cluster Replication
- 22.6.9 NDB Cluster Backups With NDB Cluster Replication
- 22.6.10 NDB Cluster Replication: Multi-Master and Circular Replication
- 22.6.11 NDB Cluster Replication Conflict Resolution
- 22.7 NDB Cluster Release Notes
MySQL NDB Cluster is a
high-availability, high-redundancy version of MySQL adapted for the
distributed computing environment. The most recent NDB Cluster
release series uses version 8 of the
NDB storage engine (also known as
NDBCLUSTER) to enable running several
computers with MySQL servers and other software in a cluster. NDB
Cluster 8.0, now available as a General Availability (GA) release
beginning with version 8.0.19, incorporates version 8.0 of the
NDB storage engine. NDB Cluster 7.6 and NDB
Cluster 7.5, still available as GA releases, use versions 7.6 and
7.5 of NDB, respectively. Previous GA releases
still available for use in production, NDB Cluster 7.4 and NDB
Cluster 7.3, incorporate NDB versions 7.4 and
7.3, respectively. NDB 7.2 and older release series are no
longer supported or maintained.
Support for the NDB storage engine is
not included in standard MySQL Server 8.0 binaries built by Oracle.
Instead, users of NDB Cluster binaries from Oracle should upgrade to
the most recent binary release of NDB Cluster for supported
platforms—these include RPMs that should work with most Linux
distributions. NDB Cluster 8.0 users who build from source should
use the sources provided for MySQL 8.0 and build with the options
required to provide NDB support. (Locations where the sources can be
obtained are listed later in this section.)
MySQL NDB Cluster does not support InnoDB cluster, which must be
deployed using MySQL Server 8.0 with the
InnoDB storage engine as well as
additional applications that are not included in the NDB Cluster
distribution. MySQL Server 8.0 binaries cannot be used with MySQL
NDB Cluster. For more information about deploying and using
InnoDB cluster, see
Chapter 21, InnoDB Cluster.
Section 22.1.6, “MySQL Server Using InnoDB Compared with NDB Cluster”, discusses differences
between the NDB and InnoDB
storage engines.
This chapter contains information about NDB Cluster 8.0 releases through 8.0.21, now available (beginning with NDB 8.0.19) as a General Availability release, and recommended for new deployments. NDB Cluster 7.6 and 7.5 are previous GA releases still supported in production; for information about NDB Cluster 7.6, see What is New in NDB Cluster 7.6. For similar information about NDB Cluster 7.5, see What is New in NDB Cluster 7.5. NDB Cluster 7.4 and 7.3 are previous GA releases still supported in production, although we recommend that new deployments for production use NDB Cluster 8.0; see MySQL NDB Cluster 7.3 and NDB Cluster 7.4.
Supported Platforms. NDB Cluster is currently available and supported on a number of platforms. For exact levels of support available for on specific combinations of operating system versions, operating system distributions, and hardware platforms, please refer to https://www.mysql.com/support/supportedplatforms/cluster.html.
Availability. NDB Cluster binary and source packages are available for supported platforms from https://dev.mysql.com/downloads/cluster/.
NDB Cluster release numbers.
NDB 8.0 follows the same release pattern as the MySQL Server 8.0
series of releases, beginning with MySQL 8.0.13 and MySQL NDB
Cluster 8.0.13. In this Manual and other
MySQL documentation, we identify these and later NDB Cluster
releases employing a version number that begins with
“NDB”. This version number is that of the
NDBCLUSTER storage engine used in the
NDB 8.0 release, and is the same as the MySQL 8.0 server version
on which the NDB Cluster 8.0 release is based.
Version strings used in NDB Cluster software. The version string displayed by the mysql client supplied with the MySQL NDB Cluster distribution uses this format:
mysql-mysql_server_version-cluster
mysql_server_version represents the
version of the MySQL Server on which the NDB Cluster release is
based. For all NDB Cluster 8.0 releases, this is
8.0., where
nn is the release number. Building from
source using -DWITH_NDBCLUSTER or the
equivalent adds the -cluster suffix to the
version string. (See
Section 22.2.2.4, “Building NDB Cluster from Source on Linux”, and
Section 22.2.3.2, “Compiling and Installing NDB Cluster from Source on Windows”.) You can see
this format used in the mysql client, as shown
here:
shell>mysqlWelcome to the MySQL monitor. Commands end with ; or \g. Your MySQL connection id is 2 Server version: 8.0.21-cluster Source distribution Type 'help;' or '\h' for help. Type '\c' to clear the buffer. mysql>SELECT VERSION()\G*************************** 1. row *************************** VERSION(): 8.0.21-cluster 1 row in set (0.00 sec)
The first General Availability release of NDB Cluster using MySQL 8.0 is NDB 8.0.19, using MySQL 8.0.19.
The version string displayed by other NDB Cluster programs not normally included with the MySQL 8.0 distribution uses this format:
mysql-mysql_server_versionndb-ndb_engine_version
mysql_server_version represents the
version of the MySQL Server on which the NDB Cluster release is
based. For all NDB Cluster 8.0 releases, this is
8.0., where
nn is the release number.
ndb_engine_version is the version of the
NDB storage engine used by this release
of the NDB Cluster software. For all NDB 8.0 releases, this number
is the same as the MySQL Server version. You can see this format
used in the output of the SHOW command in the
ndb_mgm client, like this:
ndb_mgm> SHOW
Connected to Management Server at: localhost:1186
Cluster Configuration
---------------------
[ndbd(NDB)]     2 node(s)
id=1    @10.0.10.6  (mysql-8.0.22 ndb-8.0.21, Nodegroup: 0, *)
id=2    @10.0.10.8  (mysql-8.0.22 ndb-8.0.21, Nodegroup: 0)

[ndb_mgmd(MGM)] 1 node(s)
id=3    @10.0.10.2  (mysql-8.0.22 ndb-8.0.21)

[mysqld(API)]   2 node(s)
id=4    @10.0.10.10  (mysql-8.0.22 ndb-8.0.21)
id=5 (not connected, accepting connect from any host)
Compatibility with standard MySQL 8.0 releases.
While many standard MySQL schemas and applications can work using
NDB Cluster, it is also true that unmodified applications and
database schemas may be slightly incompatible or have suboptimal
performance when run using NDB Cluster (see
Section 22.1.7, “Known Limitations of NDB Cluster”). Most of these issues
can be overcome, but this also means that you are very unlikely to
be able to switch an existing application datastore—that
currently uses, for example, MyISAM
or InnoDB—to use the
NDB storage engine without allowing
for the possibility of changes in schemas, queries, and
applications. A mysqld compiled without
NDB support (that is, built without
-DWITH_NDBCLUSTER_STORAGE_ENGINE or
its alias -DWITH_NDBCLUSTER) cannot function as a
drop-in replacement for a mysqld that is built
with it.
NDB Cluster development source trees. NDB Cluster development trees can also be accessed from https://github.com/mysql/mysql-server.
The NDB Cluster development sources maintained at https://github.com/mysql/mysql-server are licensed under the GPL. For information about obtaining MySQL sources using Git and building them yourself, see Section 2.9.5, “Installing MySQL Using a Development Source Tree”.
As with MySQL Server 8.0, NDB Cluster 8.0 releases are built using CMake.
NDB Cluster 8.0 is available beginning with NDB 8.0.19 as a General Availability release, and is recommended for new deployments. NDB Cluster 7.6 and 7.5 are previous GA releases still supported in production; for information about NDB Cluster 7.6, see What is New in NDB Cluster 7.6. For similar information about NDB Cluster 7.5, see What is New in NDB Cluster 7.5. NDB Cluster 7.4 and 7.3 are previous GA releases still supported in production, although we recommend that new deployments for production use NDB Cluster 8.0; see MySQL NDB Cluster 7.3 and NDB Cluster 7.4.
The contents of this chapter are subject to revision as NDB Cluster continues to evolve. Additional information regarding NDB Cluster can be found on the MySQL website at http://www.mysql.com/products/cluster/.
Additional Resources. More information about NDB Cluster can be found in the following places:
For answers to some commonly asked questions about NDB Cluster, see Section A.10, “MySQL 8.0 FAQ: NDB Cluster”.
The NDB Cluster Forum: https://forums.mysql.com/list.php?25.
Many NDB Cluster users and developers blog about their experiences with NDB Cluster, and make feeds of these available through PlanetMySQL.
- 22.1.1 NDB Cluster Core Concepts
- 22.1.2 NDB Cluster Nodes, Node Groups, Replicas, and Partitions
- 22.1.3 NDB Cluster Hardware, Software, and Networking Requirements
- 22.1.4 What is New in NDB Cluster
- 22.1.5 Options, Variables, and Parameters Added, Deprecated or Removed in NDB 8.0
- 22.1.6 MySQL Server Using InnoDB Compared with NDB Cluster
- 22.1.7 Known Limitations of NDB Cluster
NDB Cluster is a technology that enables clustering of in-memory databases in a shared-nothing system. The shared-nothing architecture enables the system to work with very inexpensive hardware, and with a minimum of specific requirements for hardware or software.
NDB Cluster is designed not to have any single point of failure. In a shared-nothing system, each component is expected to have its own memory and disk, and the use of shared storage mechanisms such as network shares, network file systems, and SANs is not recommended or supported.
NDB Cluster integrates the standard MySQL server with an in-memory
clustered storage engine called NDB
(which stands for “Network
DataBase”). In our
documentation, the term NDB refers to
the part of the setup that is specific to the storage engine,
whereas “MySQL NDB Cluster” refers to the combination
of one or more MySQL servers with the
NDB storage engine.
An NDB Cluster consists of a set of computers, known as hosts, each running one or more processes. These processes, known as nodes, may include MySQL servers (for access to NDB data), data nodes (for storage of the data), one or more management servers, and possibly other specialized data access programs. The relationship of these components in an NDB Cluster is shown here:
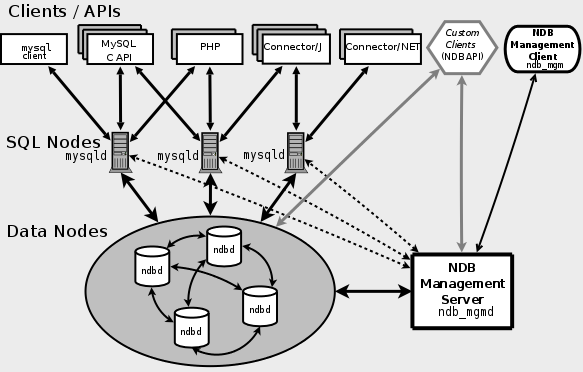
All these programs work together to form an NDB Cluster (see
Section 22.4, “NDB Cluster Programs”. When data is stored by the
NDB storage engine, the tables (and
table data) are stored in the data nodes. Such tables are directly
accessible from all other MySQL servers (SQL nodes) in the cluster.
Thus, in a payroll application storing data in a cluster, if one
application updates the salary of an employee, all other MySQL
servers that query this data can see this change immediately.
Although an NDB Cluster SQL node uses the mysqld server daemon, it differs in a number of critical respects from the mysqld binary supplied with the MySQL 8.0 distributions, and the two versions of mysqld are not interchangeable.
In addition, a MySQL server that is not connected to an NDB Cluster
cannot use the NDB storage engine and
cannot access any NDB Cluster data.
The data stored in the data nodes for NDB Cluster can be mirrored; the cluster can handle failures of individual data nodes with no other impact than that a small number of transactions are aborted due to losing the transaction state. Because transactional applications are expected to handle transaction failure, this should not be a source of problems.
Individual nodes can be stopped and restarted, and can then rejoin the system (cluster). Rolling restarts (in which all nodes are restarted in turn) are used in making configuration changes and software upgrades (see Section 22.5.5, “Performing a Rolling Restart of an NDB Cluster”). Rolling restarts are also used as part of the process of adding new data nodes online (see Section 22.5.7, “Adding NDB Cluster Data Nodes Online”). For more information about data nodes, how they are organized in an NDB Cluster, and how they handle and store NDB Cluster data, see Section 22.1.2, “NDB Cluster Nodes, Node Groups, Replicas, and Partitions”.
Backing up and restoring NDB Cluster databases can be done using the
NDB-native functionality found in the NDB Cluster
management client and the ndb_restore program
included in the NDB Cluster distribution. For more information, see
Section 22.5.8, “Online Backup of NDB Cluster”, and
Section 22.4.23, “ndb_restore — Restore an NDB Cluster Backup”. You can also
use the standard MySQL functionality provided for this purpose in
mysqldump and the MySQL server. See
Section 4.5.4, “mysqldump — A Database Backup Program”, for more information.
NDB Cluster nodes can employ different transport mechanisms for inter-node communications; TCP/IP over standard 100 Mbps or faster Ethernet hardware is used in most real-world deployments.
NDBCLUSTER
(also known as NDB) is an in-memory
storage engine offering high-availability and data-persistence
features.
The NDBCLUSTER storage engine can be
configured with a range of failover and load-balancing options,
but it is easiest to start with the storage engine at the cluster
level. NDB Cluster's NDB storage
engine contains a complete set of data, dependent only on other
data within the cluster itself.
The “Cluster” portion of NDB Cluster is configured independently of the MySQL servers. In an NDB Cluster, each part of the cluster is considered to be a node.
In many contexts, the term “node” is used to indicate a computer, but when discussing NDB Cluster it means a process. It is possible to run multiple nodes on a single computer; for a computer on which one or more cluster nodes are being run we use the term cluster host.
There are three types of cluster nodes, and in a minimal NDB Cluster configuration, there will be at least three nodes, one of each of these types:
Management node: The role of this type of node is to manage the other nodes within the NDB Cluster, performing such functions as providing configuration data, starting and stopping nodes, and running backups. Because this node type manages the configuration of the other nodes, a node of this type should be started first, before any other node. An MGM node is started with the command ndb_mgmd.
Data node: This type of node stores cluster data. There are as many data nodes as there are replicas, times the number of fragments (see Section 22.1.2, “NDB Cluster Nodes, Node Groups, Replicas, and Partitions”). For example, with two replicas, each having two fragments, you need four data nodes. One replica is sufficient for data storage, but provides no redundancy; therefore, it is recommended to have 2 (or more) replicas to provide redundancy, and thus high availability. A data node is started with the command ndbd (see Section 22.4.1, “ndbd — The NDB Cluster Data Node Daemon”) or ndbmtd (see Section 22.4.3, “ndbmtd — The NDB Cluster Data Node Daemon (Multi-Threaded)”).
NDB Cluster tables are normally stored completely in memory rather than on disk (this is why we refer to NDB Cluster as an in-memory database). However, some NDB Cluster data can be stored on disk; see Section 22.5.10, “NDB Cluster Disk Data Tables”, for more information.
SQL node: This is a node that accesses the cluster data. In the case of NDB Cluster, an SQL node is a traditional MySQL server that uses the
NDBCLUSTERstorage engine. An SQL node is a mysqld process started with the--ndbclusterand--ndb-connectstringoptions, which are explained elsewhere in this chapter, possibly with additional MySQL server options as well.An SQL node is actually just a specialized type of API node, which designates any application which accesses NDB Cluster data. Another example of an API node is the ndb_restore utility that is used to restore a cluster backup. It is possible to write such applications using the NDB API. For basic information about the NDB API, see Getting Started with the NDB API.
It is not realistic to expect to employ a three-node setup in a production environment. Such a configuration provides no redundancy; to benefit from NDB Cluster's high-availability features, you must use multiple data and SQL nodes. The use of multiple management nodes is also highly recommended.
For a brief introduction to the relationships between nodes, node groups, replicas, and partitions in NDB Cluster, see Section 22.1.2, “NDB Cluster Nodes, Node Groups, Replicas, and Partitions”.
Configuration of a cluster involves configuring each individual node in the cluster and setting up individual communication links between nodes. NDB Cluster is currently designed with the intention that data nodes are homogeneous in terms of processor power, memory space, and bandwidth. In addition, to provide a single point of configuration, all configuration data for the cluster as a whole is located in one configuration file.
The management server manages the cluster configuration file and the cluster log. Each node in the cluster retrieves the configuration data from the management server, and so requires a way to determine where the management server resides. When interesting events occur in the data nodes, the nodes transfer information about these events to the management server, which then writes the information to the cluster log.
In addition, there can be any number of cluster client processes
or applications. These include standard MySQL clients,
NDB-specific API programs, and management
clients. These are described in the next few paragraphs.
Standard MySQL clients. NDB Cluster can be used with existing MySQL applications written in PHP, Perl, C, C++, Java, Python, Ruby, and so on. Such client applications send SQL statements to and receive responses from MySQL servers acting as NDB Cluster SQL nodes in much the same way that they interact with standalone MySQL servers.
MySQL clients using an NDB Cluster as a data source can be
modified to take advantage of the ability to connect with multiple
MySQL servers to achieve load balancing and failover. For example,
Java clients using Connector/J 5.0.6 and later can use
jdbc:mysql:loadbalance:// URLs (improved in
Connector/J 5.1.7) to achieve load balancing transparently; for
more information about using Connector/J with NDB Cluster, see
Using Connector/J with NDB Cluster.
NDB client programs.
Client programs can be written that access NDB Cluster data
directly from the NDBCLUSTER storage engine,
bypassing any MySQL Servers that may be connected to the
cluster, using the NDB
API, a high-level C++ API. Such applications may be
useful for specialized purposes where an SQL interface to the
data is not needed. For more information, see
The NDB API.
NDB-specific Java applications can also be
written for NDB Cluster using the NDB
Cluster Connector for Java. This NDB Cluster Connector
includes ClusterJ, a
high-level database API similar to object-relational mapping
persistence frameworks such as Hibernate and JPA that connect
directly to NDBCLUSTER, and so does not require
access to a MySQL Server. Support is also provided in NDB Cluster
for ClusterJPA, an OpenJPA
implementation for NDB Cluster that leverages the strengths of
ClusterJ and JDBC; ID lookups and other fast operations are
performed using ClusterJ (bypassing the MySQL Server), while more
complex queries that can benefit from MySQL's query optimizer
are sent through the MySQL Server, using JDBC. See
Java and NDB Cluster, and
The ClusterJ API and Data Object Model, for more
information.
NDB Cluster also supports applications written in JavaScript using
Node.js. The MySQL Connector for JavaScript includes adapters for
direct access to the NDB storage engine and as
well as for the MySQL Server. Applications using this Connector
are typically event-driven and use a domain object model similar
in many ways to that employed by ClusterJ. For more information,
see MySQL NoSQL Connector for JavaScript.
The Memcache API for NDB Cluster, implemented as the loadable ndbmemcache storage engine for memcached version 1.6 and later, can be used to provide a persistent NDB Cluster data store, accessed using the memcache protocol.
The standard memcached caching engine is included in the NDB Cluster 8.0 distribution. Each memcached server has direct access to data stored in NDB Cluster, but is also able to cache data locally and to serve (some) requests from this local cache.
For more information, see ndbmemcache—Memcache API for NDB Cluster.
Management clients. These clients connect to the management server and provide commands for starting and stopping nodes gracefully, starting and stopping message tracing (debug versions only), showing node versions and status, starting and stopping backups, and so on. An example of this type of program is the ndb_mgm management client supplied with NDB Cluster (see Section 22.4.5, “ndb_mgm — The NDB Cluster Management Client”). Such applications can be written using the MGM API, a C-language API that communicates directly with one or more NDB Cluster management servers. For more information, see The MGM API.
Oracle also makes available MySQL Cluster Manager, which provides an advanced command-line interface simplifying many complex NDB Cluster management tasks, such restarting an NDB Cluster with a large number of nodes. The MySQL Cluster Manager client also supports commands for getting and setting the values of most node configuration parameters as well as mysqld server options and variables relating to NDB Cluster. MySQL Cluster Manager 1.4.8 provides experimental support for NDB 8.0. See MySQL™ Cluster Manager 1.4.8 User Manual, for more information.
Event logs. NDB Cluster logs events by category (startup, shutdown, errors, checkpoints, and so on), priority, and severity. A complete listing of all reportable events may be found in Section 22.5.3, “Event Reports Generated in NDB Cluster”. Event logs are of the two types listed here:
Cluster log: Keeps a record of all desired reportable events for the cluster as a whole.
Node log: A separate log which is also kept for each individual node.
Under normal circumstances, it is necessary and sufficient to keep and examine only the cluster log. The node logs need be consulted only for application development and debugging purposes.
Checkpoint.
Generally speaking, when data is saved to disk, it is said that
a checkpoint has been
reached. More specific to NDB Cluster, a checkpoint is a point
in time where all committed transactions are stored on disk.
With regard to the NDB storage
engine, there are two types of checkpoints which work together
to ensure that a consistent view of the cluster's data is
maintained. These are shown in the following list:
Local Checkpoint (LCP): This is a checkpoint that is specific to a single node; however, LCPs take place for all nodes in the cluster more or less concurrently. An LCP usually occurs every few minutes; the precise interval varies, and depends upon the amount of data stored by the node, the level of cluster activity, and other factors.
NDB 8.0 supports partial LCPs, which can significantly improve performance under some conditions. See the descriptions of the
EnablePartialLcpandRecoveryWorkconfiguration parameters which enable partial LCPs and control the amount of storage they use.Global Checkpoint (GCP): A GCP occurs every few seconds, when transactions for all nodes are synchronized and the redo-log is flushed to disk.
For more information about the files and directories created by local checkpoints and global checkpoints, see NDB Cluster Data Node File System Directory.
This section discusses the manner in which NDB Cluster divides and duplicates data for storage.
A number of concepts central to an understanding of this topic are discussed in the next few paragraphs.
Data node. An ndbd or ndbmtd process, which stores one or more replicas—that is, copies of the partitions (discussed later in this section) assigned to the node group of which the node is a member.
Each data node should be located on a separate computer. While it is also possible to host multiple data node processes on a single computer, such a configuration is not usually recommended.
It is common for the terms “node” and “data node” to be used interchangeably when referring to an ndbd or ndbmtd process; where mentioned, management nodes (ndb_mgmd processes) and SQL nodes (mysqld processes) are specified as such in this discussion.
Node group. A node group consists of one or more nodes, and stores partitions, or sets of replicas (see next item).
The number of node groups in an NDB Cluster is not directly
configurable; it is a function of the number of data nodes and of
the number of replicas
(NoOfReplicas
configuration parameter), as shown here:
[# of node groups] = [# of data nodes] / NoOfReplicas
Thus, an NDB Cluster with 4 data nodes has 4 node groups if
NoOfReplicas is set to 1
in the config.ini file, 2 node groups if
NoOfReplicas is set to 2,
and 1 node group if
NoOfReplicas is set to 4.
Replicas are discussed later in this section; for more information
about NoOfReplicas, see
Section 22.3.3.6, “Defining NDB Cluster Data Nodes”.
All node groups in an NDB Cluster must have the same number of data nodes.
You can add new node groups (and thus new data nodes) online, to a running NDB Cluster; see Section 22.5.7, “Adding NDB Cluster Data Nodes Online”, for more information.
Partition. This is a portion of the data stored by the cluster. Each node is responsible for keeping at least one copy of any partitions assigned to it (that is, at least one replica) available to the cluster.
The number of partitions used by default by NDB Cluster depends on the number of data nodes and the number of LDM threads in use by the data nodes, as shown here:
[# of partitions] = [# of data nodes] * [# of LDM threads]
When using data nodes running ndbmtd, the
number of LDM threads is controlled by the setting for
MaxNoOfExecutionThreads.
When using ndbd there is a single LDM thread,
which means that there are as many cluster partitions as nodes
participating in the cluster. This is also the case when using
ndbmtd with
MaxNoOfExecutionThreads set to 3 or less. (You
should be aware that the number of LDM threads increases with the
value of this parameter, but not in a strictly linear fashion, and
that there are additional constraints on setting it; see the
description of
MaxNoOfExecutionThreads
for more information.)
NDB and user-defined partitioning.
NDB Cluster normally partitions
NDBCLUSTER tables automatically.
However, it is also possible to employ user-defined partitioning
with NDBCLUSTER tables. This is
subject to the following limitations:
Only the
KEYandLINEAR KEYpartitioning schemes are supported in production withNDBtables.The maximum number of partitions that may be defined explicitly for any
NDBtable is8 * [, the number of node groups in an NDB Cluster being determined as discussed previously in this section. When running ndbd for data node processes, setting the number of LDM threads has no effect (sincenumber of LDM threads] * [number of node groups]ThreadConfigapplies only to ndbmtd); in such cases, this value can be treated as though it were equal to 1 for purposes of performing this calculation.See Section 22.4.3, “ndbmtd — The NDB Cluster Data Node Daemon (Multi-Threaded)”, for more information.
For more information relating to NDB Cluster and user-defined partitioning, see Section 22.1.7, “Known Limitations of NDB Cluster”, and Section 23.6.2, “Partitioning Limitations Relating to Storage Engines”.
Replica. This is a copy of a cluster partition. Each node in a node group stores a replica. Also sometimes known as a partition replica. The number of replicas is equal to the number of nodes per node group.
A replica belongs entirely to a single node; a node can (and usually does) store several replicas.
The following diagram illustrates an NDB Cluster with four data nodes running ndbd, arranged in two node groups of two nodes each; nodes 1 and 2 belong to node group 0, and nodes 3 and 4 belong to node group 1.
Only data nodes are shown here; although a working NDB Cluster requires an ndb_mgmd process for cluster management and at least one SQL node to access the data stored by the cluster, these have been omitted from the figure for clarity.
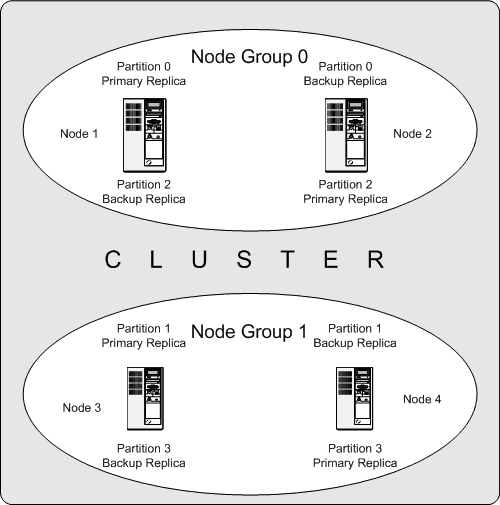
The data stored by the cluster is divided into four partitions, numbered 0, 1, 2, and 3. Each partition is stored—in multiple copies—on the same node group. Partitions are stored on alternate node groups as follows:
Partition 0 is stored on node group 0; a primary replica (primary copy) is stored on node 1, and a backup replica (backup copy of the partition) is stored on node 2.
Partition 1 is stored on the other node group (node group 1); this partition's primary replica is on node 3, and its backup replica is on node 4.
Partition 2 is stored on node group 0. However, the placing of its two replicas is reversed from that of Partition 0; for Partition 2, the primary replica is stored on node 2, and the backup on node 1.
Partition 3 is stored on node group 1, and the placement of its two replicas are reversed from those of partition 1. That is, its primary replica is located on node 4, with the backup on node 3.
What this means regarding the continued operation of an NDB Cluster is this: so long as each node group participating in the cluster has at least one node operating, the cluster has a complete copy of all data and remains viable. This is illustrated in the next diagram.
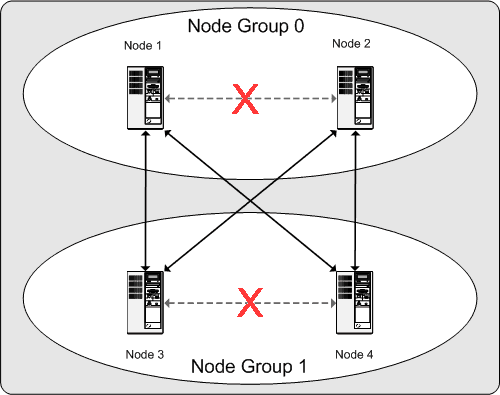
In this example, the cluster consists of two node groups each consisting of two data nodes. Each data node is running an instance of ndbd. Any combination of at least one node from node group 0 and at least one node from node group 1 is sufficient to keep the cluster “alive”. However, if both nodes from a single node group fail, the combination consisting of the remaining two nodes in the other node group is not sufficient. In this situation, the cluster has lost an entire partition and so can no longer provide access to a complete set of all NDB Cluster data.
The maximum number of node groups supported for a single NDB Cluster instance is 48.
One of the strengths of NDB Cluster is that it can be run on commodity hardware and has no unusual requirements in this regard, other than for large amounts of RAM, due to the fact that all live data storage is done in memory. (It is possible to reduce this requirement using Disk Data tables—see Section 22.5.10, “NDB Cluster Disk Data Tables”, for more information about these.) Naturally, multiple and faster CPUs can enhance performance. Memory requirements for other NDB Cluster processes are relatively small.
The software requirements for NDB Cluster are also modest. Host operating systems do not require any unusual modules, services, applications, or configuration to support NDB Cluster. For supported operating systems, a standard installation should be sufficient. The MySQL software requirements are simple: all that is needed is a production release of NDB Cluster. It is not strictly necessary to compile MySQL yourself merely to be able to use NDB Cluster. We assume that you are using the binaries appropriate to your platform, available from the NDB Cluster software downloads page at https://dev.mysql.com/downloads/cluster/.
For communication between nodes, NDB Cluster supports TCP/IP networking in any standard topology, and the minimum expected for each host is a standard 100 Mbps Ethernet card, plus a switch, hub, or router to provide network connectivity for the cluster as a whole. We strongly recommend that an NDB Cluster be run on its own subnet which is not shared with machines not forming part of the cluster for the following reasons:
Security. Communications between NDB Cluster nodes are not encrypted or shielded in any way. The only means of protecting transmissions within an NDB Cluster is to run your NDB Cluster on a protected network. If you intend to use NDB Cluster for Web applications, the cluster should definitely reside behind your firewall and not in your network's De-Militarized Zone (DMZ) or elsewhere.
See Section 22.5.17.1, “NDB Cluster Security and Networking Issues”, for more information.
Efficiency. Setting up an NDB Cluster on a private or protected network enables the cluster to make exclusive use of bandwidth between cluster hosts. Using a separate switch for your NDB Cluster not only helps protect against unauthorized access to NDB Cluster data, it also ensures that NDB Cluster nodes are shielded from interference caused by transmissions between other computers on the network. For enhanced reliability, you can use dual switches and dual cards to remove the network as a single point of failure; many device drivers support failover for such communication links.
Network communication and latency. NDB Cluster requires communication between data nodes and API nodes (including SQL nodes), as well as between data nodes and other data nodes, to execute queries and updates. Communication latency between these processes can directly affect the observed performance and latency of user queries. In addition, to maintain consistency and service despite the silent failure of nodes, NDB Cluster uses heartbeating and timeout mechanisms which treat an extended loss of communication from a node as node failure. This can lead to reduced redundancy. Recall that, to maintain data consistency, an NDB Cluster shuts down when the last node in a node group fails. Thus, to avoid increasing the risk of a forced shutdown, breaks in communication between nodes should be avoided wherever possible.
The failure of a data or API node results in the abort of all uncommitted transactions involving the failed node. Data node recovery requires synchronization of the failed node's data from a surviving data node, and re-establishment of disk-based redo and checkpoint logs, before the data node returns to service. This recovery can take some time, during which the Cluster operates with reduced redundancy.
Heartbeating relies on timely generation of heartbeat signals by all nodes. This may not be possible if the node is overloaded, has insufficient machine CPU due to sharing with other programs, or is experiencing delays due to swapping. If heartbeat generation is sufficiently delayed, other nodes treat the node that is slow to respond as failed.
This treatment of a slow node as a failed one may or may not be
desirable in some circumstances, depending on the impact of the
node's slowed operation on the rest of the cluster. When
setting timeout values such as
HeartbeatIntervalDbDb and
HeartbeatIntervalDbApi for
NDB Cluster, care must be taken care to achieve quick detection,
failover, and return to service, while avoiding potentially
expensive false positives.
Where communication latencies between data nodes are expected to be higher than would be expected in a LAN environment (on the order of 100 µs), timeout parameters must be increased to ensure that any allowed periods of latency periods are well within configured timeouts. Increasing timeouts in this way has a corresponding effect on the worst-case time to detect failure and therefore time to service recovery.
LAN environments can typically be configured with stable low latency, and such that they can provide redundancy with fast failover. Individual link failures can be recovered from with minimal and controlled latency visible at the TCP level (where NDB Cluster normally operates). WAN environments may offer a range of latencies, as well as redundancy with slower failover times. Individual link failures may require route changes to propagate before end-to-end connectivity is restored. At the TCP level this can appear as large latencies on individual channels. The worst-case observed TCP latency in these scenarios is related to the worst-case time for the IP layer to reroute around the failures.
The following sections describe changes in the implementation of NDB Cluster in MySQL NDB Cluster 8.0 through 8.0.21, as compared to earlier release series. NDB Cluster 8.0 is available as a General Availability (GA) release, beginning with NDB 8.0.19. NDB Cluster 7.6 and 7.5 are previous GA releases still supported in production; for information about NDB Cluster 7.6, see What is New in NDB Cluster 7.6. For similar information about NDB Cluster 7.5, see What is New in NDB Cluster 7.5. NDB Cluster 7.4 and 7.3 are previous GA releases still supported in production, although we recommend that new deployments for production use NDB Cluster 8.0; see MySQL NDB Cluster 7.3 and NDB Cluster 7.4.
What is New in NDB Cluster 8.0
Major changes and new features in NDB Cluster 8.0 which are likely to be of interest are shown in the following list:
Compatibility enhancements. The following changes reduce longstanding nonessential differences in
NDBbehavior as compared to that of other MySQL storage engines:Development in parallel with MySQL server. Beginning with this release, MySQL NDB Cluster is being developed in parallel with the standard MySQL 8.0 server under a new unified release model with the following features:
NDB 8.0 is developed in, built from, and released with the MySQL 8.0 source code tree.
The numbering scheme for NDB Cluster 8.0 releases follows the scheme for MySQL 8.0, starting with version 8.0.13.
Building the source with
NDBsupport appends-clusterto the version string returned by mysql-V, as shown here:shell≫
mysql -Vmysql Ver 8.0.21-cluster for Linux on x86_64 (Source distribution)NDBbinaries continue to display both the MySQL Server version and theNDBengine version, like this:shell>
ndb_mgm -VMySQL distrib mysql-8.0.21 ndb-8.0.21, for Linux (x86_64)In MySQL Cluster NDB 8.0, these two version numbers are always the same.
To build the MySQL 8.0.13 (or later) source with NDB Cluster support, use the CMake option
-DWITH_NDBCLUSTER.Platform support notes. NDB 8.0 makes the following changes in platform support:
NDBCLUSTERno longer supports 32-bit platforms. Beginning with NDB 8.0.21, the NDB build process checks the system architecture and aborts if it is not a 64-bit platform.Beginning with NDB 8.0.18, it is possible to build
NDBfrom source for 64-bitARMCPUs. Currently, this support is source-only, and we do not provide any precompiled binaries for this platform.
Database and table names. As of NDB 8.0.18, the 63-byte limit on identifiers for databases and tables is removed. These identifiers can now use up to 64 bytes, as for such objects using other MySQL storage engines. See Section 22.1.7.11, “Previous NDB Cluster Issues Resolved in NDB Cluster 8.0”.
Generated names for foreign keys.
NDB(version 8.0.18 and later) now uses the patterntbl_name_fk_NInnoDB.
Schema and metadata distribution and synchronization. NDB 8.0 makes use of the MySQL data dictionary to distribute schema information to SQL nodes joining a cluster and to synchronize new schema changes between existing SQL nodes. The following list describes individual enhancements relating to this integration work:
Schema distribution enhancements. The
NDBschema distribution coordinator, which handles schema operations and tracks their progress, has been extended in NDB 8.0.17 to ensure that resources used during a schema operation are released at its conclusion. Previously, some of this work was done by the schema distribution client; this has been changed due to the fact that the client did not always have all needed state information, which could lead to resource leaks when the client decided to abandon the schema operation prior to completion and without informing the coordinator.To help fix this issue, schema operation timeout detection has been moved from the schema distribution client to the coordinator, providing the coordinator with an opportunity to clean up any resources used during the schema operation. The coordinator now checks ongoing schema operations for timeout at regular intervals, and marks participants that have not yet completed a given schema operation as failed when detecting timeout. It also provides suitable warnings whenever a schema operation timeout occurs. (It should be noted that, after such a timeout is detected, the schema operation itself continues.) Additional reporting is done by printing a list of active schema operations at regular intervals whenever one or more of these operations is ongoing.
As an additional part of this work, a new mysqld option
--ndb-schema-dist-timeoutmakes it possible to set the length of time to wait until a schema operation is marked as having timed out.Disk data file distribution. Beginning with NDB Cluster 8.0.14,
NDBuses the MySQL data dictionary to make sure that disk data files and related constructs such as tablespaces and log file groups are correctly distributed between all connected SQL nodes.Schema synchronization of tablespace objects. When a MySQL Server connects as an SQL node to an NDB cluster, it checks its data dictionary against the information found in the
NDBdictionary.Previously, the only
NDBobjects synchronized on connection of a new SQL node were databases and tables; MySQL NDB Cluster 8.0.14 and later also implement schema synchronization of disk data objects including tablespaces and log file groups. Among other benefits, this eliminates the possibility of a mismatch between the MySQL data dictionary and theNDBdictionary following a native backup and restore, in which tablespaces and log file groups were restored to theNDBdictionary, but not to the MySQL Server's data dictionary.It is also no longer possible to issue a
CREATE TABLEstatement that refers to a nonexistent tablespace. Such a statement now fails with an error.Database DDL synchronization enhancements. Work done in NDB 8.0.17 insures that synchronization of databases by newly joined (or rejoined) SQL nodes with those on existing SQL nodes now makes proper use of the data dictionary so that any database-level operations (
CREATE DATABASE,ALTER DATABASE, orDROP DATABASE) that may have been misssed by this SQL node are now correctly duplicated on it when it connects (or reconnects) to the cluster.As part of the schema synchronization procedure performed when starting, an SQL node now compares all databases on the cluster's data nodes with those in its own data dictionary, and if any of these is found to be missing from the SQL node's data dictionary, the SQL Node installs it locally by executing a
CREATE DATABASEstatement. A database thus created uses the default MySQL Server database properties (such as those as determined bycharacter_set_databaseandcollation_database) that are in effect on this SQL node at the time the statement is executed.NDB metadata change detection and synchronization. NDB 8.0.16 implements a new mechanism for detection of updates to metadata for data objects such as tables, tablespaces, and log file groups with the MySQL data dictionary. This is done using a thread, the
NDBmetadata change monitor thread, which runs in the background and checks periodically for inconsistencies between theNDBdictionary and the MySQL data dictionary.The monitor performs metadata checks every 60 seconds by default. The polling interval can be adjusted by setting the value of the
ndb_metadata_check_intervalsystem variable; polling can be disabled altogether by setting thendb_metadata_checksystem variable toOFF. A status variable (also added in NDB 8.0.16)Ndb_metadata_detected_countshows the number of times since mysqld was last started that inconsistencies have been detected.Beginning in version 8.0.18,
NDBensures thatNDBtable, log file group, and tablespace objects submitted by the metadata change monitor thread during operations following startup are automatically checked for mismatches and synchronized by theNDBbinlog thread.NDB 8.0.18 also adds two status variables relating to automatic synchronization:
Ndb_metadata_synced_countshows the number of objects synchronized automatically;Ndb_metadata_excluded_countindicates the number of objects for which synchronization has failed (prior to NDB 8.0.22, this variable was namedNdb_metadata_blacklist_size). In addition, you can see which objects have been synchronized by inspecting the cluster log.NDB 8.0.19 further enhances this functionality by adding databases to those objects in which changes are detected and synchronized. Only databases actually used by
NDBtables are so handled; other databases which may be present in the MySQL data dictionary are ignored. This eliminates a previous requirement, for the case when a table existed inNDBbut the table and the database towhich it belonged did not exist on the SQL node, to create this database manually; now in such cases, the database and allNDBtables belonging to it should be created on the SQL node automatically.Beginning with NDB 8.0.21, more detailed information about the current state of automatic synchronization than can be obtained from log messages or status variables is provided by two new tables added to the MySQL Performance Schema. The tables are listed here:
ndb_sync_pending_objects: Contains information about database objects for which mismatches have been detected between theNDBdictionary and the MySQL data dictionary (and which have not been excluded from automatic synchronization).ndb_sync_excluded_objects: Contains information aboutNDBdatabase objects which have been excluded because they cannot be synchronized between theNDBdictionary and the MySQL data dictionary, and thus require manual intervention.
A row in one of these tables provides the database object's parent schema, name, and type. Types of objects include schemas, tablespaces, log file groups, and tables. (If the object is a log file group or tablespace, the parent schema is
NULL.) In addition, thendb_sync_excluded_objectstable shows the reason for which the object has been excluded.These tables are present only if
NDBCLUSTERstorage engine support is enabled. For more information about these tables, see Section 26.12.12, “Performance Schema NDB Cluster Tables”.Changes in NDB table extra metadata. In NDB 8.0.14 and later, the extra metadata property of an
NDBtable is used for storing serialized metadata from the MySQL data dictionary, rather than storing the binary representation of the table as in previous versions. (This was a.frmfile, no longer used by the MySQL Server—see Chapter 14, MySQL Data Dictionary.) As part of the work to support this change, the available size of the table's extra metadata has been increased. This means thatNDBtables created in NDB Cluster 8.0.14 and later are not compatible with previous NDB Cluster releases. Tables created in previous releases can be used with NDB 8.0.14 and later, but cannot be opened afterwards by an earlier version.This metadata is accessible using the NDB API methods
getExtraMetadata()andsetExtraMetadata()that were implemented in NDB 8.0.13.For more information, see Section 22.2.8, “Upgrading and Downgrading NDB Cluster”.
On-the-fly upgrades of tables using .frm files. A table created in NDB 7.6 and earlier contains metadata in the form of a compressed
.frmfile, which is no longer supported in MySQL 8.0. To facilitate online upgrades to NDB 8.0,NDBperforms on-the-fly translation of this metadata and writes it into the MySQL Server's data dictionary, which enables the mysqld in NDB Cluster 8.0 to work with the table without preventing subsequent use of the table by a previous version of theNDBsoftware.ImportantOnce a table's structure has been modified in NDB 8.0, its metadata is stored using the data dictionary, and it can no longer be accessed by NDB 7.6 and earlier.
This enhancement also makes it possible to restore an
NDBbackup made using an earlier version to a cluster running NDB 8.0 (or later).
Synchronization of user privileges with NDB_STORED_USER. A new mechanism for sharing and synchronizing users, roles, and privileges between SQL nodes is available beginning with NDB 8.0.18, using the
NDB_STORED_USERprivilege. Distributed privileges as implemented in NDB 7.6 and earlier (see Distributed Privileges Using Shared Grant Tables) are no longer supported.Once a user account is created on an SQL node, the user and its privileges can be stored in
NDBand thus shared between all SQL nodes in the cluster by issuing aGRANTstatement such as this one:GRANT NDB_STORED_USER ON *.* TO 'jon'@'localhost';
NDB_STORED_USERalways has global scope and must be granted usingON *.*. System reserved accounts such asmysql.session@localhostormysql.infoschema@localhostcannot be assigned this privilege.Roles can also be shared between SQL nodes by issuing the appropriate
GRANT NDB_STORED_USERstatement. Assigning such a role to a user does not cause the user to be shared; theNDB_STORED_USERprivilege must be granted to each user explicitly.A user or role having
NDB_STORED_USER, along with its privileges, is shared with all SQL nodes as soon as they join a given NDB Cluster. Changes to the privileges of the user or role are synchronized immediately with all connected SQL nodes. It is possible to make such changes from any connected SQL node, but recommended practice is to do so from a designated SQL node only, since the order of execution of statements affecting privileges from different SQL nodes cannot be guaranteed to be the same on all SQL nodes.Implications for upgrades. Due to changes in the MySQL server's privilege system (see Section 6.2.3, “Grant Tables”), privilege tables using the
NDBstorage engine do not function correctly in NDB 8.0. It is safe but not necessary to retain such privilege tables created in NDB 7.6 or earlier, but they are no longer used for access control. Beginning with NDB 8.0.16, a mysqld acting as an SQL node and detecting such tables inNDBwrites a warning to the MySQL server log, and createsInnoDBshadow tables local to itself; such shadow tables are created on each MySQL server connected to the cluster. When performing an upgrade from NDB 7.6 or earlier, the privilege tables usingNDBcan be removed safely using ndb_drop_table once all MySQL servers acting as SQL nodes have been upgraded (see Section 22.2.8, “Upgrading and Downgrading NDB Cluster”).The ndb_restore utility's
--restore-privilege-tablesoption is deprecated but continues to be honored in NDB 8.0, and can still be used to restore distributed privilege tables present in a backup taken from a previous release of NDB Cluster to a cluster running NDB 8.0. These tables are handled as described in the preceeding paragraph.Shared users and grants are stored in the
ndb_sql_metadatatable, which in NDB 8.0.19 and later ndb_restore by default does not restore; you can specify the--include-stored-grantsoption to cause it to do so.INFORMATION_SCHEMA changes. The following changes are made in the display of information regarding Disk Data files in the
INFORMATION_SCHEMA.FILEStable:Tablespaces and log file groups are no longer represented in the
FILEStable. (These constructs are not actually files.)Each data file is now represented by a single row in the
FILEStable. Each undo log file is also now represented in this table by one row only. (Previously, a row was displayed for each copy of each of these files on each data node.)
In addition,
INFORMATION_SCHEMAtables are now populated with tablespace statistics for MySQL Cluster tables. (Bug #27167728)Error information with ndb_perror. The deprecated
--ndboption for perror has been removed. Instead, use ndb_perror to obtain error message information fromNDBerror codes. (Bug #81704, Bug #81705, Bug #23523926, Bug #23523957)Condition pushdown enhancements. Previously, condition pushdown was limited to predicate terms referring to column values from the same table to which the condition was being pushed. In NDB 8.0.16, this restriction is removed such that column values from tables earlier in the query plan can also be referred to from pushed conditions. As of NDB 8.0.18, joins comparing column expressions are supported, as are comparisons between columns in the same table. Columns and column expressions to be compared must be of exactly the same type; this means they must also be of the same signedness, length, character set, precision, and scale, whenever these attributes apply.
Pushing down larger parts of a condition allows more rows to be filtered out by the data nodes, thereby reducing the number of rows which mysqld must handle during join processing. Another benefit of these enhancements is that filtering can be performed in parallel in the LDM threads, rather than in a single mysqld process on an SQL node; this has the potential to improve query performance significantly.
Existing rules for type compatibility between column values being compared continue to apply (see Section 8.2.1.5, “Engine Condition Pushdown Optimization”).
Increase in maximum row size. NDB 8.0.18 increases the maximum number of bytes that can be stored in an
NDBCLUSTERtable from 14000 to 30000 bytes.A
BLOBorTEXTcolumn continues to use 264 bytes of this total, as before.The maximum offset for a fixed-width column of an
NDBtable is 8188 bytes; this is also unchanged from releases previous to 8.0.18.See Section 22.1.7.5, “Limits Associated with Database Objects in NDB Cluster”, for more information.
ndb_mgm SHOW command and single user mode. Beginning with NDB 8.0.17, when the cluster in single user mode, the output of the management client
SHOWcommand indicates which API or SQL node has exclusive access while this mode is in effect.Online column renames. Beginning with NDB 8.0.18, columns of
NDBtables can be renamed online, usingALGORITHM=INPLACE. See Section 22.5.11, “Online Operations with ALTER TABLE in NDB Cluster”, for more information.Improved ndb_mgmd startup times. Start times for management nodes daemon have been significantly improved in NDB 8.0.18 and later, in the following ways:
Due to replacing the list data structure formerly used by
ndb_mgmdfor handling node properties from configuration data with a hash table, overall startup times for the management server have been decreased by a factor of 6 or more.In addition, in cases where data and SQL node host names not present in the management server's
hostsfile are used in the cluster configuration file, ndb_mgmd start times can be up to 20 times shorter than was previously the case.
NDB API enhancements. Beginning with NDB 8.0.18,
NdbScanFilter::cmp()and several comparison methods ofNdbInterpretedCodecan be used to compare table column values with each other. The affectedNdbInterpretedCodemethods are listed here:For all of the methods just listed, table column values to be compared much be of exactly matching types, including with respect to length, precision, signedness, scale, character set, and collation, as applicable.
See the descriptions of the individual API methods for more information.
Offline multithreaded index builds. It is now possible to specify a set of cores to be used for I/O threads performing offline multithreaded builds of ordered indexes, as opposed to normal I/O duties such as file I/O, compression, or decompression. “Offline” in this context refers to building of ordered indexes performed when the parent table is not being written to; such building takes place when an
NDBcluster performs a node or system restart, or as part of restoring a cluster from backup using ndb_restore--rebuild-indexes.In addition, the default behaviour for offline index build work is modified to use all cores available to ndbmtd, rather limiting itself to the core reserved for the I/O thread. Doing so can improve restart and restore times and performance, availability, and the user experience.
This enhancement is implemented as follows:
The default value for
BuildIndexThreadsis changed from 0 to 128. This means that offline ordered index builds are now multithreaded by default.The default value for
TwoPassInitialNodeRestartCopyis changed fromfalsetotrue. This means that an initial node restart first copies all data from a “live” node to one that is starting—without creating any indexes—builds ordered indexes offline, and then again synchronizes its data with the live node, that is, synchronizing twice and building indexes offline between the two synchonizations. This causes an initial node restart to behave more like the normal restart of a node, and reduces the time required for building indexes.A new thread type (
idxbld) is defined for theThreadConfigconfiguration parameter, to allow locking of offline index build threads to specific CPUs.
In addition,
NDBnow distinguishes the thread types that are accessible toThreadConfigby these two criteria:Whether the thread is an execution thread. Threads of types
main,ldm,recv,rep,tc, andsendare execution threads; thread typesio,watchdog, andidxbldare not.Whether the allocation of the thread to a given task is permanent or temporary. Currently all thread types except
idxbldare permanent.
For additonal information, see the descriptions of the indicated parameters in the Manual. (Bug #25835748, Bug #26928111)
logbuffers table backup process information. When performing an NDB backup, the
ndbinfo.logbufferstable now displays information regarding buffer usage by the backup process on each data node. This is implemented as rows reflecting two new log types in addition toREDOandDD-UNDO. One of these rows has the log typeBACKUP-DATA, which shows the amount of data buffer used during backup to copy fragments to backup files. The other row has the log typeBACKUP-LOG, which displays the amount of log buffer used during the backup to record changes made after the backup has started. One each of theselog_typerows is shown in thelogbufferstable for each data node in the cluster. Rows having these two log types are present in the table only while an NDB backup is currently in progress. (Bug #25822988)ndbinfo.processes table on Windows. The process ID of the monitor process used on Windows platforms by
RESTARTto spawn and restart a mysqld is now shown in theprocessestable as anangel_pid.String hashing improvements. Prior to NDB 8.0, all string hashing was based on first transforming the string into a normalized form, then MD5-hashing the resulting binary image. This could give rise to some performance problems, for the following reasons:
The normalized string is always space padded to its full length. For a
VARCHAR, this often involved adding more spaces than there were characters in the original string.The string libraries were not optimized for this space padding, which added considerable overhead in some use cases.
The padding semantics varied between character sets, some of which were not padded to their full length.
The transformed string could become quite large, even without space padding; some Unicode 9.0 collations can transform a single code point into 100 bytes or more of character data.
Subsequent MD5 hashing consisted mainly of padding with spaces, and was not particularly efficient, possibly causing additional performance penalties by flushing significant portions of the L1 cache.
A collation provides its own hash function, which hashes the string directly without first creating a normalized string. In addition, for a Unicode 9.0 collation, the hash is computed without padding.
NDBnow takes advantage of this built-in function whenever hashing a string identified as using a Unicode 9.0 collation.Since, for other collations, there are existing databases which are hash partitioned on the transformed string,
NDBcontinues to employ the previous method for hashing strings that use these, to maintain compatibility. (Bug #89590, Bug #89604, Bug #89609, Bug #27515000, Bug #27523758, Bug #27522732)RESET MASTER changes. Because the MySQL Server now executes
RESET MASTERwith a global read lock, the behavior of this statement when used with NDB Cluster has changed in the following two respects:It is no longer guaranteed to be synonchrous; that is, it is now possible that a read coming immediately before
RESET MASTERis issued may not be logged until after the binary log has been rotated.It now behaves in exactly the same fashion, whether the statement is issued on the same SQL node that is writing the binary log, or on a different SQL node in the same cluster.
NoteSHOW BINLOG EVENTS,FLUSH LOGS, and most data definition statements continue, as they did in previousNDBversions, to operate in a synchronous fashion.ndb_restore option usage. Beginning with NDB 8.0.16, the
--nodeidand--backupidoptions are both required when invoking ndb_restore.ndb_log_bin default. Beginning with NDB 8.0.16, the default value of the
ndb_log_binsystem variable has changed fromTRUEtoFALSE.Dynamic transactional resource allocation. Allocation of resources in the transaction corrdinator (see The DBTC Block) is now performed using dynamic memory pools. This means that resource allocation determined by data node configuration parameters such as
MaxDMLOperationsPerTransaction,MaxNoOfConcurrentIndexOperations,MaxNoOfConcurrentOperations,MaxNoOfConcurrentScans,MaxNoOfConcurrentTransactions,MaxNoOfFiredTriggers,MaxNoOfLocalScans, andTransactionBufferMemoryis now done in such a way that, if the load represented by each of these parameters is within the target load for all such resources, others of these resources can be limited so as not to exceed the total resources available.As part of this work, several new data node parameters controlling transactional resources in
DBTC, listed here, have been added:See the descriptions of the parameters just listed for further information.
Backups using multiple LDMs per data node.
NDBbackups can now be performed in a parallel fashion on individual data nodes using multiple local data managers (LDMs). (Previously, backups were done in parallel across data nodes, but were always serial within data node processes.) No special syntax is required for theSTART BACKUPcommand in the ndb_mgm client to enable this feature, but all data nodes must be using multiple LDMs. This means that data nodes must be running ndbmtd (ndbd is single-threaded and thus always has only one LDM) and they must be configured to use multiple LDMs before taking the backup; you can do this by choosing an appropriate setting for one of the multi-threaded data node configuration parametersMaxNoOfExecutionThreadsorThreadConfig.Backups using multiple LDMs create subdirectories, one per LDM, under the
BACKUP/BACKUP-directory. ndb_restore now detects these subdirectories automatically, and if they exist, attempts to restore the backup in parallel; see Section 22.4.23.2, “Restoring from a backup taken in parallel”, for details. (Single-threaded backups are restored as in previous versions ofbackup_id/NDB.) It is also possible to restore backups taken in parallel using an ndb_restore binary from a previous version of NDB Cluster by modifying the usual restore procedure; Section 22.4.23.2.2, “Restoring a parallel backup serially”, provides information on how to do this.Binary configuration file enhancements. Beginning with NDB 8.0.18, a new format is used for the management server's binary configuration file. Previously, a maximum of 16381 sections could appear in the cluster configuration file; now the maximum number of sections is 4G. This is intended to support larger numbers of nodes in a cluster than was possible before this change.
Upgrades to the new format are relatively seamless, and should seldom if ever require manual intervention, as the management server continues to be able to read the old format without issue. A downgrade from NDB 8.0.18 (or later) to an older version of the NDB Cluster software requires manual removal of any binary configuration files or, alternatively, starting the older management server binary with the
--initialoption.For more information, see Section 22.2.8, “Upgrading and Downgrading NDB Cluster”.
Increased number of data nodes. NDB 8.0.18 increases the maximum number of data nodes supported per cluster to 144 (previously, this was 48). Data nodes can now use node IDs in the range 1 to 144, inclusive.
Previously, the recommended node IDs for management nodes were 49 and 50. These are still supported for management nodes, but using them as such limits the maximum number of data nodes to 142; for this reason, it is now recommended that node IDs 145 and 146 are used for management nodes.
RedoOverCommitCounter and RedoOverCommitLimit changes. Due to ambiguities in the semantics for setting them to 0, the minimum value for each of the data node configuration parameters
RedoOverCommitCounterandRedoOverCommitLimithas been increased to 1, beginning with NDB 8.0.19.ndb_autoincrement_prefetch_sz changes. In NDB 8.0.19, the default value of the
ndb_autoincrement_prefetch_szserver system variable is increased to 512.Changes in parameter maxmimums and defaults. NDB 8.0.19 makes the following changes in configuration parameter maximum and default values:
The maximum for
DataMemoryis increased to 16 terabytes.The maximum for
DiskPageBufferMemoryis also increased to 16 terabytes.The default value for
StringMemoryis increased to 25%.The default for
LcpScanProgressTimeoutis increased to 180 seconds.
Disk Data checkpointing improvements. NDB Cluster 8.0.19 provides a number of new enhancements which help to reduce the latency of checkpoints of Disk Data tables and tablespaces when using non-volatile memory devices such as solid-state drives and the NVMe specification for such devices. These improvements include those in the following list:
Avoiding bursts of checkpoint disk writes
Speeding up checkpoints for disk data tablespaces when the redo log or the undo log becomes full
Balancing checkpoints to disk and in-memory checkpoints against one other, when necessary
Protecting disk devices from overload to help ensure low latency under high loads
As part of this work, NDB 8.0.19 introduces two new data node configuration parameters.
MaxDiskDataLatencyplaces a ceiling on the degree of latency permitted for disk access and causes transactions taking longer than this length of time to be aborted.DiskDataUsingSameDiskmakes it possible to take advantage of housing Disk Data tablespaces on separate disks by increasing the rate at which checkpoints of such tablespaces can be performed.In addition, three new tables in the
ndbinfodatabase, also added in NDB 8.0.19 and listed here, provide information about Disk Data performance:The
diskstattable reports on writes to Disk Data tablespaces during the past secondThe
diskstats_1sectable reports on writes to Disk Data tablespaces for each of the last 20 secondsThe
pgman_time_track_statstable reports on the latency of disk operations relating to Disk Data tablespaces
Memory allocation and TransactionMemory. NDB 8.0.19 introduces a new
TransactionMemoryparameter which simplifies allocation of data node memory for transactions as part of the work done to pool transactional and Local Data Manager (LDM) memory. This parameter is intended to replace several older transactional memory parameters which have been deprecated.Transaction memory can now be set in any of the three ways listed here:
Several deprecated configuration parameters are incompatible with
TransactionMemory. If any of these are set,TransactionMemorycannot be set (see Parameters incompatible with TransactionMemory), and the data node's transaction memory is determined as it was previous to NDB 8.0.19.NoteAttempting to set
TransactionMemoryand any of the deprecated parameters concurrently in theconfig.inifile prevents the management server from starting.If
TransactionMemoryis set, this value is used for determining transaction memory.TransactionMemorycannot be set if any of the incompatible deprecated parameters mentioned in the previous item have also been set.If none of the incompatible parameters are set and
TransactionMemoryis also not set, transaction memory is set byNDB.
For more information, see the description of
TransactionMemory, as well as Section 22.3.3.13, “Data Node Memory Management”.Support for additional replicas. NDB 8.0.19 increases the maximum number of replicas supported in production from 2 to 4. (Previously, it was possible to set
NoOfReplicasto 3 or 4, but this was not officially supported or verified in testing.)Restoring by slices. Beginning with NDB 8.0.20, it is possible to divide a backup into roughly equal portions (slices) and to restore these slices in parallel using two new options implemented for ndb_restore:
--num-slicesdetermines the number of slices into which the backup should be divided.--slice-idprovides the ID of the slice to be restored by the current instance of ndb_restore.
This makes it possible to employ multiple instances of ndb_restore to restore subsets of the backup in parallel, potentially reducing the amount of time required to perform the restore operation.
For more information, see the description of the ndb_restore
--num-slicesoption.Read from any replica enabled. Beginning with NDB 8.0.19, read from any replica is enabled by default for all
NDBtables. This means that the default value for thendb_read_backupsystem variable is now ON, and that the value of theNDB_TABLEcomment optionREAD_BACKUPis 1 when creating a newNDBtable. Enabling read from any replica significantly improves performance for reads fromNDBtables, with minimal impact on writes.For more information, see the description of the
ndb_read_backupsystem variable, and Section 13.1.20.10, “Setting NDB_TABLE Options”.ndb_blob_tool enhancements. Beginning with NDB 8.0.20, the ndb_blob_tool utility can detect missing blob parts for which inline parts exist and replace these with placeholder blob parts (consisting of space characters) of the correct length. To check whether there are missing blob parts, use the
--check-missingoption with this program. To replace any missing blob parts with placeholders, use the--add-missingoption.For more information, see Section 22.4.6, “ndb_blob_tool — Check and Repair BLOB and TEXT columns of NDB Cluster Tables”.
ndbinfo versioning.
NDB8.0.20 and later supports versioning forndbinfotables, and maintains the current definitions for its tables internally. At startup,NDBcompares its supportedndbinfoversion with the version stored in the data dictionary. If the versions differ,NDBdrops any oldndbinfotables and recreates them using the current definitions.Support for Fedora Linux. Beginning with NDB 8.0.20, Fedora Linux is a supported platform for NDB Cluster Community releases and can be installed using the RPMs supplied for this purpose by Oracle. These can be obtained from the NDB Cluster downloads page.
NDB programs—NDBT dependency removal. The dependency of a number of
NDButility programs on theNDBTlibrary has been removed. This library is used internally for development, and is not required for normal use; its inclusion in these programs could lead to unwanted issues when testing.Affected programs are listed here, along with the
NDBversions in which the dependency was removed:ndb_delete_all, in NDB 8.0.18
ndb_show_tables, in NDB 8.0.20
ndb_waiter, in NDB 8.0.20
The principal effect of this change for users is that these programs no longer print
NDBT_ProgramExit -following completion of a run. Applications that depend upon such behavior should be updated to reflect the change when upgrading to the indicated versions.statusPushdown of outer joins and semijoins. Work done in NDB 8.0.20 allows many outer joins and semijoins, and not only those using a primary key or unique key lookup, to be pushed down to the data nodes (see Section 8.2.1.5, “Engine Condition Pushdown Optimization”).
Outer joins using scans which can now be pushed include those which meet the following conditions:
There are no unpushed conditions on the table
There are no unpushed conditions on other tables in the same join nest, or in upper join nests on which it depends
All other tables in the same join nest, or in upper join nests on which it depends, are also pushed
A semijoin that uses an index scan can now be pushed if it meets the the conditions just noted for a pushed outer join, and it uses the
firstMatchstrategy (see Section 8.2.2.1, “Optimizing IN and EXISTS Subquery Predicates with Semijoin Transformations”).When a join cannot be pushed,
EXPLAINshould provide the reason or reasons.Foreign keys and lettercasing.
NDBstores the names of foreign keys using the case with which they were defined. Formerly, when the value of thelower_case_table_namessystem variable was set to 0, it performed case-sensitive comparisons of foreign key names as used inSELECTand other SQL statements with the names as stored. Beginning with NDB 8.0.20, such comparisons are now always performed in a case-insensitive fashion, regardless of the value oflower_case_table_names.Multiple transporters. NDB 8.0.20 introduces support for multiple transporters to handle node-to-node communication between pairs of data nodes. This facilitates higher rates of update operations for each node group in the cluster, and helps avoid constraints imposed by system or other limitations on inter-node communications using a single socket.
By default,
NDBnow uses a number of transporters based on the number of local data management (LDM) threads or the number of transaction coordinator (TC) threads, whichever is greater. By default, the number of transporters is equal to half of this number. While the default should perform well for most workloads, it is possible to adjust the number of transporters employed by each node group by setting theNodeGroupTransportersdata node configuration parameter (also introduced in NDB 8.0.20), up a maximum of the greater of the number of LDM threads or the number of TC threads. Setting it to 0 causes the number of transporters to be the same as the number of LDM threads.ndb_restore: primary key schema changes. NDB 8.0.21 (and later) supports different primary key definitions for source and target tables when restoring an
NDBnative backup with ndb_restore when it is run with the--allow-pk-changesoption. Both increasing and decreasing the number of columns making up the original primary key are supported.When the primary key is extended with an additional column or columns, any columns added must be defined as
NOT
          NULL
, and no values in any such columns may be changed during the time that the backup is being taken. Because some applications set all column values in a row when updating it, whether or not all values are actually changed, this can cause a restore operation to fail even if no values in the column to be added to the primary key have changed. You can override this behavior using the--ignore-extended-pk-updatesoption also added in NDB 8.0.21; in this case, you must ensure that no such values are changed.A column can be removed from the table's primary key whether or not this column remains part of the table.
For more information, see the description of the
--allow-pk-changesoption for ndb_restore.Merging backups with ndb_restore. In some cases, it may be desirable to consolidate data originally stored in different instances of NDB Cluster (all using the same schema) into a single target NDB Cluster. This is now supported when using backups created in the ndb_mgm client (see Section 22.5.8.2, “Using The NDB Cluster Management Client to Create a Backup”) and restoring them with ndb_restore, using the
--remap-columnoption added in NDB 8.0.21 along with--restore-data(and possibly additional compatible options as needed or desired).--remap-columncan be employed to handle cases in which primary and unique key values are overlapping between source clusters, and it is necessary that they do not overlap in the target cluster, as well as to preserve other relationships between tables such as foreign keys.--remap-columntakes as its argument a string having the formatdb.tbl.col:fn:argsdb,tbl, andcolare, respectively, the names of the database, table, and column,fnis the name of a remapping function, andargsis one or more arguments tofn. There is no default value. Onlyoffsetis supported as the function name, withargsas the integer offset to be applied to the value of the column when inserting it into the target table from the backup. The column must use one of the MySQL integer types (see Section 11.1.2, “Integer Types (Exact Value) - INTEGER, INT, SMALLINT, TINYINT, MEDIUMINT, BIGINT”); the allowed range of the offset value is the same as the signed version of that type (this allows the offset to be negative if desired).The new option can be used multiple times in the same invocation of ndb_restore, so that you can remap to new values multiple columns of the same table, different tables, or both. The offset value does not have to be the same for all instances of the option.
In addition, two new options are provided for ndb_desc, also beginning in NDB 8.0.21:
--auto-inc(short form-a): Includes the the next auto-increment value in the output, if the table has anAUTO_INCREMENTcolumn.--context(short form-x): Provides extra information about the table, including the schema, database name, table name, and internal ID.
For more information and examples, see the description of the
--remap-columnoption.Send thread improvements. As of NDB 8.0.20, each send thread now handles sends to a subset of transporters, and each block thread now assists only one send thread, resulting in more send threads, and thus better performance and data node scalability.
Adaptive spin control using SpinMethod. NDB 8.0.20 introduces a simple interface for setting up adaptive CPU spin on platforms supporting it, using the
SpinMethoddata node parameter. This parameter has four settings, one each for static spinning, cost-based adaptive spinning, latency-optimized adaptive spinning, and adaptive spinning optimized for database machines on which each thread has its own CPU. Each of these settings causes the data node to use a set of predetermined values for one or more spin parameters which enable adaptive spinning, set spin timing, and set spin overhead, as appropriate to a given scenario, thus obviating the need to set these directly for common use cases.For fine-tuning spin behavior, it is also possible to set these and additional spin parameters directly, using the existing
SchedulerSpinTimerdata node configuration parameter as well as the followingDUMPcommands in the ndb_mgm client:DUMP 104000 (SetSchedulerSpinTimerAll): Sets spin time for all threadsDUMP 104001 (SetSchedulerSpinTimerThread): Sets spin time for a specified threadDUMP 104002 (SetAllowedSpinOverhead): Sets spin overhead as the number of units of CPU time allowed to gain 1 unit of latencyDUMP 104003 (SetSpintimePerCall): Sets the time for a call to spinDUMP 104004 (EnableAdaptiveSpinning): Enables or disables adpative spinning
NDB 8.0.20 also adds a new TCP configuration parameter
TcpSpinTimewhich sets the time to spin for a given TCP connection.The ndb_top tool is also enhanced to provide spin time information per thread.
For additional information, see the description of the
SpinMethodparameter, the listedDUMPcommands, and Section 22.4.29, “ndb_top — View CPU usage information for NDB threads”.Disk Data and cluster restarts. Beginning with NDB 8.0.21, an initial restart of the cluster forces the removal of all Disk Data objects such as tablespaces and log file groups, including any data files and undo log files associated with these objects.
See Section 22.5.10, “NDB Cluster Disk Data Tables”, for more information.
Disk Data extent allocation. Beginning with NDB 8.0.20, allocation of extents in data files is done in a round-robin fashion among all data files used by a given tablespace. This is expected to improve distribution of data in cases where multiple storage devices are used for Disk Data storage.
For more information, see Section 22.5.10.1, “NDB Cluster Disk Data Objects”.
--ndb-log-fail-terminate option. Beginning with NDB 8.0.21, you can cause the SQL node to terminate whenever it is unable to log all row events fully. This can be done by starting mysqld with the
--ndb-log-fail-terminateoption.
MySQL Cluster Manager 1.4.8 also provides experimental support for NDB Cluster 8.0. MySQL Cluster Manager has an advanced command-line interface that can simplify many complex NDB Cluster management tasks. See MySQL™ Cluster Manager 1.4.8 User Manual, for more information.
The next few sections contain information about
NDB node configuration parameters and
NDB-specific mysqld options and variables that
have been added to, deprecated in, or removed from NDB 8.0.
The following node configuration parameters have been added in NDB 8.0.
DiskDataUsingSameDisk: Set to false if Disk Data tablespaces are located on separate physical disks. Added in NDB 8.0.19.MaxDiskDataLatency: Maximum allowed mean latency of disk access (ms) before starting to abort transactions. Added in NDB 8.0.19.NodeGroupTransporters: Number of transporters to use between nodes in same node group. Added in NDB 8.0.20.ReservedConcurrentIndexOperations: Number of simultaneous index operations having dedicated resources on one data node. Added in NDB 8.0.16.ReservedConcurrentOperations: Number of simultaneous operations having dedicated resources in transaction coordinators on one data node. Added in NDB 8.0.16.ReservedConcurrentScans: Number of simultaneous scans having dedicated resources on one data node. Added in NDB 8.0.16.ReservedConcurrentTransactions: Number of simultaneous transactions having dedicated resources on one data node. Added in NDB 8.0.16.ReservedFiredTriggers: Number of triggers having dedicated resources on one data node. Added in NDB 8.0.16.ReservedLocalScans: Number of simultaneous fragment scans having dedicated resources on one data node. Added in NDB 8.0.16.ReservedTransactionBufferMemory: Dynamic buffer space (in bytes) for key and attribute data allocated to each data node. Added in NDB 8.0.16.SpinMethod: Determines spin method used by data node; see documentation for details. Added in NDB 8.0.20.TcpSpinTime: Time to spin before going to sleep when receiving. Added in NDB 8.0.20.TransactionMemory: Memory allocated for transactions on each data node. Added in NDB 8.0.19.
The following node configuration parameters have been deprecated in NDB 8.0.
BatchSizePerLocalScan: Used to calculate number of lock records for scan with hold lock. Deprecated as of NDB 8.0.19.MaxNoOfConcurrentIndexOperations: Total number of index operations that can execute simultaneously on one data node. Deprecated as of NDB 8.0.19.MaxNoOfConcurrentOperations: Maximum number of operation records in transaction coordinator. Deprecated as of NDB 8.0.19.MaxNoOfConcurrentScans: Maximum number of scans executing concurrently on data node. Deprecated as of NDB 8.0.19.MaxNoOfConcurrentTransactions: Maximum number of transactions executing concurrently on this data node, total number of transactions that can be executed concurrently is this value times number of data nodes in cluster. Deprecated as of NDB 8.0.19.MaxNoOfFiredTriggers: Total number of triggers that can fire simultaneously on one data node. Deprecated as of NDB 8.0.19.MaxNoOfLocalOperations: Maximum number of operation records defined on this data node. Deprecated as of NDB 8.0.19.MaxNoOfLocalScans: Maximum number of fragment scans in parallel on this data node. Deprecated as of NDB 8.0.19.ReservedTransactionBufferMemory: Dynamic buffer space (in bytes) for key and attribute data allocated to each data node. Deprecated as of NDB 8.0.19.
No node configuration parameters have been removed from NDB 8.0.
The following mysqld system variables, status variables, and options have been added in NDB 8.0.
Ndb_metadata_blacklist_size: Number of NDB metadata objects that NDB binlog thread has failed to synchronize; renamed in NDB 8.0.22 as Ndb_metadata_excluded_count. Added in NDB 8.0.18.Ndb_metadata_detected_count: Number of times NDB metadata change monitor thread has detected changes. Added in NDB 8.0.16.Ndb_metadata_excluded_count: Number of NDB metadata objects that NDB binlog thread has failed to synchronize. Added in NDB 8.0.22.Ndb_metadata_synced_count: Number of NDB metadata objects which have been synchronized. Added in NDB 8.0.18.Ndb_trans_hint_count_session: Number of transactions using hints that have been started in this session. Added in NDB 8.0.17.ndb-log-fail-terminate: Terminate mysqld process if complete logging of all found row events is not possible. Added in NDB 8.0.21.ndb-schema-dist-timeout: How long to wait before detecting timeout during schema distribution. Added in NDB 8.0.17.ndb_dbg_check_shares: Check for any lingering shares (debug builds only). Added in NDB 8.0.13.ndb_metadata_check: Enable auto-detection of NDB metadata changes with respect to MySQL data dictionary; enabled by default. Added in NDB 8.0.16.ndb_metadata_check_interval: Interval in seconds to perform check for NDB metadata changes with respect to MySQL data dictionary. Added in NDB 8.0.16.ndb_schema_dist_lock_wait_timeout: Time during schema distribution to wait for lock before returning error. Added in NDB 8.0.18.ndb_schema_dist_timeout: Time to wait before detecting timeout during schema distribution. Added in NDB 8.0.16.ndb_schema_dist_upgrade_allowed: Allow schema distribution table upgrade when connecting to NDB. Added in NDB 8.0.17.ndbinfo: Enable ndbinfo plugin, if supported. Added in NDB 8.0.13.
No system variables, status variables, or options have been deprecated in NDB 8.0.
The following mysqld system variables, status variables, and options have been removed in NDB 8.0.
Ndb_metadata_blacklist_size: Number of NDB metadata objects that NDB binlog thread has failed to synchronize; renamed in NDB 8.0.22 as Ndb_metadata_excluded_count. Removed in NDB 8.0.22.
MySQL Server offers a number of choices in storage engines. Since
both NDB and
InnoDB can serve as transactional
MySQL storage engines, users of MySQL Server sometimes become
interested in NDB Cluster. They see
NDB as a possible alternative or
upgrade to the default InnoDB storage
engine in MySQL 8.0. While NDB and
InnoDB share common characteristics,
there are differences in architecture and implementation, so that
some existing MySQL Server applications and usage scenarios can be
a good fit for NDB Cluster, but not all of them.
In this section, we discuss and compare some characteristics of
the NDB storage engine used by NDB
8.0 with InnoDB used in MySQL 8.0.
The next few sections provide a technical comparison. In many
instances, decisions about when and where to use NDB Cluster must
be made on a case-by-case basis, taking all factors into
consideration. While it is beyond the scope of this documentation
to provide specifics for every conceivable usage scenario, we also
attempt to offer some very general guidance on the relative
suitability of some common types of applications for
NDB as opposed to
InnoDB back ends.
NDB Cluster 8.0 uses a mysqld based on MySQL
8.0, including support for InnoDB
1.1. While it is possible to use InnoDB tables
with NDB Cluster, such tables are not clustered. It is also not
possible to use programs or libraries from an NDB Cluster 8.0
distribution with MySQL Server 8.0, or the reverse.
While it is also true that some types of common business
applications can be run either on NDB Cluster or on MySQL Server
(most likely using the InnoDB storage
engine), there are some important architectural and implementation
differences. Section 22.1.6.1, “Differences Between the NDB and InnoDB Storage Engines”,
provides a summary of the these differences. Due to the
differences, some usage scenarios are clearly more suitable for
one engine or the other; see
Section 22.1.6.2, “NDB and InnoDB Workloads”. This in turn
has an impact on the types of applications that better suited for
use with NDB or
InnoDB. See
Section 22.1.6.3, “NDB and InnoDB Feature Usage Summary”, for a comparison
of the relative suitability of each for use in common types of
database applications.
For information about the relative characteristics of the
NDB and
MEMORY storage engines, see
When to Use MEMORY or NDB Cluster.
See Chapter 16, Alternative Storage Engines, for additional information about MySQL storage engines.
The NDB storage engine is
implemented using a distributed, shared-nothing architecture,
which causes it to behave differently from
InnoDB in a number of ways. For
those unaccustomed to working with
NDB, unexpected behaviors can arise
due to its distributed nature with regard to transactions,
foreign keys, table limits, and other characteristics. These are
shown in the following table:
Table 22.1 Differences between InnoDB and NDB storage engines
| Feature | InnoDB (MySQL 8.0) |
NDB 8.0 |
|---|---|---|
| MySQL Server Version | 8.0 | 8.0 |
InnoDB Version |
InnoDB 8.0.22 |
InnoDB 8.0.22 |
| NDB Cluster Version | N/A | NDB
8.0.21/8.0.21 |
| Storage Limits | 64TB | 128TB |
| Foreign Keys | Yes | Yes |
| Transactions | All standard types | READ COMMITTED |
| MVCC | Yes | No |
| Data Compression | Yes | No (NDB checkpoint and backup files can be compressed) |
| Large Row Support (> 14K) | Supported for VARBINARY,
VARCHAR,
BLOB, and
TEXT columns |
Supported for BLOB and
TEXT columns only (Using
these types to store very large amounts of data can lower
NDB performance) |
| Replication Support | Asynchronous and semisynchronous replication using MySQL Replication; MySQL Group Replication | Automatic synchronous replication within an NDB Cluster; asynchronous replication between NDB Clusters, using MySQL Replication (Semisynchronous replication is not supported) |
| Scaleout for Read Operations | Yes (MySQL Replication) | Yes (Automatic partitioning in NDB Cluster; NDB Cluster Replication) |
| Scaleout for Write Operations | Requires application-level partitioning (sharding) | Yes (Automatic partitioning in NDB Cluster is transparent to applications) |
| High Availability (HA) | Built-in, from InnoDB cluster | Yes (Designed for 99.999% uptime) |
| Node Failure Recovery and Failover | From MySQL Group Replication | Automatic (Key element in NDB architecture) |
| Time for Node Failure Recovery | 30 seconds or longer | Typically < 1 second |
| Real-Time Performance | No | Yes |
| In-Memory Tables | No | Yes (Some data can optionally be stored on disk; both in-memory and disk data storage are durable) |
| NoSQL Access to Storage Engine | Yes | Yes (Multiple APIs, including Memcached, Node.js/JavaScript, Java, JPA, C++, and HTTP/REST) |
| Concurrent and Parallel Writes | Yes | Up to 48 writers, optimized for concurrent writes |
| Conflict Detection and Resolution (Multiple Replication Masters) | Yes (MySQL Group Replication) | Yes |
| Hash Indexes | No | Yes |
| Online Addition of Nodes | Read/write replicas using MySQL Group Replication | Yes (all node types) |
| Online Upgrades | Yes (using replication) | Yes |
| Online Schema Modifications | Yes, as part of MySQL 8.0 | Yes |
NDB Cluster has a range of unique attributes that make it ideal
to serve applications requiring high availability, fast
failover, high throughput, and low latency. Due to its
distributed architecture and multi-node implementation, NDB
Cluster also has specific constraints that may keep some
workloads from performing well. A number of major differences in
behavior between the NDB and
InnoDB storage engines with regard
to some common types of database-driven application workloads
are shown in the following table::
Table 22.2 Differences between InnoDB and NDB storage engines, common types of data-driven application workloads.
| Workload | InnoDB |
NDB Cluster (NDB) |
|---|---|---|
| High-Volume OLTP Applications | Yes | Yes |
| DSS Applications (data marts, analytics) | Yes | Limited (Join operations across OLTP datasets not exceeding 3TB in size) |
| Custom Applications | Yes | Yes |
| Packaged Applications | Yes | Limited (should be mostly primary key access); NDB Cluster 8.0 supports foreign keys |
| In-Network Telecoms Applications (HLR, HSS, SDP) | No | Yes |
| Session Management and Caching | Yes | Yes |
| E-Commerce Applications | Yes | Yes |
| User Profile Management, AAA Protocol | Yes | Yes |
When comparing application feature requirements to the
capabilities of InnoDB with
NDB, some are clearly more
compatible with one storage engine than the other.
The following table lists supported application features according to the storage engine to which each feature is typically better suited.
Table 22.3 Supported application features according to the storage engine to which each feature is typically better suited
Preferred application requirements for
InnoDB |
Preferred application requirements for NDB |
|---|---|
|
|
- 22.1.7.1 Noncompliance with SQL Syntax in NDB Cluster
- 22.1.7.2 Limits and Differences of NDB Cluster from Standard MySQL Limits
- 22.1.7.3 Limits Relating to Transaction Handling in NDB Cluster
- 22.1.7.4 NDB Cluster Error Handling
- 22.1.7.5 Limits Associated with Database Objects in NDB Cluster
- 22.1.7.6 Unsupported or Missing Features in NDB Cluster
- 22.1.7.7 Limitations Relating to Performance in NDB Cluster
- 22.1.7.8 Issues Exclusive to NDB Cluster
- 22.1.7.9 Limitations Relating to NDB Cluster Disk Data Storage
- 22.1.7.10 Limitations Relating to Multiple NDB Cluster Nodes
- 22.1.7.11 Previous NDB Cluster Issues Resolved in NDB Cluster 8.0
In the sections that follow, we discuss known limitations in
current releases of NDB Cluster as compared with the features
available when using the MyISAM and
InnoDB storage engines. If you check the
“Cluster” category in the MySQL bugs database at
http://bugs.mysql.com, you can find known bugs in
the following categories under “MySQL Server:” in the
MySQL bugs database at http://bugs.mysql.com, which
we intend to correct in upcoming releases of NDB Cluster:
NDB Cluster
Cluster Direct API (NDBAPI)
Cluster Disk Data
Cluster Replication
ClusterJ
This information is intended to be complete with respect to the conditions just set forth. You can report any discrepancies that you encounter to the MySQL bugs database using the instructions given in Section 1.7, “How to Report Bugs or Problems”. If we do not plan to fix the problem in NDB Cluster 8.0, we will add it to the list.
See Section 22.1.7.11, “Previous NDB Cluster Issues Resolved in NDB Cluster 8.0” for a list of issues in earlier releases that have been resolved in NDB Cluster 8.0.
Limitations and other issues specific to NDB Cluster Replication are described in Section 22.6.3, “Known Issues in NDB Cluster Replication”.
Some SQL statements relating to certain MySQL features produce
errors when used with NDB tables,
as described in the following list:
Temporary tables. Temporary tables are not supported. Trying either to create a temporary table that uses the
NDBstorage engine or to alter an existing temporary table to useNDBfails with the error Table storage engine 'ndbcluster' does not support the create option 'TEMPORARY'.Indexes and keys in NDB tables. Keys and indexes on NDB Cluster tables are subject to the following limitations:
Column width. Attempting to create an index on an
NDBtable column whose width is greater than 3072 bytes succeeds, but only the first 3072 bytes are actually used for the index. In such cases, a warning Specified key was too long; max key length is 3072 bytes is issued, and aSHOW CREATE TABLEstatement shows the length of the index as 3072.TEXT and BLOB columns. You cannot create indexes on
NDBtable columns that use any of theTEXTorBLOBdata types.FULLTEXT indexes. The
NDBstorage engine does not supportFULLTEXTindexes, which are possible forMyISAMandInnoDBtables only.However, you can create indexes on
VARCHARcolumns ofNDBtables.USING HASH keys and NULL. Using nullable columns in unique keys and primary keys means that queries using these columns are handled as full table scans. To work around this issue, make the column
NOT NULL, or re-create the index without theUSING HASHoption.Prefixes. There are no prefix indexes; only entire columns can be indexed. (The size of an
NDBcolumn index is always the same as the width of the column in bytes, up to and including 3072 bytes, as described earlier in this section. Also see Section 22.1.7.6, “Unsupported or Missing Features in NDB Cluster”, for additional information.)BIT columns. A
BITcolumn cannot be a primary key, unique key, or index, nor can it be part of a composite primary key, unique key, or index.AUTO_INCREMENT columns. Like other MySQL storage engines, the
NDBstorage engine can handle a maximum of oneAUTO_INCREMENTcolumn per table. However, in the case of an NDB table with no explicit primary key, anAUTO_INCREMENTcolumn is automatically defined and used as a “hidden” primary key. For this reason, you cannot define a table that has an explicitAUTO_INCREMENTcolumn unless that column is also declared using thePRIMARY KEYoption. Attempting to create a table with anAUTO_INCREMENTcolumn that is not the table's primary key, and using theNDBstorage engine, fails with an error.
Restrictions on foreign keys. Support for foreign key constraints in NDB 8.0 is comparable to that provided by
InnoDB, subject to the following restrictions:Every column referenced as a foreign key requires an explicit unique key, if it is not the table's primary key.
ON UPDATE CASCADEis not supported when the reference is to the parent table's primary key.This is because an update of a primary key is implemented as a delete of the old row (containing the old primary key) plus an insert of the new row (with a new primary key). This is not visible to the
NDBkernel, which views these two rows as being the same, and thus has no way of knowing that this update should be cascaded.As of NDB 8.0.16:
ON DELETE CASCADEis not supported where the child table contains one or more columns of any of theTEXTorBLOBtypes. (Bug #89511, Bug #27484882)SET DEFAULTis not supported. (Also not supported byInnoDB.)The
NO ACTIONkeyword is accepted but treated asRESTRICT.NO ACTION, which is a standard SQL keyword, is the default in MySQL 8.0. (Also the same as withInnoDB.)In earlier versions of NDB Cluster, when creating a table with foreign key referencing an index in another table, it sometimes appeared possible to create the foreign key even if the order of the columns in the indexes did not match, due to the fact that an appropriate error was not always returned internally. A partial fix for this issue improved the error used internally to work in most cases; however, it remains possible for this situation to occur in the event that the parent index is a unique index. (Bug #18094360)
For more information, see Section 13.1.20.5, “FOREIGN KEY Constraints”, and Section 1.8.3.2, “FOREIGN KEY Constraints”.
NDB Cluster and geometry data types. Geometry data types (
WKTandWKB) are supported forNDBtables. However, spatial indexes are not supported.Character sets and binary log files. Currently, the
ndb_apply_statusandndb_binlog_indextables are created using thelatin1(ASCII) character set. Because names of binary logs are recorded in this table, binary log files named using non-Latin characters are not referenced correctly in these tables. This is a known issue, which we are working to fix. (Bug #50226)To work around this problem, use only Latin-1 characters when naming binary log files or setting any the
--basedir,--log-bin, or--log-bin-indexoptions.Creating NDB tables with user-defined partitioning. Support for user-defined partitioning in NDB Cluster is restricted to [
LINEAR]KEYpartitioning. Using any other partitioning type withENGINE=NDBorENGINE=NDBCLUSTERin aCREATE TABLEstatement results in an error.It is possible to override this restriction, but doing so is not supported for use in production settings. For details, see User-defined partitioning and the NDB storage engine (NDB Cluster).
Default partitioning scheme. All NDB Cluster tables are by default partitioned by
KEYusing the table's primary key as the partitioning key. If no primary key is explicitly set for the table, the “hidden” primary key automatically created by theNDBstorage engine is used instead. For additional discussion of these and related issues, see Section 23.2.5, “KEY Partitioning”.CREATE TABLEandALTER TABLEstatements that would cause a user-partitionedNDBCLUSTERtable not to meet either or both of the following two requirements are not permitted, and fail with an error:The table must have an explicit primary key.
All columns listed in the table's partitioning expression must be part of the primary key.
Exception. If a user-partitioned
NDBCLUSTERtable is created using an empty column-list (that is, usingPARTITION BY [LINEAR] KEY()), then no explicit primary key is required.Maximum number of partitions for NDBCLUSTER tables. The maximum number of partitions that can defined for a
NDBCLUSTERtable when employing user-defined partitioning is 8 per node group. (See Section 22.1.2, “NDB Cluster Nodes, Node Groups, Replicas, and Partitions”, for more information about NDB Cluster node groups.DROP PARTITION not supported. It is not possible to drop partitions from
NDBtables usingALTER TABLE ... DROP PARTITION. The other partitioning extensions toALTER TABLE—ADD PARTITION,REORGANIZE PARTITION, andCOALESCE PARTITION—are supported for NDB tables, but use copying and so are not optimized. See Section 23.3.1, “Management of RANGE and LIST Partitions” and Section 13.1.9, “ALTER TABLE Statement”.Row-based replication. When using row-based replication with NDB Cluster, binary logging cannot be disabled. That is, the
NDBstorage engine ignores the value ofsql_log_bin.JSON data type. The MySQL
JSONdata type is supported forNDBtables in the mysqld supplied with NDB 8.0.An
NDBtable can have a maximum of 3JSONcolumns.The NDB API has no special provision for working with
JSONdata, which it views simply asBLOBdata. Handling data asJSONmust be performed by the application.
In this section, we list limits found in NDB Cluster that either differ from limits found in, or that are not found in, standard MySQL.
Memory usage and recovery.
Memory consumed when data is inserted into an
NDB table is not automatically
recovered when deleted, as it is with other storage engines.
Instead, the following rules hold true:
A
DELETEstatement on anNDBtable makes the memory formerly used by the deleted rows available for re-use by inserts on the same table only. However, this memory can be made available for general re-use by performingOPTIMIZE TABLE.A rolling restart of the cluster also frees any memory used by deleted rows. See Section 22.5.5, “Performing a Rolling Restart of an NDB Cluster”.
A
DROP TABLEorTRUNCATE TABLEoperation on anNDBtable frees the memory that was used by this table for re-use by anyNDBtable, either by the same table or by anotherNDBtable.NoteRecall that
TRUNCATE TABLEdrops and re-creates the table. See Section 13.1.37, “TRUNCATE TABLE Statement”.Limits imposed by the cluster's configuration. A number of hard limits exist which are configurable, but available main memory in the cluster sets limits. See the complete list of configuration parameters in Section 22.3.3, “NDB Cluster Configuration Files”. Most configuration parameters can be upgraded online. These hard limits include:
Database memory size and index memory size (
DataMemoryandIndexMemory, respectively).DataMemoryis allocated as 32KB pages. As eachDataMemorypage is used, it is assigned to a specific table; once allocated, this memory cannot be freed except by dropping the table.See Section 22.3.3.6, “Defining NDB Cluster Data Nodes”, for more information.
The maximum number of operations that can be performed per transaction is set using the configuration parameters
MaxNoOfConcurrentOperationsandMaxNoOfLocalOperations.NoteBulk loading,
TRUNCATE TABLE, andALTER TABLEare handled as special cases by running multiple transactions, and so are not subject to this limitation.Different limits related to tables and indexes. For example, the maximum number of ordered indexes in the cluster is determined by
MaxNoOfOrderedIndexes, and the maximum number of ordered indexes per table is 16.
Node and data object maximums. The following limits apply to numbers of cluster nodes and metadata objects:
As of NDB 8.0.18, the maximum number of data nodes is 145. (Previously, this was 48.)
A data node must have a node ID in the range of 1 to 144, inclusive. (In NDB 8.0.17 and earlier releases, this was 1 to 48, inclusive.)
Management and API nodes may use node IDs in the range 1 to 255, inclusive.
The total maximum number of nodes in an NDB Cluster is 255. This number includes all SQL nodes (MySQL Servers), API nodes (applications accessing the cluster other than MySQL servers), data nodes, and management servers.
The maximum number of metadata objects in current versions of NDB Cluster is 20320. This limit is hard-coded.
See Section 22.1.7.11, “Previous NDB Cluster Issues Resolved in NDB Cluster 8.0”, for more information.
A number of limitations exist in NDB Cluster with regard to the handling of transactions. These include the following:
Transaction isolation level. The
NDBCLUSTERstorage engine supports only theREAD COMMITTEDtransaction isolation level. (InnoDB, for example, supportsREAD COMMITTED,READ UNCOMMITTED,REPEATABLE READ, andSERIALIZABLE.) You should keep in mind thatNDBimplementsREAD COMMITTEDon a per-row basis; when a read request arrives at the data node storing the row, what is returned is the last committed version of the row at that time.Uncommitted data is never returned, but when a transaction modifying a number of rows commits concurrently with a transaction reading the same rows, the transaction performing the read can observe “before” values, “after” values, or both, for different rows among these, due to the fact that a given row read request can be processed either before or after the commit of the other transaction.
To ensure that a given transaction reads only before or after values, you can impose row locks using
SELECT ... LOCK IN SHARE MODE. In such cases, the lock is held until the owning transaction is committed. Using row locks can also cause the following issues:Increased frequency of lock wait timeout errors, and reduced concurrency
Increased transaction processing overhead due to reads requiring a commit phase
Possibility of exhausting the available number of concurrent locks, which is limited by
MaxNoOfConcurrentOperations
NDBusesREAD COMMITTEDfor all reads unless a modifier such asLOCK IN SHARE MODEorFOR UPDATEis used.LOCK IN SHARE MODEcauses shared row locks to be used;FOR UPDATEcauses exclusive row locks to be used. Unique key reads have their locks upgraded automatically byNDBto ensure a self-consistent read;BLOBreads also employ extra locking for consistency.See Section 22.5.8.4, “NDB Cluster Backup Troubleshooting”, for information on how NDB Cluster's implementation of transaction isolation level can affect backup and restoration of
NDBdatabases.Transactions and BLOB or TEXT columns.
NDBCLUSTERstores only part of a column value that uses any of MySQL'sBLOBorTEXTdata types in the table visible to MySQL; the remainder of theBLOBorTEXTis stored in a separate internal table that is not accessible to MySQL. This gives rise to two related issues of which you should be aware whenever executingSELECTstatements on tables that contain columns of these types:For any
SELECTfrom an NDB Cluster table: If theSELECTincludes aBLOBorTEXTcolumn, theREAD COMMITTEDtransaction isolation level is converted to a read with read lock. This is done to guarantee consistency.For any
SELECTwhich uses a unique key lookup to retrieve any columns that use any of theBLOBorTEXTdata types and that is executed within a transaction, a shared read lock is held on the table for the duration of the transaction—that is, until the transaction is either committed or aborted.This issue does not occur for queries that use index or table scans, even against
NDBtables havingBLOBorTEXTcolumns.For example, consider the table
tdefined by the followingCREATE TABLEstatement:CREATE TABLE t ( a INT NOT NULL AUTO_INCREMENT PRIMARY KEY, b INT NOT NULL, c INT NOT NULL, d TEXT, INDEX i(b), UNIQUE KEY u(c) ) ENGINE = NDB,The following query on
tcauses a shared read lock, because it uses a unique key lookup:SELECT * FROM t WHERE c = 1;
However, none of the four queries shown here causes a shared read lock:
SELECT * FROM t WHERE b = 1; SELECT * FROM t WHERE d = '1'; SELECT * FROM t; SELECT b,c WHERE a = 1;
This is because, of these four queries, the first uses an index scan, the second and third use table scans, and the fourth, while using a primary key lookup, does not retrieve the value of any
BLOBorTEXTcolumns.You can help minimize issues with shared read locks by avoiding queries that use unique key lookups that retrieve
BLOBorTEXTcolumns, or, in cases where such queries are not avoidable, by committing transactions as soon as possible afterward.
Unique key lookups and transaction isolation. Unique indexes are implemented in
NDBusing a hidden index table which is maintained internally. When a user-createdNDBtable is accessed using a unique index, the hidden index table is first read to find the primary key that is then used to read the user-created table. To avoid modification of the index during this double-read operation, the row found in the hidden index table is locked. When a row referenced by a unique index in the user-createdNDBtable is updated, the hidden index table is subject to an exclusive lock by the transaction in which the update is performed. This means that any read operation on the same (user-created)NDBtable must wait for the update to complete. This is true even when the transaction level of the read operation isREAD COMMITTED.One workaround which can be used to bypass potentially blocking reads is to force the SQL node to ignore the unique index when performing the read. This can be done by using the
IGNORE INDEXindex hint as part of theSELECTstatement reading the table (see Section 8.9.4, “Index Hints”). Because the MySQL server creates a shadowing ordered index for every unique index created inNDB, this lets the ordered index be read instead, and avoids unique index access locking. The resulting read is as consistent as a committed read by primary key, returning the last committed value at the time the row is read.Reading via an ordered index makes less efficient use of resources in the cluster, and may have higher latency.
It is also possible to avoid using the unique index for access by querying for ranges rather than for unique values.
Rollbacks. There are no partial transactions, and no partial rollbacks of transactions. A duplicate key or similar error causes the entire transaction to be rolled back.
This behavior differs from that of other transactional storage engines such as
InnoDBthat may roll back individual statements.Transactions and memory usage. As noted elsewhere in this chapter, NDB Cluster does not handle large transactions well; it is better to perform a number of small transactions with a few operations each than to attempt a single large transaction containing a great many operations. Among other considerations, large transactions require very large amounts of memory. Because of this, the transactional behavior of a number of MySQL statements is affected as described in the following list:
TRUNCATE TABLEis not transactional when used onNDBtables. If aTRUNCATE TABLEfails to empty the table, then it must be re-run until it is successful.DELETE FROM(even with noWHEREclause) is transactional. For tables containing a great many rows, you may find that performance is improved by using severalDELETE FROM ... LIMIT ...statements to “chunk” the delete operation. If your objective is to empty the table, then you may wish to useTRUNCATE TABLEinstead.LOAD DATA statements.
LOAD DATAis not transactional when used onNDBtables.ALTER TABLE and transactions. When copying an
NDBtable as part of anALTER TABLE, the creation of the copy is nontransactional. (In any case, this operation is rolled back when the copy is deleted.)
Transactions and the COUNT() function. When using NDB Cluster Replication, it is not possible to guarantee the transactional consistency of the
COUNT()function on the slave. In other words, when performing on the master a series of statements (INSERT,DELETE, or both) that changes the number of rows in a table within a single transaction, executingSELECT COUNT(*) FROMqueries on the slave may yield intermediate results. This is due to the fact thattableSELECT COUNT(...)may perform dirty reads, and is not a bug in theNDBstorage engine. (See Bug #31321 for more information.)
Starting, stopping, or restarting a node may give rise to temporary errors causing some transactions to fail. These include the following cases:
Temporary errors. When first starting a node, it is possible that you may see Error 1204 Temporary failure, distribution changed and similar temporary errors.
Errors due to node failure. The stopping or failure of any data node can result in a number of different node failure errors. (However, there should be no aborted transactions when performing a planned shutdown of the cluster.)
In either of these cases, any errors that are generated must be handled within the application. This should be done by retrying the transaction.
See also Section 22.1.7.2, “Limits and Differences of NDB Cluster from Standard MySQL Limits”.
Some database objects such as tables and indexes have different
limitations when using the
NDBCLUSTER storage engine:
Number of database objects. The maximum number of all
NDBdatabase objects in a single NDB Cluster—including databases, tables, and indexes—is limited to 20320.Attributes per table. The maximum number of attributes (that is, columns and indexes) that can belong to a given table is 512.
Attributes per key. The maximum number of attributes per key is 32.
Row size. Beginning with NDB 8.0.18, the maximum permitted size of any one row is 30000 bytes, in NDB 8.0.17 and earlier releases, this limit is 14000 bytes.
Each
BLOBorTEXTcolumn contributes 256 + 8 = 264 bytes to this total; this includesJSONcolumns. See String Type Storage Requirements, as well as JSON Storage Requirements, for more information relating to these types.In addition, the maximum offset for a fixed-width column of an
NDBtable is 8188 bytes; attempting to create a table that violates this limitation fails with NDB error 851 Maximum offset for fixed-size columns exceeded. For memory-based columns, you can work around this limitation by using a variable-width column type such asVARCHARor defining the column asCOLUMN_FORMAT=DYNAMIC; this does not work with columns stored on disk. For disk-based columns, you may be able to do so by reordering one or more of the table's disk-based columns such that the combined width of all but the disk-based column defined last in theCREATE TABLEstatement used to create the table does not exceed 8188 bytes, less any possible rounding performed for some data types such asCHARorVARCHAR; otherwise it is necessary to use memory-based storage for one or more of the offending column or columns instead.BIT column storage per table. The maximum combined width for all
BITcolumns used in a givenNDBtable is 4096.FIXED column storage. NDB Cluster 8.0 supports a maximum of 128 TB per fragment of data in
FIXEDcolumns.
A number of features supported by other storage engines are not
supported for NDB tables. Trying to
use any of these features in NDB Cluster does not cause errors
in or of itself; however, errors may occur in applications that
expects the features to be supported or enforced. Statements
referencing such features, even if effectively ignored by
NDB, must be syntactically and otherwise
valid.
Index prefixes. Prefixes on indexes are not supported for
NDBtables. If a prefix is used as part of an index specification in a statement such asCREATE TABLE,ALTER TABLE, orCREATE INDEX, the prefix is not created byNDB.A statement containing an index prefix, and creating or modifying an
NDBtable, must still be syntactically valid. For example, the following statement always fails with Error 1089 Incorrect prefix key; the used key part isn't a string, the used length is longer than the key part, or the storage engine doesn't support unique prefix keys, regardless of storage engine:CREATE TABLEt1 ( c1 INT NOT NULL, c2 VARCHAR(100), INDEX i1 (c2(500)) );This happens on account of the SQL syntax rule that no index may have a prefix larger than itself.
Savepoints and rollbacks. Savepoints and rollbacks to savepoints are ignored as in
MyISAM.Durability of commits. There are no durable commits on disk. Commits are replicated, but there is no guarantee that logs are flushed to disk on commit.
Replication. Statement-based replication is not supported. Use
--binlog-format=ROW(or--binlog-format=MIXED) when setting up cluster replication. See Section 22.6, “NDB Cluster Replication”, for more information.Replication using global transaction identifiers (GTIDs) is not compatible with NDB Cluster, and is not supported in NDB Cluster 8.0. Do not enable GTIDs when using the
NDBstorage engine, as this is very likely to cause problems up to and including failure of NDB Cluster Replication.Semisynchronous replication is not supported in NDB Cluster.
Generated columns. The
NDBstorage engine does not support indexes on virtual generated columns.As with other storage engines, you can create an index on a stored generated column, but you should bear in mind that
NDBusesDataMemoryfor storage of the generated column as well asIndexMemoryfor the index. See JSON columns and indirect indexing in NDB Cluster, for an example.NDB Cluster writes changes in stored generated columns to the binary log, but does log not those made to virtual columns. This should not effect NDB Cluster Replication or replication between
NDBand other MySQL storage engines.
See Section 22.1.7.3, “Limits Relating to Transaction Handling in NDB Cluster”,
for more information relating to limitations on transaction
handling in NDB.
The following performance issues are specific to or especially pronounced in NDB Cluster:
Range scans. There are query performance issues due to sequential access to the
NDBstorage engine; it is also relatively more expensive to do many range scans than it is with eitherMyISAMorInnoDB.Reliability of Records in range. The
Records in rangestatistic is available but is not completely tested or officially supported. This may result in nonoptimal query plans in some cases. If necessary, you can employUSE INDEXorFORCE INDEXto alter the execution plan. See Section 8.9.4, “Index Hints”, for more information on how to do this.Unique hash indexes. Unique hash indexes created with
USING HASHcannot be used for accessing a table ifNULLis given as part of the key.
The following are limitations specific to the
NDB storage engine:
Machine architecture. All machines used in the cluster must have the same architecture. That is, all machines hosting nodes must be either big-endian or little-endian, and you cannot use a mixture of both. For example, you cannot have a management node running on a PowerPC which directs a data node that is running on an x86 machine. This restriction does not apply to machines simply running mysql or other clients that may be accessing the cluster's SQL nodes.
Binary logging. NDB Cluster has the following limitations or restrictions with regard to binary logging:
sql_log_binhas no effect on data operations; however, it is supported for schema operations.NDB Cluster cannot produce a binary log for tables having
BLOBcolumns but no primary key.Only the following schema operations are logged in a cluster binary log which is not on the mysqld executing the statement:
Schema operations. Schema operations (DDL statements) are rejected while any data node restarts. Schema operations are also not supported while performing an online upgrade or downgrade.
Number of replicas. The number of replicas, as determined by the
NoOfReplicasdata node configuration parameter, is the number of copies of all data stored by NDB Cluster. Setting this parameter to 1 means there is only a single copy; in this case, no redundancy is provided, and the loss of a data node entails loss of data. To guarantee redundancy, and thus preservation of data even if a data node fails, set this parameter to 2, which is the default and recommended value in production.Setting
NoOfReplicasto a value greater than 2 is supported (to a maximum of 4) but unnecessary to guard against loss of data.
See also Section 22.1.7.10, “Limitations Relating to Multiple NDB Cluster Nodes”.
Disk Data object maximums and minimums. Disk data objects are subject to the following maximums and minimums:
Maximum number of tablespaces: 232 (4294967296)
Maximum number of data files per tablespace: 216 (65536)
The minimum and maximum possible sizes of extents for tablespace data files are 32K and 2G, respectively. See Section 13.1.21, “CREATE TABLESPACE Statement”, for more information.
In addition, when working with NDB Disk Data tables, you should be aware of the following issues regarding data files and extents:
Data files use
DataMemory. Usage is the same as for in-memory data.Data files use file descriptors. It is important to keep in mind that data files are always open, which means the file descriptors are always in use and cannot be re-used for other system tasks.
Extents require sufficient
DiskPageBufferMemory; you must reserve enough for this parameter to account for all memory used by all extents (number of extents times size of extents).
Disk Data tables and diskless mode. Use of Disk Data tables is not supported when running the cluster in diskless mode.
Multiple SQL nodes.
The following are issues relating to the use of multiple MySQL
servers as NDB Cluster SQL nodes, and are specific to the
NDBCLUSTER storage engine:
No distributed table locks. A
LOCK TABLESworks only for the SQL node on which the lock is issued; no other SQL node in the cluster “sees” this lock. This is also true for a lock issued by any statement that locks tables as part of its operations. (See next item for an example.)ALTER TABLE operations.
ALTER TABLEis not fully locking when running multiple MySQL servers (SQL nodes). (As discussed in the previous item, NDB Cluster does not support distributed table locks.)
Multiple management nodes. When using multiple management servers:
If any of the management servers are running on the same host, you must give nodes explicit IDs in connection strings because automatic allocation of node IDs does not work across multiple management servers on the same host. This is not required if every management server resides on a different host.
When a management server starts, it first checks for any other management server in the same NDB Cluster, and upon successful connection to the other management server uses its configuration data. This means that the management server
--reloadand--initialstartup options are ignored unless the management server is the only one running. It also means that, when performing a rolling restart of an NDB Cluster with multiple management nodes, the management server reads its own configuration file if (and only if) it is the only management server running in this NDB Cluster. See Section 22.5.5, “Performing a Rolling Restart of an NDB Cluster”, for more information.
Multiple network addresses. Multiple network addresses per data node are not supported. Use of these is liable to cause problems: In the event of a data node failure, an SQL node waits for confirmation that the data node went down but never receives it because another route to that data node remains open. This can effectively make the cluster inoperable.
It is possible to use multiple network hardware
interfaces (such as Ethernet cards) for a
single data node, but these must be bound to the same address.
This also means that it not possible to use more than one
[tcp] section per connection in the
config.ini file. See
Section 22.3.3.10, “NDB Cluster TCP/IP Connections”, for more
information.
A number of limitations and related issues that existed in earlier versions of NDB Cluster have been resolved in NDB 8.0. These are described briefly in the following list:
Database and table names.
Prior to NDB 8.0.18, when using the NDB
storage engine, the maximum allowed length both for database
names and for table names is 63 characters, and a statement
using a database name or table name longer than this limit
failed with an appropriate error. As of NDB 8.0.18, this
restriction is lifted and identifiers for
NDB databases and tables may now use up to
64 bytes, as with other MySQL database and table names.
- 22.2.1 The NDB Cluster Auto-Installer
- 22.2.2 Installation of NDB Cluster on Linux
- 22.2.3 Installing NDB Cluster on Windows
- 22.2.4 Initial Configuration of NDB Cluster
- 22.2.5 Initial Startup of NDB Cluster
- 22.2.6 NDB Cluster Example with Tables and Data
- 22.2.7 Safe Shutdown and Restart of NDB Cluster
- 22.2.8 Upgrading and Downgrading NDB Cluster
This section describes the basics for planning, installing, configuring, and running an NDB Cluster. Whereas the examples in Section 22.3, “Configuration of NDB Cluster” provide more in-depth information on a variety of clustering options and configuration, the result of following the guidelines and procedures outlined here should be a usable NDB Cluster which meets the minimum requirements for availability and safeguarding of data.
This section covers hardware and software requirements; networking issues; installation of NDB Cluster; basic configuration issues; starting, stopping, and restarting the cluster; loading of a sample database; and performing queries.
NDB Cluster also provides the NDB Cluster Auto-Installer, a web-based graphical installer, as part of the NDB Cluster distribution. The Auto-Installer can be used to perform basic installation and setup of an NDB Cluster on one (for testing) or more host computers. See Section 22.2.1, “The NDB Cluster Auto-Installer”, for more information.
Assumptions. The following sections make a number of assumptions regarding the cluster's physical and network configuration. These assumptions are discussed in the next few paragraphs.
Cluster nodes and host computers. The cluster consists of four nodes, each on a separate host computer, and each with a fixed network address on a typical Ethernet network as shown here:
This setup is also shown in the following diagram:
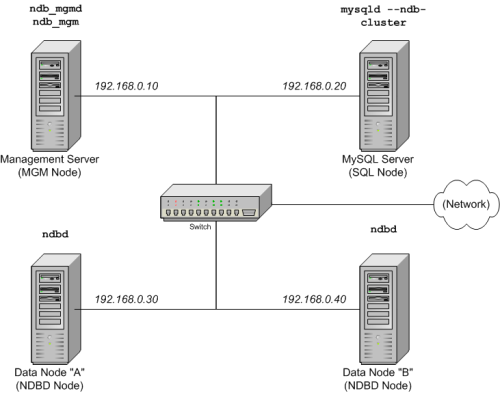
Network addressing.
In the interest of simplicity (and reliability), this
How-To uses only numeric IP addresses.
However, if DNS resolution is available on your network, it is
possible to use host names in lieu of IP addresses in configuring
Cluster. Alternatively, you can use the hosts
file (typically /etc/hosts for Linux and
other Unix-like operating systems,
C:\WINDOWS\system32\drivers\etc\hosts on
Windows, or your operating system's equivalent) for providing
a means to do host lookup if such is available.
Potential hosts file issues.
A common problem when trying to use host names for Cluster nodes
arises because of the way in which some operating systems
(including some Linux distributions) set up the system's own
host name in the /etc/hosts during
installation. Consider two machines with the host names
ndb1 and ndb2, both in the
cluster network domain. Red Hat Linux
(including some derivatives such as CentOS and Fedora) places the
following entries in these machines'
/etc/hosts files:
# ndb1 /etc/hosts:
127.0.0.1 ndb1.cluster ndb1 localhost.localdomain localhost
# ndb2 /etc/hosts:
127.0.0.1 ndb2.cluster ndb2 localhost.localdomain localhost
SUSE Linux (including OpenSUSE) places these entries in the
machines' /etc/hosts files:
# ndb1 /etc/hosts:
127.0.0.1 localhost
127.0.0.2 ndb1.cluster ndb1
# ndb2 /etc/hosts:
127.0.0.1 localhost
127.0.0.2 ndb2.cluster ndb2
In both instances, ndb1 routes
ndb1.cluster to a loopback IP address, but gets a
public IP address from DNS for ndb2.cluster,
while ndb2 routes ndb2.cluster
to a loopback address and obtains a public address for
ndb1.cluster. The result is that each data node
connects to the management server, but cannot tell when any other
data nodes have connected, and so the data nodes appear to hang
while starting.
You cannot mix localhost and other host names
or IP addresses in config.ini. For these
reasons, the solution in such cases (other than to use IP
addresses for all
config.ini HostName
entries) is to remove the fully qualified host names from
/etc/hosts and use these in
config.ini for all cluster hosts.
Host computer type. Each host computer in our installation scenario is an Intel-based desktop PC running a supported operating system installed to disk in a standard configuration, and running no unnecessary services. The core operating system with standard TCP/IP networking capabilities should be sufficient. Also for the sake of simplicity, we also assume that the file systems on all hosts are set up identically. In the event that they are not, you should adapt these instructions accordingly.
Network hardware. Standard 100 Mbps or 1 gigabit Ethernet cards are installed on each machine, along with the proper drivers for the cards, and that all four hosts are connected through a standard-issue Ethernet networking appliance such as a switch. (All machines should use network cards with the same throughput. That is, all four machines in the cluster should have 100 Mbps cards or all four machines should have 1 Gbps cards.) NDB Cluster works in a 100 Mbps network; however, gigabit Ethernet provides better performance.
NDB Cluster is not intended for use in a network for which throughput is less than 100 Mbps or which experiences a high degree of latency. For this reason (among others), attempting to run an NDB Cluster over a wide area network such as the Internet is not likely to be successful, and is not supported in production.
Sample data.
We use the world database which is available
for download from the MySQL website (see
https://dev.mysql.com/doc/index-other.html). We assume that each
machine has sufficient memory for running the operating system,
required NDB Cluster processes, and (on the data nodes) storing
the database.
For general information about installing MySQL, see Chapter 2, Installing and Upgrading MySQL. For information about installation of NDB Cluster on Linux and other Unix-like operating systems, see Section 22.2.2, “Installation of NDB Cluster on Linux”. For information about installation of NDB Cluster on Windows operating systems, see Section 22.2.3, “Installing NDB Cluster on Windows”.
For general information about NDB Cluster hardware, software, and networking requirements, see Section 22.1.3, “NDB Cluster Hardware, Software, and Networking Requirements”.
This section describes the web-based graphical configuration installer included as part of the NDB Cluster distribution. Topics discussed include an overview of the installer and its parts, software and other requirements for running the installer, navigating the GUI, and using the installer to set up and start or stop an NDB Cluster on one or more host computers.
The NDB Cluster Auto-Installer is made up of two components. The front end is a GUI client implemented as a Web page that loads and runs in a standard Web browser such as Firefox or Microsoft Internet Explorer. The back end is a server process (ndb_setup.py) that runs on the local machine or on another host to which you have access.
These two components (client and server) communicate with each other using standard HTTP requests and responses. The back end can manage NDB Cluster software programs on any host where the back end user has granted access. If the NDB Cluster software is on a different host, the back end relies on SSH for access.
This section provides information on supported operating platforms and software, required software, and other prerequisites for running the NDB Cluster Auto-Installer.
Supported platforms. The NDB Cluster Auto-Installer is available with NDB 8.0 distributions for recent versions of Linux, Windows, Solaris, and macOS. For more detailed information about platform support for NDB Cluster and the NDB Cluster Auto-Installer, see https://www.mysql.com/support/supportedplatforms/cluster.html.
Supported web browsers. The web-based installer is supported with recent versions of Firefox and Microsoft Internet Explorer. It should also work with recent versions of Opera, Safari, and Chrome, although we have not thoroughly tested for compability with these browsers.
Required software—setup host. The following software must be installed on the host where the Auto-Installer is run:
Python 2.6 or higher. The Auto-Installer requires the Python interpreter and standard libraries. If these are not already installed on the system, you may be able to add them using the system's package manager. Otherwise, you can download them from http://python.org/download/.
Paramiko 2 or higher. You can download this from http://www.lag.net/paramiko/ if it is not available from your system's package manager.
Pycrypto version 1.9 or higher. This cryptography module is required by Paramiko, and can be iunstalled using
pip install cryptography. Ifpipis not installed, and the module is not available using your system's package manage, you can download it from https://www.dlitz.net/software/pycrypto/.
All of the software in the preceding list is included in the Windows version of the configuration tool, and does not need to be installed separately.
Required software—remote hosts. The only software required for remote hosts where you wish to deploy NDB Cluster nodes is the SSH server, which is usually installed by default on Linux and Solaris systems. Several alternatives are available for Windows; for an overview of these, see http://en.wikipedia.org/wiki/Comparison_of_SSH_servers.
An additional requirement when using multiple hosts is that it is possible to authenticate to any of the remote hosts using SSH and the proper keys or user credentials, as discussed in the next few paragraphs:
Authentication and security. Three basic security or authentication mechanisms for remote access are available to the Auto-Installer, which we list and describe here:
SSH. A secure shell connection is used to enable the back end to perform actions on remote hosts. For this reason, an SSH server must be running on the remote host. In addition, the operating system user running the installer must have access to the remote server, either with a user name and password, or by using public and private keys.
ImportantYou should never use the system
rootaccount for remote access, as this is extremely insecure. In addition, mysqld cannot normally be started by systemroot. For these and other reasons, you should provide SSH credentials for a regular user account on the target system, and not for systemroot. For more information about this issue, see Section 6.1.5, “How to Run MySQL as a Normal User”.HTTPS. Remote communication between the Web browser front end and the back end is not encrypted by default, which means that information such as the user's SSH password is transmitted as cleartext that is readable to anyone. For communication from a remote client to be encrypted, the back end must have a certificate, and the front end must communicate with the back end using HTTPS rather than HTTP. Enabling HTTPS is accomplished most easily through issuing a self-signed certificate. Once the certificate is issued, you must make sure that it is used. You can do this by starting ndb_setup.py from the command line with the
--use-https(-S) and--cert-file(-c) options.A sample certificate file
cfg.pemis included and is used by default. This file is located in themccdirectory under the installation share directory; on Linux, the full path to the file is normally/usr/share/mysql/mcc/cfg.pem. On Windows systems, this is usuallyC:\Program Files\MySQL\MySQL Server 8.0\share\mcc\cfg.pem. Letting the default be used means that, for testing purposes, you can simply start the installer with the-Soption to use an HTTPS connection between the browser and the back end.The Auto-Installer saves the configuration file for a given cluster
mycluster01asmycluster01.mccin the home directory of the user invoking the ndb_setup.py executable. This file is encrypted with a passphrase supplied by the user (using Fernet); because HTTP transmits the passphrase in the clear, it is strongly recommended that you always use an HTTPS connection to access the Auto-Installer on a remote host.Certificate-based authentication. The back end ndb_setup.py process can execute commands on the local host as well as remote hosts. This means that anyone connecting to the back end can take charge of how commands are executed. To reject unwanted connections to the back end, a certificate may be required for authentication of the client. In this case, a certificate must be issued by the user, installed in the browser, and made available to the back end for authentication purposes. You can enact this requirement (together with or in place of password or key authentication) by starting ndb_setup.py with the
--ca-certs-file(-a) option.
There is no need or requirement for secure authentication when the client browser is running on the same host as the Auto-Installer back end.
See also Section 22.5.17, “NDB Cluster Security Issues”, which discusses security considerations to take into account when deploying NDB Cluster, as well as Chapter 6, Security, for more general MySQL security information.
The NDB Cluster Auto-Installer interface is made up of several pages, each corresponding to a step in the process used to configure and deploy an NDB Cluster. These pages are listed here, in order:
Welcome: Begin using the Auto-Installer by choosing either to configure a new NDB Cluster, or to continue configuring an existing one.
Define Cluster: Set basic information about the cluster as a whole, such as name, hosts, and load type. Here you can also set the SSH authentication type for accessing remote hosts, if needed.
Define Hosts: Identify the hosts where you intend to run NDB Cluster processes.
Define Processes: Assign one or more processes of a given type or types to each cluster host.
Define Parameters: Set configuration attributes for processes or types of processes.
Deploy Configuration: Deploy the cluster with the configuration set previously; start and stop the deployed cluster.
NDB Cluster Installer Settings and Help Menus
These menus are shown on all screens except for the Welcome screen. They provide access to installer settings and information. The menu is shown here in more detail:
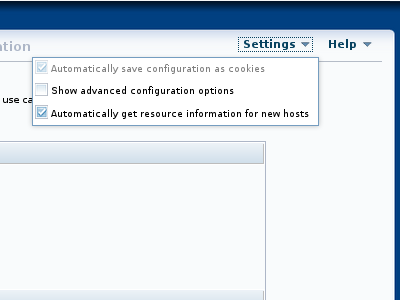
The menu has the following entries:
: Save your configuration information—such as host names, process data, and parameter values—as a cookie in the browser. When this option is chosen, all information except any SSH password is saved. This means that you can quit and restart the browser, and continue working on the same configuration from where you left off at the end of the previous session. This option is enabled by default.
The SSH password is never saved; if you use one, you must supply it at the beginning of each new session.
: Shows by default advanced configuration parameters where available.
Once set, the advanced parameters continue to be used in the configuration file until they are explicitly changed or reset. This is regardless of whether the advanced parameters are currently visible in the installer; in other words, disabling the menu item does not reset the values of any of these parameters.
You can also toggle the display of advanced parameters for individual processes on the Define Parameters screen.
This option is disabled by default.
: Query new hosts automatically for hardware resource information to pre-populate a number of configuration options and values. In this case, the suggested values are not mandatory, but they are used unless explicitly changed using the appropriate editing options in the installer.
This option is enabled by default.
The installer menu is shown here:
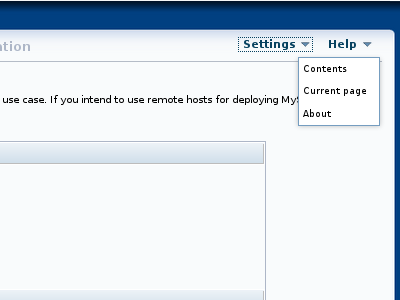
The menu provides several options, described in the following list:
: Show the built-in user guide. This is opened in a separate browser window, so that it can be used simultaneously with the installer without interrupting workflow.
: Open the built-in user guide to the section describing the page currently displayed in the installer.
: open a dialog displaying the installer name and the version number of the NDB Cluster distribution with which it was supplied.
The Auto-Installer also provides context-sensitive help in the form of tooltips for most input widgets.
In addition, the names of most NDB configuration parameters are linked to their descriptions in the online documentation. The documentation is displayed in a separate browser window.
The next section discusses starting the Auto-Installer. The sections immediately following it describe in greater detail the purpose and function of each of these pages in the order listed previously.
The Auto-Installer is provided together with the NDB Cluster
software. Separate RPM and .deb packages
containing only the Auto-Installer are also available for many
Linux distributions. (See
Section 22.2, “NDB Cluster Installation”.)
The present section explains how to start the installer. You can do by invoking the ndb_setup.py executable.
You should run the ndb_setup.py as a
normal user; no special privileges are needed to do so. You
should not run this program as the
mysql user, or using the system
root or Administrator account; doing so
may cause the installation to fail.
ndb_setup.py is found in the
bin within the NDB Cluster installation
directory; a typical location might be
/usr/local/mysql/bin on a Linux system or
C:\Program Files\MySQL\MySQL Server
8.0\bin on a Windows system. This can
vary according to where the NDB Cluster software is installed
on your system, and the installation method.
On Windows, you can also start the installer by running setup.bat in the NDB Cluster installation directory. When invoked from the command line, this batch file accepts the same options as ndb_setup.py.
ndb_setup.py can be started with any of several options that affect its operation, but it is usually sufficient to allow the default settings be used, in which case you can start ndb_setup.py by either of the following two methods:
Navigate to the NDB Cluster
bindirectory in a terminal and invoke it from the command line, without any additional arguments or options, like this:shell>
ndb_setup.pyRunning out of install dir: /usr/local/mysql/bin Starting web server on port 8081 URL is https://localhost:8081/welcome.html deathkey=627876 Press CTRL+C to stop web server. The application should now be running in your browser. (Alternatively you can navigate to https://localhost:8081/welcome.html to start it)This works regardless of operating platform.
Navigate to the NDB Cluster
bindirectory in a file browser (such as Windows Explorer on Windows, or Konqueror, Dolphin, or Nautilus on Linux) and activate (usually by double-clicking) the ndb_setup.py file icon. This works on Windows, and should work with most common Linux desktops as well.On Windows, you can also navigate to the NDB Cluster installation directory and activate the setup.bat file icon.
In either case, once ndb_setup.py is
invoked, the Auto-Installer's
Welcome
screen should open in the system's default web
browser. If not, you should be able to open the page
http://localhost:8081/welcome.html or
https://localhost:8081/welcome.html manually in the
browser.
In some cases, you may wish to use non-default settings for
the installer, such as specifying HTTPS for connections, or a
different port for the Auto-Installer's included web
server to run on, in which case you must invoke
ndb_setup.py with one or more startup
options with values overriding the necessary defaults. The
same startup options can be used on Windows systems with the
setup.bat file supplied for
such platforms in the NDB Cluster software distribution. This
can be done using the command line, but if you want or need to
start the installer from a desktop or file browser while
employing one or more of these options, it is also possible to
create a script or batch file containing the proper
invocation, then to double-click its file icon in the file
browser to start the installer. (On Linux systems, you might
also need to make the script file executable first.) If you
plan to use the Auto-Installer from a remote host, you should
start using the -S option. For information
about this and other advanced startup options for the NDB
Cluster Auto-Installer, see
Section 22.4.26, “ndb_setup.py — Start browser-based Auto-Installer for
NDB Cluster”.
The Welcome screen is loaded in the default browser when ndb_setup.py is invoked. The first time the Auto-Installer is run (or if for some other reason there are no existing configurations), this screen appears as shown here:

In this case, the only choice of cluster listed is for configuration of a new cluster, and both the and buttons are inactive.
To create a new configuration, enter and confirm a passphrase in the text boxes provided. When this has been done, you can click to proceed to the Define Cluster screen where you can assign a name to the new cluster.
If you have previously created one or more clusters with the
Auto-Installer, they are listed by name. This example shows an
existing cluster named mycluster-1:
Figure 22.8 The NDB Cluster Auto-Installer Welcome screen, with previously created cluster mycluster-1
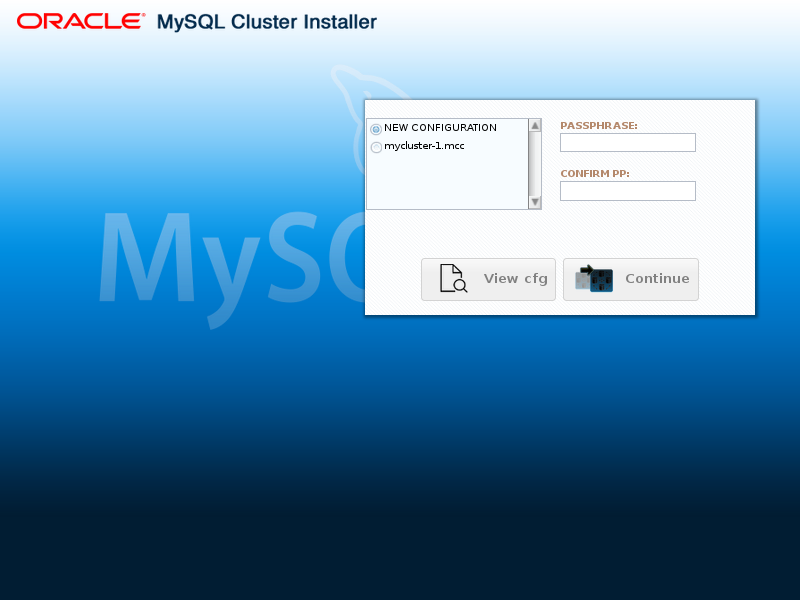
To view the configuration for and work with a given cluster, select the radiobutton next to its name in the list, then enter and confirm the passphrase that was used to create it. When you have done this correctly, you can click to view and edit this cluster's configuration.
The Define Cluster screen is appears following the Welcome screen, and is used for setting general properties of the cluster. The layout of the Define Cluster screen is shown here:
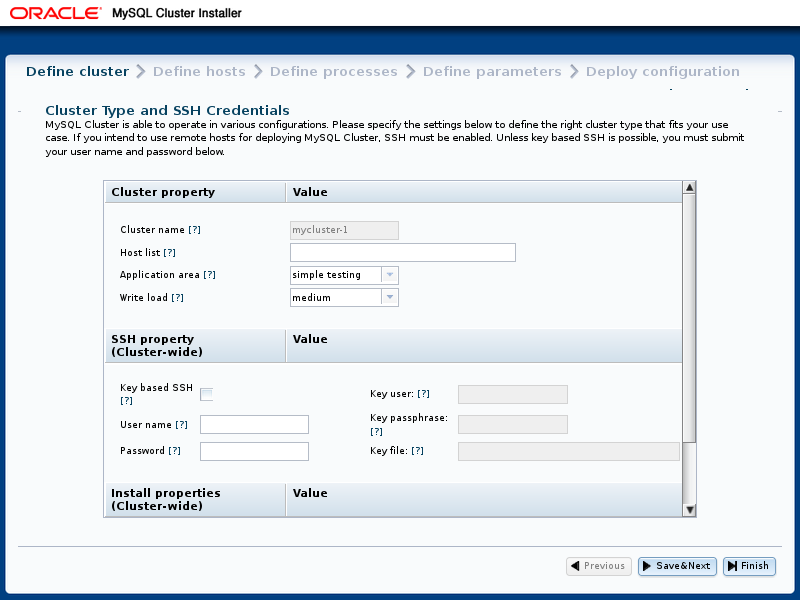
This screen and subsequent screens also include Settings and Help menus which are described later in this section; see NDB Cluster Installer Settings and Help Menus.
The Define Cluster screen allows you to set three sorts of properties for the cluster: cluster properties, SSH properties, and installation properties.
Cluster properties that can be set on this screen are listed here:
Cluster name: A name that identifies the cluster; in this example, this is
mycluster-1. The name is set on the previous screen and cannot be changed here.Host list: A comma-delimited list of one or more hosts where cluster processes should run. By default, this is
127.0.0.1. If you add remote hosts to the list, you must be able to connect to them using the credentials supplied as SSH properties.Application type: Choose one of the following:
: Minimal resource usage for small-scale testing. This the default. Not intended for production environments.
: Maximize performance for the given hardware.
: Maximize performance while maximizing sensitivity to timeouts in order to minimize the time needed to detect failed cluster processes.
Write load: Choose a level for the anticipated number of writes for the cluster as a whole. You can choose any one of the following levels:
: The expected load includes fewer than 100 write transactions for second.
: The expected load includes 100 to 1000 write transactions per second; this is the default.
: The expected load includes more than 1000 write transactions per second.
SSH properties are described in the following list:
Key-Based SSH: Check this box to use key-enabled login to the remote host. If checked, the key user and passphrase must also be supplied; otherwise, a user and password for a remote login account are needed.
User: Name of user with remote login access.
Password: Password for remote user.
Key user: Name of the user for whom the key is valid, if not the same as the operating system user.
Key passphrase: Passphrase for the key, if required.
Key file: Path to the key file. The default is
~/.ssh/id_rsa.
The SSH properties set on this page apply to all hosts in the cluster. They can be overridden for a given host by editing that hosts's properties on the Define Hosts screen.
Two installation properties can also be set on this screen:
Install MySQL Cluster: This setting determines the source from which the Auto-Installer installs NDB Cluster software, if any, on the cluster hosts. Possible values and their effects are listed here:
DOCKER: Try to install the MySQL Cluster Docker image fromhttps://hub.docker.com/r/mysql/mysql-cluster/on each hostREPO: Try to install the NDB Cluster software from the MySQL Repositories on each hostBOTH: Try to install either the Docker image or the software from the repository on each host, giving preference to the repositoryNONE: Do not install the NDB Cluster software on the hosts; this is the default
Open FW Ports: Check this checkbox to have the installer attempt to open ports required by NDB CLuster processes on all hosts.
The next figure shows the Define
Cluster page with settings for a small test cluster
with all nodes running on localhost:

After making the desired settings, you can save them to the configuration file and proceed to the Define Hosts screen by clicking the button.
If you exit the installer without saving, no changes are made to the configuration file.
The Define Hosts screen, shown here, provides a means of viewing and specifying several key properties of each cluster host:
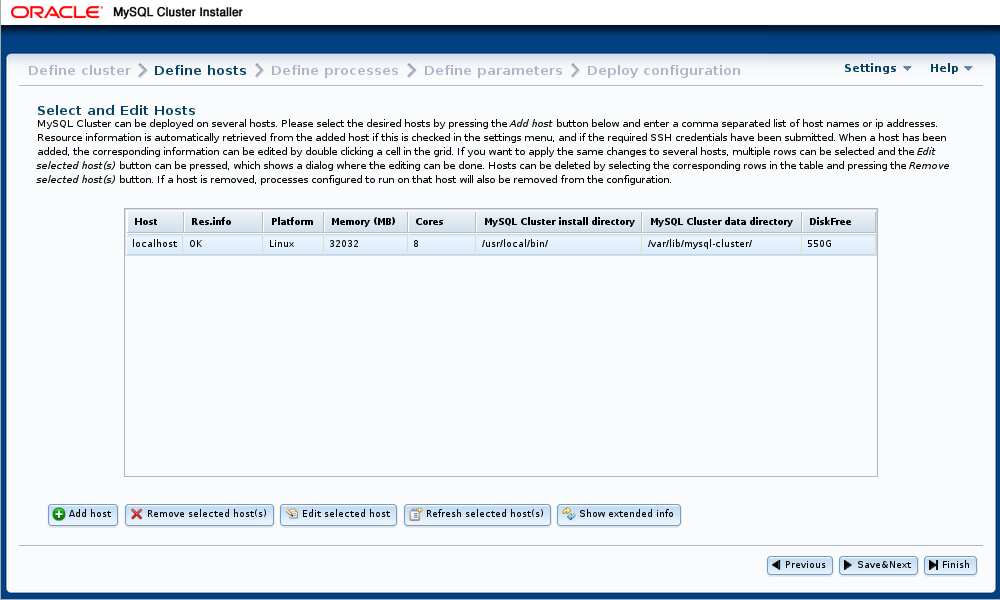
Properties shown include the following:
Host: Name or IP address of this host
Res.info: Shows
OKif the installer was able to retrieve requested resource information from this hostPlatform: Operating system or platform
Memory (MB): Amount of RAM on this host
Cores: Number of CPU cores available on this host
MySQL Cluster install directory: Path to directory where the NDB Cluster software is installed on this host; defaults to
/usr/local/binMySQL Cluster data directory: Path to directory used for data by NDB Cluster processes on this host; defaults to
/var/lib/mysql-cluster.DiskFree: Free disk space in bytes
For hosts with multiple disks, only the space available on the disk used for the data directory is shown.
This screen also provides an extended view for each host that includes the following properties:
FDQN: This host's fully qualified domain name, used by the installer to connect with it, distribute configuration information to it, and start and stop cluster processes on it.
Internal IP: The IP address used for communication with cluster processes running on this host by processes running elsewhere.
OS Details: Detailed operating system name and version information.
Open FW: If this checkbox is enabled, the installer attempts to open ports in the host's firewall needed by cluster processes.
REPO URL: URL for MySQL NDB Cluster repository
DOCKER URL: URL for MySQL NDB CLuster Docker images; for NDB 8.0, this is
mysql/mysql-cluster:8.0.Install: If this checkbox is enabled, the Auto-Installer attempts to install the NDB Cluster software on this host
The extended view is shown here:
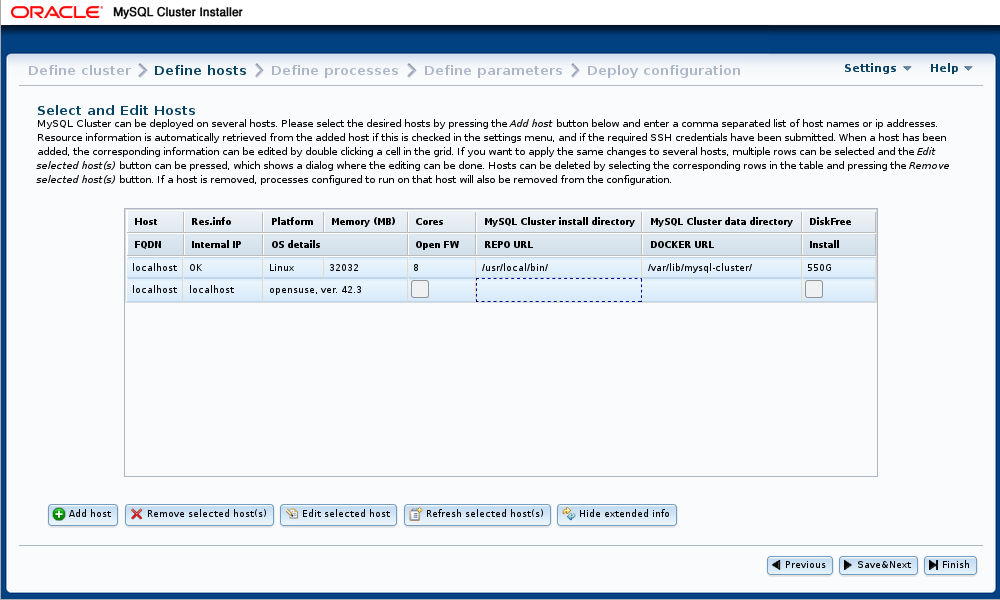
All cells in the display are editable, with the exceptions of those in the Host, Res.info, and FQDN columns.
Be aware that it may take some time for information to be
retrieved from remote hosts. Fields for which no value could
be retrieved are indicated with an ellipsis
(…). You can retry the fetching of
resource information from one or more hosts by selecting the
hosts in the list and then clicking the Refresh
selected host(s) button.
Adding and Removing Hosts
You can add one or more hosts by clicking the button and entering the required properties where indicated in the Add new host dialog, shown here:
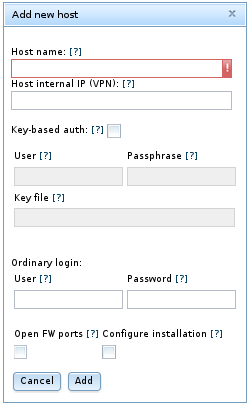
This dialog includes the following fields:
Host name: A comma-separated list of one or more host names, IP addresses, or both. These must be accessible from the host where the Auto-Installer is running.
Host internal IP (VPN): If you are setting up the cluster to run on a VPN or other internal network, enter the IP address or addresses used for contact by cluster nodes on other hosts.
Key-based auth: If checked, enables key-based authentication. You can enter any additional needed information in the User, Passphrase, and Key file fields.
Ordinary login: If accessing this host using a password-based login, enter the appropriate information in the User and Password fields.
Open FW ports: Selecting this checkbox allows the installer try opening any ports needed by cluster processes in this host's firewall.
Configure installation: Checking this allows the Auto-Install to attempt to set up the NDB Cluster software on this host.
To save the new host and its properties, click Add. If you wish to cancel without saving any changes, click Cancel instead.
Similarly, you can remove one or more hosts using the button labelled . When you remove a host, any process which was configured for that host is also removed.
acts immediately. There is no confirmation dialog. If you remove a host in error, you must re-enter its name and properties manually using .
If the SSH user credentials on the Define Cluster screen are changed, the Auto-Installer attempts to refresh the resource information from any hosts for which information is missing.
You can edit the host's platform name, hardware resource information, installation directory, and data directory by clicking the corresponding cell in the grid, by selecting one or more hosts and clicking the button labelled Edit selected host(s). This causes a dialog box to appear, in which these fields can be edited, as shown here:
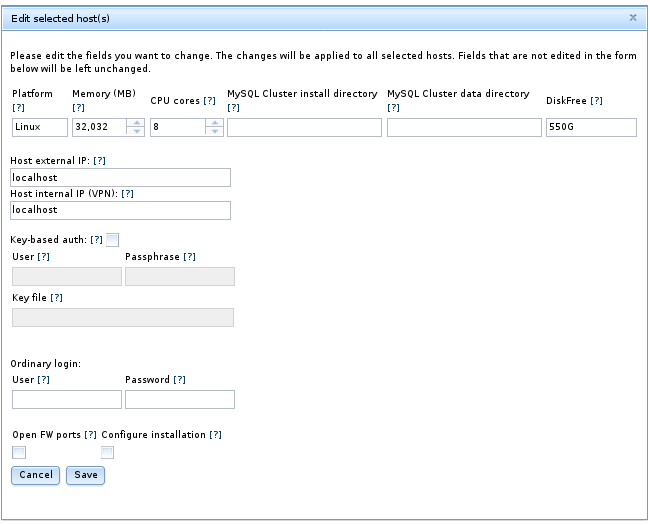
When more than one host is selected, any edited values are applied to all selected hosts.
Once you have entered all desired host information, you can use the button to save the information to the cluster's configuration file and proceed to the Define Processes screen, where you can set up NDB Cluster processes on one or more hosts.
The Define Processes screen, shown here, provides a way to assign NDB Cluster processes (nodes) to cluster hosts:
![Content is described in the surrounding text. The example process tree topology includes "Any host" and "localhost", as defined earlier. The localhost tree includes the following processes: Management mode 1, API node 1, API node 2, API node 3, SQL node 1, SQL node 2, Multi threaded data node 1, and Multi threaded data node 2. This panel also includes "Add process" and "Del[ete] process" buttons.](images/define-processes-start.png)
This screen contains a process tree showing cluster hosts and processes set up to run on each one, as well as a panel which displays information about the item currently selected in the tree.
When this screen is accessed for the first time for a given cluster, a default set of processes is defined for you, based on the number of hosts. If you later return to the Define Hosts screen, remove all hosts, and add new hosts, this also causes a new default set of processes to be defined.
NDB Cluster processes are of the types described in this list:
Management node. Performs administrative tasks such as stopping individual data nodes, querying node and cluster status, and making backups. Executable: ndb_mgmd.
Single-threaded data node. Stores data and executes queries. Executable: ndbd.
Multi threaded data node. Stores data and executes queries with multiple worker threads executing in parallel. Executable: ndbmtd.
SQL node. MySQL server for executing SQL queries against
NDB. Executable: mysqld.API node. A client accessing data in
NDBby means of the NDB API or other low-level client API, rather than by using SQL. See MySQL NDB Cluster API Developer Guide, for more information.
For more information about process (node) types, see Section 22.1.1, “NDB Cluster Core Concepts”.
Processes shown in the tree are numbered sequentially by type,
for each host—for example, SQL node
1, SQL node 2, and so on—to
simplify identification.
Each management node, data node, or SQL process must be assigned to a specific host, and is not allowed to run on any other host. An API node may be assigned to a single host, but this is not required. Instead, you can assign it to the special entry which the tree also contains in addition to any other hosts, and which acts as a placeholder for processes that are allowed to run on any host. Only API processes may use this entry.
Adding processes. To add a new process to a given host, either right-click that host's entry in the tree, then select the Add process popup when it appears, or select a host in the process tree, and press the button below the process tree. Performing either of these actions opens the add process dialog, as shown here:
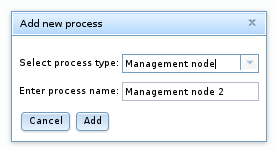
Here you can select from among the available process types described earlier this section; you can also enter an arbitrary process name to take the place of the suggested value, if desired.
Removing processes. To delete a process, select that process in the tree and use the button.
When you select a process in the process tree, information about that process is displayed in the information panel, where you can change the process name and possibly its type. You can change a multi-threaded data node (ndbmtd) to a single-threaded data node (ndbd), or the reverse, only; no other process type changes are allowed. If you want to make a change between any other process types, you must delete the original process first, then add a new process of the desired type.
Like the Define Processes screen, this screen includes a process tree; the Define Parameters process tree is organized by process or node type, in groups labelled , , , and . An information panel displays information regarding the item currently selected. The Define Attributes screen is shown here:
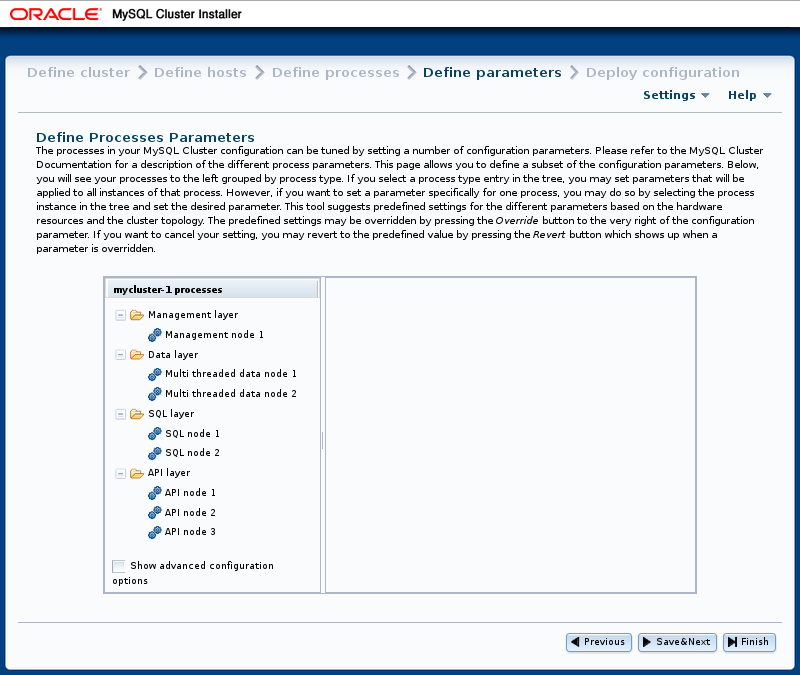
The checkbox labelled Show advanced configuration, when checked, makes advanced options for data node and SQL node processes visible in the information pane. These options are set and used whether or not they are visible. You can also enable this behavior globally by checking under Settings (see NDB Cluster Installer Settings and Help Menus).
You can edit attributes for a single process by selecting that process from the tree, or for all processes of the same type in the cluster by selecting one of the folders. A per-process value set for a given attribute overrides any per-group setting for that attribute that would otherwise apply to the process in question. An example of such an information panel (for an SQL process) is shown here:
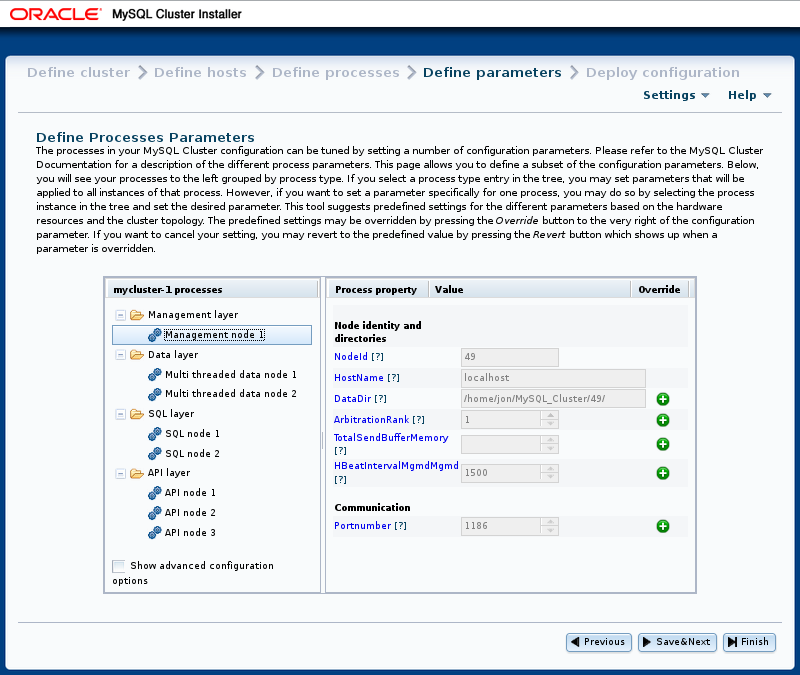
Attributes whose values can be overridden are shown in the information panel with a button bearing a plus sign. This button activates an input widget for the attribute, enabling you to change its value. When the value has been overridden, this button changes into a button showing an . The button undoes any changes made to a given attribute, which immediately reverts to the predefined value.
All configuration attributes have predefined values calculated by the installer, based such factors as host name, node ID, node type, and so on. In most cases, these values may be left as they are. If you are not familiar with it already, it is highly recommended that you read the applicable documentation before making changes to any of the attribute values. To make finding this information easier, each attribute name shown in the information panel is linked to its description in the online NDB Cluster documentation.
This screen allows you to perform the following tasks:
Review process startup commands and configuration files to be applied
Distribute configuration files by creating any necessary files and directories on all cluster hosts—that is, deploy the cluster as presently configured
Start and stop the cluster
The Deploy Configuration screen is shown here:
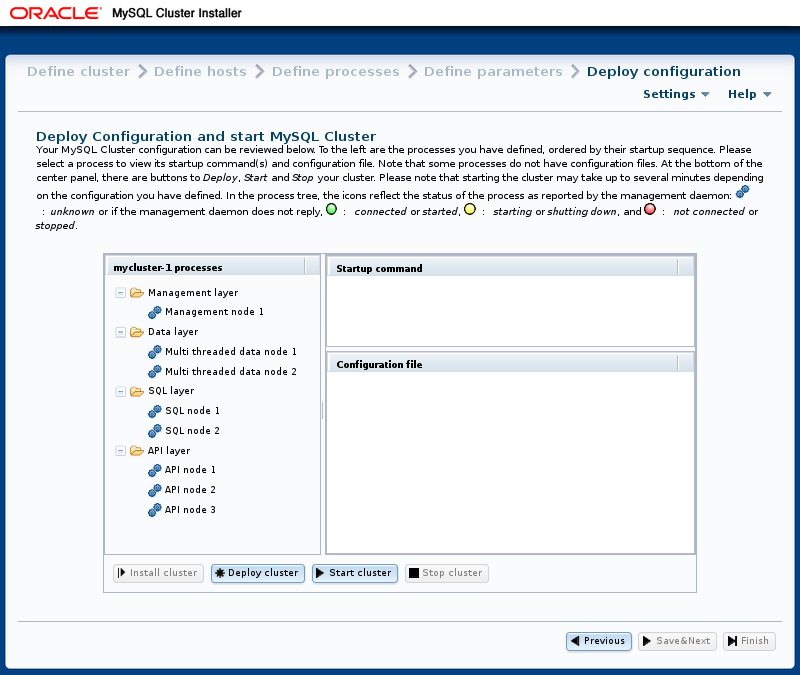
Like the
Define
Parameters screen, this screen features a
process tree which is organized by process type. Next to each
process in the tree is a status icon indicating the current
status of the process: connected
(CONNECTED), starting
(STARTING), running
(STARTED), stopping
(STOPPING), or disconnected
(NO_CONTACT). The icon shows green if the
process is connected or running; yellow if it is starting or
stopping; red if the process is stopped or cannot be contacted
by the management server.
This screen also contains two information panels, one showing the startup command or commands needed to start the selected process. (For some processes, more than one command may be required—for example, if initialization is necessary.) The other panel shows the contents of the configuration file, if any, for the given process.
This screen also contains four buttons, labelled as and performing the functions described in the following list:
: Nonfunctional in this release; implementation intended for a future release.
: Verify that the configuration is valid. Create any directories required on the cluster hosts, and distribute the configuration files onto the hosts. A progress bar shows how far the deployment has proceeded, as shown here, and a dialog is pisplayed when the deployment has completed, as shown here:
: The cluster is deployed as with , after which all cluster processes are started in the correct order.
Starting these processes may take some time. If the estimated time to completion is too large, the installer provides an opportunity to cancel or to continue of the startup procedure. A progress bar indicates the current status of the startup procedure, as shown here:
The process status icons next to the items shown in the process tree also update with the status of each process.
A confirmation dialog is shown when the startup process has completed, as shown here:
: After the cluster has been started, you can stop it using this. As with starting the cluster, cluster shutdown is not instantaneous, and may require some time complete. A progress bar, similar to that displayed during cluster startup, shows the approximate current status of the cluster shutdown procedure, as do the process status icons adjoining the process tree. The progress bar is shown here:
A confirmation dialog indicates when the shutdown process is complete:
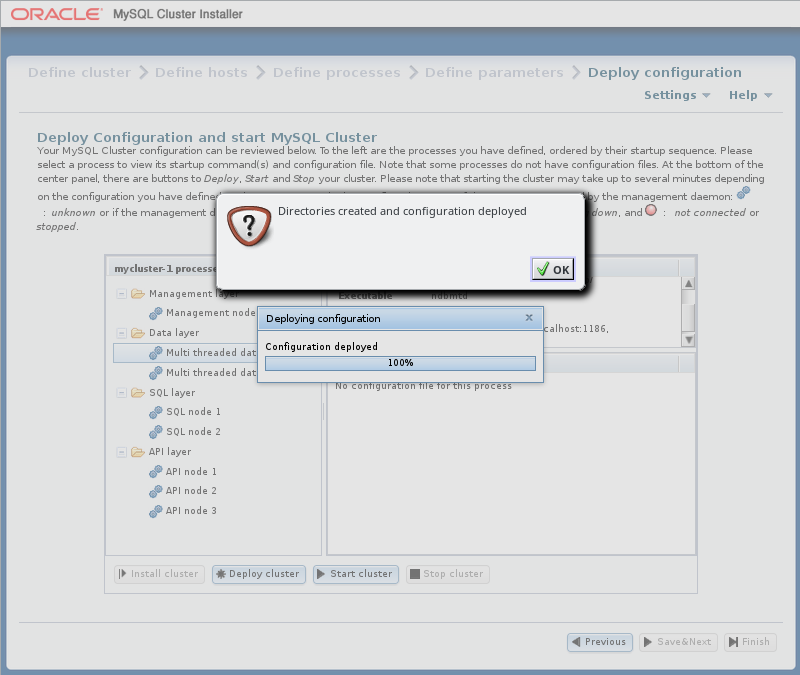
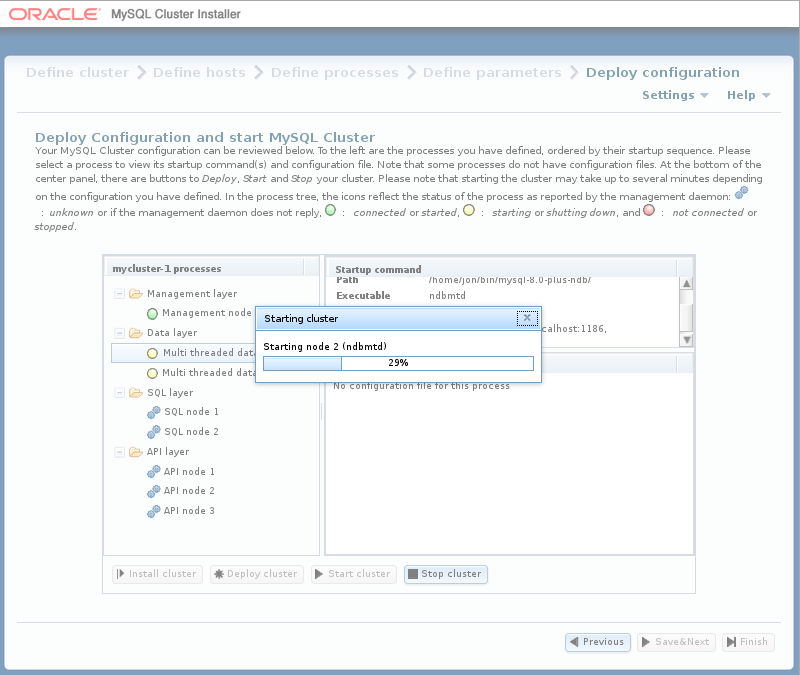
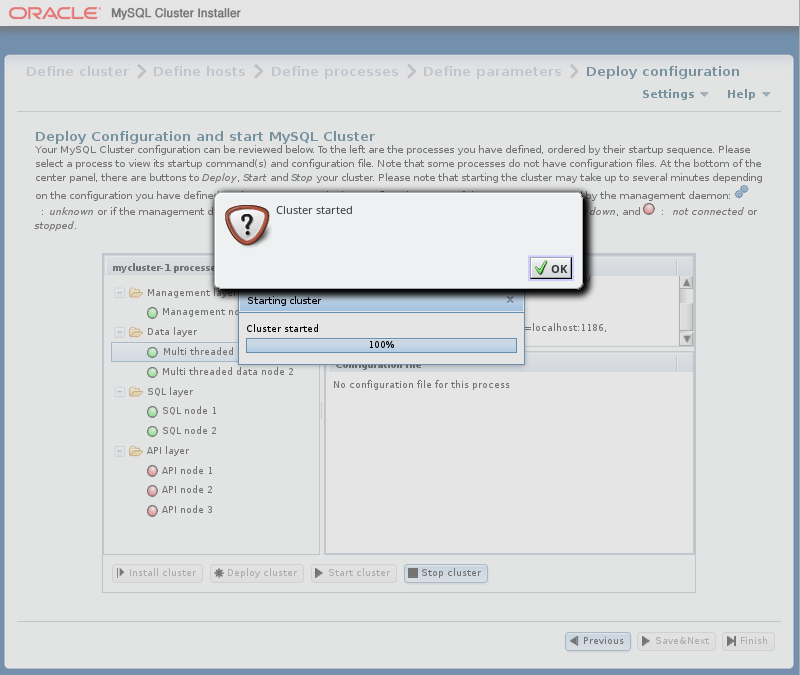
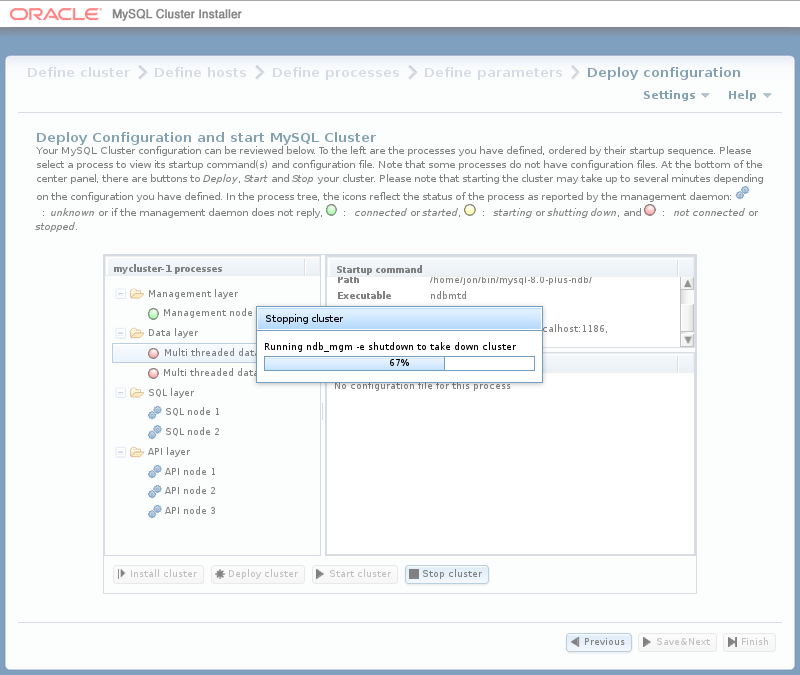
The Auto-Installer generates a config.ini
file containing NDB node parameters for each management node,
as well as a my.cnf file containing the
appropriate options for each mysqld process
in the cluster. No configuration files are created for data
nodes or API nodes.
This section covers installation methods for NDB Cluster on Linux and other Unix-like operating systems. While the next few sections refer to a Linux operating system, the instructions and procedures given there should be easily adaptable to other supported Unix-like platforms. For manual installation and setup instructions specific to Windows systems, see Section 22.2.3, “Installing NDB Cluster on Windows”.
Each NDB Cluster host computer must have the correct executable programs installed. A host running an SQL node must have installed on it a MySQL Server binary (mysqld). Management nodes require the management server daemon (ndb_mgmd); data nodes require the data node daemon (ndbd or ndbmtd). It is not necessary to install the MySQL Server binary on management node hosts and data node hosts. It is recommended that you also install the management client (ndb_mgm) on the management server host.
Installation of NDB Cluster on Linux can be done using precompiled binaries from Oracle (downloaded as a .tar.gz archive), with RPM packages (also available from Oracle), or from source code. All three of these installation methods are described in the section that follow.
Regardless of the method used, it is still necessary following installation of the NDB Cluster binaries to create configuration files for all cluster nodes, before you can start the cluster. See Section 22.2.4, “Initial Configuration of NDB Cluster”.
This section covers the steps necessary to install the correct executables for each type of Cluster node from precompiled binaries supplied by Oracle.
For setting up a cluster using precompiled binaries, the first
step in the installation process for each cluster host is to
download the binary archive from the
NDB Cluster downloads
page. (For the most recent 64-bit NDB 8.0 release, this
is
mysql-cluster-gpl-8.0.21-linux-glibc2.12-x86_64.tar.gz.)
We assume that you have placed this file in each machine's
/var/tmp directory.
If you require a custom binary, see Section 2.9.5, “Installing MySQL Using a Development Source Tree”.
After completing the installation, do not yet start any of the binaries. We show you how to do so following the configuration of the nodes (see Section 22.2.4, “Initial Configuration of NDB Cluster”).
SQL nodes.
On each of the machines designated to host SQL nodes, perform
the following steps as the system root
user:
Check your
/etc/passwdand/etc/groupfiles (or use whatever tools are provided by your operating system for managing users and groups) to see whether there is already amysqlgroup andmysqluser on the system. Some OS distributions create these as part of the operating system installation process. If they are not already present, create a newmysqluser group, and then add amysqluser to this group:shell>
groupadd mysqlshell>useradd -g mysql -s /bin/false mysqlThe syntax for useradd and groupadd may differ slightly on different versions of Unix, or they may have different names such as adduser and addgroup.
Change location to the directory containing the downloaded file, unpack the archive, and create a symbolic link named
mysqlto themysqldirectory.NoteThe actual file and directory names vary according to the NDB Cluster version number.
shell>
cd /var/tmpshell>tar -C /usr/local -xzvf mysql-cluster-gpl-8.0.21-linux-glibc2.12-x86_64.tar.gzshell>ln -s /usr/local/mysql-cluster-gpl-8.0.21-linux-glibc2.12-x86_64 /usr/local/mysqlChange location to the
mysqldirectory and set up the system databases using mysqld--initializeas shown here:shell>
cd mysqlshell>mysqld --initializeThis generates a random password for the MySQL
rootaccount. If you do not want the random password to be generated, you can substitute the--initialize-insecureoption for--initialize. In either case, you should review Section 2.10.1, “Initializing the Data Directory”, for additional information before performing this step. See also Section 4.4.2, “mysql_secure_installation — Improve MySQL Installation Security”.Set the necessary permissions for the MySQL server and data directories:
shell>
chown -R root .shell>chown -R mysql datashell>chgrp -R mysql .Copy the MySQL startup script to the appropriate directory, make it executable, and set it to start when the operating system is booted up:
shell>
cp support-files/mysql.server /etc/rc.d/init.d/shell>chmod +x /etc/rc.d/init.d/mysql.servershell>chkconfig --add mysql.server(The startup scripts directory may vary depending on your operating system and version—for example, in some Linux distributions, it is
/etc/init.d.)Here we use Red Hat's chkconfig for creating links to the startup scripts; use whatever means is appropriate for this purpose on your platform, such as update-rc.d on Debian.
Remember that the preceding steps must be repeated on each machine where an SQL node is to reside.
Data nodes.
Installation of the data nodes does not require the
mysqld binary. Only the NDB Cluster data
node executable ndbd (single-threaded) or
ndbmtd (multithreaded) is required. These
binaries can also be found in the .tar.gz
archive. Again, we assume that you have placed this archive in
/var/tmp.
As system root (that is, after using
sudo, su root, or your
system's equivalent for temporarily assuming the system
administrator account's privileges), perform the following steps
to install the data node binaries on the data node hosts:
Change location to the
/var/tmpdirectory, and extract the ndbd and ndbmtd binaries from the archive into a suitable directory such as/usr/local/bin:shell>
cd /var/tmpshell>tar -zxvf mysql-cluster-gpl-8.0.21-linux-glibc2.12-x86_64.tar.gzshell>cd mysql-cluster-gpl-8.0.21-linux-glibc2.12-x86_64shell>cp bin/ndbd /usr/local/bin/ndbdshell>cp bin/ndbmtd /usr/local/bin/ndbmtd(You can safely delete the directory created by unpacking the downloaded archive, and the files it contains, from
/var/tmponce ndb_mgm and ndb_mgmd have been copied to the executables directory.)Change location to the directory into which you copied the files, and then make both of them executable:
shell>
cd /usr/local/binshell>chmod +x ndb*
The preceding steps should be repeated on each data node host.
Although only one of the data node executables is required to run an NDB Cluster data node, we have shown you how to install both ndbd and ndbmtd in the preceding instructions. We recommend that you do this when installing or upgrading NDB Cluster, even if you plan to use only one of them, since this will save time and trouble in the event that you later decide to change from one to the other.
The data directory on each machine hosting a data node is
/usr/local/mysql/data. This piece of
information is essential when configuring the management node.
(See Section 22.2.4, “Initial Configuration of NDB Cluster”.)
Management nodes.
Installation of the management node does not require the
mysqld binary. Only the NDB Cluster
management server (ndb_mgmd) is required;
you most likely want to install the management client
(ndb_mgm) as well. Both of these binaries
also be found in the .tar.gz archive.
Again, we assume that you have placed this archive in
/var/tmp.
As system root, perform the following steps
to install ndb_mgmd and
ndb_mgm on the management node host:
Change location to the
/var/tmpdirectory, and extract the ndb_mgm and ndb_mgmd from the archive into a suitable directory such as/usr/local/bin:shell>
cd /var/tmpshell>tar -zxvf mysql-cluster-gpl-8.0.21-linux-glibc2.12-x86_64.tar.gzshell>cd mysql-cluster-gpl-8.0.21-linux-glibc2.12-x86_64shell>cp bin/ndb_mgm* /usr/local/bin(You can safely delete the directory created by unpacking the downloaded archive, and the files it contains, from
/var/tmponce ndb_mgm and ndb_mgmd have been copied to the executables directory.)Change location to the directory into which you copied the files, and then make both of them executable:
shell>
cd /usr/local/binshell>chmod +x ndb_mgm*
In Section 22.2.4, “Initial Configuration of NDB Cluster”, we create configuration files for all of the nodes in our example NDB Cluster.
This section covers the steps necessary to install the correct executables for each type of NDB Cluster 8.0 node using RPM packages supplied by Oracle. For information about RPMs for previous versions of NDB Cluster, see Installation using old-style RPMs (NDB 7.5.3 and earlier).
As an alternative to the method described in this section, Oracle provides MySQL Repositories for NDB Cluster that are compatible with many common Linux distributions. Two repostories, listed here, are available for RPM-based distributions:
For distributions using yum or dnf, you can use the MySQL Yum Repository for NDB Cluster. See Installing MySQL NDB Cluster Using the Yum Repository, for instructions and additional information.
For SLES, you can use the MySQL SLES Repository for NDB Cluster. See Installing MySQL NDB Cluster Using the SLES Repository, for instructions and additional information.
RPMs are available for both 32-bit and 64-bit Linux platforms. The filenames for these RPMs use the following pattern:
mysql-cluster-community-data-node-8.0.21-1.el7.x86_64.rpm mysql-cluster-license-component-ver-rev.distro.arch.rpmlicense:= {commercial | community}component: {management-server | data-node | server | client |other—see text}ver:major.minor.releaserev:major[.minor]distro: {el6 | el7 | sles12}arch: {i686 | x86_64}
license indicates whether the RPM is
part of a Commercial or Community release of NDB Cluster. In the
remainder of this section, we assume for the examples that you
are installing a Community release.
Possible values for component, with
descriptions, can be found in the following table:
Table 22.5 Components of the NDB Cluster RPM distribution
| Component | Description |
|---|---|
auto-installer |
NDB Cluster Auto Installer program; see Section 22.2.1, “The NDB Cluster Auto-Installer”, for usage |
client |
MySQL and NDB client programs; includes
mysql client,
ndb_mgm client, and other client
tools |
common |
Character set and error message information needed by the MySQL server |
data-node |
ndbd and ndbmtd data node binaries |
devel |
Headers and library files needed for MySQL client development |
embedded |
Embedded MySQL server |
embedded-compat |
Backwards-compatible embedded MySQL server |
embedded-devel |
Header and library files for developing applications for embedded MySQL |
java |
JAR files needed for support of ClusterJ applications |
libs |
MySQL client libraries |
libs-compat |
Backwards-compatible MySQL client libraries |
management-server |
The NDB Cluster management server (ndb_mgmd) |
memcached |
Files needed to support ndbmemcache |
minimal-debuginfo |
Debug information for package server-minimal; useful when developing applications that use this package or when debugging this package |
ndbclient |
NDB client library for running NDB API and MGM API
applications (libndbclient) |
ndbclient-devel |
Header and other files needed for developing NDB API and MGM API applications |
nodejs |
Files needed to set up Node.JS support for NDB Cluster |
server |
The MySQL server (mysqld) with NDB
storage engine support included, and associated MySQL
server programs |
server-minimal |
Minimal installation of the MySQL server for NDB and related tools |
test |
mysqltest, other MySQL test programs, and support files |
A single bundle (.tar file) of all NDB
Cluster RPMs for a given platform and architecture is also
available. The name of this file follows the pattern shown here:
mysql-cluster-license-ver-rev.distro.arch.rpm-bundle.tar
You can extract the individual RPM files from this file using tar or your preferred tool for extracting archives.
The components required to install the three major types of NDB Cluster nodes are given in the following list:
Management node:
management-serverData node:
data-nodeSQL node:
serverandcommon
In addition, the client RPM should be
installed to provide the ndb_mgm management
client on at least one management node. You may also wish to
install it on SQL nodes, to have mysql and
other MySQL client programs available on these. We discuss
installation of nodes by type later in this section.
ver represents the three-part
NDB storage engine version number in
8.0.x format, shown as
8.0.21 in the examples.
rev provides the RPM revision number in
major.minor
format. In the examples shown in this section, we use
1.1 for this value.
The distro (Linux distribution) is
one of rhel5 (Oracle Linux 5, Red Hat
Enterprise Linux 4 and 5), el6 (Oracle Linux
6, Red Hat Enterprise Linux 6), el7 (Oracle
Linux 7, Red Hat Enterprise Linux 7), or
sles12 (SUSE Enterprise Linux 12). For the
examples in this section, we assume that the host runs Oracle
Linux 7, Red Hat Enterprise Linux 7, or the equivalent
(el7).
arch is i686 for
32-bit RPMs and x86_64 for 64-bit versions.
In the examples shown here, we assume a 64-bit platform.
The NDB Cluster version number in the RPM file names (shown here
as 8.0.21) can vary
according to the version which you are actually using.
It is very important that all of the Cluster RPMs to
be installed have the same version number. The
architecture should also be appropriate to the machine on which
the RPM is to be installed; in particular, you should keep in
mind that 64-bit RPMs (x86_64) cannot be used
with 32-bit operating systems (use i686 for
the latter).
Data nodes.
On a computer that is to host an NDB Cluster data node it is
necessary to install only the data-node
RPM. To do so, copy this RPM to the data node host, and run
the following command as the system root user, replacing the
name shown for the RPM as necessary to match that of the RPM
downloaded from the MySQL website:
shell> rpm -Uhv mysql-cluster-community-data-node-8.0.21-1.el7.x86_64.rpm
This installs the ndbd and
ndbmtd data node binaries in
/usr/sbin. Either of these can be used to
run a data node process on this host.
SQL nodes.
Copy the server and
common RPMs to each machine to be used for
hosting an NDB Cluster SQL node (server
requires common). Install the
server RPM by executing the following
command as the system root user, replacing the name shown for
the RPM as necessary to match the name of the RPM downloaded
from the MySQL website:
shell> rpm -Uhv mysql-cluster-community-server-8.0.21-1.el7.x86_64.rpm
This installs the MySQL server binary
(mysqld), with NDB storage
engine support, in the /usr/sbin directory.
It also installs all needed MySQL Server support files and
useful MySQL server programs, including the
mysql.server and
mysqld_safe startup scripts (in
/usr/share/mysql and
/usr/bin, respectively). The RPM installer
should take care of general configuration issues (such as
creating the mysql user and group, if needed)
automatically.
You must use the versions of these RPMs released for NDB
Cluster ; those released for the standard MySQL server do not
provide support for the NDB storage engine.
To administer the SQL node (MySQL server), you should also
install the client RPM, as shown here:
shell> rpm -Uhv mysql-cluster-community-client-8.0.21-1.el7.x86_64.rpm
This installs the mysql client and other
MySQL client programs, such as mysqladmin and
mysqldump, to /usr/bin.
Management nodes.
To install the NDB Cluster management server, it is necessary
only to use the management-server RPM. Copy
this RPM to the computer intended to host the management node,
and then install it by running the following command as the
system root user (replace the name shown for the RPM as
necessary to match that of the
management-server RPM downloaded from the
MySQL website):
shell> rpm -Uhv mysql-cluster-commercial-management-server-8.0.21-1.el7.x86_64.rpm
This RPM installs the management server binary
ndb_mgmd in the
/usr/sbin directory. While this is the only
program actually required for running a management node, it is
also a good idea to have the ndb_mgm NDB
Cluster management client available as well. You can obtain this
program, as well as other NDB client programs
such as ndb_desc and
ndb_config, by installing the
client RPM as described previously.
See Section 2.5.4, “Installing MySQL on Linux Using RPM Packages from Oracle”, for general information about installing MySQL using RPMs supplied by Oracle.
After installing from RPM, you still need to configure the cluster; see Section 22.2.4, “Initial Configuration of NDB Cluster”, for the relevant information.
It is very important that all of the Cluster RPMs to
be installed have the same version number. The
architecture designation should also
be appropriate to the machine on which the RPM is to be
installed; in particular, you should keep in mind that 64-bit
RPMs cannot be used with 32-bit operating systems.
Data nodes.
On a computer that is to host a cluster data node it is
necessary to install only the server RPM.
To do so, copy this RPM to the data node host, and run the
following command as the system root user, replacing the name
shown for the RPM as necessary to match that of the RPM
downloaded from the MySQL website:
shell> rpm -Uhv MySQL-Cluster-server-gpl-8.0.21-1.sles11.i386.rpm
Although this installs all NDB Cluster binaries, only the
program ndbd or ndbmtd
(both in /usr/sbin) is actually needed to
run an NDB Cluster data node.
SQL nodes.
On each machine to be used for hosting a cluster SQL node,
install the server RPM by executing the
following command as the system root user, replacing the name
shown for the RPM as necessary to match the name of the RPM
downloaded from the MySQL website:
shell> rpm -Uhv MySQL-Cluster-server-gpl-8.0.21-1.sles11.i386.rpm
This installs the MySQL server binary
(mysqld) with
NDB storage engine support in the
/usr/sbin directory, as well as all needed
MySQL Server support files. It also installs the
mysql.server and
mysqld_safe startup scripts (in
/usr/share/mysql and
/usr/bin, respectively). The RPM installer
should take care of general configuration issues (such as
creating the mysql user and group, if needed)
automatically.
To administer the SQL node (MySQL server), you should also
install the client RPM, as shown here:
shell> rpm -Uhv MySQL-Cluster-client-gpl-8.0.21-1.sles11.i386.rpm
This installs the mysql client program.
Management nodes.
To install the NDB Cluster management server, it is necessary
only to use the server RPM. Copy this RPM
to the computer intended to host the management node, and then
install it by running the following command as the system root
user (replace the name shown for the RPM as necessary to match
that of the server RPM downloaded from the
MySQL website):
shell> rpm -Uhv MySQL-Cluster-server-gpl-8.0.21-1.sles11.i386.rpm
Although this RPM installs many other files, only the management
server binary ndb_mgmd (in the
/usr/sbin directory) is actually required
for running a management node. The server RPM
also installs ndb_mgm, the
NDB management client.
See Section 2.5.4, “Installing MySQL on Linux Using RPM Packages from Oracle”, for general information about installing MySQL using RPMs supplied by Oracle. See Section 22.2.4, “Initial Configuration of NDB Cluster”, for information about required post-installation configuration.
The section provides information about installing NDB Cluster on
Debian and related Linux distributions such Ubuntu using the
.deb files supplied by Oracle for this
purpose.
Oracle also provides an NDB Cluster APT repository for Debian and other distributions. See Installing MySQL NDB Cluster Using the APT Repository, for instructions and additional information.
Oracle provides .deb installer files for
NDB Cluster for 32-bit and 64-bit platforms. For a Debian-based
system, only a single installer file is necessary. This file is
named using the pattern shown here, according to the applicable
NDB Cluster version, Debian version, and architecture:
mysql-cluster-gpl-ndbver-debiandebianver-arch.deb
Here, ndbver is the 3-part
NDB engine version number,
debianver is the major version of
Debian (8 or 9), and
arch is one of
i686 or x86_64. In the
examples that follow, we assume you wish to install NDB
8.0.21 on a 64-bit Debian 9 system; in this
case, the installer file is named
mysql-cluster-gpl-8.0.21-debian9-x86_64.deb-bundle.tar.
Once you have downloaded the appropriate
.deb file, you can untar it, and then
install it from the command line using dpkg,
like this:
shell> dpkg -i mysql-cluster-gpl-8.0.21-debian9-i686.deb
You can also remove it using dpkg as shown
here:
shell> dpkg -r mysql
The installer file should also be compatible with most graphical
package managers that work with .deb files,
such as GDebi for the Gnome desktop.
The .deb file installs NDB Cluster under
/opt/mysql/server-,
where version/version is the 2-part release
series version for the included MySQL server. For NDB 8.0, this
is always 5.7. The directory layout is the
same as that for the generic Linux binary distribution (see
Table 2.3, “MySQL Installation Layout for Generic Unix/Linux Binary Package”), with the
exception that startup scripts and configuration files are found
in support-files instead of
share. All NDB Cluster executables, such as
ndb_mgm, ndbd, and
ndb_mgmd, are placed in the
bin directory.
This section provides information about compiling NDB Cluster on Linux and other Unix-like platforms. Building NDB Cluster from source is similar to building the standard MySQL Server, although it differs in a few key respects discussed here. For general information about building MySQL from source, see Section 2.9, “Installing MySQL from Source”. For information about compiling NDB Cluster on Windows platforms, see Section 22.2.3.2, “Compiling and Installing NDB Cluster from Source on Windows”.
Building MySQL NDB Cluster 8.0 requires using the MySQL Server
8.0 sources. These are available from the MySQL downloads page
at https://dev.mysql.com/downloads/. The archived source file
should have a name similar to
mysql-8.0.21.tar.gz. You
can also obtain the sources from GitHub at
https://github.com/mysql/mysql-server.
In previous versions, building of NDB Cluster from standard MySQL Server sources was not supported. In MySQL 8.0 and NDB Cluster 8.0, this is no longer the case—both products are now built from the same sources.
The WITH_NDBCLUSTER option for
CMake causes the binaries for the management
nodes, data nodes, and other NDB Cluster programs to be built;
it also causes mysqld to be compiled with
NDB storage engine support. This
option (or one of its aliases
WITH_NDBCLUSTER_STORAGE_ENGINE and
WITH_PLUGIN_NDBCLUSTER) is required when
building NDB Cluster.
The WITH_NDB_JAVA option is
enabled by default. This means that, by default, if
CMake cannot find the location of Java on
your system, the configuration process fails; if you do not
wish to enable Java and ClusterJ support, you must indicate
this explicitly by configuring the build using
-DWITH_NDB_JAVA=OFF. Use
WITH_CLASSPATH to provide the
Java classpath if needed.
For more information about CMake options specific to building NDB Cluster, see Options for Compiling NDB Cluster.
After you have run make && make install (or your system's equivalent), the result is similar to what is obtained by unpacking a precompiled binary to the same location.
Management nodes.
When building from source and running the default
make install, the management server and
management client binaries (ndb_mgmd and
ndb_mgm) can be found in
/usr/local/mysql/bin. Only
ndb_mgmd is required to be present on a
management node host; however, it is also a good idea to have
ndb_mgm present on the same host machine.
Neither of these executables requires a specific location on
the host machine's file system.
Data nodes.
The only executable required on a data node host is the data
node binary ndbd or
ndbmtd. (mysqld, for
example, does not have to be present on the host machine.) By
default, when building from source, this file is placed in the
directory /usr/local/mysql/bin. For
installing on multiple data node hosts, only
ndbd or ndbmtd need be
copied to the other host machine or machines. (This assumes
that all data node hosts use the same architecture and
operating system; otherwise you may need to compile separately
for each different platform.) The data node binary need not be
in any particular location on the host's file system, as long
as the location is known.
When compiling NDB Cluster from source, no special options are
required for building multithreaded data node binaries.
Configuring the build with NDB
storage engine support causes ndbmtd to be
built automatically; make install places the
ndbmtd binary in the installation
bin directory along with
mysqld, ndbd, and
ndb_mgm.
SQL nodes.
If you compile MySQL with clustering support, and perform the
default installation (using make install as
the system root user),
mysqld is placed in
/usr/local/mysql/bin. Follow the steps
given in Section 2.9, “Installing MySQL from Source” to make
mysqld ready for use. If you want to run
multiple SQL nodes, you can use a copy of the same
mysqld executable and its associated
support files on several machines. The easiest way to do this
is to copy the entire /usr/local/mysql
directory and all directories and files contained within it to
the other SQL node host or hosts, then repeat the steps from
Section 2.9, “Installing MySQL from Source” on each machine. If you
configure the build with a nondefault PREFIX
option, you must adjust the directory accordingly.
In Section 22.2.4, “Initial Configuration of NDB Cluster”, we create configuration files for all of the nodes in our example NDB Cluster.
This section describes installation procedures for NDB Cluster on Windows hosts. NDB Cluster 8.0 binaries for Windows can be obtained from https://dev.mysql.com/downloads/cluster/. For information about installing NDB Cluster on Windows from a binary release provided by Oracle, see Section 22.2.3.1, “Installing NDB Cluster on Windows from a Binary Release”.
It is also possible to compile and install NDB Cluster from source on Windows using Microsoft Visual Studio. For more information, see Section 22.2.3.2, “Compiling and Installing NDB Cluster from Source on Windows”.
This section describes a basic installation of NDB Cluster on Windows using a binary “no-install” NDB Cluster release provided by Oracle, using the same 4-node setup outlined in the beginning of this section (see Section 22.2, “NDB Cluster Installation”), as shown in the following table:
As on other platforms, the NDB Cluster host computer running an SQL node must have installed on it a MySQL Server binary (mysqld.exe). You should also have the MySQL client (mysql.exe) on this host. For management nodes and data nodes, it is not necessary to install the MySQL Server binary; however, each management node requires the management server daemon (ndb_mgmd.exe); each data node requires the data node daemon (ndbd.exe or ndbmtd.exe). For this example, we refer to ndbd.exe as the data node executable, but you can install ndbmtd.exe, the multithreaded version of this program, instead, in exactly the same way. You should also install the management client (ndb_mgm.exe) on the management server host. This section covers the steps necessary to install the correct Windows binaries for each type of NDB Cluster node.
As with other Windows programs, NDB Cluster executables are
named with the .exe file extension.
However, it is not necessary to include the
.exe extension when invoking these
programs from the command line. Therefore, we often simply
refer to these programs in this documentation as
mysqld, mysql,
ndb_mgmd, and so on. You should understand
that, whether we refer (for example) to
mysqld or mysqld.exe,
either name means the same thing (the MySQL Server program).
For setting up an NDB Cluster using Oracles's
no-install binaries, the first step in the
installation process is to download the latest NDB Cluster
Windows ZIP binary archive from
https://dev.mysql.com/downloads/cluster/. This archive has a
filename of the
mysql-cluster-gpl-,
where ver-winarch.zipver is the
NDB storage engine version (such as
8.0.21), and
arch is the architecture
(32 for 32-bit binaries, and
64 for 64-bit binaries). For example, the NDB
Cluster 8.0.21 archive for 64-bit Windows
systems is named
mysql-cluster-gpl-8.0.21-win64.zip.
You can run 32-bit NDB Cluster binaries on both 32-bit and 64-bit versions of Windows; however, 64-bit NDB Cluster binaries can be used only on 64-bit versions of Windows. If you are using a 32-bit version of Windows on a computer that has a 64-bit CPU, then you must use the 32-bit NDB Cluster binaries.
To minimize the number of files that need to be downloaded from the Internet or copied between machines, we start with the computer where you intend to run the SQL node.
SQL node.
We assume that you have placed a copy of the archive in the
directory C:\Documents and
Settings\ on the computer having the IP
address 198.51.100.20, where
username\My
Documents\Downloadsusername is the name of the current
user. (You can obtain this name using ECHO
%USERNAME% on the command line.) To install and run
NDB Cluster executables as Windows services, this user should
be a member of the Administrators group.
Extract all the files from the archive. The Extraction Wizard
integrated with Windows Explorer is adequate for this task. (If
you use a different archive program, be sure that it extracts
all files and directories from the archive, and that it
preserves the archive's directory structure.) When you are
asked for a destination directory, enter
C:\, which causes the Extraction Wizard to
extract the archive to the directory
C:\mysql-cluster-gpl-.
Rename this directory to ver-winarchC:\mysql.
It is possible to install the NDB Cluster binaries to
directories other than C:\mysql\bin;
however, if you do so, you must modify the paths shown in this
procedure accordingly. In particular, if the MySQL Server (SQL
node) binary is installed to a location other than
C:\mysql or C:\Program
Files\MySQL\MySQL Server 8.0, or if the
SQL node's data directory is in a location other than
C:\mysql\data or C:\Program
Files\MySQL\MySQL Server 8.0\data, extra
configuration options must be used on the command line or added
to the my.ini or
my.cnf file when starting the SQL node. For
more information about configuring a MySQL Server to run in a
nonstandard location, see
Section 2.3.4, “Installing MySQL on Microsoft Windows Using a
noinstall ZIP Archive”.
For a MySQL Server with NDB Cluster support to run as part of an
NDB Cluster, it must be started with the options
--ndbcluster and
--ndb-connectstring. While you
can specify these options on the command line, it is usually
more convenient to place them in an option file. To do this,
create a new text file in Notepad or another text editor. Enter
the following configuration information into this file:
[mysqld] # Options for mysqld process: ndbcluster # run NDB storage engine ndb-connectstring=198.51.100.10 # location of management server
You can add other options used by this MySQL Server if desired
(see Section 2.3.4.2, “Creating an Option File”), but the file
must contain the options shown, at a minimum. Save this file as
C:\mysql\my.ini. This completes the
installation and setup for the SQL node.
Data nodes.
An NDB Cluster data node on a Windows host requires only a
single executable, one of either ndbd.exe
or ndbmtd.exe. For this example, we assume
that you are using ndbd.exe, but the same
instructions apply when using ndbmtd.exe.
On each computer where you wish to run a data node (the
computers having the IP addresses 198.51.100.30 and
198.51.100.40), create the directories
C:\mysql,
C:\mysql\bin, and
C:\mysql\cluster-data; then, on the
computer where you downloaded and extracted the
no-install archive, locate
ndbd.exe in the
C:\mysql\bin directory. Copy this file to
the C:\mysql\bin directory on each of the
two data node hosts.
To function as part of an NDB Cluster, each data node must be
given the address or hostname of the management server. You can
supply this information on the command line using the
--ndb-connectstring or
-c option when starting each data node process.
However, it is usually preferable to put this information in an
option file. To do this, create a new text file in Notepad or
another text editor and enter the following text:
[mysql_cluster] # Options for data node process: ndb-connectstring=198.51.100.10 # location of management server
Save this file as C:\mysql\my.ini on the
data node host. Create another text file containing the same
information and save it on as
C:mysql\my.ini on the other data node host,
or copy the my.ini file from the first data node host to the
second one, making sure to place the copy in the second data
node's C:\mysql directory. Both data
node hosts are now ready to be used in the NDB Cluster, which
leaves only the management node to be installed and configured.
Management node.
The only executable program required on a computer used for
hosting an NDB Cluster management node is the management
server program ndb_mgmd.exe. However, in
order to administer the NDB Cluster once it has been started,
you should also install the NDB Cluster management client
program ndb_mgm.exe on the same machine as
the management server. Locate these two programs on the
machine where you downloaded and extracted the
no-install archive; this should be the
directory C:\mysql\bin on the SQL node
host. Create the directory C:\mysql\bin
on the computer having the IP address 198.51.100.10, then copy
both programs to this directory.
You should now create two configuration files for use by
ndb_mgmd.exe:
A local configuration file to supply configuration data specific to the management node itself. Typically, this file needs only to supply the location of the NDB Cluster global configuration file (see item 2).
To create this file, start a new text file in Notepad or another text editor, and enter the following information:
[mysql_cluster] # Options for management node process config-file=C:/mysql/bin/config.ini
Save this file as the text file
C:\mysql\bin\my.ini.A global configuration file from which the management node can obtain configuration information governing the NDB Cluster as a whole. At a minimum, this file must contain a section for each node in the NDB Cluster, and the IP addresses or hostnames for the management node and all data nodes (
HostNameconfiguration parameter). It is also advisable to include the following additional information:The IP address or hostname of any SQL nodes
The data memory and index memory allocated to each data node (
DataMemoryandIndexMemoryconfiguration parameters)The number of replicas, using the
NoOfReplicasconfiguration parameter (see Section 22.1.2, “NDB Cluster Nodes, Node Groups, Replicas, and Partitions”)The directory where each data node stores it data and log file, and the directory where the management node keeps its log files (in both cases, the
DataDirconfiguration parameter)
Create a new text file using a text editor such as Notepad, and input the following information:
[ndbd default] # Options affecting ndbd processes on all data nodes: NoOfReplicas=2 # Number of replicas DataDir=C:/mysql/cluster-data # Directory for each data node's data files # Forward slashes used in directory path, # rather than backslashes. This is correct; # see Important note in text DataMemory=80M # Memory allocated to data storage IndexMemory=18M # Memory allocated to index storage # For DataMemory and IndexMemory, we have used the # default values. Since the "world" database takes up # only about 500KB, this should be more than enough for # this example Cluster setup. [ndb_mgmd] # Management process options: HostName=198.51.100.10 # Hostname or IP address of management node DataDir=C:/mysql/bin/cluster-logs # Directory for management node log files [ndbd] # Options for data node "A": # (one [ndbd] section per data node) HostName=198.51.100.30 # Hostname or IP address [ndbd] # Options for data node "B": HostName=198.51.100.40 # Hostname or IP address [mysqld] # SQL node options: HostName=198.51.100.20 # Hostname or IP addressSave this file as the text file
C:\mysql\bin\config.ini.
A single backslash character (\) cannot be
used when specifying directory paths in program options or
configuration files used by NDB Cluster on Windows. Instead,
you must either escape each backslash character with a second
backslash (\\), or replace the backslash
with a forward slash character (/). For
example, the following line from the
[ndb_mgmd] section of an NDB Cluster
config.ini file does not work:
DataDir=C:\mysql\bin\cluster-logs
Instead, you may use either of the following:
DataDir=C:\\mysql\\bin\\cluster-logs # Escaped backslashes
DataDir=C:/mysql/bin/cluster-logs # Forward slashes
For reasons of brevity and legibility, we recommend that you use forward slashes in directory paths used in NDB Cluster program options and configuration files on Windows.
Oracle provides precompiled NDB Cluster binaries for Windows which should be adequate for most users. However, if you wish, it is also possible to compile NDB Cluster for Windows from source code. The procedure for doing this is almost identical to the procedure used to compile the standard MySQL Server binaries for Windows, and uses the same tools. However, there are two major differences:
Building MySQL NDB Cluster 8.0 requires using the MySQL Server 8.0 sources. These are available from the MySQL downloads page at https://dev.mysql.com/downloads/. The archived source file should have a name similar to
mysql-8.0.21.tar.gz. You can also obtain the sources from GitHub at https://github.com/mysql/mysql-server.You must configure the build using the
WITH_NDBCLUSTERoption in addition to any other build options you wish to use with CMake.WITH_NDBCLUSTER_STORAGE_ENGINEandWITH_PLUGIN_NDBCLUSTERare supported as aliases forWITH_NDBCLUSTER, and work in exactly the same way.
The WITH_NDB_JAVA option is
enabled by default. This means that, by default, if
CMake cannot find the location of Java on
your system, the configuration process fails; if you do not
wish to enable Java and ClusterJ support, you must indicate
this explicitly by configuring the build using
-DWITH_NDB_JAVA=OFF. (Bug #12379735) Use
WITH_CLASSPATH to provide the
Java classpath if needed.
For more information about CMake options specific to building NDB Cluster, see Options for Compiling NDB Cluster.
Once the build process is complete, you can create a Zip archive
containing the compiled binaries;
Section 2.9.4, “Installing MySQL Using a Standard Source Distribution” provides the
commands needed to perform this task on Windows systems. The NDB
Cluster binaries can be found in the bin
directory of the resulting archive, which is equivalent to the
no-install archive, and which can be
installed and configured in the same manner. For more
information, see
Section 22.2.3.1, “Installing NDB Cluster on Windows from a Binary Release”.
Once the NDB Cluster executables and needed configuration files are in place, performing an initial start of the cluster is simply a matter of starting the NDB Cluster executables for all nodes in the cluster. Each cluster node process must be started separately, and on the host computer where it resides. The management node should be started first, followed by the data nodes, and then finally by any SQL nodes.
On the management node host, issue the following command from the command line to start the management node process. The output should appear similar to what is shown here:
C:\mysql\bin>
ndb_mgmd2010-06-23 07:53:34 [MgmtSrvr] INFO -- NDB Cluster Management Server. mysql-8.0.21-ndb-8.0.21 2010-06-23 07:53:34 [MgmtSrvr] INFO -- Reading cluster configuration from 'config.ini'The management node process continues to print logging output to the console. This is normal, because the management node is not running as a Windows service. (If you have used NDB Cluster on a Unix-like platform such as Linux, you may notice that the management node's default behavior in this regard on Windows is effectively the opposite of its behavior on Unix systems, where it runs by default as a Unix daemon process. This behavior is also true of NDB Cluster data node processes running on Windows.) For this reason, do not close the window in which ndb_mgmd.exe is running; doing so kills the management node process. (See Section 22.2.3.4, “Installing NDB Cluster Processes as Windows Services”, where we show how to install and run NDB Cluster processes as Windows services.)
The required
-foption tells the management node where to find the global configuration file (config.ini). The long form of this option is--config-file.ImportantAn NDB Cluster management node caches the configuration data that it reads from
config.ini; once it has created a configuration cache, it ignores theconfig.inifile on subsequent starts unless forced to do otherwise. This means that, if the management node fails to start due to an error in this file, you must make the management node re-readconfig.iniafter you have corrected any errors in it. You can do this by starting ndb_mgmd.exe with the--reloador--initialoption on the command line. Either of these options works to refresh the configuration cache.It is not necessary or advisable to use either of these options in the management node's
my.inifile.For additional information about options which can be used with ndb_mgmd, see Section 22.4.4, “ndb_mgmd — The NDB Cluster Management Server Daemon”, as well as Section 22.4.31, “Options Common to NDB Cluster Programs — Options Common to NDB Cluster Programs”.
On each of the data node hosts, run the command shown here to start the data node processes:
C:\mysql\bin>
ndbd2010-06-23 07:53:46 [ndbd] INFO -- Configuration fetched from 'localhost:1186', generation: 1In each case, the first line of output from the data node process should resemble what is shown in the preceding example, and is followed by additional lines of logging output. As with the management node process, this is normal, because the data node is not running as a Windows service. For this reason, do not close the console window in which the data node process is running; doing so kills ndbd.exe. (For more information, see Section 22.2.3.4, “Installing NDB Cluster Processes as Windows Services”.)
Do not start the SQL node yet; it cannot connect to the cluster until the data nodes have finished starting, which may take some time. Instead, in a new console window on the management node host, start the NDB Cluster management client ndb_mgm.exe, which should be in
C:\mysql\binon the management node host. (Do not try to re-use the console window where ndb_mgmd.exe is running by typing CTRL+C, as this kills the management node.) The resulting output should look like this:C:\mysql\bin>
ndb_mgm-- NDB Cluster -- Management Client -- ndb_mgm>When the prompt
ndb_mgm>appears, this indicates that the management client is ready to receive NDB Cluster management commands. You can observe the status of the data nodes as they start by enteringALL STATUSat the management client prompt. This command causes a running report of the data nodes's startup sequence, which should look something like this:ndb_mgm>
ALL STATUSConnected to Management Server at: localhost:1186 Node 2: starting (Last completed phase 3) (mysql-8.0.21-ndb-8.0.21) Node 3: starting (Last completed phase 3) (mysql-8.0.21-ndb-8.0.21) Node 2: starting (Last completed phase 4) (mysql-8.0.21-ndb-8.0.21) Node 3: starting (Last completed phase 4) (mysql-8.0.21-ndb-8.0.21) Node 2: Started (version 8.0.21) Node 3: Started (version 8.0.21) ndb_mgm>NoteCommands issued in the management client are not case-sensitive; we use uppercase as the canonical form of these commands, but you are not required to observe this convention when inputting them into the ndb_mgm client. For more information, see Section 22.5.1, “Commands in the NDB Cluster Management Client”.
The output produced by
ALL STATUSis likely to vary from what is shown here, according to the speed at which the data nodes are able to start, the release version number of the NDB Cluster software you are using, and other factors. What is significant is that, when you see that both data nodes have started, you are ready to start the SQL node.You can leave ndb_mgm.exe running; it has no negative impact on the performance of the NDB Cluster, and we use it in the next step to verify that the SQL node is connected to the cluster after you have started it.
On the computer designated as the SQL node host, open a console window and navigate to the directory where you unpacked the NDB Cluster binaries (if you are following our example, this is
C:\mysql\bin).Start the SQL node by invoking mysqld.exe from the command line, as shown here:
C:\mysql\bin>
mysqld --consoleThe
--consoleoption causes logging information to be written to the console, which can be helpful in the event of problems. (Once you are satisfied that the SQL node is running in a satisfactory manner, you can stop it and restart it out without the--consoleoption, so that logging is performed normally.)In the console window where the management client (ndb_mgm.exe) is running on the management node host, enter the
SHOWcommand, which should produce output similar to what is shown here:ndb_mgm>
SHOWConnected to Management Server at: localhost:1186 Cluster Configuration --------------------- [ndbd(NDB)] 2 node(s) id=2 @198.51.100.30 (Version: 8.0.21-ndb-8.0.21, Nodegroup: 0, *) id=3 @198.51.100.40 (Version: 8.0.21-ndb-8.0.21, Nodegroup: 0) [ndb_mgmd(MGM)] 1 node(s) id=1 @198.51.100.10 (Version: 8.0.21-ndb-8.0.21) [mysqld(API)] 1 node(s) id=4 @198.51.100.20 (Version: 8.0.21-ndb-8.0.21)You can also verify that the SQL node is connected to the NDB Cluster in the mysql client (mysql.exe) using the
SHOW ENGINE NDB STATUSstatement.
You should now be ready to work with database objects and data
using NDB Cluster 's
NDBCLUSTER storage engine. See
Section 22.2.6, “NDB Cluster Example with Tables and Data”, for more
information and examples.
You can also install ndb_mgmd.exe, ndbd.exe, and ndbmtd.exe as Windows services. For information on how to do this, see Section 22.2.3.4, “Installing NDB Cluster Processes as Windows Services”).
Once you are satisfied that NDB Cluster is running as desired, you can install the management nodes and data nodes as Windows services, so that these processes are started and stopped automatically whenever Windows is started or stopped. This also makes it possible to control these processes from the command line with the appropriate SC START and SC STOP commands, or using the Windows graphical Services utility. NET START and NET STOP commands can also be used.
Installing programs as Windows services usually must be done using an account that has Administrator rights on the system.
To install the management node as a service on Windows, invoke
ndb_mgmd.exe from the command line on the
machine hosting the management node, using the
--install option, as shown
here:
C:\> C:\mysql\bin\ndb_mgmd.exe --install
Installing service 'NDB Cluster Management Server'
as '"C:\mysql\bin\ndbd.exe" "--service=ndb_mgmd"'
Service successfully installed.
When installing an NDB Cluster program as a Windows service, you should always specify the complete path; otherwise the service installation may fail with the error The system cannot find the file specified.
The --install option must be
used first, ahead of any other options that might be specified
for ndb_mgmd.exe. However, it is preferable
to specify such options in an options file instead. If your
options file is not in one of the default locations as shown in
the output of ndb_mgmd.exe
--help, you can specify the
location using the
--config-file option.
Now you should be able to start and stop the management server like this:
C:\>SC START ndb_mgmdC:\>SC STOP ndb_mgmd
If using NET commands, you can also start or stop the management server as a Windows service using the descriptive name, as shown here:
C:\>NET START 'NDB Cluster Management Server'The NDB Cluster Management Server service is starting. The NDB Cluster Management Server service was started successfully. C:\>NET STOP 'NDB Cluster Management Server'The NDB Cluster Management Server service is stopping.. The NDB Cluster Management Server service was stopped successfully.
It is usually simpler to specify a short service name or to
permit the default service name to be used when installing the
service, and then reference that name when starting or stopping
the service. To specify a service name other than
ndb_mgmd, append it to the
--install option, as shown in
this example:
C:\> C:\mysql\bin\ndb_mgmd.exe --install=mgmd1
Installing service 'NDB Cluster Management Server'
as '"C:\mysql\bin\ndb_mgmd.exe" "--service=mgmd1"'
Service successfully installed.
Now you should be able to start or stop the service using the name you have specified, like this:
C:\>SC START mgmd1C:\>SC STOP mgmd1
To remove the management node service, use SC DELETE
service_name:
C:\> SC DELETE mgmd1
Alternatively, invoke ndb_mgmd.exe with the
--remove option, as shown here:
C:\> C:\mysql\bin\ndb_mgmd.exe --remove
Removing service 'NDB Cluster Management Server'
Service successfully removed.
If you installed the service using a service name other than the
default, pass the service name as the value of the
ndb_mgmd.exe
--remove option, like this:
C:\> C:\mysql\bin\ndb_mgmd.exe --remove=mgmd1
Removing service 'mgmd1'
Service successfully removed.
Installation of an NDB Cluster data node process as a Windows
service can be done in a similar fashion, using the
--install option for
ndbd.exe (or ndbmtd.exe),
as shown here:
C:\> C:\mysql\bin\ndbd.exe --install
Installing service 'NDB Cluster Data Node Daemon' as '"C:\mysql\bin\ndbd.exe" "--service=ndbd"'
Service successfully installed.
Now you can start or stop the data node as shown in the following example:
C:\>SC START ndbdC:\>SC STOP ndbd
To remove the data node service, use SC DELETE
service_name:
C:\> SC DELETE ndbd
Alternatively, invoke ndbd.exe with the
--remove option, as shown here:
C:\> C:\mysql\bin\ndbd.exe --remove
Removing service 'NDB Cluster Data Node Daemon'
Service successfully removed.
As with ndb_mgmd.exe (and
mysqld.exe), when installing
ndbd.exe as a Windows service, you can also
specify a name for the service as the value of
--install, and then use it when
starting or stopping the service, like this:
C:\>C:\mysql\bin\ndbd.exe --install=dnode1Installing service 'dnode1' as '"C:\mysql\bin\ndbd.exe" "--service=dnode1"' Service successfully installed. C:\>SC START dnode1C:\>SC STOP dnode1
If you specified a service name when installing the data node service, you can use this name when removing it as well, as shown here:
C:\> SC DELETE dnode1
Alternatively, you can pass the service name as the value of the
ndbd.exe
--remove option, as shown here:
C:\> C:\mysql\bin\ndbd.exe --remove=dnode1
Removing service 'dnode1'
Service successfully removed.
Installation of the SQL node as a Windows service, starting the
service, stopping the service, and removing the service are done
in a similar fashion, using mysqld
--install, SC START,
SC STOP, and SC DELETE (or
mysqld
--remove). NET
commands can also be used to start or stop a service. For
additional information, see
Section 2.3.4.8, “Starting MySQL as a Windows Service”.
In this section, we discuss manual configuration of an installed NDB Cluster by creating and editing configuration files.
NDB Cluster also provides a GUI installer which can be used to perform the configuration without the need to edit text files in a separate application. For more information, see Section 22.2.1, “The NDB Cluster Auto-Installer”.
For our four-node, four-host NDB Cluster (see Cluster nodes and host computers), it is necessary to write four configuration files, one per node host.
Each data node or SQL node requires a
my.cnffile that provides two pieces of information: a connection string that tells the node where to find the management node, and a line telling the MySQL server on this host (the machine hosting the data node) to enable theNDBCLUSTERstorage engine.For more information on connection strings, see Section 22.3.3.3, “NDB Cluster Connection Strings”.
The management node needs a
config.inifile telling it how many replicas to maintain, how much memory to allocate for data and indexes on each data node, where to find the data nodes, where to save data to disk on each data node, and where to find any SQL nodes.
Configuring the data nodes and SQL nodes.
The my.cnf file needed for the data nodes
is fairly simple. The configuration file should be located in
the /etc directory and can be edited using
any text editor. (Create the file if it does not exist.) For
example:
shell> vi /etc/my.cnf
We show vi being used here to create the file, but any text editor should work just as well.
For each data node and SQL node in our example setup,
my.cnf should look like this:
[mysqld] # Options for mysqld process: ndbcluster # run NDB storage engine [mysql_cluster] # Options for NDB Cluster processes: ndb-connectstring=198.51.100.10 # location of management server
After entering the preceding information, save this file and exit the text editor. Do this for the machines hosting data node “A”, data node “B”, and the SQL node.
Once you have started a mysqld process with
the ndbcluster and
ndb-connectstring parameters in the
[mysqld] and
[mysql_cluster] sections of the
my.cnf file as shown previously, you cannot
execute any CREATE TABLE or
ALTER TABLE statements without
having actually started the cluster. Otherwise, these statements
will fail with an error. This is by design.
Configuring the management node.
The first step in configuring the management node is to create
the directory in which the configuration file can be found and
then to create the file itself. For example (running as
root):
shell>mkdir /var/lib/mysql-clustershell>cd /var/lib/mysql-clustershell>vi config.ini
For our representative setup, the config.ini
file should read as follows:
[ndbd default]
# Options affecting ndbd processes on all data nodes:
NoOfReplicas=2 # Number of replicas
DataMemory=98M # How much memory to allocate for data storage
[ndb_mgmd]
# Management process options:
HostName=198.51.100.10 # Hostname or IP address of MGM node
DataDir=/var/lib/mysql-cluster # Directory for MGM node log files
[ndbd]
# Options for data node "A":
# (one [ndbd] section per data node)
HostName=198.51.100.30 # Hostname or IP address
NodeId=2 # Node ID for this data node
DataDir=/usr/local/mysql/data # Directory for this data node's data files
[ndbd]
# Options for data node "B":
HostName=198.51.100.40 # Hostname or IP address
NodeId=3 # Node ID for this data node
DataDir=/usr/local/mysql/data # Directory for this data node's data files
[mysqld]
# SQL node options:
HostName=198.51.100.20 # Hostname or IP address
# (additional mysqld connections can be
# specified for this node for various
# purposes such as running ndb_restore)
The world database can be downloaded from
https://dev.mysql.com/doc/index-other.html.
After all the configuration files have been created and these minimal options have been specified, you are ready to proceed with starting the cluster and verifying that all processes are running. We discuss how this is done in Section 22.2.5, “Initial Startup of NDB Cluster”.
For more detailed information about the available NDB Cluster configuration parameters and their uses, see Section 22.3.3, “NDB Cluster Configuration Files”, and Section 22.3, “Configuration of NDB Cluster”. For configuration of NDB Cluster as relates to making backups, see Section 22.5.8.3, “Configuration for NDB Cluster Backups”.
The default port for Cluster management nodes is 1186; the default port for data nodes is 2202. However, the cluster can automatically allocate ports for data nodes from those that are already free.
Starting the cluster is not very difficult after it has been configured. Each cluster node process must be started separately, and on the host where it resides. The management node should be started first, followed by the data nodes, and then finally by any SQL nodes:
On the management host, issue the following command from the system shell to start the management node process:
shell>
ndb_mgmd -f /var/lib/mysql-cluster/config.iniThe first time that it is started, ndb_mgmd must be told where to find its configuration file, using the
-for--config-fileoption. (See Section 22.4.4, “ndb_mgmd — The NDB Cluster Management Server Daemon”, for details.)For additional options which can be used with ndb_mgmd, see Section 22.4.31, “Options Common to NDB Cluster Programs — Options Common to NDB Cluster Programs”.
On each of the data node hosts, run this command to start the ndbd process:
shell>
ndbdIf you used RPM files to install MySQL on the cluster host where the SQL node is to reside, you can (and should) use the supplied startup script to start the MySQL server process on the SQL node.
If all has gone well, and the cluster has been set up correctly, the cluster should now be operational. You can test this by invoking the ndb_mgm management node client. The output should look like that shown here, although you might see some slight differences in the output depending upon the exact version of MySQL that you are using:
shell>ndb_mgm-- NDB Cluster -- Management Client -- ndb_mgm>SHOWConnected to Management Server at: localhost:1186 Cluster Configuration --------------------- [ndbd(NDB)] 2 node(s) id=2 @198.51.100.30 (Version: 8.0.21-ndb-8.0.21, Nodegroup: 0, *) id=3 @198.51.100.40 (Version: 8.0.21-ndb-8.0.21, Nodegroup: 0) [ndb_mgmd(MGM)] 1 node(s) id=1 @198.51.100.10 (Version: 8.0.21-ndb-8.0.21) [mysqld(API)] 1 node(s) id=4 @198.51.100.20 (Version: 8.0.21-ndb-8.0.21)
The SQL node is referenced here as
[mysqld(API)], which reflects the fact that the
mysqld process is acting as an NDB Cluster API
node.
The IP address shown for a given NDB Cluster SQL or other API
node in the output of SHOW
is the address used by the SQL or API node to connect to the
cluster data nodes, and not to any management node.
You should now be ready to work with databases, tables, and data in NDB Cluster. See Section 22.2.6, “NDB Cluster Example with Tables and Data”, for a brief discussion.
The information in this section applies to NDB Cluster running on both Unix and Windows platforms.
Working with database tables and data in NDB Cluster is not much different from doing so in standard MySQL. There are two key points to keep in mind:
For a table to be replicated in the cluster, it must use the
NDBCLUSTERstorage engine. To specify this, use theENGINE=NDBCLUSTERorENGINE=NDBoption when creating the table:CREATE TABLE
tbl_name(col_namecolumn_definitions) ENGINE=NDBCLUSTER;Alternatively, for an existing table that uses a different storage engine, use
ALTER TABLEto change the table to useNDBCLUSTER:ALTER TABLE
tbl_nameENGINE=NDBCLUSTER;Every
NDBCLUSTERtable has a primary key. If no primary key is defined by the user when a table is created, theNDBCLUSTERstorage engine automatically generates a hidden one. Such a key takes up space just as does any other table index. (It is not uncommon to encounter problems due to insufficient memory for accommodating these automatically created indexes.)
If you are importing tables from an existing database using the
output of mysqldump, you can open the SQL
script in a text editor and add the ENGINE
option to any table creation statements, or replace any existing
ENGINE options. Suppose that you have the
world sample database on another MySQL server
that does not support NDB Cluster, and you want to export the
City table:
shell> mysqldump --add-drop-table world City > city_table.sql
The resulting city_table.sql file will
contain this table creation statement (and the
INSERT statements necessary to
import the table data):
DROP TABLE IF EXISTS `City`;
CREATE TABLE `City` (
`ID` int(11) NOT NULL auto_increment,
`Name` char(35) NOT NULL default '',
`CountryCode` char(3) NOT NULL default '',
`District` char(20) NOT NULL default '',
`Population` int(11) NOT NULL default '0',
PRIMARY KEY (`ID`)
) ENGINE=MyISAM DEFAULT CHARSET=latin1;
INSERT INTO `City` VALUES (1,'Kabul','AFG','Kabol',1780000);
INSERT INTO `City` VALUES (2,'Qandahar','AFG','Qandahar',237500);
INSERT INTO `City` VALUES (3,'Herat','AFG','Herat',186800);(remaining INSERT statements omitted)
You need to make sure that MySQL uses the
NDBCLUSTER storage engine for this
table. There are two ways that this can be accomplished. One of
these is to modify the table definition
before importing it into the Cluster
database. Using the City table as an example,
modify the ENGINE option of the definition as
follows:
DROP TABLE IF EXISTS `City`;
CREATE TABLE `City` (
`ID` int(11) NOT NULL auto_increment,
`Name` char(35) NOT NULL default '',
`CountryCode` char(3) NOT NULL default '',
`District` char(20) NOT NULL default '',
`Population` int(11) NOT NULL default '0',
PRIMARY KEY (`ID`)
) ENGINE=NDBCLUSTER DEFAULT CHARSET=latin1;
INSERT INTO `City` VALUES (1,'Kabul','AFG','Kabol',1780000);
INSERT INTO `City` VALUES (2,'Qandahar','AFG','Qandahar',237500);
INSERT INTO `City` VALUES (3,'Herat','AFG','Herat',186800);
(remaining INSERT statements omitted)
This must be done for the definition of each table that is to be
part of the clustered database. The easiest way to accomplish this
is to do a search-and-replace on the file that contains the
definitions and replace all instances of
TYPE= or
engine_nameENGINE=
with engine_nameENGINE=NDBCLUSTER. If you do not want to
modify the file, you can use the unmodified file to create the
tables, and then use ALTER TABLE to
change their storage engine. The particulars are given later in
this section.
Assuming that you have already created a database named
world on the SQL node of the cluster, you can
then use the mysql command-line client to read
city_table.sql, and create and populate the
corresponding table in the usual manner:
shell> mysql world < city_table.sql
It is very important to keep in mind that the preceding command
must be executed on the host where the SQL node is running (in
this case, on the machine with the IP address
198.51.100.20).
To create a copy of the entire world database
on the SQL node, use mysqldump on the
noncluster server to export the database to a file named
world.sql (for example, in the
/tmp directory). Then modify the table
definitions as just described and import the file into the SQL
node of the cluster like this:
shell> mysql world < /tmp/world.sql
If you save the file to a different location, adjust the preceding instructions accordingly.
Running SELECT queries on the SQL
node is no different from running them on any other instance of a
MySQL server. To run queries from the command line, you first need
to log in to the MySQL Monitor in the usual way (specify the
root password at the Enter
password: prompt):
shell> mysql -u root -p
Enter password:
Welcome to the MySQL monitor. Commands end with ; or \g.
Your MySQL connection id is 1 to server version: 8.0.21-ndb-8.0.21
Type 'help;' or '\h' for help. Type '\c' to clear the buffer.
mysql>
We simply use the MySQL server's root
account and assume that you have followed the standard security
precautions for installing a MySQL server, including setting a
strong root password. For more information, see
Section 2.10.4, “Securing the Initial MySQL Account”.
It is worth taking into account that NDB Cluster nodes do
not make use of the MySQL privilege system
when accessing one another. Setting or changing MySQL user
accounts (including the root account) effects
only applications that access the SQL node, not interaction
between nodes. See
Section 22.5.17.2, “NDB Cluster and MySQL Privileges”, for
more information.
If you did not modify the ENGINE clauses in the
table definitions prior to importing the SQL script, you should
run the following statements at this point:
mysql>USE world;mysql>ALTER TABLE City ENGINE=NDBCLUSTER;mysql>ALTER TABLE Country ENGINE=NDBCLUSTER;mysql>ALTER TABLE CountryLanguage ENGINE=NDBCLUSTER;
Selecting a database and running a SELECT query against a table in that database is also accomplished in the usual manner, as is exiting the MySQL Monitor:
mysql>USE world;mysql>SELECT Name, Population FROM City ORDER BY Population DESC LIMIT 5;+-----------+------------+ | Name | Population | +-----------+------------+ | Bombay | 10500000 | | Seoul | 9981619 | | São Paulo | 9968485 | | Shanghai | 9696300 | | Jakarta | 9604900 | +-----------+------------+ 5 rows in set (0.34 sec) mysql>\qBye shell>
Applications that use MySQL can employ standard APIs to access
NDB tables. It is important to
remember that your application must access the SQL node, and not
the management or data nodes. This brief example shows how we
might execute the SELECT statement
just shown by using the PHP 5.X mysqli
extension running on a Web server elsewhere on the network:
<!DOCTYPE HTML PUBLIC "-//W3C//DTD HTML 4.01 Transitional//EN"
"http://www.w3.org/TR/html4/loose.dtd">
<html>
<head>
<meta http-equiv="Content-Type"
content="text/html; charset=iso-8859-1">
<title>SIMPLE mysqli SELECT</title>
</head>
<body>
<?php
# connect to SQL node:
$link = new mysqli('198.51.100.20', 'root', 'root_password', 'world');
# parameters for mysqli constructor are:
# host, user, password, database
if( mysqli_connect_errno() )
die("Connect failed: " . mysqli_connect_error());
$query = "SELECT Name, Population
FROM City
ORDER BY Population DESC
LIMIT 5";
# if no errors...
if( $result = $link->query($query) )
{
?>
<table border="1" width="40%" cellpadding="4" cellspacing ="1">
<tbody>
<tr>
<th width="10%">City</th>
<th>Population</th>
</tr>
<?
# then display the results...
while($row = $result->fetch_object())
printf("<tr>\n <td align=\"center\">%s</td><td>%d</td>\n</tr>\n",
$row->Name, $row->Population);
?>
</tbody
</table>
<?
# ...and verify the number of rows that were retrieved
printf("<p>Affected rows: %d</p>\n", $link->affected_rows);
}
else
# otherwise, tell us what went wrong
echo mysqli_error();
# free the result set and the mysqli connection object
$result->close();
$link->close();
?>
</body>
</html>
We assume that the process running on the Web server can reach the IP address of the SQL node.
In a similar fashion, you can use the MySQL C API, Perl-DBI, Python-mysql, or MySQL Connectors to perform the tasks of data definition and manipulation just as you would normally with MySQL.
To shut down the cluster, enter the following command in a shell on the machine hosting the management node:
shell> ndb_mgm -e shutdown
The -e option here is used to pass a command to
the ndb_mgm client from the shell. (See
Section 22.4.31, “Options Common to NDB Cluster Programs — Options Common to NDB Cluster Programs”, for more
information about this option.) The command causes the
ndb_mgm, ndb_mgmd, and any
ndbd or ndbmtd processes to
terminate gracefully. Any SQL nodes can be terminated using
mysqladmin shutdown and other means. On Windows
platforms, assuming that you have installed the SQL node as a
Windows service, you can use SC STOP
service_name or NET
STOP service_name.
To restart the cluster on Unix platforms, run these commands:
On the management host (
198.51.100.10in our example setup):shell>
ndb_mgmd -f /var/lib/mysql-cluster/config.iniOn each of the data node hosts (
198.51.100.30and198.51.100.40):shell>
ndbdUse the ndb_mgm client to verify that both data nodes have started successfully.
On the SQL host (
198.51.100.20):shell>
mysqld_safe &
On Windows platforms, assuming that you have installed all NDB Cluster processes as Windows services using the default service names (see Section 22.2.3.4, “Installing NDB Cluster Processes as Windows Services”), you can restart the cluster as follows:
On the management host (
198.51.100.10in our example setup), execute the following command:C:\>
SC START ndb_mgmdOn each of the data node hosts (
198.51.100.30and198.51.100.40), execute the following command:C:\>
SC START ndbdOn the management node host, use the ndb_mgm client to verify that the management node and both data nodes have started successfully (see Section 22.2.3.3, “Initial Startup of NDB Cluster on Windows”).
On the SQL node host (
198.51.100.20), execute the following command:C:\>
SC START mysql
In a production setting, it is usually not desirable to shut down the cluster completely. In many cases, even when making configuration changes, or performing upgrades to the cluster hardware or software (or both), which require shutting down individual host machines, it is possible to do so without shutting down the cluster as a whole by performing a rolling restart of the cluster. For more information about doing this, see Section 22.5.5, “Performing a Rolling Restart of an NDB Cluster”.
This section provides information about NDB Cluster software and table file compatibility between different NDB Cluster 8.0 releases with regard to performing upgrades and downgrades as well as compatibility matrices and notes. You should already be familiar with installing and configuring NDB Cluster prior to attempting an upgrade or downgrade. See Section 22.3, “Configuration of NDB Cluster”.
Schema operations, including SQL DDL statements, cannot be performed while any data nodes are restarting, and thus during an online upgrade or downgrade of the cluster. For other information regarding the rolling restart procedure used to perform an online upgrade, see Section 22.5.5, “Performing a Rolling Restart of an NDB Cluster”.
Only compatibility between MySQL versions with regard to
NDBCLUSTER is taken into account in
this section, and there are likely other issues to be
considered. As with any other MySQL software upgrade
or downgrade, you are strongly encouraged to review the relevant
portions of the MySQL Manual for the MySQL versions from which
and to which you intend to migrate, before attempting an upgrade
or downgrade of the NDB Cluster software. See
Section 2.11, “Upgrading MySQL”.
The table shown here provides information on NDB Cluster upgrade and downgrade compatibility among different releases of NDB 8.0. Additional notes about upgrades and downgrades to, from, or within the NDB Cluster 8.0 release series can be found following the table.
Upgrades and Downgrades, NDB Cluster 8.0
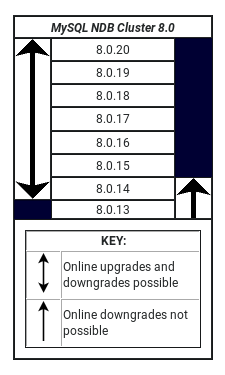
Version support. The following versions of NDB Cluster are supported for upgrades to GA releases of NDB Cluster 8.0 (8.0.19 and later):
NDB Cluster 7.6: NDB 7.6.4 and later
NDB Cluster 7.5: NDB 7.5.4 and later
NDB Cluster 7.4: NDB 7.4.6 and later
To upgrade from a release series previous to NDB 7.4, you must upgrade in stages, first to one of the versions just listed, and then from that version to the latest NDB 8.0 release. In such cases, upgrading to the latest NDB 7.6 release is recommended as the first step.
Known Issues. The following issues are known to occur when upgrading to or between NDB 8.0 releases:
Online downgrades from NDB 8.0.14 to previous releases are not supported. Tables created in NDB 8.0.14 are not backwards compatible with previous releases. This is due to a change in usage of the extra metadata property implemented by
NDBtables to provide full support for the MySQL data dictionary.For more information, see Changes in NDB table extra metadata. See also Chapter 14, MySQL Data Dictionary.
Distributed privileges shared between MySQL servers as implemented in prior release series (see Distributed Privileges Using Shared Grant Tables) are not supported in NDB Cluster 8.0. When started, the mysqld supplied with NDB 8.0.16 and later checks for the existence of any grant tables which use the
NDBstorage engine; if it finds any, it creates local copies (“shadow tables”) of these usingInnoDB. This is true for each MySQL server connected to NDB Cluster. After this has been performed on all MySQL servers acting as NDB Cluster SQL nodes, theNDBgrant tables may be safely removed using the ndb_drop_table utility supplied with the NDB Cluster distribution, like this:ndb_drop_table -d mysql user db columns_priv tables_priv proxies_priv procs_priv
It is safe to retain the
NDBgrant tables, but they are not used for access control and are effectively ignored.For more information about the MySQL privileges system used in NDB 8.0, see Section 22.5.12, “Distributed MySQL Privileges with NDB_STORED_USER”, as well as Section 6.2.3, “Grant Tables”.
In NDB 8.0.18, the binary configuration file format has been enhanced to provide support for greater numbers of nodes than in previous versions. The new format is not accessible to 8.0.17 and older nodes, although newer management servers can detect older nodes and communicate with them using the appropriate format.
Upgrades to NDB 8.0.18 or later from 8.0.17 and earlier should not be problematic in this regard. In the case of downgrades from NDB 8.0.18 or later to 8.0.17 or earlier, because older management servers cannot read the newer binary configuration file format, some manual intervention is required. When performing such a downgrade, it is necessary to remove any cached binary configuration files prior to starting the management using the older
NDBsoftware version, and to have the plaintext configuration file available for the management server to read. Alternatively, you can start the older management server using the--initialoption (again, it is necessary to have theconfig.iniavailable). If the cluster uses multiple management servers, one of these two things must be done for each management server binary.Also in connection with support for increased numbers of nodes, due to incompatible changes implemented in NDB 8.0.18 in the data node LCP
Sysfile, it is necessary, when performing an online downgrade from NDB 8.0.18 (or later) to any prior release, to restart all data nodes using the--initialoption.Restarting the data nodes with
--initialis also required when upgrading any release prior to NDB 7.6.4 to any NDB 8.0 release.Direct downgrades of clusters running more than 48 data nodes, or with data nodes using node IDs greater than 48, to NDB versions 8.0.17 and earlier from NDB 8.0.18 or later are not supported. It is necessary in such cases to reduce the number of data nodes, change the configurations for all data nodes such that they use node IDs less than or equal to 48, or both, as required not to exceed the old maximums.
If you are downgrading from NDB 8.0 to NDB 7.5 or NDB 7.4, you must set an explicit value for
IndexMemoryin the cluster configuration file if none is already present. This is because NDB 8.0 does not use this parameter (which was removed in NDB 7.6) and sets it to 0 by default, whereas it is required in NDB 7.5 and NDB 7.4, in both of which the cluster refuses to start with Invalid configuration received from Management Server... ifIndexMemoryis not set to a nonzero value.Setting
IndexMemoryis not required for downgrades from NDB 8.0 to NDB 7.6.
A MySQL server that is part of an NDB Cluster differs in one chief
respect from a normal (nonclustered) MySQL server, in that it
employs the NDB storage engine. This
engine is also referred to sometimes as
NDBCLUSTER, although
NDB is preferred.
To avoid unnecessary allocation of resources, the server is
configured by default with the NDB
storage engine disabled. To enable NDB,
you must modify the server's my.cnf
configuration file, or start the server with the
--ndbcluster option.
This MySQL server is a part of the cluster, so it also must know how
to access a management node to obtain the cluster configuration
data. The default behavior is to look for the management node on
localhost. However, should you need to specify
that its location is elsewhere, this can be done in
my.cnf, or with the mysql
client. Before the NDB storage engine
can be used, at least one management node must be operational, as
well as any desired data nodes.
For more information about
--ndbcluster and other
mysqld options specific to NDB Cluster, see
Section 22.3.3.9.1, “MySQL Server Options for NDB Cluster”.
You can use also the NDB Cluster Auto-Installer to set up and deploy an NDB Cluster on one or more hosts using a browser-based GUI. For more information, see The NDB Cluster Auto-Installer (NDB 7.5).
For general information about installing NDB Cluster, see Section 22.2, “NDB Cluster Installation”.
To familiarize you with the basics, we will describe the simplest possible configuration for a functional NDB Cluster. After this, you should be able to design your desired setup from the information provided in the other relevant sections of this chapter.
First, you need to create a configuration directory such as
/var/lib/mysql-cluster, by executing the
following command as the system root user:
shell> mkdir /var/lib/mysql-cluster
In this directory, create a file named
config.ini that contains the following
information. Substitute appropriate values for
HostName and DataDir as
necessary for your system.
# file "config.ini" - showing minimal setup consisting of 1 data node, # 1 management server, and 3 MySQL servers. # The empty default sections are not required, and are shown only for # the sake of completeness. # Data nodes must provide a hostname but MySQL Servers are not required # to do so. # If you don't know the hostname for your machine, use localhost. # The DataDir parameter also has a default value, but it is recommended to # set it explicitly. # Note: [db], [api], and [mgm] are aliases for [ndbd], [mysqld], and [ndb_mgmd], # respectively. [db] is deprecated and should not be used in new installations. [ndbd default] NoOfReplicas= 1 [mysqld default] [ndb_mgmd default] [tcp default] [ndb_mgmd] HostName= myhost.example.com [ndbd] HostName= myhost.example.com DataDir= /var/lib/mysql-cluster [mysqld] [mysqld] [mysqld]
You can now start the ndb_mgmd management
server. By default, it attempts to read the
config.ini file in its current working
directory, so change location into the directory where the file is
located and then invoke ndb_mgmd:
shell>cd /var/lib/mysql-clustershell>ndb_mgmd
Then start a single data node by running ndbd:
shell> ndbd
For command-line options which can be used when starting ndbd, see Section 22.4.31, “Options Common to NDB Cluster Programs — Options Common to NDB Cluster Programs”.
By default, ndbd looks for the management
server at localhost on port 1186.
If you have installed MySQL from a binary tarball, you will need
to specify the path of the ndb_mgmd and
ndbd servers explicitly. (Normally, these
will be found in /usr/local/mysql/bin.)
Finally, change location to the MySQL data directory (usually
/var/lib/mysql or
/usr/local/mysql/data), and make sure that
the my.cnf file contains the option necessary
to enable the NDB storage engine:
[mysqld] ndbcluster
You can now start the MySQL server as usual:
shell> mysqld_safe --user=mysql &
Wait a moment to make sure the MySQL server is running properly.
If you see the notice mysql ended, check the
server's .err file to find out what went
wrong.
If all has gone well so far, you now can start using the cluster.
Connect to the server and verify that the
NDBCLUSTER storage engine is enabled:
shell>mysqlWelcome to the MySQL monitor. Commands end with ; or \g. Your MySQL connection id is 1 to server version: 8.0.22 Type 'help;' or '\h' for help. Type '\c' to clear the buffer. mysql>SHOW ENGINES\G... *************************** 12. row *************************** Engine: NDBCLUSTER Support: YES Comment: Clustered, fault-tolerant, memory-based tables *************************** 13. row *************************** Engine: NDB Support: YES Comment: Alias for NDBCLUSTER ...
The row numbers shown in the preceding example output may be different from those shown on your system, depending upon how your server is configured.
Try to create an NDBCLUSTER table:
shell>mysqlmysql>USE test;Database changed mysql>CREATE TABLE ctest (i INT) ENGINE=NDBCLUSTER;Query OK, 0 rows affected (0.09 sec) mysql>SHOW CREATE TABLE ctest \G*************************** 1. row *************************** Table: ctest Create Table: CREATE TABLE `ctest` ( `i` int(11) default NULL ) ENGINE=ndbcluster DEFAULT CHARSET=latin1 1 row in set (0.00 sec)
To check that your nodes were set up properly, start the management client:
shell> ndb_mgm
Use the SHOW command from within the management client to obtain a report on the cluster's status:
ndb_mgm> SHOW
Cluster Configuration
---------------------
[ndbd(NDB)] 1 node(s)
id=2 @127.0.0.1 (Version: 8.0.21-ndb-8.0.21, Nodegroup: 0, *)
[ndb_mgmd(MGM)] 1 node(s)
id=1 @127.0.0.1 (Version: 8.0.21-ndb-8.0.21)
[mysqld(API)] 3 node(s)
id=3 @127.0.0.1 (Version: 8.0.21-ndb-8.0.21)
id=4 (not connected, accepting connect from any host)
id=5 (not connected, accepting connect from any host)
At this point, you have successfully set up a working NDB Cluster
. You can now store data in the cluster by using any table created
with ENGINE=NDBCLUSTER or its alias
ENGINE=NDB.
The next several sections provide summary tables of NDB Cluster
node configuration parameters used in the
config.ini file to govern various aspects of
node behavior, as well as of options and variables read by
mysqld from a my.cnf file
or from the command line when run as an NDB Cluster process. Each
of the node parameter tables lists the parameters for a given type
(ndbd, ndb_mgmd,
mysqld, computer,
tcp, or shm). All tables
include the data type for the parameter, option, or variable, as
well as its default, mimimum, and maximum values as applicable.
Considerations when restarting nodes.
For node parameters, these tables also indicate what type of
restart is required (node restart or system restart)—and
whether the restart must be done with
--initial—to change the value of a given
configuration parameter. When performing a node restart or an
initial node restart, all of the cluster's data nodes must
be restarted in turn (also referred to as a
rolling restart). It is
possible to update cluster configuration parameters marked as
node online—that is, without shutting
down the cluster—in this fashion. An initial node restart
requires restarting each ndbd process with
the --initial option.
A system restart requires a complete shutdown and restart of the entire cluster. An initial system restart requires taking a backup of the cluster, wiping the cluster file system after shutdown, and then restoring from the backup following the restart.
In any cluster restart, all of the cluster's management servers must be restarted for them to read the updated configuration parameter values.
Values for numeric cluster parameters can generally be increased without any problems, although it is advisable to do so progressively, making such adjustments in relatively small increments. Many of these can be increased online, using a rolling restart.
However, decreasing the values of such parameters—whether
this is done using a node restart, node initial restart, or even
a complete system restart of the cluster—is not to be
undertaken lightly; it is recommended that you do so only after
careful planning and testing. This is especially true with
regard to those parameters that relate to memory usage and disk
space, such as
MaxNoOfTables,
MaxNoOfOrderedIndexes,
and
MaxNoOfUniqueHashIndexes.
In addition, it is the generally the case that configuration
parameters relating to memory and disk usage can be raised using
a simple node restart, but they require an initial node restart
to be lowered.
Because some of these parameters can be used for configuring more than one type of cluster node, they may appear in more than one of the tables.
4294967039 often appears as a maximum value
in these tables. This value is defined in the
NDBCLUSTER sources as
MAX_INT_RNIL and is equal to
0xFFFFFEFF, or
232 −
28 − 1.
The listings in this section provide information about
parameters used in the [ndbd] or
[ndbd default] sections of a
config.ini file for configuring NDB Cluster
data nodes. For detailed descriptions and other additional
information about each of these parameters, see
Section 22.3.3.6, “Defining NDB Cluster Data Nodes”.
These parameters also apply to ndbmtd, the multithreaded version of ndbd. For more information, see Section 22.4.3, “ndbmtd — The NDB Cluster Data Node Daemon (Multi-Threaded)”.
Arbitration: How arbitration should be performed to avoid split-brain issues in event of node failure.ArbitrationTimeout: Maximum time (milliseconds) database partition waits for arbitration signal.BackupDataBufferSize: Default size of databuffer for a backup (in bytes).BackupDataDir: Path to where to store backups. Note that string '/BACKUP' is always appended to this setting, so that *effective* default is FileSystemPath/BACKUP.BackupDiskWriteSpeedPct: Sets percentage of data node's allocated maximum write speed (MaxDiskWriteSpeed) to reserve for LCPs when starting a backup.BackupLogBufferSize: Default size of log buffer for a backup (in bytes).BackupMaxWriteSize: Maximum size of file system writes made by backup (in bytes).BackupMemory: Total memory allocated for backups per node (in bytes).BackupReportFrequency: Frequency of backup status reports during backup in seconds.BackupWriteSize: Default size of file system writes made by backup (in bytes).BatchSizePerLocalScan: Used to calculate number of lock records for scan with hold lock.BuildIndexThreads: Number of threads to use for building ordered indexes during a system or node restart. Also applies when running ndb_restore --rebuild-indexes. Setting this parameter to 0 disables multithreaded building of ordered indexes.CompressedBackup: Use zlib to compress backups as they are written.CompressedLCP: Write compressed LCPs using zlib.ConnectCheckIntervalDelay: Time between data node connectivity check stages. Data node is considered suspect after 1 interval and dead after 2 intervals with no response.CrashOnCorruptedTuple: When enabled, forces node to shut down whenever it detects a corrupted tuple.DataDir: Data directory for this node.DataMemory: Number of bytes on each data node allocated for storing data; subject to available system RAM and size of IndexMemory.DefaultHashMapSize: Set size (in buckets) to use for table hash maps. Three values are supported: 0, 240, and 3840..DictTrace: Enable DBDICT debugging; for NDB development.DiskDataUsingSameDisk: Set to false if Disk Data tablespaces are located on separate physical disks.DiskIOThreadPool: Number of unbound threads for file access, applies to disk data only.Diskless: Run without using disk.DiskPageBufferEntries: Memory to allocate in DiskPageBufferMemory; very large disk transactions may require increasing this value.DiskPageBufferMemory: Number of bytes on each data node allocated for disk page buffer cache.DiskSyncSize: Amount of data written to file before a synch is forced.EnablePartialLcp: Enable partial LCP (true); if this is disabled (false), all LCPs write full checkpoints.EnableRedoControl: Enable adaptive checkpointing speed for controlling redo log usage.EventLogBufferSize: Size of circular buffer for NDB log events within data nodes.ExecuteOnComputer: String referencing an earlier defined COMPUTER.ExtraSendBufferMemory: Memory to use for send buffers in addition to any allocated by TotalSendBufferMemory or SendBufferMemory. Default (0) allows up to 16MB.FileSystemPath: Path to directory where data node stores its data (directory must exist).FileSystemPathDataFiles: Path to directory where data node stores its Disk Data files. The default value is FilesystemPathDD, if set; otherwise, FilesystemPath is used if it is set; otherwise, value of DataDir is used.FileSystemPathDD: Path to directory where data node stores its Disk Data and undo files. Default value is FileSystemPath, if set; otherwise, value of DataDir is used.FileSystemPathUndoFiles: Path to directory where data node stores its undo files for Disk Data. Default value is FilesystemPathDD, if set; otherwise, FilesystemPath is used if it is set; otherwise, value of DataDir is used.FragmentLogFileSize: Size of each redo log file.HeartbeatIntervalDbApi: Time between API node-data node heartbeats. (API connection closed after 3 missed heartbeats).HeartbeatIntervalDbDb: Time between data node-to-data node heartbeats; data node considered dead after 3 missed heartbeats.HeartbeatOrder: Sets order in which data nodes check each others' heartbeats for determining whether given node is still active and connected to cluster. Must be zero for all data nodes or distinct nonzero values for all data nodes; see documentation for further guidance.HostName: Host name or IP address for this data node.IndexMemory: Number of bytes on each data node allocated for storing indexes; subject to available system RAM and size of DataMemory.IndexStatAutoCreate: Enable/disable automatic statistics collection when indexes are created.IndexStatAutoUpdate: Monitor indexes for changes and trigger automatic statistics updates.IndexStatSaveScale: Scaling factor used in determining size of stored index statistics.IndexStatSaveSize: Maximum size in bytes for saved statistics per index.IndexStatTriggerPct: Threshold percent change in DML operations for index statistics updates. Value is scaled down by IndexStatTriggerScale.IndexStatTriggerScale: Scale down IndexStatTriggerPct by this amount, multiplied by base 2 logarithm of index size, for a large index. Set to 0 to disable scaling.IndexStatUpdateDelay: Minimum delay between automatic index statistics updates for a given index. 0 means no delay.InitFragmentLogFiles: Initialize fragment logfiles (sparse/full).InitialLogFileGroup: Describes a log file group that is created during an initial start. See documentation for format.InitialNoOfOpenFiles: Initial number of files open per data node. (One thread is created per file).InitialTablespace: Describes a tablespace that is created during an initial start. See documentation for format.InsertRecoveryWork: Percentage of RecoveryWork used for inserted rows; has no effect unless partial local checkpoints are in use.LateAlloc: Allocate memory after connection to management server has been established.LcpScanProgressTimeout: Maximum time that local checkpoint fragment scan can be stalled before node is shut down to ensure systemwide LCP progress. Use 0 to disable.LockExecuteThreadToCPU: A comma-delimited list of CPU IDs.LockMaintThreadsToCPU: CPU ID indicating which CPU runs maintenance threads.LockPagesInMainMemory: 0=disable locking, 1=lock after memory allocation, 2=lock before memory allocation.LogLevelCheckpoint: Log level of local and global checkpoint information printed to stdout.LogLevelCongestion: Level of congestion information printed to stdout.LogLevelConnection: Level of node connect/disconnect information printed to stdout.LogLevelError: Transporter, heartbeat errors printed to stdout.LogLevelInfo: Heartbeat and log information printed to stdout.LogLevelNodeRestart: Level of node restart and node failure information printed to stdout.LogLevelShutdown: Level of node shutdown information printed to stdout.LogLevelStartup: Level of node startup information printed to stdout.LogLevelStatistic: Level of transaction, operation, and transporter information printed to stdout.LongMessageBuffer: Number of bytes allocated on each data node for internal long messages.MaxAllocate: Maximum size of allocation to use when allocating memory for tables.MaxBufferedEpochs: Allowed numbered of epochs that a subscribing node can lag behind (unprocessed epochs). Exceeding will cause lagging subscribers to be disconnected.MaxBufferedEpochBytes: Total number of bytes allocated for buffering epochs.MaxDiskDataLatency: Maximum allowed mean latency of disk access (ms) before starting to abort transactions.MaxDiskWriteSpeed: Maximum number of bytes per second that can be written by LCP and backup when no restarts are ongoing.MaxDiskWriteSpeedOtherNodeRestart: Maximum number of bytes per second that can be written by LCP and backup when another node is restarting.MaxDiskWriteSpeedOwnRestart: Maximum number of bytes per second that can be written by LCP and backup when this node is restarting.MaxFKBuildBatchSize: Maximum scan batch size to use for building foreign keys. Increasing this value may speed up builds of foreign keys but impacts ongoing traffic as well.MaxDMLOperationsPerTransaction: Limit size of a transaction; aborts transaction if it requires more than this many DML operations. Set to 0 to disable.MaxLCPStartDelay: Time in seconds that LCP polls for checkpoint mutex (to allow other data nodes to complete metadata synchronization), before putting itself in lock queue for parallel recovery of table data.MaxNoOfAttributes: Suggests a total number of attributes stored in database (sum over all tables).MaxNoOfConcurrentIndexOperations: Total number of index operations that can execute simultaneously on one data node.MaxNoOfConcurrentOperations: Maximum number of operation records in transaction coordinator.MaxNoOfConcurrentScans: Maximum number of scans executing concurrently on data node.MaxNoOfConcurrentSubOperations: Maximum number of concurrent subscriber operations.MaxNoOfConcurrentTransactions: Maximum number of transactions executing concurrently on this data node, total number of transactions that can be executed concurrently is this value times number of data nodes in cluster.MaxNoOfFiredTriggers: Total number of triggers that can fire simultaneously on one data node.MaxNoOfLocalOperations: Maximum number of operation records defined on this data node.MaxNoOfLocalScans: Maximum number of fragment scans in parallel on this data node.MaxNoOfOpenFiles: Maximum number of files open per data node.(One thread is created per file).MaxNoOfOrderedIndexes: Total number of ordered indexes that can be defined in system.MaxNoOfSavedMessages: Maximum number of error messages to write in error log and maximum number of trace files to retain.MaxNoOfSubscribers: Maximum number of subscribers (default 0 = MaxNoOfTables * 2).MaxNoOfSubscriptions: Maximum number of subscriptions (default 0 = MaxNoOfTables).MaxNoOfTables: Suggests a total number of NDB tables stored in database.MaxNoOfTriggers: Total number of triggers that can be defined in system.MaxNoOfUniqueHashIndexes: Total number of unique hash indexes that can be defined in the system.MaxParallelCopyInstances: Number of parallel copies during node restarts. Default is 0, which uses number of LDMs on both nodes, to a maximum of 16.MaxParallelScansPerFragment: Maximum number of parallel scans per fragment. Once this limit is reached, scans are serialized.MaxReorgBuildBatchSize: Maximum scan batch size to use for reorganization of table partitions. Increasing this value may speed up table partition reorganization but impacts ongoing traffic as well.MaxStartFailRetries: Maximum retries when data node fails on startup, requires StopOnError = 0. Setting to 0 causes start attempts to continue indefinitely.MaxUIBuildBatchSize: Maximum scan batch size to use for building unique keys. Increasing this value may speed up builds of unique keys but impacts ongoing traffic as well.MemReportFrequency: Frequency of memory reports in seconds; 0 = report only when exceeding percentage limits.MinDiskWriteSpeed: Minimum number of bytes per second that can be written by LCP and backup.MinFreePct: Percentage of memory resources to keep in reserve for restarts.NodeGroup: Node group to which data node belongs; used only during initial start of cluster.NodeGroupTransporters: Number of transporters to use between nodes in same node group.NodeId: Number uniquely identifying data node among all nodes in cluster.NoOfFragmentLogFiles: Number of 16 MB redo log files in each of 4 file sets belonging to data node.NoOfReplicas: Number of copies of all data in database.Numa: (Linux only; requires libnuma) Controls NUMA support. Setting to 0 permits system to determine use of interleaving by data node process; 1 means that it is determined by data node.ODirect: Use O_DIRECT file reads and writes when possible.ODirectSyncFlag: O_DIRECT writes are treated as synchronized writes; ignored when ODirect is not enabled, InitFragmentLogFiles is set to SPARSE, or both.RealtimeScheduler: When true, data node threads are scheduled as real-time threads. Default is false.RecoveryWork: Percentage of storage overhead for LCP files: greater value means less work in normal operations, more work during recovery.RedoBuffer: Number of bytes on each data node allocated for writing redo logs.RedoOverCommitCounter: When RedoOverCommitLimit has been exceeded this many times, transactions are aborted, and operations are handled as specified by DefaultOperationRedoProblemAction.RedoOverCommitLimit: Each time that flushing current redo buffer takes longer than this many seconds, number of times that this has happened is compared to RedoOverCommitCounter.ReservedConcurrentIndexOperations: Number of simultaneous index operations having dedicated resources on one data node.ReservedConcurrentOperations: Number of simultaneous operations having dedicated resources in transaction coordinators on one data node.ReservedConcurrentScans: Number of simultaneous scans having dedicated resources on one data node.ReservedConcurrentTransactions: Number of simultaneous transactions having dedicated resources on one data node.ReservedFiredTriggers: Number of triggers having dedicated resources on one data node.ReservedLocalScans: Number of simultaneous fragment scans having dedicated resources on one data node.ReservedTransactionBufferMemory: Dynamic buffer space (in bytes) for key and attribute data allocated to each data node.RestartOnErrorInsert: Control type of restart caused by inserting an error (when StopOnError is enabled).SchedulerExecutionTimer: Number of microseconds to execute in scheduler before sending.SchedulerResponsiveness: Set NDB scheduler response optimization 0-10; higher values provide better response time but lower throughput.SchedulerSpinTimer: Number of microseconds to execute in scheduler before sleeping.ServerPort: Port used to set up transporter for incoming connections from API nodes.SharedGlobalMemory: Total number of bytes on each data node allocated for any use.SpinMethod: Determines spin method used by data node; see documentation for details.StartFailRetryDelay: Delay in seconds after start failure prior to retry; requires StopOnError = 0.StartFailureTimeout: Milliseconds to wait before terminating. (0=Wait forever).StartNoNodeGroupTimeout: Time to wait for nodes without a nodegroup before trying to start (0=forever).StartPartialTimeout: Milliseconds to wait before trying to start without all nodes. (0=Wait forever).StartPartitionedTimeout: Milliseconds to wait before trying to start partitioned. (0=Wait forever).StartupStatusReportFrequency: Frequency of status reports during startup.StopOnError: When set to 0, data node automatically restarts and recovers following node failures.StringMemory: Default size of string memory (0 to 100 = % of maximum, 101+ = actual bytes).TcpBind_INADDR_ANY: Bind IP_ADDR_ANY so that connections can be made from anywhere (for autogenerated connections).TimeBetweenEpochs: Time between epochs (synchronization used for replication).TimeBetweenEpochsTimeout: Timeout for time between epochs. Exceeding will cause node shutdown.TimeBetweenGlobalCheckpoints: Time between group commits of transactions to disk.TimeBetweenGlobalCheckpointsTimeout: Minimum timeout for group commit of transactions to disk.TimeBetweenInactiveTransactionAbortCheck: Time between checks for inactive transactions.TimeBetweenLocalCheckpoints: Time between taking snapshots of database (expressed in base-2 logarithm of bytes).TimeBetweenWatchDogCheck: Time between execution checks inside a data node.TimeBetweenWatchDogCheckInitial: Time between execution checks inside a data node (early start phases when memory is allocated).TotalSendBufferMemory: Total memory to use for all transporter send buffers..TransactionBufferMemory: Dynamic buffer space (in bytes) for key and attribute data allocated for each data node.TransactionDeadlockDetectionTimeout: Time transaction can spend executing within a data node. This is time that transaction coordinator waits for each data node participating in transaction to execute a request. If data node takes more than this amount of time, transaction is aborted.TransactionInactiveTimeout: Milliseconds that application waits before executing another part of transaction. This is time transaction coordinator waits for application to execute or send another part (query, statement) of transaction. If application takes too much time, then transaction is aborted. Timeout = 0 means that application never times out.TransactionMemory: Memory allocated for transactions on each data node.TwoPassInitialNodeRestartCopy: Copy data in 2 passes during initial node restart, which enables multithreaded building of ordered indexes for such restarts.UndoDataBuffer: Number of bytes on each data node allocated for writing data undo logs.UndoIndexBuffer: Number of bytes on each data node allocated for writing index undo logs.UseShm: Use shared memory connections between this data node and API node also running on this host.
The following parameters are specific to ndbmtd:
MaxNoOfExecutionThreads: For ndbmtd only, specify maximum number of execution threads.NoOfFragmentLogParts: Number of redo log file groups belonging to this data node.ThreadConfig: Used for configuration of multithreaded data nodes (ndbmtd). Default is an empty string; see documentation for syntax and other information.
The listing in this section provides information about
parameters used in the [ndb_mgmd] or
[mgm] section of a
config.ini file for configuring NDB Cluster
management nodes. For detailed descriptions and other additional
information about each of these parameters, see
Section 22.3.3.5, “Defining an NDB Cluster Management Server”.
ArbitrationDelay: When asked to arbitrate, arbitrator waits this long before voting (milliseconds).ArbitrationRank: If 0, then management node is not arbitrator. Kernel selects arbitrators in order 1, 2.DataDir: Data directory for this node.ExecuteOnComputer: String referencing an earlier defined COMPUTER.ExtraSendBufferMemory: Memory to use for send buffers in addition to any allocated by TotalSendBufferMemory or SendBufferMemory. Default (0) allows up to 16MB.HeartbeatIntervalMgmdMgmd: Time between management-node-to-management-node heartbeats; connection between management nodes is considered lost after 3 missed heartbeats.HeartbeatThreadPriority: Set heartbeat thread policy and priority for management nodes; see manual for allowed values.HostName: Host name or IP address for this management node.Id: Number identifying management node. Now deprecated; use NodeId instead.LogDestination: Where to send log messages: console, system log, or specified log file.NodeId: Number uniquely identifying management node among all nodes in cluster.PortNumber: Port number to send commands to and fetch configuration from management server.PortNumberStats: Port number used to get statistical information from a management server.TotalSendBufferMemory: Total memory to use for all transporter send buffers.wan: Use WAN TCP setting as default.
After making changes in a management node's configuration, it is necessary to perform a rolling restart of the cluster for the new configuration to take effect. See Section 22.3.3.5, “Defining an NDB Cluster Management Server”, for more information.
To add new management servers to a running NDB Cluster, it is
also necessary perform a rolling restart of all cluster nodes
after modifying any existing config.ini
files. For more information about issues arising when using
multiple management nodes, see
Section 22.1.7.10, “Limitations Relating to Multiple NDB Cluster Nodes”.
The listing in this section provides information about
parameters used in the [mysqld] and
[api] sections of a
config.ini file for configuring NDB Cluster
SQL nodes and API nodes. For detailed descriptions and other
additional information about each of these parameters, see
Section 22.3.3.7, “Defining SQL and Other API Nodes in an NDB Cluster”.
ApiVerbose: Enable NDB API debugging; for NDB development.ArbitrationDelay: When asked to arbitrate, arbitrator waits this many milliseconds before voting.ArbitrationRank: If 0, then API node is not arbitrator. Kernel selects arbitrators in order 1, 2.AutoReconnect: Specifies whether an API node should reconnect fully when disconnected from cluster.BatchByteSize: Default batch size in bytes.BatchSize: Default batch size in number of records.ConnectBackoffMaxTime: Specifies longest time in milliseconds (~100ms resolution) to allow between connection attempts to any given data node by this API node. Excludes time elapsed while connection attempts are ongoing, which in worst case can take several seconds. Disable by setting to 0. If no data nodes are currently connected to this API node, StartConnectBackoffMaxTime is used instead.ConnectionMap: Specifies which data nodes to connect.DefaultHashMapSize: Set size (in buckets) to use for table hash maps. Three values are supported: 0, 240, and 3840.DefaultOperationRedoProblemAction: How operations are handled in event that RedoOverCommitCounter is exceeded.ExecuteOnComputer: String referencing an earlier defined COMPUTER.ExtraSendBufferMemory: Memory to use for send buffers in addition to any allocated by TotalSendBufferMemory or SendBufferMemory. Default (0) allows up to 16MB.HeartbeatThreadPriority: Set heartbeat thread policy and priority for API nodes; see manual for allowed values.HostName: Host name or IP address for this SQL or API node.Id: Number identifying MySQL server or API node (Id). Now deprecated; use NodeId instead.MaxScanBatchSize: Maximum collective batch size for one scan.NodeId: Number uniquely identifying SQL node or API node among all nodes in cluster.StartConnectBackoffMaxTime: Same as ConnectBackoffMaxTime except that this parameter is used in its place if no data nodes are connected to this API node.TotalSendBufferMemory: Total memory to use for all transporter send buffers.wan: Use WAN TCP setting as default.
For a discussion of MySQL server options for NDB Cluster, see Section 22.3.3.9.1, “MySQL Server Options for NDB Cluster”. For information about MySQL server system variables relating to NDB Cluster, see Section 22.3.3.9.2, “NDB Cluster System Variables”.
To add new SQL or API nodes to the configuration of a running
NDB Cluster, it is necessary to perform a rolling restart of
all cluster nodes after adding new [mysqld]
or [api] sections to the
config.ini file (or files, if you are
using more than one management server). This must be done
before the new SQL or API nodes can connect to the cluster.
It is not necessary to perform any restart of the cluster if new SQL or API nodes can employ previously unused API slots in the cluster configuration to connect to the cluster.
The listings in this section provide information about
parameters used in the [computer],
[tcp], and [shm] sections
of a config.ini file for configuring NDB
Cluster. For detailed descriptions and additional information
about individual parameters, see
Section 22.3.3.10, “NDB Cluster TCP/IP Connections”, or
Section 22.3.3.12, “NDB Cluster Shared-Memory Connections”, as appropriate.
The following parameters apply to the
config.ini file's
[computer] section:
The following parameters apply to the
config.ini file's
[tcp] section:
Checksum: If checksum is enabled, all signals between nodes are checked for errors.Group: Used for group proximity; smaller value is interpreted as being closer.NodeId1: ID of node (data node, API node, or management node) on one side of connection.NodeId2: ID of node (data node, API node, or management node) on one side of connection.NodeIdServer: Set server side of TCP connection.OverloadLimit: When more than this many unsent bytes are in send buffer, connection is considered overloaded.PreSendChecksum: If this parameter and Checksum are both enabled, perform pre-send checksum checks, and check all TCP signals between nodes for errors.Proxy: .ReceiveBufferMemory: Bytes of buffer for signals received by this node.SendBufferMemory: Bytes of TCP buffer for signals sent from this node.SendSignalId: Sends ID in each signal. Used in trace files. Defaults to true in debug builds.TCP_MAXSEG_SIZE: Value used for TCP_MAXSEG.TCP_RCV_BUF_SIZE: Value used for SO_RCVBUF.TCP_SND_BUF_SIZE: Value used for SO_SNDBUF.TcpBind_INADDR_ANY: Bind InAddrAny instead of host name for server part of connection.
The following parameters apply to the
config.ini file's
[shm] section:
Checksum: If checksum is enabled, all signals between nodes are checked for errors.Group: Used for group proximity; smaller value is interpreted as being closer.NodeId1: ID of node (data node, API node, or management node) on one side of connection.NodeId2: ID of node (data node, API node, or management node) on one side of connection.NodeIdServer: Set server side of SHM connection.OverloadLimit: When more than this many unsent bytes are in send buffer, connection is considered overloaded.PreSendChecksum: If this parameter and Checksum are both enabled, perform pre-send checksum checks, and check all SHM signals between nodes for errors.SendBufferMemory: Bytes in shared memory buffer for signals sent from this node.SendSignalId: Sends ID in each signal. Used in trace files.ShmKey: A shared memory key; when set to 1, this is calculated by NDB.ShmSpinTime: When receiving, number of microseconds to spin before sleeping.ShmSize: Size of shared memory segment.Signum: Signal number to be used for signalling.
The following table provides a list of the command-line options,
server and status variables applicable within
mysqld when it is running as an SQL node in
an NDB Cluster. For a table showing all
command-line options, server and status variables available for
use with mysqld, see
Section 5.1.4, “Server Option, System Variable, and Status Variable Reference”.
Com_show_ndb_status: Count of SHOW NDB STATUS statements.Handler_discover: Number of times that tables have been discovered.ndb-batch-size: Size (in bytes) to use for NDB transaction batches.ndb-blob-read-batch-bytes: Specifies size in bytes that large BLOB reads should be batched into. 0 = no limit.ndb-blob-write-batch-bytes: Specifies size in bytes that large BLOB writes should be batched into. 0 = no limit.ndb-cluster-connection-pool: Number of connections to the cluster used by MySQL.ndb-cluster-connection-pool-nodeids: Comma-separated list of node IDs for connections to the cluster used by MySQL; the number of nodes in the list must be the same as the value set for --ndb-cluster-connection-pool.ndb-connectstring: Point to the management server that distributes the cluster configuration.ndb-default-column-format: Use this value (FIXED or DYNAMIC) by default for COLUMN_FORMAT and ROW_FORMAT options when creating or adding columns to a table.ndb-deferred-constraints: Specifies that constraint checks on unique indexes (where these are supported) should be deferred until commit time. Not normally needed or used; for testing purposes only.ndb-distribution: Default distribution for new tables in NDBCLUSTER (KEYHASH or LINHASH, default is KEYHASH).ndb-log-apply-status: Cause a MySQL server acting as a slave to log mysql.ndb_apply_status updates received from its immediate master in its own binary log, using its own server ID. Effective only if the server is started with the --ndbcluster option.ndb-log-empty-epochs: When enabled, causes epochs in which there were no changes to be written to the ndb_apply_status and ndb_binlog_index tables, even when --log-slave-updates is enabled.ndb-log-empty-update: When enabled, causes updates that produced no changes to be written to the ndb_apply_status and ndb_binlog_index tables, even when --log-slave-updates is enabled.ndb-log-exclusive-reads: Log primary key reads with exclusive locks; allow conflict resolution based on read conflicts.ndb-log-fail-terminate: Terminate mysqld process if complete logging of all found row events is not possible.ndb-log-orig: Log originating server id and epoch in mysql.ndb_binlog_index table.ndb-log-transaction-id: Write NDB transaction IDs in the binary log. Requires --log-bin-v1-events=OFF.ndb-log-update-as-write: Toggles logging of updates on the master between updates (OFF) and writes (ON).ndb-mgmd-host: Set the host (and port, if desired) for connecting to management server.ndb-nodeid: NDB Cluster node ID for this MySQL server.ndb-transid-mysql-connection-map: Enable or disable the ndb_transid_mysql_connection_map plugin; that is, enable or disable the INFORMATION_SCHEMA table having that name.ndb-wait-connected: Time (in seconds) for the MySQL server to wait for connection to cluster management and data nodes before accepting MySQL client connections.ndb-wait-setup: Time (in seconds) for the MySQL server to wait for NDB engine setup to complete.ndb-allow-copying-alter-table: Set to OFF to keep ALTER TABLE from using copying operations on NDB tables.Ndb_api_bytes_received_count: Amount of data (in bytes) received from the data nodes by this MySQL Server (SQL node).Ndb_api_bytes_received_count_session: Amount of data (in bytes) received from the data nodes in this client session.Ndb_api_bytes_received_count_slave: Amount of data (in bytes) received from the data nodes by this slave.Ndb_api_bytes_sent_count: Amount of data (in bytes) sent to the data nodes by this MySQL Server (SQL node).Ndb_api_bytes_sent_count_session: Amount of data (in bytes) sent to the data nodes in this client session.Ndb_api_bytes_sent_count_slave: Amount of data (in bytes) sent to the data nodes by this slave.Ndb_api_event_bytes_count: Number of bytes of events received by this MySQL Server (SQL node).Ndb_api_event_bytes_count_injector: Number of bytes of events received by the NDB binary log injector thread.Ndb_api_event_data_count: Number of row change events received by this MySQL Server (SQL node).Ndb_api_event_data_count_injector: Number of row change events received by the NDB binary log injector thread.Ndb_api_event_nondata_count: Number of events received, other than row change events, by this MySQL Server (SQL node).Ndb_api_event_nondata_count_injector: Number of events received, other than row change events, by the NDB binary log injector thread.Ndb_api_pk_op_count: Number of operations based on or using primary keys by this MySQL Server (SQL node).Ndb_api_pk_op_count_session: Number of operations based on or using primary keys in this client session.Ndb_api_pk_op_count_slave: Number of operations based on or using primary keys by this slave.Ndb_api_pruned_scan_count: Number of scans that have been pruned to a single partition by this MySQL Server (SQL node).Ndb_api_pruned_scan_count_session: Number of scans that have been pruned to a single partition in this client session.Ndb_api_pruned_scan_count_slave: Number of scans that have been pruned to a single partition by this slave.Ndb_api_range_scan_count: Number of range scans that have been started by this MySQL Server (SQL node).Ndb_api_range_scan_count_session: Number of range scans that have been started in this client session.Ndb_api_range_scan_count_slave: Number of range scans that have been started by this slave.Ndb_api_read_row_count: Total number of rows that have been read by this MySQL Server (SQL node).Ndb_api_read_row_count_session: Total number of rows that have been read in this client session.Ndb_api_read_row_count_slave: Total number of rows that have been read by this slave.Ndb_api_scan_batch_count: Number of batches of rows received by this MySQL Server (SQL node).Ndb_api_scan_batch_count_session: Number of batches of rows received in this client session.Ndb_api_scan_batch_count_slave: Number of batches of rows received by this slave.Ndb_api_table_scan_count: Number of table scans that have been started, including scans of internal tables, by this MySQL Server (SQL node).Ndb_api_table_scan_count_session: Number of table scans that have been started, including scans of internal tables, in this client session.Ndb_api_table_scan_count_slave: Number of table scans that have been started, including scans of internal tables, by this slave.Ndb_api_trans_abort_count: Number of transactions aborted by this MySQL Server (SQL node).Ndb_api_trans_abort_count_session: Number of transactions aborted in this client session.Ndb_api_trans_abort_count_slave: Number of transactions aborted by this slave.Ndb_api_trans_close_count: Number of transactions aborted (may be greater than the sum of TransCommitCount and TransAbortCount) by this MySQL Server (SQL node).Ndb_api_trans_close_count_session: Number of transactions aborted (may be greater than the sum of TransCommitCount and TransAbortCount) in this client session.Ndb_api_trans_close_count_slave: Number of transactions aborted (may be greater than the sum of TransCommitCount and TransAbortCount) by this slave.Ndb_api_trans_commit_count: Number of transactions committed by this MySQL Server (SQL node).Ndb_api_trans_commit_count_session: Number of transactions committed in this client session.Ndb_api_trans_commit_count_slave: Number of transactions committed by this slave.Ndb_api_trans_local_read_row_count: Total number of rows that have been read by this MySQL Server (SQL node).Ndb_api_trans_local_read_row_count_session: Total number of rows that have been read in this client session.Ndb_api_trans_local_read_row_count_slave: Total number of rows that have been read by this slave.Ndb_api_trans_start_count: Number of transactions started by this MySQL Server (SQL node).Ndb_api_trans_start_count_session: Number of transactions started in this client session.Ndb_api_trans_start_count_slave: Number of transactions started by this slave.Ndb_api_uk_op_count: Number of operations based on or using unique keys by this MySQL Server (SQL node).Ndb_api_uk_op_count_session: Number of operations based on or using unique keys in this client session.Ndb_api_uk_op_count_slave: Number of operations based on or using unique keys by this slave.Ndb_api_wait_exec_complete_count: Number of times thread has been blocked while waiting for execution of an operation to complete by this MySQL Server (SQL node).Ndb_api_wait_exec_complete_count_session: Number of times thread has been blocked while waiting for execution of an operation to complete in this client session.Ndb_api_wait_exec_complete_count_slave: Number of times thread has been blocked while waiting for execution of an operation to complete by this slave.Ndb_api_wait_meta_request_count: Number of times thread has been blocked waiting for a metadata-based signal by this MySQL Server (SQL node).Ndb_api_wait_meta_request_count_session: Number of times thread has been blocked waiting for a metadata-based signal in this client session.Ndb_api_wait_meta_request_count_slave: Number of times thread has been blocked waiting for a metadata-based signal by this slave.Ndb_api_wait_nanos_count: Total time (in nanoseconds) spent waiting for some type of signal from the data nodes by this MySQL Server (SQL node).Ndb_api_wait_nanos_count_session: Total time (in nanoseconds) spent waiting for some type of signal from the data nodes in this client session.Ndb_api_wait_nanos_count_slave: Total time (in nanoseconds) spent waiting for some type of signal from the data nodes by this slave.Ndb_api_wait_scan_result_count: Number of times thread has been blocked while waiting for a scan-based signal by this MySQL Server (SQL node).Ndb_api_wait_scan_result_count_session: Number of times thread has been blocked while waiting for a scan-based signal in this client session.Ndb_api_wait_scan_result_count_slave: Number of times thread has been blocked while waiting for a scan-based signal by this slave.ndb_autoincrement_prefetch_sz: NDB auto-increment prefetch size.ndb_cache_check_time: Number of milliseconds between checks of cluster SQL nodes made by the MySQL query cache.ndb_clear_apply_status: Causes RESET SLAVE to clear all rows from the ndb_apply_status table; ON by default.Ndb_cluster_node_id: If the server is acting as an NDB Cluster node, then the value of this variable its node ID in the cluster.Ndb_config_from_host: The host name or IP address of the Cluster management server Formerly Ndb_connected_host.Ndb_config_from_port: The port for connecting to Cluster management server. Formerly Ndb_connected_port.Ndb_conflict_fn_epoch: Number of rows that have been found in conflict by the NDB$EPOCH() conflict detection function.Ndb_conflict_fn_epoch2: Number of rows that have been found in conflict by the NDB$EPOCH2() conflict detection function.Ndb_conflict_fn_epoch2_trans: Number of rows that have been found in conflict by the NDB$EPOCH2_TRANS() conflict detection function.Ndb_conflict_fn_epoch_trans: Number of rows that have been found in conflict by the NDB$EPOCH_TRANS() conflict detection function.Ndb_conflict_fn_max: If the server is part of an NDB Cluster involved in cluster replication, the value of this variable indicates the number of times that conflict resolution based on "greater timestamp wins" has been applied.Ndb_conflict_fn_old: If the server is part of an NDB Cluster involved in cluster replication, the value of this variable indicates the number of times that "same timestamp wins" conflict resolution has been applied.Ndb_conflict_last_conflict_epoch: Most recent NDB epoch on this slave in which a conflict was detected.Ndb_conflict_last_stable_epoch: Number of rows found to be in conflict by a transactional conflict function.Ndb_conflict_reflected_op_discard_count: Number of reflected operations that were not applied due an error during execution.Ndb_conflict_reflected_op_prepare_count: Number of reflected operations received that have been prepared for execution.Ndb_conflict_refresh_op_count: Number of refresh operations that have been prepared.Ndb_conflict_trans_conflict_commit_count: Number of epoch transactions committed after requiring transactional conflict handling.Ndb_conflict_trans_detect_iter_count: Number of internal iterations required to commit an epoch transaction. Should be (slightly) greater than or equal to Ndb_conflict_trans_conflict_commit_count.Ndb_conflict_trans_reject_count: Number of transactions rejected after being found in conflict by a transactional conflict function.Ndb_conflict_trans_row_conflict_count: Number of rows found in conflict by a transactional conflict function. Includes any rows included in or dependent on conflicting transactions.Ndb_conflict_trans_row_reject_count: Total number of rows realigned after being found in conflict by a transactional conflict function. Includes Ndb_conflict_trans_row_conflict_count and any rows included in or dependent on conflicting transactions.ndb_data_node_neighbour: Specifies cluster data node "closest" to this MySQL Server, for transaction hinting and fully replicated tables.ndb_default_column_format: Sets default row format and column format (FIXED or DYNAMIC) used for new NDB tables.ndb_deferred_constraints: Specifies that constraint checks should be deferred (where these are supported). Not normally needed or used; for testing purposes only.ndb_dbg_check_shares: Check for any lingering shares (debug builds only).ndb-schema-dist-timeout: How long to wait before detecting timeout during schema distribution.ndb_distribution: Default distribution for new tables in NDBCLUSTER (KEYHASH or LINHASH, default is KEYHASH).Ndb_epoch_delete_delete_count: Number of delete-delete conflicts detected (delete operation is applied, but row does not exist).ndb_eventbuffer_free_percent: Percentage of free memory that should be available in event buffer before resumption of buffering, after reaching limit set by ndb_eventbuffer_max_alloc.ndb_eventbuffer_max_alloc: Maximum memory that can be allocated for buffering events by the NDB API. Defaults to 0 (no limit).Ndb_execute_count: Provides the number of round trips to the NDB kernel made by operations.ndb_extra_logging: Controls logging of NDB Cluster schema, connection, and data distribution events in the MySQL error log.ndb_force_send: Forces sending of buffers to NDB immediately, without waiting for other threads.ndb_fully_replicated: Whether new NDB tables are fully replicated.ndb_index_stat_enable: Use NDB index statistics in query optimization.ndb_index_stat_option: Comma-separated list of tunable options for NDB index statistics; the list should contain no spaces.ndb_join_pushdown: Enables pushing down of joins to data nodes.Ndb_last_commit_epoch_server: Epoch most recently committed by NDB.Ndb_last_commit_epoch_session: Epoch most recently committed by this NDB client.ndb_log_apply_status: Whether or not a MySQL server acting as a slave logs mysql.ndb_apply_status updates received from its immediate master in its own binary log, using its own server ID.ndb_log_bin: Write updates to NDB tables in the binary log. Effective only if binary logging is enabled with --log-bin.ndb_log_binlog_index: Insert mapping between epochs and binary log positions into the ndb_binlog_index table. Defaults to ON. Effective only if binary logging is enabled on the server.ndb_log_empty_epochs: When enabled, epochs in which there were no changes are written to the ndb_apply_status and ndb_binlog_index tables, even when log_slave_updates is enabled.ndb_log_empty_update: When enabled, updates which produce no changes are written to the ndb_apply_status and ndb_binlog_index tables, even when log_slave_updates is enabled.ndb_log_exclusive_reads: Log primary key reads with exclusive locks; allow conflict resolution based on read conflicts.ndb_log_orig: Whether the id and epoch of the originating server are recorded in the mysql.ndb_binlog_index table. Set using the --ndb-log-orig option when starting mysqld.ndb_log_transaction_id: Whether NDB transaction IDs are written into the binary log (Read-only.).ndb-log-update-minimal: Log updates in a minimal format.ndb-log-updated-only: Log complete rows (ON) or updates only (OFF).ndb_metadata_check: Enable auto-detection of NDB metadata changes with respect to MySQL data dictionary; enabled by default.Ndb_metadata_blacklist_size: Number of NDB metadata objects that NDB binlog thread has failed to synchronize; renamed in NDB 8.0.22 as Ndb_metadata_excluded_count.ndb_metadata_check_interval: Interval in seconds to perform check for NDB metadata changes with respect to MySQL data dictionary.Ndb_metadata_detected_count: Number of times NDB metadata change monitor thread has detected changes.Ndb_metadata_excluded_count: Number of NDB metadata objects that NDB binlog thread has failed to synchronize.Ndb_metadata_synced_count: Number of NDB metadata objects which have been synchronized.Ndb_number_of_data_nodes: If the server is part of an NDB Cluster, the value of this variable is the number of data nodes in the cluster.ndb-optimization-delay: Sets the number of milliseconds to wait between processing sets of rows by OPTIMIZE TABLE on NDB tables.ndb_optimized_node_selection: Determines how an SQL node chooses a cluster data node to use as transaction coordinator.Ndb_pruned_scan_count: Number of scans executed by NDB since the cluster was last started where partition pruning could be used.Ndb_pushed_queries_defined: Number of joins that API nodes have attempted to push down to the data nodes.Ndb_pushed_queries_dropped: Number of joins that API nodes have tried to push down, but failed.Ndb_pushed_queries_executed: Number of joins successfully pushed down and executed on the data nodes.Ndb_pushed_reads: Number of reads executed on the data nodes by pushed-down joins.ndb_read_backup: Enable read from any replica for all NDB tables; use NDB_TABLE=READ_BACKUP={0|1} with CREATE TABLE or ALTER TABLE to enable or disable for individual NDB tables.ndb_recv_thread_activation_threshold: Activation threshold when receive thread takes over the polling of the cluster connection (measured in concurrently active threads).ndb_recv_thread_cpu_mask: CPU mask for locking receiver threads to specific CPUs; specified as hexadecimal. See documentation for details.ndb_report_thresh_binlog_epoch_slip: NDB 7.5.4 and later: Threshold for number of epochs completely buffered, but not yet consumed by binlog injector thread which when exceeded generates BUFFERED_EPOCHS_OVER_THRESHOLD event buffer status message; prior to NDB 7.5.4: Threshold for number of epochs to lag behind before reporting binary log status.ndb_report_thresh_binlog_mem_usage: This is a threshold on the percentage of free memory remaining before reporting binary log status.ndb_row_checksum: When enabled, set row checksums; enabled by default.Ndb_scan_count: The total number of scans executed by NDB since the cluster was last started.ndb_schema_dist_lock_wait_timeout: Time during schema distribution to wait for lock before returning error.ndb_schema_dist_timeout: Time to wait before detecting timeout during schema distribution.ndb_schema_dist_upgrade_allowed: Allow schema distribution table upgrade when connecting to NDB.ndb_show_foreign_key_mock_tables: Show the mock tables used to support foreign_key_checks=0.ndb_slave_conflict_role: Role for slave to play in conflict detection and resolution. Value is one of PRIMARY, SECONDARY, PASS, or NONE (default). Can be changed only when slave SQL thread is stopped. See documentation for further information.Ndb_slave_max_replicated_epoch: The most recently committed NDB epoch on this slave. When this value is greater than or equal to Ndb_conflict_last_conflict_epoch, no conflicts have yet been detected.Ndb_system_name: Configured cluster system name; empty if server not connected to NDB.ndb_table_no_logging: NDB tables created when this setting is enabled are not checkpointed to disk (although table schema files are created). The setting in effect when the table is created with or altered to use NDBCLUSTER persists for the lifetime of the table.ndb_table_temporary: NDB tables are not persistent on disk: no schema files are created and the tables are not logged.Ndb_trans_hint_count_session: Number of transactions using hints that have been started in this session.ndb_use_copying_alter_table: Use copying ALTER TABLE operations in NDB Cluster.ndb_use_exact_count: Use exact row count when planning queries.ndb_use_transactions: Forces NDB to use a count of records during SELECT COUNT(*) query planning to speed up this type of query.ndb_version: Shows build and NDB engine version as an integer.ndb_version_string: Shows build information including NDB engine version in ndb-x.y.z format.ndbcluster: Enable NDB Cluster (if this version of MySQL supports it). Disabled by--skip-ndbcluster.ndbinfo: Enable ndbinfo plugin, if supported.ndbinfo_database: The name used for the NDB information database; read only.ndbinfo_max_bytes: Used for debugging only.ndbinfo_max_rows: Used for debugging only.ndbinfo_offline: Put the ndbinfo database into offline mode, in which no rows are returned from tables or views.ndbinfo_show_hidden: Whether to show ndbinfo internal base tables in the mysql client. The default is OFF.ndbinfo_table_prefix: The prefix to use for naming ndbinfo internal base tables.ndbinfo_version: The version of the ndbinfo engine; read only.server_id_bits: Sets the number of least significant bits in the server_id actually used for identifying the server, permitting NDB API applications to store application data in the most significant bits. server_id must be less than 2 to the power of this value.skip-ndbcluster: Disable the NDB Cluster storage engine.slave_allow_batching: Turns update batching on and off for a replication slave.transaction_allow_batching: Allows batching of statements within a transaction. Disable AUTOCOMMIT to use.
- 22.3.3.1 NDB Cluster Configuration: Basic Example
- 22.3.3.2 Recommended Starting Configuration for NDB Cluster
- 22.3.3.3 NDB Cluster Connection Strings
- 22.3.3.4 Defining Computers in an NDB Cluster
- 22.3.3.5 Defining an NDB Cluster Management Server
- 22.3.3.6 Defining NDB Cluster Data Nodes
- 22.3.3.7 Defining SQL and Other API Nodes in an NDB Cluster
- 22.3.3.8 Defining the System
- 22.3.3.9 MySQL Server Options and Variables for NDB Cluster
- 22.3.3.10 NDB Cluster TCP/IP Connections
- 22.3.3.11 NDB Cluster TCP/IP Connections Using Direct Connections
- 22.3.3.12 NDB Cluster Shared-Memory Connections
- 22.3.3.13 Data Node Memory Management
- 22.3.3.14 Configuring NDB Cluster Send Buffer Parameters
Configuring NDB Cluster requires working with two files:
my.cnf: Specifies options for all NDB Cluster executables. This file, with which you should be familiar with from previous work with MySQL, must be accessible by each executable running in the cluster.config.ini: This file, sometimes known as the global configuration file, is read only by the NDB Cluster management server, which then distributes the information contained therein to all processes participating in the cluster.config.inicontains a description of each node involved in the cluster. This includes configuration parameters for data nodes and configuration parameters for connections between all nodes in the cluster. For a quick reference to the sections that can appear in this file, and what sorts of configuration parameters may be placed in each section, see Sections of theconfig.iniFile.
Caching of configuration data.
NDB uses stateful
configuration. Rather than reading the global
configuration file every time the management server is
restarted, the management server caches the configuration the
first time it is started, and thereafter, the global
configuration file is read only when one of the following
conditions is true:
The management server is started using the --initial option. When
--initialis used, the global configuration file is re-read, any existing cache files are deleted, and the management server creates a new configuration cache.The management server is started using the --reload option. The
--reloadoption causes the management server to compare its cache with the global configuration file. If they differ, the management server creates a new configuration cache; any existing configuration cache is preserved, but not used. If the management server's cache and the global configuration file contain the same configuration data, then the existing cache is used, and no new cache is created.The management server is started using --config-cache=FALSE. This disables
--config-cache(enabled by default), and can be used to force the management server to bypass configuration caching altogether. In this case, the management server ignores any configuration files that may be present, always reading its configuration data from theconfig.inifile instead.No configuration cache is found. In this case, the management server reads the global configuration file and creates a cache containing the same configuration data as found in the file.
Configuration cache files.
The management server by default creates configuration cache
files in a directory named mysql-cluster in
the MySQL installation directory. (If you build NDB Cluster from
source on a Unix system, the default location is
/usr/local/mysql-cluster.) This can be
overridden at runtime by starting the management server with the
--configdir option.
Configuration cache files are binary files named according to
the pattern
ndb_,
where node_id_config.bin.seq_idnode_id is the management
server's node ID in the cluster, and
seq_id is a cache idenitifer. Cache
files are numbered sequentially using
seq_id, in the order in which they
are created. The management server uses the latest cache file as
determined by the seq_id.
It is possible to roll back to a previous configuration by
deleting later configuration cache files, or by renaming an
earlier cache file so that it has a higher
seq_id. However, since configuration
cache files are written in a binary format, you should not
attempt to edit their contents by hand.
For more information about the
--configdir,
--config-cache,
--initial, and
--reload options for the NDB
Cluster management server, see
Section 22.4.4, “ndb_mgmd — The NDB Cluster Management Server Daemon”.
We are continuously making improvements in Cluster configuration and attempting to simplify this process. Although we strive to maintain backward compatibility, there may be times when introduce an incompatible change. In such cases we will try to let Cluster users know in advance if a change is not backward compatible. If you find such a change and we have not documented it, please report it in the MySQL bugs database using the instructions given in Section 1.7, “How to Report Bugs or Problems”.
To support NDB Cluster, you will need to update
my.cnf as shown in the following example.
You may also specify these parameters on the command line when
invoking the executables.
The options shown here should not be confused with those that
are used in config.ini global
configuration files. Global configuration options are
discussed later in this section.
# my.cnf # example additions to my.cnf for NDB Cluster # (valid in MySQL 8.0) # enable ndbcluster storage engine, and provide connection string for # management server host (default port is 1186) [mysqld] ndbcluster ndb-connectstring=ndb_mgmd.mysql.com # provide connection string for management server host (default port: 1186) [ndbd] connect-string=ndb_mgmd.mysql.com # provide connection string for management server host (default port: 1186) [ndb_mgm] connect-string=ndb_mgmd.mysql.com # provide location of cluster configuration file [ndb_mgmd] config-file=/etc/config.ini
(For more information on connection strings, see Section 22.3.3.3, “NDB Cluster Connection Strings”.)
# my.cnf # example additions to my.cnf for NDB Cluster # (will work on all versions) # enable ndbcluster storage engine, and provide connection string for management # server host to the default port 1186 [mysqld] ndbcluster ndb-connectstring=ndb_mgmd.mysql.com:1186
Once you have started a mysqld process with
the NDBCLUSTER and
ndb-connectstring parameters in the
[mysqld] in the my.cnf
file as shown previously, you cannot execute any
CREATE TABLE or
ALTER TABLE statements without
having actually started the cluster. Otherwise, these
statements will fail with an error. This is by
design.
You may also use a separate [mysql_cluster]
section in the cluster my.cnf file for
settings to be read and used by all executables:
# cluster-specific settings [mysql_cluster] ndb-connectstring=ndb_mgmd.mysql.com:1186
For additional NDB variables that
can be set in the my.cnf file, see
Section 22.3.3.9.2, “NDB Cluster System Variables”.
The NDB Cluster global configuration file is by convention named
config.ini (but this is not required). If
needed, it is read by ndb_mgmd at startup and
can be placed in any location that can be read by it. The
location and name of the configuration are specified using
--config-file=
with ndb_mgmd on the command line. This
option has no default value, and is ignored if
ndb_mgmd uses the configuration cache.
path_name
The global configuration file for NDB Cluster uses INI format,
which consists of sections preceded by section headings
(surrounded by square brackets), followed by the appropriate
parameter names and values. One deviation from the standard INI
format is that the parameter name and value can be separated by
a colon (:) as well as the equal sign
(=); however, the equal sign is preferred.
Another deviation is that sections are not uniquely identified
by section name. Instead, unique sections (such as two different
nodes of the same type) are identified by a unique ID specified
as a parameter within the section.
Default values are defined for most parameters, and can also be
specified in config.ini. To create a
default value section, simply add the word
default to the section name. For example, an
[ndbd] section contains parameters that apply
to a particular data node, whereas an [ndbd
default] section contains parameters that apply to all
data nodes. Suppose that all data nodes should use the same data
memory size. To configure them all, create an [ndbd
default] section that contains a
DataMemory line to
specify the data memory size.
If used, the [ndbd default] section must
precede any [ndbd] sections in the
configuration file. This is also true for
default sections of any other type.
In some older releases of NDB Cluster, there was no default
value for
NoOfReplicas, which
always had to be specified explicitly in the [ndbd
default] section. Although this parameter now has a
default value of 2, which is the recommended setting in most
common usage scenarios, it is still recommended practice to
set this parameter explicitly.
The global configuration file must define the computers and nodes involved in the cluster and on which computers these nodes are located. An example of a simple configuration file for a cluster consisting of one management server, two data nodes and two MySQL servers is shown here:
# file "config.ini" - 2 data nodes and 2 SQL nodes # This file is placed in the startup directory of ndb_mgmd (the # management server) # The first MySQL Server can be started from any host. The second # can be started only on the host mysqld_5.mysql.com [ndbd default] NoOfReplicas= 2 DataDir= /var/lib/mysql-cluster [ndb_mgmd] Hostname= ndb_mgmd.mysql.com DataDir= /var/lib/mysql-cluster [ndbd] HostName= ndbd_2.mysql.com [ndbd] HostName= ndbd_3.mysql.com [mysqld] [mysqld] HostName= mysqld_5.mysql.com
The preceding example is intended as a minimal starting configuration for purposes of familiarization with NDB Cluster , and is almost certain not to be sufficient for production settings. See Section 22.3.3.2, “Recommended Starting Configuration for NDB Cluster”, which provides a more complete example starting configuration.
Each node has its own section in the
config.ini file. For example, this cluster
has two data nodes, so the preceding configuration file contains
two [ndbd] sections defining these nodes.
Do not place comments on the same line as a section heading in
the config.ini file; this causes the
management server not to start because it cannot parse the
configuration file in such cases.
Sections of the config.ini File
There are six different sections that you can use in the
config.ini configuration file, as described
in the following list:
[computer]: Defines cluster hosts. This is not required to configure a viable NDB Cluster, but be may used as a convenience when setting up a large cluster. See Section 22.3.3.4, “Defining Computers in an NDB Cluster”, for more information.[ndbd]: Defines a cluster data node (ndbd process). See Section 22.3.3.6, “Defining NDB Cluster Data Nodes”, for details.[mysqld]: Defines the cluster's MySQL server nodes (also called SQL or API nodes). For a discussion of SQL node configuration, see Section 22.3.3.7, “Defining SQL and Other API Nodes in an NDB Cluster”.[mgm]or[ndb_mgmd]: Defines a cluster management server (MGM) node. For information concerning the configuration of management nodes, see Section 22.3.3.5, “Defining an NDB Cluster Management Server”.[tcp]: Defines a TCP/IP connection between cluster nodes, with TCP/IP being the default connection protocol. Normally,[tcp]or[tcp default]sections are not required to set up an NDB Cluster, as the cluster handles this automatically; however, it may be necessary in some situations to override the defaults provided by the cluster. See Section 22.3.3.10, “NDB Cluster TCP/IP Connections”, for information about available TCP/IP configuration parameters and how to use them. (You may also find Section 22.3.3.11, “NDB Cluster TCP/IP Connections Using Direct Connections” to be of interest in some cases.)[shm]: Defines shared-memory connections between nodes. In MySQL 8.0, it is enabled by default, but should still be considered experimental. For a discussion of SHM interconnects, see Section 22.3.3.12, “NDB Cluster Shared-Memory Connections”.[sci]: Defines Scalable Coherent Interface connections between cluster data nodes. Not supported in NDB 8.0.
You can define default values for each
section. If used, a default section should
come before any other sections of that type. For example, an
[ndbd default] section should appear in the
configuration file before any [ndbd]
sections.
NDB Cluster parameter names are case-insensitive, unless
specified in MySQL Server my.cnf or
my.ini files.
Achieving the best performance from an NDB Cluster depends on a number of factors including the following:
NDB Cluster software version
Numbers of data nodes and SQL nodes
Hardware
Operating system
Amount of data to be stored
Size and type of load under which the cluster is to operate
Therefore, obtaining an optimum configuration is likely to be an iterative process, the outcome of which can vary widely with the specifics of each NDB Cluster deployment. Changes in configuration are also likely to be indicated when changes are made in the platform on which the cluster is run, or in applications that use the NDB Cluster 's data. For these reasons, it is not possible to offer a single configuration that is ideal for all usage scenarios. However, in this section, we provide a recommended base configuration.
Starting config.ini file.
The following config.ini file is a
recommended starting point for configuring a cluster running
NDB Cluster 8.0:
# TCP PARAMETERS [tcp default]SendBufferMemory=2MReceiveBufferMemory=2M # Increasing the sizes of these 2 buffers beyond the default values # helps prevent bottlenecks due to slow disk I/O. # MANAGEMENT NODE PARAMETERS [ndb_mgmd default]DataDir=path/to/management/server/data/directory# It is possible to use a different data directory for each management # server, but for ease of administration it is preferable to be # consistent. [ndb_mgmd]HostName=management-server-A-hostname#NodeId=management-server-A-nodeid[ndb_mgmd]HostName=management-server-B-hostname#NodeId=management-server-B-nodeid# Using 2 management servers helps guarantee that there is always an # arbitrator in the event of network partitioning, and so is # recommended for high availability. Each management server must be # identified by a HostName. You may for the sake of convenience specify # a NodeId for any management server, although one will be allocated # for it automatically; if you do so, it must be in the range 1-255 # inclusive and must be unique among all IDs specified for cluster # nodes. # DATA NODE PARAMETERS [ndbd default]NoOfReplicas=2 # Using 2 replicas is recommended to guarantee availability of data; # using only 1 replica does not provide any redundancy, which means # that the failure of a single data node causes the entire cluster to # shut down. As of NDB 8.0.19, it is also possible (but not required) to # use more than 2 replicas, although 2 replicas are sufficient to provide # high availability.LockPagesInMainMemory=1 # On Linux and Solaris systems, setting this parameter locks data node # processes into memory. Doing so prevents them from swapping to disk, # which can severely degrade cluster performance.DataMemory=3456M # The value provided for DataMemory assumes 4 GB RAM # per data node. However, for best results, you should first calculate # the memory that would be used based on the data you actually plan to # store (you may find the ndb_size.pl utility helpful in estimating # this), then allow an extra 20% over the calculated values. Naturally, # you should ensure that each data node host has at least as much # physical memory as the sum of these two values. #ODirect=1 # Enabling this parameter causes NDBCLUSTER to try using O_DIRECT # writes for local checkpoints and redo logs; this can reduce load on # CPUs. We recommend doing so when using NDB Cluster on systems running # Linux kernel 2.6 or later.NoOfFragmentLogFiles=300DataDir=path/to/data/node/data/directoryMaxNoOfConcurrentOperations=100000SchedulerSpinTimer=400SchedulerExecutionTimer=100RealTimeScheduler=1 # Setting these parameters allows you to take advantage of real-time scheduling # of NDB threads to achieve increased throughput when using ndbd. They # are not needed when using ndbmtd; in particular, you should not set #RealTimeSchedulerfor ndbmtd data nodes.TimeBetweenGlobalCheckpoints=1000TimeBetweenEpochs=200RedoBuffer=32M #CompressedLCP=1 #CompressedBackup=1 # Enabling CompressedLCP and CompressedBackup causes, respectively, local checkpoint files and backup files to be compressed, which can result in a space savings of up to 50% over noncompressed LCPs and backups. #MaxNoOfLocalScans=64MaxNoOfTables=1024MaxNoOfOrderedIndexes=256 [ndbd]HostName=data-node-A-hostname#NodeId=data-node-A-nodeidLockExecuteThreadToCPU=1LockMaintThreadsToCPU=0 # On systems with multiple CPUs, these parameters can be used to lock NDBCLUSTER # threads to specific CPUs [ndbd]HostName=data-node-B-hostname#NodeId=data-node-B-nodeidLockExecuteThreadToCPU=1LockMaintThreadsToCPU=0 # You must have an [ndbd] section for every data node in the cluster; # each of these sections must include a HostName. Each section may # optionally include a NodeId for convenience, but in most cases, it is # sufficient to allow the cluster to allocate node IDs dynamically. If # you do specify the node ID for a data node, it must be in the range 1 # to 144 inclusive and must be unique among all IDs specified for # cluster nodes. (Previous to NDB 8.0.18, this range was 1 to 48 inclusive.) # SQL NODE / API NODE PARAMETERS [mysqld] #HostName=sql-node-A-hostname#NodeId=sql-node-A-nodeid[mysqld] [mysqld] # Each API or SQL node that connects to the cluster requires a [mysqld] # or [api] section of its own. Each such section defines a connection # “slot”; you should have at least as many of these sections in the # config.ini file as the total number of API nodes and SQL nodes that # you wish to have connected to the cluster at any given time. There is # no performance or other penalty for having extra slots available in # case you find later that you want or need more API or SQL nodes to # connect to the cluster at the same time. # If no HostName is specified for a given [mysqld] or [api] section, # then any API or SQL node may use that slot to connect to the # cluster. You may wish to use an explicit HostName for one connection slot # to guarantee that an API or SQL node from that host can always # connect to the cluster. If you wish to prevent API or SQL nodes from # connecting from other than a desired host or hosts, then use a # HostName for every [mysqld] or [api] section in the config.ini file. # You can if you wish define a node ID (NodeId parameter) for any API or # SQL node, but this is not necessary; if you do so, it must be in the # range 1 to 255 inclusive and must be unique among all IDs specified # for cluster nodes.
Recommended my.cnf options for SQL nodes.
MySQL Servers acting as NDB Cluster SQL nodes must always be
started with the --ndbcluster
and --ndb-connectstring options, either on
the command line or in my.cnf. In
addition, set the following options for all
mysqld processes in the cluster, unless
your setup requires otherwise:
--ndb-use-exact-count=0--ndb-index-stat-enable=0--ndb-force-send=1--optimizer-switch=engine_condition_pushdown=on
With the exception of the NDB Cluster management server (ndb_mgmd), each node that is part of an NDB Cluster requires a connection string that points to the management server's location. This connection string is used in establishing a connection to the management server as well as in performing other tasks depending on the node's role in the cluster. The syntax for a connection string is as follows:
[nodeid=node_id, ]host-definition[,host-definition[, ...]]host-definition:host_name[:port_number]
node_id is an integer greater than or equal
to 1 which identifies a node in config.ini.
host_name is a string representing a
valid Internet host name or IP address.
port_number is an integer referring
to a TCP/IP port number.
example 1 (long): "nodeid=2,myhost1:1100,myhost2:1100,198.51.100.3:1200" example 2 (short): "myhost1"
localhost:1186 is used as the default
connection string value if none is provided. If
port_num is omitted from the
connection string, the default port is 1186. This port should
always be available on the network because it has been assigned
by IANA for this purpose (see
http://www.iana.org/assignments/port-numbers for
details).
By listing multiple host definitions, it is possible to designate several redundant management servers. An NDB Cluster data or API node attempts to contact successive management servers on each host in the order specified, until a successful connection has been established.
It is also possible to specify in a connection string one or more bind addresses to be used by nodes having multiple network interfaces for connecting to management servers. A bind address consists of a hostname or network address and an optional port number. This enhanced syntax for connection strings is shown here:
[nodeid=node_id, ] [bind-address=host-definition, ]host-definition[; bind-address=host-definition]host-definition[; bind-address=host-definition] [, ...]]host-definition:host_name[:port_number]
If a single bind address is used in the connection string
prior to specifying any management hosts,
then this address is used as the default for connecting to any
of them (unless overridden for a given management server; see
later in this section for an example). For example, the
following connection string causes the node to use
198.51.100.242 regardless of the management
server to which it connects:
bind-address=198.51.100.242, poseidon:1186, perch:1186
If a bind address is specified following a management host definition, then it is used only for connecting to that management node. Consider the following connection string:
poseidon:1186;bind-address=localhost, perch:1186;bind-address=198.51.100.242
In this case, the node uses localhost to
connect to the management server running on the host named
poseidon and
198.51.100.242 to connect to the management
server running on the host named perch.
You can specify a default bind address and then override this
default for one or more specific management hosts. In the
following example, localhost is used for
connecting to the management server running on host
poseidon; since
198.51.100.242 is specified first (before any
management server definitions), it is the default bind address
and so is used for connecting to the management servers on hosts
perch and orca:
bind-address=198.51.100.242,poseidon:1186;bind-address=localhost,perch:1186,orca:2200
There are a number of different ways to specify the connection string:
Each executable has its own command-line option which enables specifying the management server at startup. (See the documentation for the respective executable.)
It is also possible to set the connection string for all nodes in the cluster at once by placing it in a
[mysql_cluster]section in the management server'smy.cnffile.For backward compatibility, two other options are available, using the same syntax:
Set the
NDB_CONNECTSTRINGenvironment variable to contain the connection string.Write the connection string for each executable into a text file named
Ndb.cfgand place this file in the executable's startup directory.
However, these are now deprecated and should not be used for new installations.
The recommended method for specifying the connection string is
to set it on the command line or in the
my.cnf file for each executable.
The [computer] section has no real
significance other than serving as a way to avoid the need of
defining host names for each node in the system. All parameters
mentioned here are required.
-
Table 22.7 This table provides type and value information for the Id computer configuration parameter
Property Value Version (or later) NDB 8.0.13 Type or units string Default [none] Range ... Restart Type IS This is a unique identifier, used to refer to the host computer elsewhere in the configuration file.
ImportantThe computer ID is not the same as the node ID used for a management, API, or data node. Unlike the case with node IDs, you cannot use
NodeIdin place ofIdin the[computer]section of theconfig.inifile. -
Table 22.8 This table provides type and value information for the HostName computer configuration parameter
Property Value Version (or later) NDB 8.0.13 Type or units name or IP address Default [none] Range ... Restart Type N This is the computer's hostname or IP address.
Restart types. Information about the restart types used by the parameter descriptions in this section is shown in the following table:
Table 22.9 NDB Cluster restart types
| Symbol | Restart Type | Description |
|---|---|---|
| N | Node | The parameter can be updated using a rolling restart (see Section 22.5.5, “Performing a Rolling Restart of an NDB Cluster”) |
| S | System | All cluster nodes must be shut down completely, then restarted, to effect a change in this parameter |
| I | Initial | Data nodes must be restarted using the
--initial option |
The [ndb_mgmd] section is used to configure
the behavior of the management server. If multiple management
servers are employed, you can specify parameters common to all
of them in an [ndb_mgmd default] section.
[mgm] and [mgm default]
are older aliases for these, supported for backward
compatibility.
All parameters in the following list are optional and assume their default values if omitted.
If neither the ExecuteOnComputer nor the
HostName parameter is present, the default
value localhost will be assumed for both.
-
Table 22.10 This table provides type and value information for the Id management node configuration parameter
Property Value Version (or later) NDB 8.0.13 Type or units unsigned Default [none] Range 1 - 255 Restart Type IS Each node in the cluster has a unique identity. For a management node, this is represented by an integer value in the range 1 to 255, inclusive. This ID is used by all internal cluster messages for addressing the node, and so must be unique for each NDB Cluster node, regardless of the type of node.
NoteData node IDs must be less than 145. If you plan to deploy a large number of data nodes, it is a good idea to limit the node IDs for management nodes (and API nodes) to values greater than 144. (In NDB 8.0.17 and earlier, the maximum value for a data node ID was 48.)
The use of the
Idparameter for identifying management nodes is deprecated in favor ofNodeId. AlthoughIdcontinues to be supported for backward compatibility, it now generates a warning and is subject to removal in a future version of NDB Cluster. -
Table 22.11 This table provides type and value information for the NodeId management node configuration parameter
Property Value Version (or later) NDB 8.0.13 Type or units unsigned Default [none] Range 1 - 255 Restart Type IS Each node in the cluster has a unique identity. For a management node, this is represented by an integer value in the range 1 to 255 inclusive. This ID is used by all internal cluster messages for addressing the node, and so must be unique for each NDB Cluster node, regardless of the type of node.
NoteAs of NDB 8.0.18, data node IDs must be less than 145. (Previously, this was less than 49.) If you plan to deploy a large number of data nodes, it is a good idea to limit the node IDs for management nodes (and API nodes) to values greater than 144.
NodeIdis the preferred parameter name to use when identifying management nodes. Although the olderIdcontinues to be supported for backward compatibility, it is now deprecated and generates a warning when used; it is also subject to removal in a future NDB Cluster release. -
Table 22.12 This table provides type and value information for the ExecuteOnComputer management node configuration parameter
Property Value Version (or later) NDB 8.0.13 Type or units name Default [none] Range ... Restart Type S This refers to the
Idset for one of the computers defined in a[computer]section of theconfig.inifile.ImportantThis parameter is deprecated, and is subject to removal in a future release. Use the
HostNameparameter instead. -
Table 22.13 This table provides type and value information for the PortNumber management node configuration parameter
Property Value Version (or later) NDB 8.0.13 Type or units unsigned Default 1186 Range 0 - 64K Restart Type S This is the port number on which the management server listens for configuration requests and management commands.
The node ID for this node can be given out only to connections that explicitly request it. A management server that requests “any” node ID cannot use this one. This parameter can be used when running multiple management servers on the same host, and
HostNameis not sufficient for distinguishing among processes. Intended for use in testing.-
Table 22.14 This table provides type and value information for the HostName management node configuration parameter
Property Value Version (or later) NDB 8.0.13 Type or units name or IP address Default [none] Range ... Restart Type N Specifying this parameter defines the hostname of the computer on which the management node is to reside. To specify a hostname other than
localhost, either this parameter orExecuteOnComputeris required. -
Table 22.15 This table provides type and value information for the LocationDomainId management node configuration parameter
Property Value Version (or later) NDB 8.0.13 Type or units integer Default 0 Range 0 - 16 Restart Type S Assigns a management node to a specific availability domain (also known as an availability zone) within a cloud. By informing
NDBwhich nodes are in which availability domains, performance can be improved in a cloud environment in the following ways:If requested data is not found on the same node, reads can be directed to another node in the same availability domain.
Communication between nodes in different availability domains are guaranteed to use
NDBtransporters' WAN support without any further manual intervention.The transporter's group number can be based on which availability domain is used, such that also SQL and other API nodes communicate with local data nodes in the same availability domain whenever possible.
The arbitrator can be selected from an availability domain in which no data nodes are present, or, if no such availability domain can be found, from a third availability domain.
LocationDomainIdtakes an integer value between 0 and 16 inclusive, with 0 being the default; using 0 is the same as leaving the parameter unset. -
Table 22.16 This table provides type and value information for the LogDestination management node configuration parameter
Property Value Version (or later) NDB 8.0.13 Type or units {CONSOLE|SYSLOG|FILE} Default FILE: filename=ndb_nodeid_cluster.log, maxsize=1000000, maxfiles=6 Range ... Restart Type N This parameter specifies where to send cluster logging information. There are three options in this regard—
CONSOLE,SYSLOG, andFILE—withFILEbeing the default:CONSOLEoutputs the log tostdout:CONSOLE
SYSLOGsends the log to asyslogfacility, possible values being one ofauth,authpriv,cron,daemon,ftp,kern,lpr,mail,news,syslog,user,uucp,local0,local1,local2,local3,local4,local5,local6, orlocal7.NoteNot every facility is necessarily supported by every operating system.
SYSLOG:facility=syslog
FILEpipes the cluster log output to a regular file on the same machine. The following values can be specified:filename: The name of the log file.The default log file name used in such cases is
ndb_.nodeid_cluster.logmaxsize: The maximum size (in bytes) to which the file can grow before logging rolls over to a new file. When this occurs, the old log file is renamed by appending.Nto the file name, whereNis the next number not yet used with this name.maxfiles: The maximum number of log files.
FILE:filename=cluster.log,maxsize=1000000,maxfiles=6
The default value for the
FILEparameter isFILE:filename=ndb_, wherenode_id_cluster.log,maxsize=1000000,maxfiles=6node_idis the ID of the node.
It is possible to specify multiple log destinations separated by semicolons as shown here:
CONSOLE;SYSLOG:facility=local0;FILE:filename=/var/log/mgmd
-
Table 22.17 This table provides type and value information for the ArbitrationRank management node configuration parameter
Property Value Version (or later) NDB 8.0.13 Type or units 0-2 Default 1 Range 0 - 2 Restart Type N This parameter is used to define which nodes can act as arbitrators. Only management nodes and SQL nodes can be arbitrators.
ArbitrationRankcan take one of the following values:0: The node will never be used as an arbitrator.1: The node has high priority; that is, it will be preferred as an arbitrator over low-priority nodes.2: Indicates a low-priority node which be used as an arbitrator only if a node with a higher priority is not available for that purpose.
Normally, the management server should be configured as an arbitrator by setting its
ArbitrationRankto 1 (the default for management nodes) and those for all SQL nodes to 0 (the default for SQL nodes).You can disable arbitration completely either by setting
ArbitrationRankto 0 on all management and SQL nodes, or by setting theArbitrationparameter in the[ndbd default]section of theconfig.iniglobal configuration file. SettingArbitrationcauses any settings forArbitrationRankto be disregarded. -
Table 22.18 This table provides type and value information for the ArbitrationDelay management node configuration parameter
Property Value Version (or later) NDB 8.0.13 Type or units milliseconds Default 0 Range 0 - 4294967039 (0xFFFFFEFF) Restart Type N An integer value which causes the management server's responses to arbitration requests to be delayed by that number of milliseconds. By default, this value is 0; it is normally not necessary to change it.
-
Table 22.19 This table provides type and value information for the DataDir management node configuration parameter
Property Value Version (or later) NDB 8.0.13 Type or units path Default . Range ... Restart Type N This specifies the directory where output files from the management server will be placed. These files include cluster log files, process output files, and the daemon's process ID (PID) file. (For log files, this location can be overridden by setting the
FILEparameter forLogDestinationas discussed previously in this section.)The default value for this parameter is the directory in which ndb_mgmd is located.
-
Table 22.20 This table provides type and value information for the PortNumberStats management node configuration parameter
Property Value Version (or later) NDB 8.0.13 Type or units unsigned Default [none] Range 0 - 64K Restart Type N This parameter specifies the port number used to obtain statistical information from an NDB Cluster management server. It has no default value.
-
Table 22.21 This table provides type and value information for the wan management node configuration parameter
Property Value Version (or later) NDB 8.0.13 Type or units boolean Default false Range true, false Restart Type N Use WAN TCP setting as default.
-
Table 22.22 This table provides type and value information for the HeartbeatThreadPriority management node configuration parameter
Property Value Version (or later) NDB 8.0.13 Type or units string Default [none] Range ... Restart Type S Set the scheduling policy and priority of heartbeat threads for management and API nodes.
The syntax for setting this parameter is shown here:
HeartbeatThreadPriority =
policy[,priority]policy: {FIFO | RR}When setting this parameter, you must specify a policy. This is one of
FIFO(first in, first out) orRR(round robin). The policy value is followed optionally by the priority (an integer). -
Table 22.23 This table provides type and value information for the ExtraSendBufferMemory management node configuration parameter
Property Value Version (or later) NDB 8.0.13 Type or units bytes Default 0 Range 0 - 32G Restart Type N This parameter specifies the amount of transporter send buffer memory to allocate in addition to any that has been set using
TotalSendBufferMemory,SendBufferMemory, or both. -
Table 22.24 This table provides type and value information for the TotalSendBufferMemory management node configuration parameter
Property Value Version (or later) NDB 8.0.13 Type or units bytes Default 0 Range 256K - 4294967039 (0xFFFFFEFF) Restart Type N This parameter is used to determine the total amount of memory to allocate on this node for shared send buffer memory among all configured transporters.
If this parameter is set, its minimum permitted value is 256KB; 0 indicates that the parameter has not been set. For more detailed information, see Section 22.3.3.14, “Configuring NDB Cluster Send Buffer Parameters”.
-
Table 22.25 This table provides type and value information for the HeartbeatIntervalMgmdMgmd management node configuration parameter
Property Value Version (or later) NDB 8.0.13 Type or units milliseconds Default 1500 Range 100 - 4294967039 (0xFFFFFEFF) Restart Type N Specify the interval between heartbeat messages used to determine whether another management node is on contact with this one. The management node waits after 3 of these intervals to declare the connection dead; thus, the default setting of 1500 milliseconds causes the management node to wait for approximately 1600 ms before timing out.
After making changes in a management node's configuration, it is necessary to perform a rolling restart of the cluster for the new configuration to take effect.
To add new management servers to a running NDB Cluster, it is
also necessary to perform a rolling restart of all cluster
nodes after modifying any existing
config.ini files. For more information
about issues arising when using multiple management nodes, see
Section 22.1.7.10, “Limitations Relating to Multiple NDB Cluster Nodes”.
Restart types. Information about the restart types used by the parameter descriptions in this section is shown in the following table:
Table 22.26 NDB Cluster restart types
| Symbol | Restart Type | Description |
|---|---|---|
| N | Node | The parameter can be updated using a rolling restart (see Section 22.5.5, “Performing a Rolling Restart of an NDB Cluster”) |
| S | System | All cluster nodes must be shut down completely, then restarted, to effect a change in this parameter |
| I | Initial | Data nodes must be restarted using the
--initial option |
The [ndbd] and [ndbd
default] sections are used to configure the behavior
of the cluster's data nodes.
[ndbd] and [ndbd default]
are always used as the section names whether you are using
ndbd or ndbmtd binaries
for the data node processes.
There are many parameters which control buffer sizes, pool
sizes, timeouts, and so forth. The only mandatory parameter is
either one of ExecuteOnComputer or
HostName; this must be defined in the local
[ndbd] section.
The parameter
NoOfReplicas should be
defined in the [ndbd default] section, as it
is common to all Cluster data nodes. It is not strictly
necessary to set
NoOfReplicas, but it is
good practice to set it explicitly.
Most data node parameters are set in the [ndbd
default] section. Only those parameters explicitly
stated as being able to set local values are permitted to be
changed in the [ndbd] section. Where present,
HostName, NodeId and
ExecuteOnComputer must
be defined in the local [ndbd] section, and
not in any other section of config.ini. In
other words, settings for these parameters are specific to one
data node.
For those parameters affecting memory usage or buffer sizes, it
is possible to use K, M,
or G as a suffix to indicate units of 1024,
1024×1024, or 1024×1024×1024. (For example,
100K means 100 × 1024 = 102400.)
Parameter names and values are case-insensitive, unless used in
a MySQL Server my.cnf or
my.ini file, in which case they are case
sensitive.
Information about configuration parameters specific to NDB Cluster Disk Data tables can be found later in this section (see Disk Data Configuration Parameters).
All of these parameters also apply to ndbmtd
(the multithreaded version of ndbd). Three
additional data node configuration
parameters—MaxNoOfExecutionThreads,
ThreadConfig, and
NoOfFragmentLogParts—apply
to ndbmtd only; these have no effect when
used with ndbd. For more information, see
Multi-Threading Configuration Parameters (ndbmtd).
See also Section 22.4.3, “ndbmtd — The NDB Cluster Data Node Daemon (Multi-Threaded)”.
Identifying data nodes.
The NodeId or Id value
(that is, the data node identifier) can be allocated on the
command line when the node is started or in the configuration
file.
-
Table 22.27 This table provides type and value information for the NodeId data node configuration parameter
Property Value Version (or later) NDB 8.0.13 Type or units unsigned Default [none] Range 1 - 48 Restart Type IS Version (or later) NDB 8.0.18 Type or units unsigned Default [none] Range 1 - 144 Restart Type IS A unique node ID is used as the node's address for all cluster internal messages. For data nodes, this is an integer in the range 1 to 144 inclusive. (In NDB 8.0.17 and earlier, this was 1 to 48 inclusive.) Each node in the cluster must have a unique identifier.
NodeIdis the only supported parameter name to use when identifying data nodes. -
Table 22.28 This table provides type and value information for the ExecuteOnComputer data node configuration parameter
Property Value Version (or later) NDB 8.0.13 Type or units name Default [none] Range ... Restart Type S This refers to the
Idset for one of the computers defined in a[computer]section.ImportantThis parameter is deprecated, and is subject to removal in a future release. Use the
HostNameparameter instead. The node ID for this node can be given out only to connections that explicitly request it. A management server that requests “any” node ID cannot use this one. This parameter can be used when running multiple management servers on the same host, and
HostNameis not sufficient for distinguishing among processes. Intended for use in testing.-
Table 22.29 This table provides type and value information for the HostName data node configuration parameter
Property Value Version (or later) NDB 8.0.13 Type or units name or IP address Default localhost Range ... Restart Type N Specifying this parameter defines the hostname of the computer on which the data node is to reside. To specify a hostname other than
localhost, either this parameter orExecuteOnComputeris required. -
Table 22.30 This table provides type and value information for the ServerPort data node configuration parameter
Property Value Version (or later) NDB 8.0.13 Type or units unsigned Default [none] Range 1 - 64K Restart Type S Each node in the cluster uses a port to connect to other nodes. By default, this port is allocated dynamically in such a way as to ensure that no two nodes on the same host computer receive the same port number, so it should normally not be necessary to specify a value for this parameter.
However, if you need to be able to open specific ports in a firewall to permit communication between data nodes and API nodes (including SQL nodes), you can set this parameter to the number of the desired port in an
[ndbd]section or (if you need to do this for multiple data nodes) the[ndbd default]section of theconfig.inifile, and then open the port having that number for incoming connections from SQL nodes, API nodes, or both.NoteConnections from data nodes to management nodes is done using the ndb_mgmd management port (the management server's
PortNumber) so outgoing connections to that port from any data nodes should always be permitted. Setting this parameter to
TRUEor1bindsIP_ADDR_ANYso that connections can be made from anywhere (for autogenerated connections). The default isFALSE(0).-
Table 22.31 This table provides type and value information for the NodeGroup data node configuration parameter
Property Value Version (or later) NDB 8.0.13 Type or units Default [none] Range 0 - 65536 Restart Type IS This parameter can be used to assign a data node to a specific node group. It is read only when the cluster is started for the first time, and cannot be used to reassign a data node to a different node group online. It is generally not desirable to use this parameter in the
[ndbd default]section of theconfig.inifile, and care must be taken not to assign nodes to node groups in such a way that an invalid numbers of nodes are assigned to any node groups.The
NodeGroupparameter is chiefly intended for use in adding a new node group to a running NDB Cluster without having to perform a rolling restart. For this purpose, you should set it to 65536 (the maximum value). You are not required to set aNodeGroupvalue for all cluster data nodes, only for those nodes which are to be started and added to the cluster as a new node group at a later time. For more information, see Section 22.5.7.3, “Adding NDB Cluster Data Nodes Online: Detailed Example”. -
Table 22.32 This table provides type and value information for the LocationDomainId data node configuration parameter
Property Value Version (or later) NDB 8.0.13 Type or units integer Default 0 Range 0 - 16 Restart Type S Assigns a data node to a specific availability domain (also known as an availability zone) within a cloud. By informing
NDBwhich nodes are in which availability domains, performance can be improved in a cloud environment in the following ways:If requested data is not found on the same node, reads can be directed to another node in the same availability domain.
Communication between nodes in different availability domains are guaranteed to use
NDBtransporters' WAN support without any further manual intervention.The transporter's group number can be based on which availability domain is used, such that also SQL and other API nodes communicate with local data nodes in the same availability domain whenever possible.
The arbitrator can be selected from an availability domain in which no data nodes are present, or, if no such availability domain can be found, from a third availability domain.
LocationDomainIdtakes an integer value between 0 and 16 inclusive, with 0 being the default; using 0 is the same as leaving the parameter unset. -
Table 22.33 This table provides type and value information for the NoOfReplicas data node configuration parameter
Property Value Version (or later) NDB 8.0.13 Type or units integer Default 2 Range 1 - 2 Restart Type IS Version (or later) NDB 8.0.19 Type or units integer Default 2 Range 1 - 4 Restart Type IS This global parameter can be set only in the
[ndbd default]section, and defines the number of replicas for each table stored in the cluster. This parameter also specifies the size of node groups. A node group is a set of nodes all storing the same information.Node groups are formed implicitly. The first node group is formed by the set of data nodes with the lowest node IDs, the next node group by the set of the next lowest node identities, and so on. By way of example, assume that we have 4 data nodes and that
NoOfReplicasis set to 2. The four data nodes have node IDs 2, 3, 4 and 5. Then the first node group is formed from nodes 2 and 3, and the second node group by nodes 4 and 5. It is important to configure the cluster in such a manner that nodes in the same node groups are not placed on the same computer because a single hardware failure would cause the entire cluster to fail.If no node IDs are provided, the order of the data nodes will be the determining factor for the node group. Whether or not explicit assignments are made, they can be viewed in the output of the management client's
SHOWcommand.The default value for
NoOfReplicasis 2. This is the recommended value for most production environments, and prior to NDB 8.0.18, it was the maximum value supported. Beginning with NDB 8.0.19, setting this parameter's value to 3 or 4 is fully tested and supported in production.WarningSetting
NoOfReplicasto 1 means that there is only a single copy of all Cluster data; in this case, the loss of a single data node causes the cluster to fail because there are no additional copies of the data stored by that node.The value for this parameter must divide evenly into the number of data nodes in the cluster. For example, if there are two data nodes, then
NoOfReplicasmust be equal to either 1 or 2, since 2/3 and 2/4 both yield fractional values; if there are four data nodes, thenNoOfReplicasmust be equal to 1, 2, or 4. -
Table 22.34 This table provides type and value information for the DataDir data node configuration parameter
Property Value Version (or later) NDB 8.0.13 Type or units path Default . Range ... Restart Type IN This parameter specifies the directory where trace files, log files, pid files and error logs are placed.
The default is the data node process working directory.
-
Table 22.35 This table provides type and value information for the FileSystemPath data node configuration parameter
Property Value Version (or later) NDB 8.0.13 Type or units path Default DataDir Range ... Restart Type IN This parameter specifies the directory where all files created for metadata, REDO logs, UNDO logs (for Disk Data tables), and data files are placed. The default is the directory specified by
DataDir.NoteThis directory must exist before the ndbd process is initiated.
The recommended directory hierarchy for NDB Cluster includes
/var/lib/mysql-cluster, under which a directory for the node's file system is created. The name of this subdirectory contains the node ID. For example, if the node ID is 2, this subdirectory is namedndb_2_fs. -
Table 22.36 This table provides type and value information for the BackupDataDir data node configuration parameter
Property Value Version (or later) NDB 8.0.13 Type or units path Default FileSystemPath Range ... Restart Type IN This parameter specifies the directory in which backups are placed.
ImportantThe string '
/BACKUP' is always appended to this value. For example, if you set the value ofBackupDataDirto/var/lib/cluster-data, then all backups are stored under/var/lib/cluster-data/BACKUP. This also means that the effective default backup location is the directory namedBACKUPunder the location specified by theFileSystemPathparameter.
Data Memory, Index Memory, and String Memory
DataMemory and
IndexMemory are
[ndbd] parameters specifying the size of
memory segments used to store the actual records and their
indexes. In setting values for these, it is important to
understand how
DataMemory is used, as
it usually needs to be updated to reflect actual usage by the
cluster.
IndexMemory is deprecated, and subject to
removal in a future version of NDB Cluster. See the
descriptions that follow for further information.
-
Table 22.37 This table provides type and value information for the DataMemory data node configuration parameter
Property Value Version (or later) NDB 8.0.13 Type or units bytes Default 98M Range 1M - 1T Restart Type N Version (or later) NDB 8.0.19 Type or units bytes Default 98M Range 1M - 16T Restart Type N This parameter defines the amount of space (in bytes) available for storing database records. The entire amount specified by this value is allocated in memory, so it is extremely important that the machine has sufficient physical memory to accommodate it.
The memory allocated by
DataMemoryis used to store both the actual records and indexes. There is a 16-byte overhead on each record; an additional amount for each record is incurred because it is stored in a 32KB page with 128 byte page overhead (see below). There is also a small amount wasted per page due to the fact that each record is stored in only one page.For variable-size table attributes, the data is stored on separate data pages, allocated from
DataMemory. Variable-length records use a fixed-size part with an extra overhead of 4 bytes to reference the variable-size part. The variable-size part has 2 bytes overhead plus 2 bytes per attribute.As of NDB 8.0.18, the maximum record size is 30000 bytes. Previously, this was 14000 bytes.
Resources assigned to
DataMemoryare used for storing all data and indexes. (Any memory configured asIndexMemoryis automatically added to that used byDataMemoryto form a common resource pool.)Currently, NDB Cluster can use a maximum of 512 MB for hash indexes per partition, which means in some cases it is possible to get Table is full errors in MySQL client applications even when ndb_mgm -e "ALL REPORT MEMORYUSAGE" shows significant free
DataMemory. This can also pose a problem with data node restarts on nodes that are heavily loaded with data.You can control the number of partitions per local data manager for a given table by setting the
NDB_TABLEoptionPARTITION_BALANCEto one of the valuesFOR_RA_BY_LDM,FOR_RA_BY_LDM_X_2,FOR_RA_BY_LDM_X_3, orFOR_RA_BY_LDM_X_4, for 1, 2, 3, or 4 partitions per LDM, respectively, when creating the table (see Section 13.1.20.10, “Setting NDB_TABLE Options”).NoteIn previous versions of NDB Cluster it was possible to create extra partitions for NDB Cluster tables and thus have more memory available for hash indexes by using the
MAX_ROWSoption forCREATE TABLE. While still supported for backward compatibility, usingMAX_ROWSfor this purpose is deprecated; you should usePARTITION_BALANCEinstead.You can also use the
MinFreePctconfiguration parameter to help avoid problems with node restarts.The memory space allocated by
DataMemoryconsists of 32KB pages, which are allocated to table fragments. Each table is normally partitioned into the same number of fragments as there are data nodes in the cluster. Thus, for each node, there are the same number of fragments as are set inNoOfReplicas.Once a page has been allocated, it is currently not possible to return it to the pool of free pages, except by deleting the table. (This also means that
DataMemorypages, once allocated to a given table, cannot be used by other tables.) Performing a data node recovery also compresses the partition because all records are inserted into empty partitions from other live nodes.The
DataMemorymemory space also contains UNDO information: For each update, a copy of the unaltered record is allocated in theDataMemory. There is also a reference to each copy in the ordered table indexes. Unique hash indexes are updated only when the unique index columns are updated, in which case a new entry in the index table is inserted and the old entry is deleted upon commit. For this reason, it is also necessary to allocate enough memory to handle the largest transactions performed by applications using the cluster. In any case, performing a few large transactions holds no advantage over using many smaller ones, for the following reasons:Large transactions are not any faster than smaller ones
Large transactions increase the number of operations that are lost and must be repeated in event of transaction failure
Large transactions use more memory
The default value for
DataMemoryin NDB 8.0 is 98MB. The minimum value is 1MB. There is no maximum size, but in reality the maximum size has to be adapted so that the process does not start swapping when the limit is reached. This limit is determined by the amount of physical RAM available on the machine and by the amount of memory that the operating system may commit to any one process. 32-bit operating systems are generally limited to 2−4GB per process; 64-bit operating systems can use more. For large databases, it may be preferable to use a 64-bit operating system for this reason. -
Table 22.38 This table provides type and value information for the IndexMemory data node configuration parameter
Property Value Version (or later) NDB 8.0.13 Type or units bytes Default 0 Range 1M - 1T Restart Type N The
IndexMemoryparameter is deprecated (and subject to future removal); any memory assigned toIndexMemoryis allocated instead to the same pool asDataMemory, which is solely responsible for all resources needed for storing data and indexes in memory. In NDB 8.0, the use ofIndexMemoryin the cluster configuration file triggers a warning from the management server.You can estimate the size of a hash index using this formula:
size = ( (
fragments* 32K) + (rows* 18) ) *replicasfragmentsis the number of fragments,replicasis the number of replicas (normally 2), androwsis the number of rows. If a table has one million rows, 8 fragments, and 2 replicas, the expected index memory usage is calculated as shown here:((8 * 32K) + (1000000 * 18)) * 2 = ((8 * 32768) + (1000000 * 18)) * 2 = (262144 + 18000000) * 2 = 18262144 * 2 = 36524288 bytes = ~35MB
Index statistics for ordered indexes (when these are enabled) are stored in the
mysql.ndb_index_stat_sampletable. Since this table has a hash index, this adds to index memory usage. An upper bound to the number of rows for a given ordered index can be calculated as follows:sample_size= key_size + ((key_attributes + 1) * 4) sample_rows =
IndexStatSaveSize* ((0.01 *IndexStatSaveScale* log2(rows * sample_size)) + 1) / sample_sizeIn the preceding formula,
key_sizeis the size of the ordered index key in bytes,key_attributesis the number ot attributes in the ordered index key, androwsis the number of rows in the base table.Assume that table
t1has 1 million rows and an ordered index namedix1on two four-byte integers. Assume in addition thatIndexStatSaveSizeandIndexStatSaveScaleare set to their default values (32K and 100, respectively). Using the previous 2 formulas, we can calculate as follows:sample_size = 8 + ((1 + 2) * 4) = 20 bytes sample_rows = 32K * ((0.01 * 100 * log2(1000000*20)) + 1) / 20 = 32768 * ( (1 * ~16.811) +1) / 20 = 32768 * ~17.811 / 20 = ~29182 rowsThe expected index memory usage is thus 2 * 18 * 29182 = ~1050550 bytes.
In NDB 8.0, the minimum and default vaue for this parameter is 0 (zero).
-
Table 22.39 This table provides type and value information for the StringMemory data node configuration parameter
Property Value Version (or later) NDB 8.0.13 Type or units % or bytes Default 25 Range 0 - 4294967039 (0xFFFFFEFF) Restart Type S This parameter determines how much memory is allocated for strings such as table names, and is specified in an
[ndbd]or[ndbd default]section of theconfig.inifile. A value between0and100inclusive is interpreted as a percent of the maximum default value, which is calculated based on a number of factors including the number of tables, maximum table name size, maximum size of.FRMfiles,MaxNoOfTriggers, maximum column name size, and maximum default column value.A value greater than
100is interpreted as a number of bytes.The default value is 25—that is, 25 percent of the default maximum.
Under most circumstances, the default value should be sufficient, but when you have a great many
NDBtables (1000 or more), it is possible to get Error 773 Out of string memory, please modify StringMemory config parameter: Permanent error: Schema error, in which case you should increase this value.25(25 percent) is not excessive, and should prevent this error from recurring in all but the most extreme conditions.
The following example illustrates how memory is used for a table. Consider this table definition:
CREATE TABLE example ( a INT NOT NULL, b INT NOT NULL, c INT NOT NULL, PRIMARY KEY(a), UNIQUE(b) ) ENGINE=NDBCLUSTER;
For each record, there are 12 bytes of data plus 12 bytes
overhead. Having no nullable columns saves 4 bytes of overhead.
In addition, we have two ordered indexes on columns
a and b consuming roughly
10 bytes each per record. There is a primary key hash index on
the base table using roughly 29 bytes per record. The unique
constraint is implemented by a separate table with
b as primary key and a as
a column. This other table consumes an additional 29 bytes of
index memory per record in the example table
as well 8 bytes of record data plus 12 bytes of overhead.
Thus, for one million records, we need 58MB for index memory to handle the hash indexes for the primary key and the unique constraint. We also need 64MB for the records of the base table and the unique index table, plus the two ordered index tables.
You can see that hash indexes takes up a fair amount of memory space; however, they provide very fast access to the data in return. They are also used in NDB Cluster to handle uniqueness constraints.
Currently, the only partitioning algorithm is hashing and ordered indexes are local to each node. Thus, ordered indexes cannot be used to handle uniqueness constraints in the general case.
An important point for both
IndexMemory and
DataMemory is that the
total database size is the sum of all data memory and all index
memory for each node group. Each node group is used to store
replicated information, so if there are four nodes with two
replicas, there will be two node groups. Thus, the total data
memory available is 2 ×
DataMemory for each data
node.
It is highly recommended that
DataMemory and
IndexMemory be set to
the same values for all nodes. Data distribution is even over
all nodes in the cluster, so the maximum amount of space
available for any node can be no greater than that of the
smallest node in the cluster.
DataMemory can be
changed, but decreasing it can be risky; doing so can easily
lead to a node or even an entire NDB Cluster that is unable to
restart due to there being insufficient memory space. Increasing
these values should be acceptable, but it is recommended that
such upgrades are performed in the same manner as a software
upgrade, beginning with an update of the configuration file, and
then restarting the management server followed by restarting
each data node in turn.
MinFreePct.
A proportion (5% by default) of data node resources including
DataMemory is kept in
reserve to insure that the data node does not exhaust its
memory when performing a restart. This can be adjusted using
the MinFreePct data
node configuration parameter (default 5).
Table 22.40 This table provides type and value information for the MinFreePct data node configuration parameter
| Property | Value |
|---|---|
| Version (or later) | NDB 8.0.13 |
| Type or units | unsigned |
| Default | 5 |
| Range | 0 - 100 |
| Restart Type | N |
Updates do not increase the amount of index memory used. Inserts take effect immediately; however, rows are not actually deleted until the transaction is committed.
Transaction parameters.
The next few [ndbd] parameters that we
discuss are important because they affect the number of
parallel transactions and the sizes of transactions that can
be handled by the system.
MaxNoOfConcurrentTransactions
sets the number of parallel transactions possible in a node.
MaxNoOfConcurrentOperations
sets the number of records that can be in update phase or
locked simultaneously.
Both of these parameters (especially
MaxNoOfConcurrentOperations)
are likely targets for users setting specific values and not
using the default value. The default value is set for systems
using small transactions, to ensure that these do not use
excessive memory.
MaxDMLOperationsPerTransaction
sets the maximum number of DML operations that can be performed
in a given transaction.
-
Table 22.41 This table provides type and value information for the MaxNoOfConcurrentTransactions data node configuration parameter
Property Value Version (or later) NDB 8.0.13 Type or units integer Default 4096 Range 32 - 4294967039 (0xFFFFFEFF) Restart Type N Each cluster data node requires a transaction record for each active transaction in the cluster. The task of coordinating transactions is distributed among all of the data nodes. The total number of transaction records in the cluster is the number of transactions in any given node times the number of nodes in the cluster.
Transaction records are allocated to individual MySQL servers. Each connection to a MySQL server requires at least one transaction record, plus an additional transaction object per table accessed by that connection. This means that a reasonable minimum for the total number of transactions in the cluster can be expressed as
TotalNoOfConcurrentTransactions = (maximum number of tables accessed in any single transaction + 1) * number of SQL nodesSuppose that there are 10 SQL nodes using the cluster. A single join involving 10 tables requires 11 transaction records; if there are 10 such joins in a transaction, then 10 * 11 = 110 transaction records are required for this transaction, per MySQL server, or 110 * 10 = 1100 transaction records total. Each data node can be expected to handle TotalNoOfConcurrentTransactions / number of data nodes. For an NDB Cluster having 4 data nodes, this would mean setting
MaxNoOfConcurrentTransactionson each data node to 1100 / 4 = 275. In addition, you should provide for failure recovery by ensuring that a single node group can accommodate all concurrent transactions; in other words, that each data node's MaxNoOfConcurrentTransactions is sufficient to cover a number of transactions equal to TotalNoOfConcurrentTransactions / number of node groups. If this cluster has a single node group, thenMaxNoOfConcurrentTransactionsshould be set to 1100 (the same as the total number of concurrent transactions for the entire cluster).In addition, each transaction involves at least one operation; for this reason, the value set for
MaxNoOfConcurrentTransactionsshould always be no more than the value ofMaxNoOfConcurrentOperations.This parameter must be set to the same value for all cluster data nodes. This is due to the fact that, when a data node fails, the oldest surviving node re-creates the transaction state of all transactions that were ongoing in the failed node.
It is possible to change this value using a rolling restart, but the amount of traffic on the cluster must be such that no more transactions occur than the lower of the old and new levels while this is taking place.
The default value is 4096.
-
Table 22.42 This table provides type and value information for the MaxNoOfConcurrentOperations data node configuration parameter
Property Value Version (or later) NDB 8.0.13 Type or units integer Default 32K Range 32 - 4294967039 (0xFFFFFEFF) Restart Type N It is a good idea to adjust the value of this parameter according to the size and number of transactions. When performing transactions which involve only a few operations and records, the default value for this parameter is usually sufficient. Performing large transactions involving many records usually requires that you increase its value.
Records are kept for each transaction updating cluster data, both in the transaction coordinator and in the nodes where the actual updates are performed. These records contain state information needed to find UNDO records for rollback, lock queues, and other purposes.
This parameter should be set at a minimum to the number of records to be updated simultaneously in transactions, divided by the number of cluster data nodes. For example, in a cluster which has four data nodes and which is expected to handle one million concurrent updates using transactions, you should set this value to 1000000 / 4 = 250000. To help provide resiliency against failures, it is suggested that you set this parameter to a value that is high enough to permit an individual data node to handle the load for its node group. In other words, you should set the value equal to
total number of concurrent operations / number of node groups. (In the case where there is a single node group, this is the same as the total number of concurrent operations for the entire cluster.)Because each transaction always involves at least one operation, the value of
MaxNoOfConcurrentOperationsshould always be greater than or equal to the value ofMaxNoOfConcurrentTransactions.Read queries which set locks also cause operation records to be created. Some extra space is allocated within individual nodes to accommodate cases where the distribution is not perfect over the nodes.
When queries make use of the unique hash index, there are actually two operation records used per record in the transaction. The first record represents the read in the index table and the second handles the operation on the base table.
The default value is 32768.
This parameter actually handles two values that can be configured separately. The first of these specifies how many operation records are to be placed with the transaction coordinator. The second part specifies how many operation records are to be local to the database.
A very large transaction performed on an eight-node cluster requires as many operation records in the transaction coordinator as there are reads, updates, and deletes involved in the transaction. However, the operation records of the are spread over all eight nodes. Thus, if it is necessary to configure the system for one very large transaction, it is a good idea to configure the two parts separately.
MaxNoOfConcurrentOperationswill always be used to calculate the number of operation records in the transaction coordinator portion of the node.It is also important to have an idea of the memory requirements for operation records. These consume about 1KB per record.
-
Table 22.43 This table provides type and value information for the MaxNoOfLocalOperations data node configuration parameter
Property Value Version (or later) NDB 8.0.13 Type or units integer Default UNDEFINED Range 32 - 4294967039 (0xFFFFFEFF) Restart Type N By default, this parameter is calculated as 1.1 ×
MaxNoOfConcurrentOperations. This fits systems with many simultaneous transactions, none of them being very large. If there is a need to handle one very large transaction at a time and there are many nodes, it is a good idea to override the default value by explicitly specifying this parameter.This parameter is deprecated as of NDB 8.0.19, and is subject to removal in a future NDB Cluster release. In addition, this parameter is incompatible with the
TransactionMemoryparameter; if you try to set values for both parameters in the cluster configuration file (config.ini), the management server refuses to start. MaxDMLOperationsPerTransactionTable 22.44 This table provides type and value information for the MaxDMLOperationsPerTransaction data node configuration parameter
Property Value Version (or later) NDB 8.0.13 Type or units operations (DML) Default 4294967295 Range 32 - 4294967295 Restart Type N This parameter limits the size of a transaction. The transaction is aborted if it requires more than this many DML operations. The minimum number of operations per transaction is 32; however, you can set
MaxDMLOperationsPerTransactionto 0 to disable any limitation on the number of DML operations per transaction. The maximum (and default) is 4294967295.The value of this parameter cannot exceed that set for
MaxNoOfConcurrentOperations.
Transaction temporary storage.
The next set of [ndbd] parameters is used
to determine temporary storage when executing a statement that
is part of a Cluster transaction. All records are released
when the statement is completed and the cluster is waiting for
the commit or rollback.
The default values for these parameters are adequate for most situations. However, users with a need to support transactions involving large numbers of rows or operations may need to increase these values to enable better parallelism in the system, whereas users whose applications require relatively small transactions can decrease the values to save memory.
MaxNoOfConcurrentIndexOperationsTable 22.45 This table provides type and value information for the MaxNoOfConcurrentIndexOperations data node configuration parameter
Property Value Version (or later) NDB 8.0.13 Type or units integer Default 8K Range 0 - 4294967039 (0xFFFFFEFF) Restart Type N For queries using a unique hash index, another temporary set of operation records is used during a query's execution phase. This parameter sets the size of that pool of records. Thus, this record is allocated only while executing a part of a query. As soon as this part has been executed, the record is released. The state needed to handle aborts and commits is handled by the normal operation records, where the pool size is set by the parameter
MaxNoOfConcurrentOperations.The default value of this parameter is 8192. Only in rare cases of extremely high parallelism using unique hash indexes should it be necessary to increase this value. Using a smaller value is possible and can save memory if the DBA is certain that a high degree of parallelism is not required for the cluster.
This parameter is deprecated as of NDB 8.0.19, and is subject to removal in a future NDB Cluster release. In addition, this parameter is incompatible with the
TransactionMemoryparameter; if you try to set values for both parameters in the cluster configuration file (config.ini), the management server refuses to start.-
Table 22.46 This table provides type and value information for the MaxNoOfFiredTriggers data node configuration parameter
Property Value Version (or later) NDB 8.0.13 Type or units integer Default 4000 Range 0 - 4294967039 (0xFFFFFEFF) Restart Type N The default value of
MaxNoOfFiredTriggersis 4000, which is sufficient for most situations. In some cases it can even be decreased if the DBA feels certain the need for parallelism in the cluster is not high.A record is created when an operation is performed that affects a unique hash index. Inserting or deleting a record in a table with unique hash indexes or updating a column that is part of a unique hash index fires an insert or a delete in the index table. The resulting record is used to represent this index table operation while waiting for the original operation that fired it to complete. This operation is short-lived but can still require a large number of records in its pool for situations with many parallel write operations on a base table containing a set of unique hash indexes.
This parameter is deprecated as of NDB 8.0.19, and is subject to removal in a future NDB Cluster release. In addition, this parameter is incompatible with the
TransactionMemoryparameter; if you try to set values for both parameters in the cluster configuration file (config.ini), the management server refuses to start. -
Table 22.47 This table provides type and value information for the TransactionBufferMemory data node configuration parameter
Property Value Version (or later) NDB 8.0.13 Type or units bytes Default 1M Range 1K - 4294967039 (0xFFFFFEFF) Restart Type N The memory affected by this parameter is used for tracking operations fired when updating index tables and reading unique indexes. This memory is used to store the key and column information for these operations. It is only very rarely that the value for this parameter needs to be altered from the default.
The default value for
TransactionBufferMemoryis 1MB.Normal read and write operations use a similar buffer, whose usage is even more short-lived. The compile-time parameter
ZATTRBUF_FILESIZE(found inndb/src/kernel/blocks/Dbtc/Dbtc.hpp) set to 4000 × 128 bytes (500KB). A similar buffer for key information,ZDATABUF_FILESIZE(also inDbtc.hpp) contains 4000 × 16 = 62.5KB of buffer space.Dbtcis the module that handles transaction coordination.
Transaction resource allocation parameters.
The parameters in the following list are used to allocate
transaction resources in the transaction coordinator
(DBTC). Leaving any one of
these set to the default (0) dedicates transaction memory for
25% of estimated total data node usage for the corresponding
resource. The actual maximum possible values for these
parameters are typically limited by the amount of memory
available to the data node; setting them has no impact on the
total amount of memory allocated to the data node. In
addition, you should keep in mind that they control numbers of
reserved internal records for the data node independent of any
settings for
MaxDMLOperationsPerTransaction,
MaxNoOfConcurrentIndexOperations,
MaxNoOfConcurrentOperations,
MaxNoOfConcurrentScans,
MaxNoOfConcurrentTransactions,
MaxNoOfFiredTriggers,
MaxNoOfLocalScans, or
TransactionBufferMemory
(see Transaction parameters
and
Transaction temporary storage).
ReservedConcurrentIndexOperationsTable 22.48 This table provides type and value information for the ReservedConcurrentIndexOperations data node configuration parameter
Property Value Version (or later) NDB 8.0.16 Type or units numeric Default 0 Range 0 - 4294967039 (0xFFFFFEFF) Restart Type N Number of simultaneous index operations having dedicated resources on one data node.
-
Table 22.49 This table provides type and value information for the ReservedConcurrentOperations data node configuration parameter
Property Value Version (or later) NDB 8.0.16 Type or units numeric Default 0 Range 0 - 4294967039 (0xFFFFFEFF) Restart Type N Number of simultaneous operations having dedicated resources in transaction coordinators on one data node.
-
Table 22.50 This table provides type and value information for the ReservedConcurrentScans data node configuration parameter
Property Value Version (or later) NDB 8.0.16 Type or units numeric Default 0 Range 0 - 4294967039 (0xFFFFFEFF) Restart Type N Number of simultaneous scans having dedicated resources on one data node.
ReservedConcurrentTransactionsTable 22.51 This table provides type and value information for the ReservedConcurrentTransactions data node configuration parameter
Property Value Version (or later) NDB 8.0.16 Type or units numeric Default 0 Range 0 - 4294967039 (0xFFFFFEFF) Restart Type N Number of simultaneous transactions having dedicated resources on one data node.
-
Table 22.52 This table provides type and value information for the ReservedFiredTriggers data node configuration parameter
Property Value Version (or later) NDB 8.0.16 Type or units numeric Default 0 Range 0 - 4294967039 (0xFFFFFEFF) Restart Type N Number of triggers that have dedicated resources on one ndbd(DB) node.
-
Table 22.53 This table provides type and value information for the ReservedLocalScans data node configuration parameter
Property Value Version (or later) NDB 8.0.16 Type or units numeric Default 0 Range 0 - 4294967039 (0xFFFFFEFF) Restart Type N Number of simultaneous fragment scans having dedicated resources on one data node.
ReservedTransactionBufferMemoryTable 22.54 This table provides type and value information for the ReservedTransactionBufferMemory data node configuration parameter
Property Value Version (or later) NDB 8.0.16 Type or units numeric Default 0 Range 0 - 4294967039 (0xFFFFFEFF) Restart Type N Dynamic buffer space (in bytes) for key and attribute data allocated to each data node.
-
Table 22.55 This table provides type and value information for the TransactionMemory data node configuration parameter
Property Value Version (or later) NDB 8.0.19 Type or units bytes Default 0 Range 0 - 16384G Restart Type N This parameter determines the memory (in bytes) allocated for transactions on each data node. Setting of transaction memory can be handled in any one of the three ways listed here:
A number of configuration parameters are incompatible with
TransactionMemory. If any of these are set, transaction memory is calculated as it was previous to NDB 8.0.19. You should be aware that it is not possible to set any of these parameters concurrently withTransactionMemory; if you attempt to do so, the management server is unable to start (see Parameters incompatible with TransactionMemory).If
TransactionMemoryis set, this value is used for determining transaction memory.If neither any incompatible parameters are set nor
TransactionMemoryis set, transaction memory is set byNDBto 10% of the value of theDataMemoryconfiguration parameter.
Parameters incompatible with TransactionMemory. The following parameters cannot be used concurrently with
TransactionMemoryand are deprecated as of NDB 8.0.19:Explicitly setting any of the parameters just listed when
TransactionMemoryhas also been set in the cluster configuration file (config.ini) keeps the management node from starting.For more information regarding resource allocation in NDB Cluster data nodes, see Section 22.3.3.13, “Data Node Memory Management”.
Scans and buffering.
There are additional [ndbd] parameters in
the Dblqh module (in
ndb/src/kernel/blocks/Dblqh/Dblqh.hpp)
that affect reads and updates. These include
ZATTRINBUF_FILESIZE, set by default to
10000 × 128 bytes (1250KB) and
ZDATABUF_FILE_SIZE, set by default to
10000*16 bytes (roughly 156KB) of buffer space. To date, there
have been neither any reports from users nor any results from
our own extensive tests suggesting that either of these
compile-time limits should be increased.
-
Table 22.56 This table provides type and value information for the BatchSizePerLocalScan data node configuration parameter
Property Value Version (or later) NDB 8.0.13 Type or units integer Default 256 Range 1 - 992 Restart Type N This parameter is used to calculate the number of lock records used to handle concurrent scan operations.
BatchSizePerLocalScanhas a strong connection to theBatchSizedefined in the SQL nodes.Deprecated as of NDB 8.0.19.
-
Table 22.57 This table provides type and value information for the LongMessageBuffer data node configuration parameter
Property Value Version (or later) NDB 8.0.13 Type or units bytes Default 64M Range 512K - 4294967039 (0xFFFFFEFF) Restart Type N This is an internal buffer used for passing messages within individual nodes and between nodes. The default is 64MB.
This parameter seldom needs to be changed from the default.
-
Table 22.58 This table provides type and value information for the MaxFKBuildBatchSize data node configuration parameter
Property Value Version (or later) NDB 8.0.13 Type or units integer Default 64 Range 16 - 512 Restart Type S Maximum scan batch size used for building foreign keys. Increasing the value set for this parameter may speed up building of foreign key builds at the expense of greater impact to ongoing traffic.
-
Table 22.59 This table provides type and value information for the MaxNoOfConcurrentScans data node configuration parameter
Property Value Version (or later) NDB 8.0.13 Type or units integer Default 256 Range 2 - 500 Restart Type N This parameter is used to control the number of parallel scans that can be performed in the cluster. Each transaction coordinator can handle the number of parallel scans defined for this parameter. Each scan query is performed by scanning all partitions in parallel. Each partition scan uses a scan record in the node where the partition is located, the number of records being the value of this parameter times the number of nodes. The cluster should be able to sustain
MaxNoOfConcurrentScansscans concurrently from all nodes in the cluster.Scans are actually performed in two cases. The first of these cases occurs when no hash or ordered indexes exists to handle the query, in which case the query is executed by performing a full table scan. The second case is encountered when there is no hash index to support the query but there is an ordered index. Using the ordered index means executing a parallel range scan. The order is kept on the local partitions only, so it is necessary to perform the index scan on all partitions.
The default value of
MaxNoOfConcurrentScansis 256. The maximum value is 500. -
Table 22.60 This table provides type and value information for the MaxNoOfLocalScans data node configuration parameter
Property Value Version (or later) NDB 8.0.13 Type or units integer Default 4 * MaxNoOfConcurrentScans * [# of data nodes] + 2 Range 32 - 4294967039 (0xFFFFFEFF) Restart Type N Specifies the number of local scan records if many scans are not fully parallelized. When the number of local scan records is not provided, it is calculated as shown here:
4 *
MaxNoOfConcurrentScans* [# data nodes] + 2This parameter is deprecated as of NDB 8.0.19, and is subject to removal in a future NDB Cluster release. In addition, this parameter is incompatible with the
TransactionMemoryparameter; if you try to set values for both parameters in the cluster configuration file (config.ini), the management server refuses to start. -
Table 22.61 This table provides type and value information for the MaxParallelCopyInstances data node configuration parameter
Property Value Version (or later) NDB 8.0.13 Type or units integer Default 0 Range 0 - 64 Restart Type S This parameter sets the parallelization used in the copy phase of a node restart or system restart, when a node that is currently just starting is synchronised with a node that already has current data by copying over any changed records from the node that is up to date. Because full parallelism in such cases can lead to overload situations,
MaxParallelCopyInstancesprovides a means to decrease it. This parameter's default value 0. This value means that the effective parallelism is equal to the number of LDM instances in the node just starting as well as the node updating it. -
Table 22.62 This table provides type and value information for the MaxParallelScansPerFragment data node configuration parameter
Property Value Version (or later) NDB 8.0.13 Type or units bytes Default 256 Range 1 - 4294967039 (0xFFFFFEFF) Restart Type N It is possible to configure the maximum number of parallel scans (
TUPscans andTUXscans) allowed before they begin queuing for serial handling. You can increase this to take advantage of any unused CPU when performing large number of scans in parallel and improve their performance.The default value for this parameter is 256.
-
Table 22.63 This table provides type and value information for the MaxReorgBuildBatchSize data node configuration parameter
Property Value Version (or later) NDB 8.0.13 Type or units integer Default 64 Range 16 - 512 Restart Type S Maximum scan batch size used for reorganization of table partitions. Increasing the value set for this parameter may speed up reorganization at the expense of greater impact to ongoing traffic.
-
Table 22.64 This table provides type and value information for the MaxUIBuildBatchSize data node configuration parameter
Property Value Version (or later) NDB 8.0.13 Type or units integer Default 64 Range 16 - 512 Restart Type S Maximum scan batch size used for building unique keys. Increasing the value set for this parameter may speed up such builds at the expense of greater impact to ongoing traffic.
Memory Allocation
Table 22.65 This table provides type and value information for the MaxAllocate data node configuration parameter
| Property | Value |
|---|---|
| Version (or later) | NDB 8.0.13 |
| Type or units | unsigned |
| Default | 32M |
| Range | 1M - 1G |
| Restart Type | N |
This is the maximum size of the memory unit to use when
allocating memory for tables. In cases where
NDB gives Out of
memory errors, but it is evident by examining the
cluster logs or the output of DUMP
1000 that all available memory has not yet been used,
you can increase the value of this parameter (or
MaxNoOfTables, or both)
to cause NDB to make sufficient memory
available.
Multiple Transporters
Beginning with version 8.0.20, NDB allocates
multiple transporters for communication between pairs of data
nodes. The number of transporters so allocated can be influenced
by setting an appropriate value for the
NodeGroupTransporters parameter introduced in
that release.
Table 22.66 This table provides type and value information for the NodeGroupTransporters data node configuration parameter
| Property | Value |
|---|---|
| Version (or later) | NDB 8.0.20 |
| Type or units | integer |
| Default | 0 |
| Range | 0 - 32 |
| Restart Type | N |
This parameter determines the number of transporters used between nodes in the same node group. The default value (0) means that the number of transporters used is the same as the number of LDMs in the node. This should be sufficient for most use cases; thus it should seldom be necessary to change this value from its default.
Setting NodeGroupTransporters to a number
greater than the number of LDM threads or the number of TC
threads, whichever is higher, causes NDB to
use the maximum of these two numbers of threads. This means that
a value greater than this is effectively ignored.
Hash Map Size
Table 22.67 This table provides type and value information for the DefaultHashMapSize data node configuration parameter
| Property | Value |
|---|---|
| Version (or later) | NDB 8.0.13 |
| Type or units | LDM threads |
| Default | 240 |
| Range | 0 - 3840 |
| Restart Type | N |
The original intended use for this parameter was to facilitate upgrades and especially downgrades to and from very old releases with differing default hash map sizes. This is not an issue when upgrading from NDB Cluster 7.3 (or later) to later versions.
Decreasing this parameter online after any tables have been
created or modified with DefaultHashMapSize
equal to 3840 is not currently supported.
Logging and checkpointing.
The following [ndbd] parameters control log
and checkpoint behavior.
-
Table 22.68 This table provides type and value information for the FragmentLogFileSize data node configuration parameter
Property Value Version (or later) NDB 8.0.13 Type or units bytes Default 16M Range 4M - 1G Restart Type IN Setting this parameter enables you to control directly the size of redo log files. This can be useful in situations when NDB Cluster is operating under a high load and it is unable to close fragment log files quickly enough before attempting to open new ones (only 2 fragment log files can be open at one time); increasing the size of the fragment log files gives the cluster more time before having to open each new fragment log file. The default value for this parameter is 16M.
For more information about fragment log files, see the description for
NoOfFragmentLogFiles. -
Table 22.69 This table provides type and value information for the InitialNoOfOpenFiles data node configuration parameter
Property Value Version (or later) NDB 8.0.13 Type or units files Default 27 Range 20 - 4294967039 (0xFFFFFEFF) Restart Type N This parameter sets the initial number of internal threads to allocate for open files.
The default value is 27.
-
Table 22.70 This table provides type and value information for the InitFragmentLogFiles data node configuration parameter
Property Value Version (or later) NDB 8.0.13 Type or units [see values] Default SPARSE Range SPARSE, FULL Restart Type IN By default, fragment log files are created sparsely when performing an initial start of a data node—that is, depending on the operating system and file system in use, not all bytes are necessarily written to disk. However, it is possible to override this behavior and force all bytes to be written, regardless of the platform and file system type being used, by means of this parameter.
InitFragmentLogFilestakes either of two values:SPARSE. Fragment log files are created sparsely. This is the default value.FULL. Force all bytes of the fragment log file to be written to disk.
Depending on your operating system and file system, setting
InitFragmentLogFiles=FULLmay help eliminate I/O errors on writes to the REDO log. -
Table 22.71 This table provides type and value information for the EnablePartialLcp data node configuration parameter
Property Value Version (or later) NDB 8.0.13 Type or units boolean Default true Range ... Restart Type N When
true, enable partial local checkpoints: This means that each LCP records only part of the full database, plus any records containing rows changed since the last LCP; if no rows have changed, the LCP updates only the LCP control file and does not update any data files.If
EnablePartialLcpis disabled (false), each LCP uses only a single file and writes a full checkpoint; this requires the least amount of disk space for LCPs, but increases the write load for each LCP. The default value is enabled (true). The proportion of space used by partial LCPS can be modified by the setting for theRecoveryWorkconfiguration parameter.For more information about files and directories used for full and partial LCPs, see NDB Cluster Data Node File System Directory.
Setting this parameter to
falsealso disables the calculation of disk write speed used by the adaptive LCP control mechanism. -
Table 22.72 This table provides type and value information for the LcpScanProgressTimeout data node configuration parameter
Property Value Version (or later) NDB 8.0.13 Type or units second Default 60 Range 0 - 4294967039 (0xFFFFFEFF) Restart Type N Version (or later) NDB 8.0.19 Type or units second Default 180 Range 0 - 4294967039 (0xFFFFFEFF) Restart Type N A local checkpoint fragment scan watchdog checks periodically for no progress in each fragment scan performed as part of a local checkpoint, and shuts down the node if there is no progress after a given amount of time has elapsed. This interval can be set using the
LcpScanProgressTimeoutdata node configuration parameter, which sets the maximum time for which the local checkpoint can be stalled before the LCP fragment scan watchdog shuts down the node.The default value is 60 seconds (providing compatibility with previous releases). Setting this parameter to 0 disables the LCP fragment scan watchdog altogether.
-
Table 22.73 This table provides type and value information for the MaxNoOfOpenFiles data node configuration parameter
Property Value Version (or later) NDB 8.0.13 Type or units unsigned Default 0 Range 20 - 4294967039 (0xFFFFFEFF) Restart Type N This parameter sets a ceiling on how many internal threads to allocate for open files. Any situation requiring a change in this parameter should be reported as a bug.
The default value is 0. However, the minimum value to which this parameter can be set is 20.
-
Table 22.74 This table provides type and value information for the MaxNoOfSavedMessages data node configuration parameter
Property Value Version (or later) NDB 8.0.13 Type or units integer Default 25 Range 0 - 4294967039 (0xFFFFFEFF) Restart Type N This parameter sets the maximum number of errors written in the error log as well as the maximum number of trace files that are kept before overwriting the existing ones. Trace files are generated when, for whatever reason, the node crashes.
The default is 25, which sets these maximums to 25 error messages and 25 trace files.
-
Table 22.75 This table provides type and value information for the MaxLCPStartDelay data node configuration parameter
Property Value Version (or later) NDB 8.0.13 Type or units seconds Default 0 Range 0 - 600 Restart Type N In parallel data node recovery, only table data is actually copied and synchronized in parallel; synchronization of metadata such as dictionary and checkpoint information is done in a serial fashion. In addition, recovery of dictionary and checkpoint information cannot be executed in parallel with performing of local checkpoints. This means that, when starting or restarting many data nodes concurrently, data nodes may be forced to wait while a local checkpoint is performed, which can result in longer node recovery times.
It is possible to force a delay in the local checkpoint to permit more (and possibly all) data nodes to complete metadata synchronization; once each data node's metadata synchronization is complete, all of the data nodes can recover table data in parallel, even while the local checkpoint is being executed. To force such a delay, set
MaxLCPStartDelay, which determines the number of seconds the cluster can wait to begin a local checkpoint while data nodes continue to synchronize metadata. This parameter should be set in the[ndbd default]section of theconfig.inifile, so that it is the same for all data nodes. The maximum value is 600; the default is 0. -
Table 22.76 This table provides type and value information for the NoOfFragmentLogFiles data node configuration parameter
Property Value Version (or later) NDB 8.0.13 Type or units integer Default 16 Range 3 - 4294967039 (0xFFFFFEFF) Restart Type IN This parameter sets the number of REDO log files for the node, and thus the amount of space allocated to REDO logging. Because the REDO log files are organized in a ring, it is extremely important that the first and last log files in the set (sometimes referred to as the “head” and “tail” log files, respectively) do not meet. When these approach one another too closely, the node begins aborting all transactions encompassing updates due to a lack of room for new log records.
A
REDOlog record is not removed until both required local checkpoints have been completed since that log record was inserted. Checkpointing frequency is determined by its own set of configuration parameters discussed elsewhere in this chapter.The default parameter value is 16, which by default means 16 sets of 4 16MB files for a total of 1024MB. The size of the individual log files is configurable using the
FragmentLogFileSizeparameter. In scenarios requiring a great many updates, the value forNoOfFragmentLogFilesmay need to be set as high as 300 or even higher to provide sufficient space for REDO logs.If the checkpointing is slow and there are so many writes to the database that the log files are full and the log tail cannot be cut without jeopardizing recovery, all updating transactions are aborted with internal error code 410 (
Out of log file space temporarily). This condition prevails until a checkpoint has completed and the log tail can be moved forward.ImportantThis parameter cannot be changed “on the fly”; you must restart the node using
--initial. If you wish to change this value for all data nodes in a running cluster, you can do so using a rolling node restart (using--initialwhen starting each data node). -
Table 22.77 This table provides type and value information for the RecoveryWork data node configuration parameter
Property Value Version (or later) NDB 8.0.13 Type or units integer Default 60 Range 25 - 100 Restart Type N Percentage of storage overhead for LCP files. This parameter has an effect only when
EnablePartialLcpis true, that is, only when partial local checkpoints are enabled. A higher value means:Fewer records are written for each LCP, LCPs use more space
More work is needed during restarts
A lower value for
RecoveryWorkmeans:More records are written during each LCP, but LCPs require less space on disk.
Less work during restart and thus faster restarts, at the expense of more work during normal operations
For example, setting
RecoveryWorkto 60 means that the total size of an LCP is roughly 1 + 0.6 = 1.6 times the size of the data to be checkpointed. This means that 60% more work is required during the restore phase of a restart compared to the work done during a restart that uses full checkpoints. (This is more than compensated for during other phases of the restart such that the restart as a whole is still faster when using partial LCPs than when using full LCPs.) In order not to fill up the redo log, it is necessary to write at 1 + (1 /RecoveryWork) times the rate of data changes during checkpoints—thus, whenRecoveryWork= 60, it is necessary to write at approximately 1 + (1 / 0.6 ) = 2.67 times the change rate. In other words, if changes are being written at 10 MByte per second, the checkpoint needs to be written at roughly 26.7 MByte per second.Setting
RecoveryWork= 40 means that only 1.4 times the total LCP size is needed (and thus the restore phase takes 10 to 15 percent less time. In this case, the checkpoint write rate is 3.5 times the rate of change.The NDB source distribution includes a test program for simulating LCPs.
lcp_simulator.cccan be found instorage/ndb/src/kernel/blocks/backup/. To compile and run it on Unix platforms, execute the commands shown here:shell>
gcc lcp_simulator.ccshell>./a.outThis program has no dependencies other than
stdio.h, and does not require a connection to an NDB cluster or a MySQL server. By default, it simulates 300 LCPs (three sets of 100 LCPs, each consisting of inserts, updates, and deletes, in turn), reporting the size of the LCP after each one. You can alter the simulation by changing the values ofrecovery_work,insert_work, anddelete_workin the source and recompiling. For more information, see the source of the program. -
Table 22.78 This table provides type and value information for the InsertRecoveryWork data node configuration parameter
Property Value Version (or later) NDB 8.0.13 Type or units integer Default 40 Range 0 - 70 Restart Type N Percentage of
RecoveryWorkused for inserted rows. A higher value increases the number of writes during a local checkpoint, and decreases the total size of the LCP. A lower value decreases the number of writes during an LCP, but results in more space being used for the LCP, which means that recovery takes longer. This parameter has an effect only whenEnablePartialLcpis true, that is, only when partial local checkpoints are enabled. -
Table 22.79 This table provides type and value information for the EnableRedoControl data node configuration parameter
Property Value Version (or later) NDB 8.0.13 Type or units boolean Default false Range ... Restart Type N Enable adaptive checkpointing speed for controlling redo log usage. Set to
falseto disable (the default). SettingEnablePartialLcptofalsealso disables the adaptive calculation.When enabled,
EnableRedoControlallows the data nodes greater flexibility with regard to the rate at which they write LCPs to disk. More specifically, enabling this parameter means that higher write rates can be employed, so that LCPs can complete and Redo logs be trimmed more quickly, thereby reducing recovery time and disk space requirements. This functionality allows data nodes to make better use of the higher rate of I/O and greater bandwidth available from modern solid-state storage devices and protocols, such as solid-state drives (SSDs) using Non-Volatile Memory Express (NVMe).The parameter currently defaults to
false(disabled) due to the fact thatNDBis still deployed widely on systems whose I/O or bandwidth is constrained relative to those employing solid-state technology, such as those using conventional hard disks (HDDs). In settings such as these, theEnableRedoControlmechanism can easily cause the I/O subsystem to become saturated, increasing wait times for data node input and output. In particular, this can cause issues with NDB Disk Data tables which have tablespaces or log file groups sharing a constrained IO subsystem with data node LCP and redo log files; such problems potentially include node or cluster failure due to GCP stop errors.
Metadata objects.
The next set of [ndbd] parameters defines
pool sizes for metadata objects, used to define the maximum
number of attributes, tables, indexes, and trigger objects
used by indexes, events, and replication between clusters.
These act merely as “suggestions” to the cluster, and any that are not specified revert to the default values shown.
-
Table 22.80 This table provides type and value information for the MaxNoOfAttributes data node configuration parameter
Property Value Version (or later) NDB 8.0.13 Type or units integer Default 1000 Range 32 - 4294967039 (0xFFFFFEFF) Restart Type N This parameter sets a suggested maximum number of attributes that can be defined in the cluster; like
MaxNoOfTables, it is not intended to function as a hard upper limit.(In older NDB Cluster releases, this parameter was sometimes treated as a hard limit for certain operations. This caused problems with NDB Cluster Replication, when it was possible to create more tables than could be replicated, and sometimes led to confusion when it was possible [or not possible, depending on the circumstances] to create more than
MaxNoOfAttributesattributes.)The default value is 1000, with the minimum possible value being 32. The maximum is 4294967039. Each attribute consumes around 200 bytes of storage per node due to the fact that all metadata is fully replicated on the servers.
When setting
MaxNoOfAttributes, it is important to prepare in advance for anyALTER TABLEstatements that you might want to perform in the future. This is due to the fact, during the execution ofALTER TABLEon a Cluster table, 3 times the number of attributes as in the original table are used, and a good practice is to permit double this amount. For example, if the NDB Cluster table having the greatest number of attributes (greatest_number_of_attributes) has 100 attributes, a good starting point for the value ofMaxNoOfAttributeswould be6 *.greatest_number_of_attributes= 600You should also estimate the average number of attributes per table and multiply this by
MaxNoOfTables. If this value is larger than the value obtained in the previous paragraph, you should use the larger value instead.Assuming that you can create all desired tables without any problems, you should also verify that this number is sufficient by trying an actual
ALTER TABLEafter configuring the parameter. If this is not successful, increaseMaxNoOfAttributesby another multiple ofMaxNoOfTablesand test it again. -
Table 22.81 This table provides type and value information for the MaxNoOfTables data node configuration parameter
Property Value Version (or later) NDB 8.0.13 Type or units integer Default 128 Range 8 - 20320 Restart Type N A table object is allocated for each table and for each unique hash index in the cluster. This parameter sets a suggested maximum number of table objects for the cluster as a whole; like
MaxNoOfAttributes, it is not intended to function as a hard upper limit.(In older NDB Cluster releases, this parameter was sometimes treated as a hard limit for certain operations. This caused problems with NDB Cluster Replication, when it was possible to create more tables than could be replicated, and sometimes led to confusion when it was possible [or not possible, depending on the circumstances] to create more than
MaxNoOfTablestables.)For each attribute that has a
BLOBdata type an extra table is used to store most of theBLOBdata. These tables also must be taken into account when defining the total number of tables.The default value of this parameter is 128. The minimum is 8 and the maximum is 20320. Each table object consumes approximately 20KB per node.
NoteThe sum of
MaxNoOfTables,MaxNoOfOrderedIndexes, andMaxNoOfUniqueHashIndexesmust not exceed232 − 2(4294967294). -
Table 22.82 This table provides type and value information for the MaxNoOfOrderedIndexes data node configuration parameter
Property Value Version (or later) NDB 8.0.13 Type or units integer Default 128 Range 0 - 4294967039 (0xFFFFFEFF) Restart Type N For each ordered index in the cluster, an object is allocated describing what is being indexed and its storage segments. By default, each index so defined also defines an ordered index. Each unique index and primary key has both an ordered index and a hash index.
MaxNoOfOrderedIndexessets the total number of ordered indexes that can be in use in the system at any one time.The default value of this parameter is 128. Each index object consumes approximately 10KB of data per node.
NoteThe sum of
MaxNoOfTables,MaxNoOfOrderedIndexes, andMaxNoOfUniqueHashIndexesmust not exceed232 − 2(4294967294). -
Table 22.83 This table provides type and value information for the MaxNoOfUniqueHashIndexes data node configuration parameter
Property Value Version (or later) NDB 8.0.13 Type or units integer Default 64 Range 0 - 4294967039 (0xFFFFFEFF) Restart Type N For each unique index that is not a primary key, a special table is allocated that maps the unique key to the primary key of the indexed table. By default, an ordered index is also defined for each unique index. To prevent this, you must specify the
USING HASHoption when defining the unique index.The default value is 64. Each index consumes approximately 15KB per node.
NoteThe sum of
MaxNoOfTables,MaxNoOfOrderedIndexes, andMaxNoOfUniqueHashIndexesmust not exceed232 − 2(4294967294). -
Table 22.84 This table provides type and value information for the MaxNoOfTriggers data node configuration parameter
Property Value Version (or later) NDB 8.0.13 Type or units integer Default 768 Range 0 - 4294967039 (0xFFFFFEFF) Restart Type N Internal update, insert, and delete triggers are allocated for each unique hash index. (This means that three triggers are created for each unique hash index.) However, an ordered index requires only a single trigger object. Backups also use three trigger objects for each normal table in the cluster.
Replication between clusters also makes use of internal triggers.
This parameter sets the maximum number of trigger objects in the cluster.
The default value is 768.
-
Table 22.85 This table provides type and value information for the MaxNoOfSubscriptions data node configuration parameter
Property Value Version (or later) NDB 8.0.13 Type or units unsigned Default 0 Range 0 - 4294967039 (0xFFFFFEFF) Restart Type N Each
NDBtable in an NDB Cluster requires a subscription in the NDB kernel. For some NDB API applications, it may be necessary or desirable to change this parameter. However, for normal usage with MySQL servers acting as SQL nodes, there is not any need to do so.The default value for
MaxNoOfSubscriptionsis 0, which is treated as equal toMaxNoOfTables. Each subscription consumes 108 bytes. -
Table 22.86 This table provides type and value information for the MaxNoOfSubscribers data node configuration parameter
Property Value Version (or later) NDB 8.0.13 Type or units unsigned Default 0 Range 0 - 4294967039 (0xFFFFFEFF) Restart Type N This parameter is of interest only when using NDB Cluster Replication. The default value is 0, which is treated as
2 * MaxNoOfTables; that is, there is one subscription perNDBtable for each of two MySQL servers (one acting as the replication master and the other as the slave). Each subscriber uses 16 bytes of memory.When using circular replication, multi-master replication, and other replication setups involving more than 2 MySQL servers, you should increase this parameter to the number of mysqld processes included in replication (this is often, but not always, the same as the number of clusters). For example, if you have a circular replication setup using three NDB Cluster s, with one mysqld attached to each cluster, and each of these mysqld processes acts as a master and as a slave, you should set
MaxNoOfSubscribersequal to3 * MaxNoOfTables.For more information, see Section 22.6, “NDB Cluster Replication”.
MaxNoOfConcurrentSubOperationsTable 22.87 This table provides type and value information for the MaxNoOfConcurrentSubOperations data node configuration parameter
Property Value Version (or later) NDB 8.0.13 Type or units unsigned Default 256 Range 0 - 4294967039 (0xFFFFFEFF) Restart Type N This parameter sets a ceiling on the number of operations that can be performed by all API nodes in the cluster at one time. The default value (256) is sufficient for normal operations, and might need to be adjusted only in scenarios where there are a great many API nodes each performing a high volume of operations concurrently.
Boolean parameters.
The behavior of data nodes is also affected by a set of
[ndbd] parameters taking on boolean values.
These parameters can each be specified as
TRUE by setting them equal to
1 or Y, and as
FALSE by setting them equal to
0 or N.
-
Table 22.88 This table provides type and value information for the CompressedBackup data node configuration parameter
Property Value Version (or later) NDB 8.0.13 Type or units boolean Default false Range true, false Restart Type N Enabling this parameter causes backup files to be compressed. The compression used is equivalent to gzip --fast, and can save 50% or more of the space required on the data node to store uncompressed backup files. Compressed backups can be enabled for individual data nodes, or for all data nodes (by setting this parameter in the
[ndbd default]section of theconfig.inifile).ImportantYou cannot restore a compressed backup to a cluster running a MySQL version that does not support this feature.
The default value is
0(disabled). -
Table 22.89 This table provides type and value information for the CompressedLCP data node configuration parameter
Property Value Version (or later) NDB 8.0.13 Type or units boolean Default false Range true, false Restart Type N Setting this parameter to
1causes local checkpoint files to be compressed. The compression used is equivalent to gzip --fast, and can save 50% or more of the space required on the data node to store uncompressed checkpoint files. Compressed LCPs can be enabled for individual data nodes, or for all data nodes (by setting this parameter in the[ndbd default]section of theconfig.inifile).ImportantYou cannot restore a compressed local checkpoint to a cluster running a MySQL version that does not support this feature.
The default value is
0(disabled). -
Table 22.90 This table provides type and value information for the CrashOnCorruptedTuple data node configuration parameter
Property Value Version (or later) NDB 8.0.13 Type or units boolean Default true Range true, false Restart Type S When this parameter is enabled (the default), it forces a data node to shut down whenever it encounters a corrupted tuple.
-
Table 22.91 This table provides type and value information for the Diskless data node configuration parameter
Property Value Version (or later) NDB 8.0.13 Type or units true|false (1|0) Default false Range true, false Restart Type IS It is possible to specify NDB Cluster tables as diskless, meaning that tables are not checkpointed to disk and that no logging occurs. Such tables exist only in main memory. A consequence of using diskless tables is that neither the tables nor the records in those tables survive a crash. However, when operating in diskless mode, it is possible to run ndbd on a diskless computer.
ImportantThis feature causes the entire cluster to operate in diskless mode.
When this feature is enabled, Cluster online backup is disabled. In addition, a partial start of the cluster is not possible.
Disklessis disabled by default. -
Table 22.92 This table provides type and value information for the LateAlloc data node configuration parameter
Property Value Version (or later) NDB 8.0.13 Type or units numeric Default 1 Range 0 - 1 Restart Type N Allocate memory for this data node after a connection to the management server has been established. Enabled by default.
-
Table 22.93 This table provides type and value information for the LockPagesInMainMemory data node configuration parameter
Property Value Version (or later) NDB 8.0.13 Type or units numeric Default 0 Range 0 - 2 Restart Type N For a number of operating systems, including Solaris and Linux, it is possible to lock a process into memory and so avoid any swapping to disk. This can be used to help guarantee the cluster's real-time characteristics.
This parameter takes one of the integer values
0,1, or2, which act as shown in the following list:0: Disables locking. This is the default value.1: Performs the lock after allocating memory for the process.2: Performs the lock before memory for the process is allocated.
If the operating system is not configured to permit unprivileged users to lock pages, then the data node process making use of this parameter may have to be run as system root. (
LockPagesInMainMemoryuses themlockallfunction. From Linux kernel 2.6.9, unprivileged users can lock memory as limited bymax locked memory. For more information, see ulimit -l and http://linux.die.net/man/2/mlock).NoteIn older NDB Cluster releases, this parameter was a Boolean.
0orfalsewas the default setting, and disabled locking.1ortrueenabled locking of the process after its memory was allocated. NDB Cluster 8.0 treatstrueorfalsefor the value of this parameter as an error.ImportantBeginning with
glibc2.10,glibcuses per-thread arenas to reduce lock contention on a shared pool, which consumes real memory. In general, a data node process does not need per-thread arenas, since it does not perform any memory allocation after startup. (This difference in allocators does not appear to affect performance significantly.)The
glibcbehavior is intended to be configurable via theMALLOC_ARENA_MAXenvironment variable, but a bug in this mechanism prior toglibc2.16 meant that this variable could not be set to less than 8, so that the wasted memory could not be reclaimed. (Bug #15907219; see also http://sourceware.org/bugzilla/show_bug.cgi?id=13137 for more information concerning this issue.)One possible workaround for this problem is to use the
LD_PRELOADenvironment variable to preload ajemallocmemory allocation library to take the place of that supplied withglibc. -
Table 22.94 This table provides type and value information for the ODirect data node configuration parameter
Property Value Version (or later) NDB 8.0.13 Type or units boolean Default false Range true, false Restart Type N Enabling this parameter causes
NDBto attempt usingO_DIRECTwrites for LCP, backups, and redo logs, often lowering kswapd and CPU usage. When using NDB Cluster on Linux, enableODirectif you are using a 2.6 or later kernel.ODirectis disabled by default. -
Table 22.95 This table provides type and value information for the ODirectSyncFlag data node configuration parameter
Property Value Version (or later) NDB 8.0.13 Type or units boolean Default false Range true, false Restart Type N When this parameter is enabled, redo log writes are performed such that each completed file system write is handled as a call to
fsync. The setting for this parameter is ignored if at least one of the following conditions is true:ODirectis not enabled.InitFragmentLogFilesis set toSPARSE.
Disabled by default.
-
Table 22.96 This table provides type and value information for the RestartOnErrorInsert data node configuration parameter
Property Value Version (or later) NDB 8.0.13 Type or units error code Default 2 Range 0 - 4 Restart Type N This feature is accessible only when building the debug version where it is possible to insert errors in the execution of individual blocks of code as part of testing.
This feature is disabled by default.
-
Table 22.97 This table provides type and value information for the StopOnError data node configuration parameter
Property Value Version (or later) NDB 8.0.13 Type or units boolean Default 1 Range 0, 1 Restart Type N This parameter specifies whether a data node process should exit or perform an automatic restart when an error condition is encountered.
This parameter's default value is 1; this means that, by default, an error causes the data node process to halt.
When an error is encountered and
StopOnErroris 0, the data node process is restarted.Users of MySQL Cluster Manager should note that, when
StopOnErrorequals 1, this prevents the MySQL Cluster Manager agent from restarting any data nodes after it has performed its own restart and recovery. See Starting and Stopping the Agent on Linux, for more information. -
Table 22.98 This table provides type and value information for the UseShm data node configuration parameter
Property Value Version (or later) NDB 8.0.13 Type or units boolean Default false Range true, false Restart Type S Enable a shared memory connection between this data node and the API node also running on this host. Set to 1 to enable.
Controlling Timeouts, Intervals, and Disk Paging
There are a number of [ndbd] parameters
specifying timeouts and intervals between various actions in
Cluster data nodes. Most of the timeout values are specified in
milliseconds. Any exceptions to this are mentioned where
applicable.
-
Table 22.99 This table provides type and value information for the TimeBetweenWatchDogCheck data node configuration parameter
Property Value Version (or later) NDB 8.0.13 Type or units milliseconds Default 6000 Range 70 - 4294967039 (0xFFFFFEFF) Restart Type N To prevent the main thread from getting stuck in an endless loop at some point, a “watchdog” thread checks the main thread. This parameter specifies the number of milliseconds between checks. If the process remains in the same state after three checks, the watchdog thread terminates it.
This parameter can easily be changed for purposes of experimentation or to adapt to local conditions. It can be specified on a per-node basis although there seems to be little reason for doing so.
The default timeout is 6000 milliseconds (6 seconds).
TimeBetweenWatchDogCheckInitialTable 22.100 This table provides type and value information for the TimeBetweenWatchDogCheckInitial data node configuration parameter
Property Value Version (or later) NDB 8.0.13 Type or units milliseconds Default 6000 Range 70 - 4294967039 (0xFFFFFEFF) Restart Type N This is similar to the
TimeBetweenWatchDogCheckparameter, except thatTimeBetweenWatchDogCheckInitialcontrols the amount of time that passes between execution checks inside a storage node in the early start phases during which memory is allocated.The default timeout is 6000 milliseconds (6 seconds).
-
Table 22.101 This table provides type and value information for the StartPartialTimeout data node configuration parameter
Property Value Version (or later) NDB 8.0.13 Type or units milliseconds Default 30000 Range 0 - 4294967039 (0xFFFFFEFF) Restart Type N This parameter specifies how long the Cluster waits for all data nodes to come up before the cluster initialization routine is invoked. This timeout is used to avoid a partial Cluster startup whenever possible.
This parameter is overridden when performing an initial start or initial restart of the cluster.
The default value is 30000 milliseconds (30 seconds). 0 disables the timeout, in which case the cluster may start only if all nodes are available.
-
Table 22.102 This table provides type and value information for the StartPartitionedTimeout data node configuration parameter
Property Value Version (or later) NDB 8.0.13 Type or units milliseconds Default 0 Range 0 - 4294967039 (0xFFFFFEFF) Restart Type N If the cluster is ready to start after waiting for
StartPartialTimeoutmilliseconds but is still possibly in a partitioned state, the cluster waits until this timeout has also passed. IfStartPartitionedTimeoutis set to 0, the cluster waits indefinitely (232−1 ms, or approximately 49.71 days).This parameter is overridden when performing an initial start or initial restart of the cluster.
-
Table 22.103 This table provides type and value information for the StartFailureTimeout data node configuration parameter
Property Value Version (or later) NDB 8.0.13 Type or units milliseconds Default 0 Range 0 - 4294967039 (0xFFFFFEFF) Restart Type N If a data node has not completed its startup sequence within the time specified by this parameter, the node startup fails. Setting this parameter to 0 (the default value) means that no data node timeout is applied.
For nonzero values, this parameter is measured in milliseconds. For data nodes containing extremely large amounts of data, this parameter should be increased. For example, in the case of a data node containing several gigabytes of data, a period as long as 10−15 minutes (that is, 600000 to 1000000 milliseconds) might be required to perform a node restart.
-
Table 22.104 This table provides type and value information for the StartNoNodeGroupTimeout data node configuration parameter
Property Value Version (or later) NDB 8.0.13 Type or units milliseconds Default 15000 Range 0 - 4294967039 (0xFFFFFEFF) Restart Type N When a data node is configured with
Nodegroup = 65536, is regarded as not being assigned to any node group. When that is done, the cluster waitsStartNoNodegroupTimeoutmilliseconds, then treats such nodes as though they had been added to the list passed to the--nowait-nodesoption, and starts. The default value is15000(that is, the management server waits 15 seconds). Setting this parameter equal to0means that the cluster waits indefinitely.StartNoNodegroupTimeoutmust be the same for all data nodes in the cluster; for this reason, you should always set it in the[ndbd default]section of theconfig.inifile, rather than for individual data nodes.See Section 22.5.7, “Adding NDB Cluster Data Nodes Online”, for more information.
-
Table 22.105 This table provides type and value information for the HeartbeatIntervalDbDb data node configuration parameter
Property Value Version (or later) NDB 8.0.13 Type or units milliseconds Default 5000 Range 10 - 4294967039 (0xFFFFFEFF) Restart Type N One of the primary methods of discovering failed nodes is by the use of heartbeats. This parameter states how often heartbeat signals are sent and how often to expect to receive them. Heartbeats cannot be disabled.
After missing four heartbeat intervals in a row, the node is declared dead. Thus, the maximum time for discovering a failure through the heartbeat mechanism is five times the heartbeat interval.
The default heartbeat interval is 5000 milliseconds (5 seconds). This parameter must not be changed drastically and should not vary widely between nodes. If one node uses 5000 milliseconds and the node watching it uses 1000 milliseconds, obviously the node will be declared dead very quickly. This parameter can be changed during an online software upgrade, but only in small increments.
See also Network communication and latency, as well as the description of the
ConnectCheckIntervalDelayconfiguration parameter. -
Table 22.106 This table provides type and value information for the HeartbeatIntervalDbApi data node configuration parameter
Property Value Version (or later) NDB 8.0.13 Type or units milliseconds Default 1500 Range 100 - 4294967039 (0xFFFFFEFF) Restart Type N Each data node sends heartbeat signals to each MySQL server (SQL node) to ensure that it remains in contact. If a MySQL server fails to send a heartbeat in time it is declared “dead,” in which case all ongoing transactions are completed and all resources released. The SQL node cannot reconnect until all activities initiated by the previous MySQL instance have been completed. The three-heartbeat criteria for this determination are the same as described for
HeartbeatIntervalDbDb.The default interval is 1500 milliseconds (1.5 seconds). This interval can vary between individual data nodes because each data node watches the MySQL servers connected to it, independently of all other data nodes.
For more information, see Network communication and latency.
-
Table 22.107 This table provides type and value information for the HeartbeatOrder data node configuration parameter
Property Value Version (or later) NDB 8.0.13 Type or units numeric Default 0 Range 0 - 65535 Restart Type S Data nodes send heartbeats to one another in a circular fashion whereby each data node monitors the previous one. If a heartbeat is not detected by a given data node, this node declares the previous data node in the circle “dead” (that is, no longer accessible by the cluster). The determination that a data node is dead is done globally; in other words; once a data node is declared dead, it is regarded as such by all nodes in the cluster.
It is possible for heartbeats between data nodes residing on different hosts to be too slow compared to heartbeats between other pairs of nodes (for example, due to a very low heartbeat interval or temporary connection problem), such that a data node is declared dead, even though the node can still function as part of the cluster. .
In this type of situation, it may be that the order in which heartbeats are transmitted between data nodes makes a difference as to whether or not a particular data node is declared dead. If this declaration occurs unnecessarily, this can in turn lead to the unnecessary loss of a node group and as thus to a failure of the cluster.
Consider a setup where there are 4 data nodes A, B, C, and D running on 2 host computers
host1andhost2, and that these data nodes make up 2 node groups, as shown in the following table:Table 22.108 Four data nodes A, B, C, D running on two host computers host1, host2; each data node belongs to one of two node groups.
Node Group Nodes Running on host1Nodes Running on host2Node Group 0: Node A Node B Node Group 1: Node C Node D Suppose the heartbeats are transmitted in the order A->B->C->D->A. In this case, the loss of the heartbeat between the hosts causes node B to declare node A dead and node C to declare node B dead. This results in loss of Node Group 0, and so the cluster fails. On the other hand, if the order of transmission is A->B->D->C->A (and all other conditions remain as previously stated), the loss of the heartbeat causes nodes A and D to be declared dead; in this case, each node group has one surviving node, and the cluster survives.
The
HeartbeatOrderconfiguration parameter makes the order of heartbeat transmission user-configurable. The default value forHeartbeatOrderis zero; allowing the default value to be used on all data nodes causes the order of heartbeat transmission to be determined byNDB. If this parameter is used, it must be set to a nonzero value (maximum 65535) for every data node in the cluster, and this value must be unique for each data node; this causes the heartbeat transmission to proceed from data node to data node in the order of theirHeartbeatOrdervalues from lowest to highest (and then directly from the data node having the highestHeartbeatOrderto the data node having the lowest value, to complete the circle). The values need not be consecutive. For example, to force the heartbeat transmission order A->B->D->C->A in the scenario outlined previously, you could set theHeartbeatOrdervalues as shown here:Table 22.109 HeartbeatOrder values to force a heartbeat transition order of A->B->D->C->A.
Node HeartbeatOrderValueA 10 B 20 C 30 D 25 To use this parameter to change the heartbeat transmission order in a running NDB Cluster, you must first set
HeartbeatOrderfor each data node in the cluster in the global configuration (config.ini) file (or files). To cause the change to take effect, you must perform either of the following:A complete shutdown and restart of the entire cluster.
2 rolling restarts of the cluster in succession. All nodes must be restarted in the same order in both rolling restarts.
You can use
DUMP 908to observe the effect of this parameter in the data node logs. -
Table 22.110 This table provides type and value information for the ConnectCheckIntervalDelay data node configuration parameter
Property Value Version (or later) NDB 8.0.13 Type or units milliseconds Default 0 Range 0 - 4294967039 (0xFFFFFEFF) Restart Type N This parameter enables connection checking between data nodes after one of them has failed heartbeat checks for 5 intervals of up to
HeartbeatIntervalDbDbmilliseconds.Such a data node that further fails to respond within an interval of
ConnectCheckIntervalDelaymilliseconds is considered suspect, and is considered dead after two such intervals. This can be useful in setups with known latency issues.The default value for this parameter is 0 (disabled).
-
Table 22.111 This table provides type and value information for the TimeBetweenLocalCheckpoints data node configuration parameter
Property Value Version (or later) NDB 8.0.13 Type or units number of 4-byte words, as a base-2 logarithm Default 20 Range 0 - 31 Restart Type N This parameter is an exception in that it does not specify a time to wait before starting a new local checkpoint; rather, it is used to ensure that local checkpoints are not performed in a cluster where relatively few updates are taking place. In most clusters with high update rates, it is likely that a new local checkpoint is started immediately after the previous one has been completed.
The size of all write operations executed since the start of the previous local checkpoints is added. This parameter is also exceptional in that it is specified as the base-2 logarithm of the number of 4-byte words, so that the default value 20 means 4MB (4 × 220) of write operations, 21 would mean 8MB, and so on up to a maximum value of 31, which equates to 8GB of write operations.
All the write operations in the cluster are added together. Setting
TimeBetweenLocalCheckpointsto 6 or less means that local checkpoints will be executed continuously without pause, independent of the cluster's workload. -
Table 22.112 This table provides type and value information for the TimeBetweenGlobalCheckpoints data node configuration parameter
Property Value Version (or later) NDB 8.0.13 Type or units milliseconds Default 2000 Range 20 - 32000 Restart Type N When a transaction is committed, it is committed in main memory in all nodes on which the data is mirrored. However, transaction log records are not flushed to disk as part of the commit. The reasoning behind this behavior is that having the transaction safely committed on at least two autonomous host machines should meet reasonable standards for durability.
It is also important to ensure that even the worst of cases—a complete crash of the cluster—is handled properly. To guarantee that this happens, all transactions taking place within a given interval are put into a global checkpoint, which can be thought of as a set of committed transactions that has been flushed to disk. In other words, as part of the commit process, a transaction is placed in a global checkpoint group. Later, this group's log records are flushed to disk, and then the entire group of transactions is safely committed to disk on all computers in the cluster.
In NDB 8.0.19 and later, it recommended when using solid-state disks (especially those employing NVMe) with Disk Data tables that you reduce this value. In such cases, you should also ensure that
MaxDiskDataLatencyis set to a proper level.This parameter defines the interval between global checkpoints. The default is 2000 milliseconds.
TimeBetweenGlobalCheckpointsTimeoutTable 22.113 This table provides type and value information for the TimeBetweenGlobalCheckpointsTimeout data node configuration parameter
Property Value Version (or later) NDB 8.0.13 Type or units milliseconds Default 120000 Range 10 - 4294967039 (0xFFFFFEFF) Restart Type N This parameter defines the minimum timeout between global checkpoints. The default is 120000 milliseconds.
-
Table 22.114 This table provides type and value information for the TimeBetweenEpochs data node configuration parameter
Property Value Version (or later) NDB 8.0.13 Type or units milliseconds Default 100 Range 0 - 32000 Restart Type N This parameter defines the interval between synchronization epochs for NDB Cluster Replication. The default value is 100 milliseconds.
TimeBetweenEpochsis part of the implementation of “micro-GCPs”, which can be used to improve the performance of NDB Cluster Replication. -
Table 22.115 This table provides type and value information for the TimeBetweenEpochsTimeout data node configuration parameter
Property Value Version (or later) NDB 8.0.13 Type or units milliseconds Default 0 Range 0 - 256000 Restart Type N This parameter defines a timeout for synchronization epochs for NDB Cluster Replication. If a node fails to participate in a global checkpoint within the time determined by this parameter, the node is shut down. The default value is 0; in other words, the timeout is disabled.
TimeBetweenEpochsTimeoutis part of the implementation of “micro-GCPs”, which can be used to improve the performance of NDB Cluster Replication.The current value of this parameter and a warning are written to the cluster log whenever a GCP save takes longer than 1 minute or a GCP commit takes longer than 10 seconds.
Setting this parameter to zero has the effect of disabling GCP stops caused by save timeouts, commit timeouts, or both. The maximum possible value for this parameter is 256000 milliseconds.
-
Table 22.116 This table provides type and value information for the MaxBufferedEpochs data node configuration parameter
Property Value Version (or later) NDB 8.0.13 Type or units epochs Default 100 Range 0 - 100000 Restart Type N The number of unprocessed epochs by which a subscribing node can lag behind. Exceeding this number causes a lagging subscriber to be disconnected.
The default value of 100 is sufficient for most normal operations. If a subscribing node does lag enough to cause disconnections, it is usually due to network or scheduling issues with regard to processes or threads. (In rare circumstances, the problem may be due to a bug in the
NDBclient.) It may be desirable to set the value lower than the default when epochs are longer.Disconnection prevents client issues from affecting the data node service, running out of memory to buffer data, and eventually shutting down. Instead, only the client is affected as a result of the disconnect (by, for example gap events in the binary log), forcing the client to reconnect or restart the process.
-
Table 22.117 This table provides type and value information for the MaxBufferedEpochBytes data node configuration parameter
Property Value Version (or later) NDB 8.0.13 Type or units bytes Default 26214400 Range 26214400 (0x01900000) - 4294967039 (0xFFFFFEFF) Restart Type N The total number of bytes allocated for buffering epochs by this node.
TimeBetweenInactiveTransactionAbortCheckTable 22.118 This table provides type and value information for the TimeBetweenInactiveTransactionAbortCheck data node configuration parameter
Property Value Version (or later) NDB 8.0.13 Type or units milliseconds Default 1000 Range 1000 - 4294967039 (0xFFFFFEFF) Restart Type N Timeout handling is performed by checking a timer on each transaction once for every interval specified by this parameter. Thus, if this parameter is set to 1000 milliseconds, every transaction will be checked for timing out once per second.
The default value is 1000 milliseconds (1 second).
-
Table 22.119 This table provides type and value information for the TransactionInactiveTimeout data node configuration parameter
Property Value Version (or later) NDB 8.0.13 Type or units milliseconds Default 4294967039 (0xFFFFFEFF) Range 0 - 4294967039 (0xFFFFFEFF) Restart Type N This parameter states the maximum time that is permitted to lapse between operations in the same transaction before the transaction is aborted.
The default for this parameter is
4G(also the maximum). For a real-time database that needs to ensure that no transaction keeps locks for too long, this parameter should be set to a relatively small value. Setting it to 0 means that the application never times out. The unit is milliseconds. TransactionDeadlockDetectionTimeoutTable 22.120 This table provides type and value information for the TransactionDeadlockDetectionTimeout data node configuration parameter
Property Value Version (or later) NDB 8.0.13 Type or units milliseconds Default 1200 Range 50 - 4294967039 (0xFFFFFEFF) Restart Type N When a node executes a query involving a transaction, the node waits for the other nodes in the cluster to respond before continuing. This parameter sets the amount of time that the transaction can spend executing within a data node, that is, the time that the transaction coordinator waits for each data node participating in the transaction to execute a request.
A failure to respond can occur for any of the following reasons:
The node is “dead”
The operation has entered a lock queue
The node requested to perform the action could be heavily overloaded.
This timeout parameter states how long the transaction coordinator waits for query execution by another node before aborting the transaction, and is important for both node failure handling and deadlock detection.
The default timeout value is 1200 milliseconds (1.2 seconds).
The minimum for this parameter is 50 milliseconds.
-
Table 22.121 This table provides type and value information for the DiskSyncSize data node configuration parameter
Property Value Version (or later) NDB 8.0.13 Type or units bytes Default 4M Range 32K - 4294967039 (0xFFFFFEFF) Restart Type N This is the maximum number of bytes to store before flushing data to a local checkpoint file. This is done to prevent write buffering, which can impede performance significantly. This parameter is not intended to take the place of
TimeBetweenLocalCheckpoints.NoteWhen
ODirectis enabled, it is not necessary to setDiskSyncSize; in fact, in such cases its value is simply ignored.The default value is 4M (4 megabytes).
-
Table 22.122 This table provides type and value information for the MaxDiskWriteSpeed data node configuration parameter
Property Value Version (or later) NDB 8.0.13 Type or units numeric Default 20M Range 1M - 1024G Restart Type S Set the maximum rate for writing to disk, in bytes per second, by local checkpoints and backup operations when no restarts (by this data node or any other data node) are taking place in this NDB Cluster.
For setting the maximum rate of disk writes allowed while this data node is restarting, use
MaxDiskWriteSpeedOwnRestart. For setting the maximum rate of disk writes allowed while other data nodes are restarting, useMaxDiskWriteSpeedOtherNodeRestart. The minimum speed for disk writes by all LCPs and backup operations can be adjusted by settingMinDiskWriteSpeed. MaxDiskWriteSpeedOtherNodeRestartTable 22.123 This table provides type and value information for the MaxDiskWriteSpeedOtherNodeRestart data node configuration parameter
Property Value Version (or later) NDB 8.0.13 Type or units numeric Default 50M Range 1M - 1024G Restart Type S Set the maximum rate for writing to disk, in bytes per second, by local checkpoints and backup operations when one or more data nodes in this NDB Cluster are restarting, other than this node.
For setting the maximum rate of disk writes allowed while this data node is restarting, use
MaxDiskWriteSpeedOwnRestart. For setting the maximum rate of disk writes allowed when no data nodes are restarting anywhere in the cluster, useMaxDiskWriteSpeed. The minimum speed for disk writes by all LCPs and backup operations can be adjusted by settingMinDiskWriteSpeed.-
Table 22.124 This table provides type and value information for the MaxDiskWriteSpeedOwnRestart data node configuration parameter
Property Value Version (or later) NDB 8.0.13 Type or units numeric Default 200M Range 1M - 1024G Restart Type S Set the maximum rate for writing to disk, in bytes per second, by local checkpoints and backup operations while this data node is restarting.
For setting the maximum rate of disk writes allowed while other data nodes are restarting, use
MaxDiskWriteSpeedOtherNodeRestart. For setting the maximum rate of disk writes allowed when no data nodes are restarting anywhere in the cluster, useMaxDiskWriteSpeed. The minimum speed for disk writes by all LCPs and backup operations can be adjusted by settingMinDiskWriteSpeed. -
Table 22.125 This table provides type and value information for the MinDiskWriteSpeed data node configuration parameter
Property Value Version (or later) NDB 8.0.13 Type or units numeric Default 10M Range 1M - 1024G Restart Type S Set the minimum rate for writing to disk, in bytes per second, by local checkpoints and backup operations.
The maximum rates of disk writes allowed for LCPs and backups under various conditions are adjustable using the parameters
MaxDiskWriteSpeed,MaxDiskWriteSpeedOwnRestart, andMaxDiskWriteSpeedOtherNodeRestart. See the descriptions of these parameters for more information. -
Table 22.126 This table provides type and value information for the ArbitrationTimeout data node configuration parameter
Property Value Version (or later) NDB 8.0.13 Type or units milliseconds Default 7500 Range 10 - 4294967039 (0xFFFFFEFF) Restart Type N This parameter specifies how long data nodes wait for a response from the arbitrator to an arbitration message. If this is exceeded, the network is assumed to have split.
The default value is 7500 milliseconds (7.5 seconds).
-
Table 22.127 This table provides type and value information for the Arbitration data node configuration parameter
Property Value Version (or later) NDB 8.0.13 Type or units enumeration Default Default Range Default, Disabled, WaitExternal Restart Type N The
Arbitrationparameter enables a choice of arbitration schemes, corresponding to one of 3 possible values for this parameter:Default. This enables arbitration to proceed normally, as determined by the
ArbitrationRanksettings for the management and API nodes. This is the default value.Disabled. Setting
Arbitration = Disabledin the[ndbd default]section of theconfig.inifile to accomplishes the same task as settingArbitrationRankto 0 on all management and API nodes. WhenArbitrationis set in this way, anyArbitrationRanksettings are ignored.WaitExternal. The
Arbitrationparameter also makes it possible to configure arbitration in such a way that the cluster waits until after the time determined byArbitrationTimeouthas passed for an external cluster manager application to perform arbitration instead of handling arbitration internally. This can be done by settingArbitration = WaitExternalin the[ndbd default]section of theconfig.inifile. For best results with theWaitExternalsetting, it is recommended thatArbitrationTimeoutbe 2 times as long as the interval required by the external cluster manager to perform arbitration.
ImportantThis parameter should be used only in the
[ndbd default]section of the cluster configuration file. The behavior of the cluster is unspecified whenArbitrationis set to different values for individual data nodes. RestartSubscriberConnectTimeoutTable 22.128 This table provides type and value information for the RestartSubscriberConnectTimeout data node configuration parameter
Property Value Version (or later) NDB 8.0.13 Type or units ms Default 12000 Range 0 - 4294967039 (0xFFFFFEFF) Restart Type S This parameter determines the time that a data node waits for subscribing API nodes to connect. Once this timeout expires, any “missing” API nodes are disconnected from the cluster. To disable this timeout, set
RestartSubscriberConnectTimeoutto 0.While this parameter is specified in milliseconds, the timeout itself is resolved to the next-greatest whole second.
Buffering and logging.
Several [ndbd] configuration parameters
enable the advanced user to have more control over the
resources used by node processes and to adjust various buffer
sizes at need.
These buffers are used as front ends to the file system when
writing log records to disk. If the node is running in diskless
mode, these parameters can be set to their minimum values
without penalty due to the fact that disk writes are
“faked” by the NDB
storage engine's file system abstraction layer.
-
Table 22.129 This table provides type and value information for the UndoIndexBuffer data node configuration parameter
Property Value Version (or later) NDB 8.0.13 Type or units unsigned Default 2M Range 1M - 4294967039 (0xFFFFFEFF) Restart Type N The UNDO index buffer, whose size is set by this parameter, is used during local checkpoints. The
NDBstorage engine uses a recovery scheme based on checkpoint consistency in conjunction with an operational REDO log. To produce a consistent checkpoint without blocking the entire system for writes, UNDO logging is done while performing the local checkpoint. UNDO logging is activated on a single table fragment at a time. This optimization is possible because tables are stored entirely in main memory.The UNDO index buffer is used for the updates on the primary key hash index. Inserts and deletes rearrange the hash index; the NDB storage engine writes UNDO log records that map all physical changes to an index page so that they can be undone at system restart. It also logs all active insert operations for each fragment at the start of a local checkpoint.
Reads and updates set lock bits and update a header in the hash index entry. These changes are handled by the page-writing algorithm to ensure that these operations need no UNDO logging.
This buffer is 2MB by default. The minimum value is 1MB, which is sufficient for most applications. For applications doing extremely large or numerous inserts and deletes together with large transactions and large primary keys, it may be necessary to increase the size of this buffer. If this buffer is too small, the NDB storage engine issues internal error code 677 (
Index UNDO buffers overloaded).ImportantIt is not safe to decrease the value of this parameter during a rolling restart.
-
Table 22.130 This table provides type and value information for the UndoDataBuffer data node configuration parameter
Property Value Version (or later) NDB 8.0.13 Type or units unsigned Default 16M Range 1M - 4294967039 (0xFFFFFEFF) Restart Type N This parameter sets the size of the UNDO data buffer, which performs a function similar to that of the UNDO index buffer, except the UNDO data buffer is used with regard to data memory rather than index memory. This buffer is used during the local checkpoint phase of a fragment for inserts, deletes, and updates.
Because UNDO log entries tend to grow larger as more operations are logged, this buffer is also larger than its index memory counterpart, with a default value of 16MB.
This amount of memory may be unnecessarily large for some applications. In such cases, it is possible to decrease this size to a minimum of 1MB.
It is rarely necessary to increase the size of this buffer. If there is such a need, it is a good idea to check whether the disks can actually handle the load caused by database update activity. A lack of sufficient disk space cannot be overcome by increasing the size of this buffer.
If this buffer is too small and gets congested, the NDB storage engine issues internal error code 891 (Data UNDO buffers overloaded).
ImportantIt is not safe to decrease the value of this parameter during a rolling restart.
-
Table 22.131 This table provides type and value information for the RedoBuffer data node configuration parameter
Property Value Version (or later) NDB 8.0.13 Type or units bytes Default 32M Range 1M - 4294967039 (0xFFFFFEFF) Restart Type N All update activities also need to be logged. The REDO log makes it possible to replay these updates whenever the system is restarted. The NDB recovery algorithm uses a “fuzzy” checkpoint of the data together with the UNDO log, and then applies the REDO log to play back all changes up to the restoration point.
RedoBuffersets the size of the buffer in which the REDO log is written. The default value is 32MB; the minimum value is 1MB.If this buffer is too small, the
NDBstorage engine issues error code 1221 (REDO log buffers overloaded). For this reason, you should exercise care if you attempt to decrease the value ofRedoBufferas part of an online change in the cluster's configuration.ndbmtd allocates a separate buffer for each LDM thread (see
ThreadConfig). For example, with 4 LDM threads, an ndbmtd data node actually has 4 buffers and allocatesRedoBufferbytes to each one, for a total of4 * RedoBufferbytes. -
Table 22.132 This table provides type and value information for the EventLogBufferSize data node configuration parameter
Property Value Version (or later) NDB 8.0.13 Type or units bytes Default 8192 Range 0 - 64K Restart Type S Controls the size of the circular buffer used for NDB log events within data nodes.
Controlling log messages.
In managing the cluster, it is very important to be able to
control the number of log messages sent for various event
types to stdout. For each event category,
there are 16 possible event levels (numbered 0 through 15).
Setting event reporting for a given event category to level 15
means all event reports in that category are sent to
stdout; setting it to 0 means that there
will be no event reports made in that category.
By default, only the startup message is sent to
stdout, with the remaining event reporting
level defaults being set to 0. The reason for this is that these
messages are also sent to the management server's cluster log.
An analogous set of levels can be set for the management client to determine which event levels to record in the cluster log.
-
Table 22.133 This table provides type and value information for the LogLevelStartup data node configuration parameter
Property Value Version (or later) NDB 8.0.13 Type or units integer Default 1 Range 0 - 15 Restart Type N The reporting level for events generated during startup of the process.
The default level is 1.
-
Table 22.134 This table provides type and value information for the LogLevelShutdown data node configuration parameter
Property Value Version (or later) NDB 8.0.13 Type or units integer Default 0 Range 0 - 15 Restart Type N The reporting level for events generated as part of graceful shutdown of a node.
The default level is 0.
-
Table 22.135 This table provides type and value information for the LogLevelStatistic data node configuration parameter
Property Value Version (or later) NDB 8.0.13 Type or units integer Default 0 Range 0 - 15 Restart Type N The reporting level for statistical events such as number of primary key reads, number of updates, number of inserts, information relating to buffer usage, and so on.
The default level is 0.
-
Table 22.136 This table provides type and value information for the LogLevelCheckpoint data node configuration parameter
Property Value Version (or later) NDB 8.0.13 Type or units log level Default 0 Range 0 - 15 Restart Type N The reporting level for events generated by local and global checkpoints.
The default level is 0.
-
Table 22.137 This table provides type and value information for the LogLevelNodeRestart data node configuration parameter
Property Value Version (or later) NDB 8.0.13 Type or units integer Default 0 Range 0 - 15 Restart Type N The reporting level for events generated during node restart.
The default level is 0.
-
Table 22.138 This table provides type and value information for the LogLevelConnection data node configuration parameter
Property Value Version (or later) NDB 8.0.13 Type or units integer Default 0 Range 0 - 15 Restart Type N The reporting level for events generated by connections between cluster nodes.
The default level is 0.
-
Table 22.139 This table provides type and value information for the LogLevelError data node configuration parameter
Property Value Version (or later) NDB 8.0.13 Type or units integer Default 0 Range 0 - 15 Restart Type N The reporting level for events generated by errors and warnings by the cluster as a whole. These errors do not cause any node failure but are still considered worth reporting.
The default level is 0.
-
Table 22.140 This table provides type and value information for the LogLevelCongestion data node configuration parameter
Property Value Version (or later) NDB 8.0.13 Type or units level Default 0 Range 0 - 15 Restart Type N The reporting level for events generated by congestion. These errors do not cause node failure but are still considered worth reporting.
The default level is 0.
-
Table 22.141 This table provides type and value information for the LogLevelInfo data node configuration parameter
Property Value Version (or later) NDB 8.0.13 Type or units integer Default 0 Range 0 - 15 Restart Type N The reporting level for events generated for information about the general state of the cluster.
The default level is 0.
-
Table 22.142 This table provides type and value information for the MemReportFrequency data node configuration parameter
Property Value Version (or later) NDB 8.0.13 Type or units unsigned Default 0 Range 0 - 4294967039 (0xFFFFFEFF) Restart Type N This parameter controls how often data node memory usage reports are recorded in the cluster log; it is an integer value representing the number of seconds between reports.
Each data node's data memory and index memory usage is logged as both a percentage and a number of 32 KB pages of
DataMemory, as set in theconfig.inifile. For example, ifDataMemoryis equal to 100 MB, and a given data node is using 50 MB for data memory storage, the corresponding line in the cluster log might look like this:2006-12-24 01:18:16 [MgmSrvr] INFO -- Node 2: Data usage is 50%(1280 32K pages of total 2560)
MemReportFrequencyis not a required parameter. If used, it can be set for all cluster data nodes in the[ndbd default]section ofconfig.ini, and can also be set or overridden for individual data nodes in the corresponding[ndbd]sections of the configuration file. The minimum value—which is also the default value—is 0, in which case memory reports are logged only when memory usage reaches certain percentages (80%, 90%, and 100%), as mentioned in the discussion of statistics events in Section 22.5.3.2, “NDB Cluster Log Events”. -
Table 22.143 This table provides type and value information for the StartupStatusReportFrequency data node configuration parameter
Property Value Version (or later) NDB 8.0.13 Type or units seconds Default 0 Range 0 - 4294967039 (0xFFFFFEFF) Restart Type N When a data node is started with the
--initial, it initializes the redo log file during Start Phase 4 (see Section 22.5.4, “Summary of NDB Cluster Start Phases”). When very large values are set forNoOfFragmentLogFiles,FragmentLogFileSize, or both, this initialization can take a long time.You can force reports on the progress of this process to be logged periodically, by means of theStartupStatusReportFrequencyconfiguration parameter. In this case, progress is reported in the cluster log, in terms of both the number of files and the amount of space that have been initialized, as shown here:2009-06-20 16:39:23 [MgmSrvr] INFO -- Node 1: Local redo log file initialization status: #Total files: 80, Completed: 60 #Total MBytes: 20480, Completed: 15557 2009-06-20 16:39:23 [MgmSrvr] INFO -- Node 2: Local redo log file initialization status: #Total files: 80, Completed: 60 #Total MBytes: 20480, Completed: 15570
These reports are logged each
StartupStatusReportFrequencyseconds during Start Phase 4. IfStartupStatusReportFrequencyis 0 (the default), then reports are written to the cluster log only when at the beginning and at the completion of the redo log file initialization process.
Data Node Debugging Parameters
The following parameters are intended for use during testing or debugging of data nodes, and not for use in production.
-
Table 22.144 This table provides type and value information for the DictTrace data node configuration parameter
Property Value Version (or later) NDB 8.0.13 Type or units bytes Default undefined Range 0 - 100 Restart Type N It is possible to cause logging of traces for events generated by creating and dropping tables using
DictTrace. This parameter is useful only in debugging NDB kernel code.DictTracetakes an integer value. 0 is the default, and means no logging is performed; 1 enables trace logging, and 2 enables logging of additionalDBDICTdebugging output. -
Table 22.145 This table provides type and value information for the WatchDogImmediateKill data node configuration parameter
Property Value Version (or later) NDB 8.0.13 Type or units boolean Default false Range true, false Restart Type S You can cause threads to be killed immediately whenever watchdog issues occur by enabling the
WatchdogImmediateKilldata node configuration parameter. This parameter should be used only when debugging or troubleshooting, to obtain trace files reporting exactly what was occurring the instant that execution ceased.
Backup parameters.
The [ndbd] parameters discussed in this
section define memory buffers set aside for execution of
online backups.
-
Table 22.146 This table provides type and value information for the BackupDataBufferSize data node configuration parameter
Property Value Version (or later) NDB 8.0.13 Type or units bytes Default 16M Range 512K - 4294967039 (0xFFFFFEFF) Restart Type N In creating a backup, there are two buffers used for sending data to the disk. The backup data buffer is used to fill in data recorded by scanning a node's tables. Once this buffer has been filled to the level specified as
BackupWriteSize, the pages are sent to disk. While flushing data to disk, the backup process can continue filling this buffer until it runs out of space. When this happens, the backup process pauses the scan and waits until some disk writes have completed freeing up memory so that scanning may continue.The default value for this parameter is 16MB. The minimum is 512K.
-
Table 22.147 This table provides type and value information for the BackupDiskWriteSpeedPct data node configuration parameter
Property Value Version (or later) NDB 8.0.13 Type or units percent Default 50 Range 0 - 90 Restart Type N During normal operation, data nodes attempt to maximize the disk write speed used for local checkpoints and backups while remaining within the bounds set by
MinDiskWriteSpeedandMaxDiskWriteSpeed. Disk write throttling gives each LDM thread an equal share of the total budget. This allows parallel LCPs to take place without exceeding the disk I/O budget. Because a backup is executed by only one LDM thread, this effectively caused a budget cut, resulting in longer backup completion times, and—if the rate of change is sufficiently high—in failure to complete the backup when the backup log buffer fill rate is higher than the achievable write rate.This problem can be addressed by using the
BackupDiskWriteSpeedPctconfiguration parameter, which takes a value in the range 0-90 (inclusive) which is interpreted as the percentage of the node's maximum write rate budget that is reserved prior to sharing out the remainder of the budget among LDM threads for LCPs. The LDM thread running the backup receives the whole write rate budget for the backup, plus its (reduced) share of the write rate budget for local checkpoints.The default value for this parameter is 50 (interpreted as 50%).
-
Table 22.148 This table provides type and value information for the BackupLogBufferSize data node configuration parameter
Property Value Version (or later) NDB 8.0.13 Type or units bytes Default 16M Range 2M - 4294967039 (0xFFFFFEFF) Restart Type N The backup log buffer fulfills a role similar to that played by the backup data buffer, except that it is used for generating a log of all table writes made during execution of the backup. The same principles apply for writing these pages as with the backup data buffer, except that when there is no more space in the backup log buffer, the backup fails. For that reason, the size of the backup log buffer must be large enough to handle the load caused by write activities while the backup is being made. See Section 22.5.8.3, “Configuration for NDB Cluster Backups”.
The default value for this parameter should be sufficient for most applications. In fact, it is more likely for a backup failure to be caused by insufficient disk write speed than it is for the backup log buffer to become full. If the disk subsystem is not configured for the write load caused by applications, the cluster is unlikely to be able to perform the desired operations.
It is preferable to configure cluster nodes in such a manner that the processor becomes the bottleneck rather than the disks or the network connections.
The default value for this parameter is 16MB.
-
Table 22.149 This table provides type and value information for the BackupMemory data node configuration parameter
Property Value Version (or later) NDB 8.0.13 Type or units bytes Default 32M Range 0 - 4294967039 (0xFFFFFEFF) Restart Type N This parameter is deprecated, and subject to removal in a future version of NDB Cluster. Any setting made for it is ignored.
-
Table 22.150 This table provides type and value information for the BackupReportFrequency data node configuration parameter
Property Value Version (or later) NDB 8.0.13 Type or units seconds Default 0 Range 0 - 4294967039 (0xFFFFFEFF) Restart Type N This parameter controls how often backup status reports are issued in the management client during a backup, as well as how often such reports are written to the cluster log (provided cluster event logging is configured to permit it—see Logging and checkpointing).
BackupReportFrequencyrepresents the time in seconds between backup status reports.The default value is 0.
-
Table 22.151 This table provides type and value information for the BackupWriteSize data node configuration parameter
Property Value Version (or later) NDB 8.0.13 Type or units bytes Default 256K Range 32K - 4294967039 (0xFFFFFEFF) Restart Type N This parameter specifies the default size of messages written to disk by the backup log and backup data buffers.
The default value for this parameter is 256KB.
-
Table 22.152 This table provides type and value information for the BackupMaxWriteSize data node configuration parameter
Property Value Version (or later) NDB 8.0.13 Type or units bytes Default 1M Range 256K - 4294967039 (0xFFFFFEFF) Restart Type N This parameter specifies the maximum size of messages written to disk by the backup log and backup data buffers.
The default value for this parameter is 1MB.
The location of the backup files is determined by the
BackupDataDir data
node configuration parameter.
Additional requirements. When specifying these parameters, the following relationships must hold true. Otherwise, the data node will be unable to start.
BackupDataBufferSize >= BackupWriteSize + 188KBBackupLogBufferSize >= BackupWriteSize + 16KBBackupMaxWriteSize >= BackupWriteSize
NDB Cluster Realtime Performance Parameters
The [ndbd] parameters discussed in this
section are used in scheduling and locking of threads to
specific CPUs on multiprocessor data node hosts.
To make use of these parameters, the data node process must be run as system root.
-
Table 22.153 This table provides type and value information for the BuildIndexThreads data node configuration parameter
Property Value Version (or later) NDB 8.0.13 Type or units numeric Default 128 Range 0 - 128 Restart Type S This parameter determines the number of threads to create when rebuilding ordered indexes during a system or node start, as well as when running ndb_restore
--rebuild-indexes. It is supported only when there is more than one fragment for the table per data node (for example, whenCOMMENT="NDB_TABLE=PARTITION_BALANCE=FOR_RA_BY_LDM_X_2"is used withCREATE TABLE).Setting this parameter to 0 (the default) disables multithreaded building of ordered indexes.
This parameter is supported when using ndbd or ndbmtd.
You can enable multithreaded builds during data node initial restarts by setting the
TwoPassInitialNodeRestartCopydata node configuration parameter toTRUE. -
Table 22.154 This table provides type and value information for the LockExecuteThreadToCPU data node configuration parameter
Property Value Version (or later) NDB 8.0.13 Type or units set of CPU IDs Default 0 Range ... Restart Type N When used with ndbd, this parameter (now a string) specifies the ID of the CPU assigned to handle the
NDBCLUSTERexecution thread. When used with ndbmtd, the value of this parameter is a comma-separated list of CPU IDs assigned to handle execution threads. Each CPU ID in the list should be an integer in the range 0 to 65535 (inclusive).The number of IDs specified should match the number of execution threads determined by
MaxNoOfExecutionThreads. However, there is no guarantee that threads are assigned to CPUs in any given order when using this parameter. You can obtain more finely-grained control of this type usingThreadConfig.LockExecuteThreadToCPUhas no default value. -
Table 22.155 This table provides type and value information for the LockMaintThreadsToCPU data node configuration parameter
Property Value Version (or later) NDB 8.0.13 Type or units CPU ID Default 0 Range 0 - 64K Restart Type N This parameter specifies the ID of the CPU assigned to handle
NDBCLUSTERmaintenance threads.The value of this parameter is an integer in the range 0 to 65535 (inclusive). There is no default value.
-
Table 22.156 This table provides type and value information for the Numa data node configuration parameter
Property Value Version (or later) NDB 8.0.13 Type or units numeric Default 1 Range ... Restart Type N This parameter determines whether Non-Uniform Memory Access (NUMA) is controlled by the operating system or by the data node process, whether the data node uses ndbd or ndbmtd. By default,
NDBattempts to use an interleaved NUMA memory allocation policy on any data node where the host operating system provides NUMA support.Setting
Numa = 0means that the datanode process does not itself attempt to set a policy for memory allocation, and permits this behavior to be determined by the operating system, which may be further guided by the separate numactl tool. That is,Numa = 0yields the system default behavior, which can be customised by numactl. For many Linux systems, the system default behavior is to allocate socket-local memory to any given process at allocation time. This can be problematic when using ndbmtd; this is because nbdmtd allocates all memory at startup, leading to an imbalance, giving different access speeds for different sockets, especially when locking pages in main memory.Setting
Numa = 1means that the data node process useslibnumato request interleaved memory allocation. (This can also be accomplished manually, on the operating system level, using numactl.) Using interleaved allocation in effect tells the data node process to ignore non-uniform memory access but does not attempt to take any advantage of fast local memory; instead, the data node process tries to avoid imbalances due to slow remote memory. If interleaved allocation is not desired, setNumato 0 so that the desired behavior can be determined on the operating system level.The
Numaconfiguration parameter is supported only on Linux systems wherelibnuma.sois available. -
Table 22.157 This table provides type and value information for the RealtimeScheduler data node configuration parameter
Property Value Version (or later) NDB 8.0.13 Type or units boolean Default false Range true, false Restart Type N Setting this parameter to 1 enables real-time scheduling of data node threads.
The default is 0 (scheduling disabled).
-
Table 22.158 This table provides type and value information for the SchedulerExecutionTimer data node configuration parameter
Property Value Version (or later) NDB 8.0.13 Type or units µs Default 50 Range 0 - 11000 Restart Type N This parameter specifies the time in microseconds for threads to be executed in the scheduler before being sent. Setting it to 0 minimizes the response time; to achieve higher throughput, you can increase the value at the expense of longer response times.
The default is 50 μsec, which our testing shows to increase throughput slightly in high-load cases without materially delaying requests.
-
Table 22.159 This table provides type and value information for the SchedulerResponsiveness data node configuration parameter
Property Value Version (or later) NDB 8.0.13 Type or units integer Default 5 Range 0 - 10 Restart Type S Set the balance in the
NDBscheduler between speed and throughput. This parameter takes an integer whose value is in the range 0-10 inclusive, with 5 as the default. Higher values provide better response times relative to throughput. Lower values provide increased throughput at the expense of longer response times. -
Table 22.160 This table provides type and value information for the SchedulerSpinTimer data node configuration parameter
Property Value Version (or later) NDB 8.0.13 Type or units µs Default 0 Range 0 - 500 Restart Type N This parameter specifies the time in microseconds for threads to be executed in the scheduler before sleeping.
Starting with NDB 8.0.20, if
SpinMethodis set, any setting for this parameter is ignored. -
Table 22.161 This table provides type and value information for the SpinMethod data node configuration parameter
Property Value Version (or later) NDB 8.0.20 Type or units enumeration Default StaticSpinning Range CostBasedSpinning, LatencyOptimisedSpinning, DatabaseMachineSpinning, StaticSpinning Restart Type N This parameter provides a simple interface to control adaptive spinning on data nodes, with four possible values furnishing presets for spin parameter values, as shown in the following list:
StaticSpinning(default): SetsEnableAdaptiveSpinningtofalseandSchedulerSpinTimerto 0. (SetAllowedSpinOverheadis not relevant in this case.)CostBasedSpinning: SetsEnableAdaptiveSpinningtotrue,SchedulerSpinTimerto 100, andSetAllowedSpinOverheadto 200.LatencyOptimisedSpinning: SetsEnableAdaptiveSpinningtotrue,SchedulerSpinTimerto 200, andSetAllowedSpinOverheadto 1000.DatabaseMachineSpinning: SetsEnableAdaptiveSpinningtotrue,SchedulerSpinTimerto 500, andSetAllowedSpinOverheadto 10000. This is intended for use in cases where threads own their own CPUs.
The spin parameters modified by
SpinMethodare described in the following list:SchedulerSpinTimer: This is the same as the data node configuration parameter of that name. The setting applied to this parameter bySpinMethodoverrides any value set in theconfig.inifile.EnableAdaptiveSpinning: Enables or disables adaptive spinning. Disabling it causes spinning to be performed without making any checks for CPU resources. This parameter cannot be set directly in the cluster configuration file, and under most circumstances should not need to be, but can be enabled directly usingDUMP 104004 1or disabled withDUMP 104004 0in the ndb_mgm management client.SetAllowedSpinOverhead: Sets the amount of CPU time to allow for gaining latency. This parameter cannot be set directly in theconfig.inifile. In most cases, the setting applied by SpinMethod should be satisfactory, but if it is necessary to change it directly, you can useDUMP 104002to do so, whereoverheadoverheadis a value ranging from 0 to 10000, inclusive; see the description of the indicatedDUMPcommand for details.
On platforms lacking usable spin instructions, such as PowerPC and some SPARC platforms, spin time is set to 0 in all situations, and values for
SpinMethodother thanStaticSpinningare ignored. -
Table 22.162 This table provides type and value information for the TwoPassInitialNodeRestartCopy data node configuration parameter
Property Value Version (or later) NDB 8.0.13 Type or units boolean Default true Range true, false Restart Type N Multithreaded building of ordered indexes can be enabled for initial restarts of data nodes by setting this configuration parameter to
true(the default value), which enables two-pass copying of data during initial node restarts.You must also set
BuildIndexThreadsto a nonzero value.
Multi-Threading Configuration Parameters (ndbmtd).
ndbmtd runs by default as a single-threaded
process and must be configured to use multiple threads, using
either of two methods, both of which require setting
configuration parameters in the
config.ini file. The first method is
simply to set an appropriate value for the
MaxNoOfExecutionThreads
configuration parameter. A second method, makes it possible to
set up more complex rules for ndbmtd
multithreading using
ThreadConfig. The
next few paragraphs provide information about these parameters
and their use with multithreaded data nodes.
A backup using parallelism on the data nodes requires that multiple LDMs are in use on all data nodes in the cluster prior to taking the backup. For more information, see Section 22.5.8.5, “Taking an NDB Backup with Parallel Data Nodes”, as well as Section 22.4.23.2, “Restoring from a backup taken in parallel”.
-
Table 22.163 This table provides type and value information for the MaxNoOfExecutionThreads multi-threaded data node configuration parameter
Property Value Version (or later) NDB 8.0.13 Type or units integer Default 2 Range 2 - 72 Restart Type IS This parameter directly controls the number of execution threads used by ndbmtd, up to a maximum of 72. Although this parameter is set in
[ndbd]or[ndbd default]sections of theconfig.inifile, it is exclusive to ndbmtd and does not apply to ndbd.Setting
MaxNoOfExecutionThreadssets the number of threads for each type as determined by a matrix in the filestorage/ndb/src/kernel/vm/mt_thr_config.cpp. This table shows these numbers of threads for possible values ofMaxNoOfExecutionThreads.Table 22.164 MaxNoOfExecutionThreads values and the corresponding number of threads by thread type (LQH, TC, Send, Receive).
MaxNoOfExecutionThreadsValueLDM Threads TC Threads Send Threads Receive Threads 0 .. 3 1 0 0 1 4 .. 6 2 0 0 1 7 .. 8 4 0 0 1 9 4 2 0 1 10 4 2 1 1 11 4 3 1 1 12 6 2 1 1 13 6 3 1 1 14 6 3 1 2 15 6 3 2 2 16 8 3 1 2 17 8 4 1 2 18 8 4 2 2 19 8 5 2 2 20 10 4 2 2 21 10 5 2 2 22 10 5 2 3 23 10 6 2 3 24 12 5 2 3 25 12 6 2 3 26 12 6 3 3 27 12 7 3 3 28 12 7 3 4 29 12 8 3 4 30 12 8 4 4 31 12 9 4 4 32 16 8 3 3 33 16 8 3 4 34 16 8 4 4 35 16 9 4 4 36 16 10 4 4 37 16 10 4 5 38 16 11 4 5 39 16 11 5 5 40 20 10 4 4 41 20 10 4 5 42 20 11 4 5 43 20 11 5 5 44 20 12 5 5 45 20 12 5 6 46 20 13 5 6 47 20 13 6 6 48 24 12 5 5 49 24 12 5 6 50 24 13 5 6 51 24 13 6 6 52 24 14 6 6 53 24 14 6 7 54 24 15 6 7 55 24 15 7 7 56 24 16 7 7 57 24 16 7 8 58 24 17 7 8 59 24 17 8 8 60 24 18 8 8 61 24 18 8 9 62 24 19 8 9 63 24 19 9 9 64 32 16 7 7 65 32 16 7 8 66 32 17 7 8 67 32 17 8 8 68 32 18 8 8 69 32 18 8 9 70 32 19 8 9 71 32 20 8 9 72 32 20 8 10 There is always one SUMA (replication) thread.
NoOfFragmentLogPartsshould be set equal to the number of LDM threads used by ndbmtd, as determined by the setting for this parameter. This ratio should not be any greater than 4:1; a configuration in which this is the case is specifically disallowed.The number of LDM threads also determines the number of partitions used by an
NDBtable that is not explicitly partitioned; this is the number of LDM threads times the number of data nodes in the cluster. (If ndbd is used on the data nodes rather than ndbmtd, then there is always a single LDM thread; in this case, the number of partitions created automatically is simply equal to the number of data nodes. See Section 22.1.2, “NDB Cluster Nodes, Node Groups, Replicas, and Partitions”, for more information.Adding large tablespaces for Disk Data tables when using more than the default number of LDM threads may cause issues with resource and CPU usage if the disk page buffer is insufficiently large; see the description of the
DiskPageBufferMemoryconfiguration parameter, for more information.The thread types are described later in this section (see
ThreadConfig).Setting this parameter outside the permitted range of values causes the management server to abort on startup with the error Error line
number: Illegal valuevaluefor parameter MaxNoOfExecutionThreads.For
MaxNoOfExecutionThreads, a value of 0 or 1 is rounded up internally byNDBto 2, so that 2 is considered this parameter's default and minimum value.MaxNoOfExecutionThreadsis generally intended to be set equal to the number of CPU threads available, and to allocate a number of threads of each type suitable to typical workloads. It does not assign particular threads to specified CPUs. For cases where it is desirable to vary from the settings provided, or to bind threads to CPUs, you should useThreadConfiginstead, which allows you to allocate each thread directly to a desired type, CPU, or both.The multithreaded data node process always spawns, at a minimum, the threads listed here:
1 local query handler (LDM) thread
1 receive thread
1 subscription manager (SUMA or replication) thread
For a
MaxNoOfExecutionThreadsvalue of 8 or less, no TC threads are created, and TC handling is instead performed by the main thread.Changing the number of LDM threads normally requires a system restart, whether it is changed using this parameter or
ThreadConfig, but it is possible to effect the change using a node initial restart (NI) provided the following two conditions are met:Each LDM thread handles a maximum of 8 fragments, and
The total number of table fragments is an integer multiple of the number of LDM threads.
In NDB 8.0, an initial restart is not required to effect a change in this parameter, as it was in some older versions of NDB Cluster.
-
Table 22.165 This table provides type and value information for the NoOfFragmentLogParts multi-threaded data node configuration parameter
Property Value Version (or later) NDB 8.0.13 Type or units numeric Default 4 Range 4, 6, 8, 10, 12, 16, 20, 24, 32 Restart Type IN Set the number of log file groups for redo logs belonging to this ndbmtd. The value of this parameter should be set equal to the number of LDM threads used by ndbmtd as determined by the setting for
MaxNoOfExecutionThreads. A configuration using more than 4 redo log parts per LDM is disallowed.See the description of
MaxNoOfExecutionThreadsfor more information. -
Table 22.166 This table provides type and value information for the ThreadConfig multi-threaded data node configuration parameter
Property Value Version (or later) NDB 8.0.13 Type or units string Default '' Range ... Restart Type IS This parameter is used with ndbmtd to assign threads of different types to different CPUs. Its value is a string whose format has the following syntax:
ThreadConfig :=
entry[,entry[,...]]entry:=type={param[,param[,...]]}type:= ldm | main | recv | send | rep | io | tc | watchdog | idxbldparam:= count=number| cpubind=cpu_list| cpuset=cpu_list| spintime=number| realtime={0|1} | nosend={0|1} | thread_prio={0..10} | cpubind_exclusive=cpu_list| cpuset_exclusive=cpu_listThe curly braces (
{...}) surrounding the list of parameters are required, even if there is only one parameter in the list.A
param(parameter) specifies any or all of the following information:The number of threads of the given type (
count).The set of CPUs to which the threads of the given type are to be nonexclusively bound. This is determined by either one of
cpubindorcpuset).cpubindcauses each thread to be bound (nonexclusively) to a CPU in the set;cpusetmeans that each thread is bound (nonexclusively) to the set of CPUs specified.On Solaris, you can instead specify a set of CPUs to which the threads of the given type are to be bound exclusively.
cpubind_exclusivecauses each thread to be bound exclusively to a CPU in the set;cpuset_exclsuivemeans that each thread is bound exclusively to the set of CPUs specified.Only one of
cpubind,cpuset,cpubind_exclusive, orcpuset_exclusivecan be provided in a single configuration.spintimedetermines the wait time in microseconds the thread spins before going to sleep.The default value for
spintimeis the value of theSchedulerSpinTimerdata node configuration parameter.spintimedoes not apply to I/O threads, watchdog, or offline index build threads, and so cannot be set for these thread types.realtimecan be set to 0 or 1. If it is set to 1, the threads run with real-time priority. This also means thatthread_priocannot be set.The
realtimeparameter is set by default to the value of theRealtimeSchedulerdata node configuration parameter.realtimecannot be set for offline index build threads.By setting
nosendto 1, you can prevent amain,ldm,rep, ortcthread from assisting the send threads. This parameter is 0 by default, and cannot be used with other types of threads.thread_priois a thread priority level that can be set from 0 to 10, with 10 representing the greatest priority. The default is 5. The precise effects of this parameter are platform-specific, and are described later in this section.The thread priority level cannot be set for offline index build threads.
thread_prio settings and effects by platform. The implementation of
thread_priodiffers between Linux/FreeBSD, Solaris, and Windows. In the following list, we discuss its effects on each of these platforms in turn:Linux and FreeBSD: We map
thread_prioto a value to be supplied to thenicesystem call. Since a lower niceness value for a process indicates a higher process priority, increasingthread_priohas the effect of lowering thenicevalue.Table 22.167 Mapping of thread_prio to nice values on Linux and FreeBSD
thread_priovaluenicevalue0 19 1 16 2 12 3 8 4 4 5 0 6 -4 7 -8 8 -12 9 -16 10 -20 Some operating systems may provide for a maximum process niceness level of 20, but this is not supported by all targeted versions; for this reason, we choose 19 as the maximum
nicevalue that can be set.Solaris: Setting
thread_prioon Solaris sets the Solaris FX priority, with mappings as shown in the following table:Table 22.168 Mapping of thread_prio to FX priority on Solaris
thread_priovalueSolaris FXpriority0 15 1 20 2 25 3 30 4 35 5 40 6 45 7 50 8 55 9 59 10 60 A
thread_priosetting of 9 is mapped on Solaris to the special FX priority value 59, which means that the operating system also attempts to force the thread to run alone on its own CPU core.Windows: We map
thread_prioto a Windows thread priority value passed to the Windows APISetThreadPriority()function. This mapping is shown in the following table:Table 22.169 Mapping of thread_prio to Windows thread priority
thread_priovalueWindows thread priority 0 - 1 THREAD_PRIORITY_LOWEST2 - 3 THREAD_PRIORITY_BELOW_NORMAL4 - 5 THREAD_PRIORITY_NORMAL6 - 7 THREAD_PRIORITY_ABOVE_NORMAL8 - 10 THREAD_PRIORITY_HIGHEST
The
typeattribute represents an NDB thread type. The thread types supported, and the range of permittedcountvalues for each, are provided in the following list:ldm: Local query handler (DBLQHkernel block) that handles data. The more LDM threads that are used, the more highly partitioned the data becomes. Each LDM thread maintains its own sets of data and index partitions, as well as its own redo log. The value set forldmmust be one of the values 1, 2, 4, 6, 8, 12, 16, 24, or 32.Changing the number of LDM threads normally requires a system restart to be effective and safe for cluster operations, this requirement is relaxed in certain cases, as explained later in this section. This is also true when this is done using
MaxNoOfExecutionThreads.Adding large tablespaces (hundreds of gigabytes or more) for Disk Data tables when using more than the default number of LDMs may cause issues with resource and CPU usage if
DiskPageBufferMemoryis not sufficiently large.tc: Transaction coordinator thread (DBTCkernel block) containing the state of an ongoing transaction. The maximum number of TC threads is 32.Optimally, every new transaction can be assigned to a new TC thread. In most cases 1 TC thread per 2 LDM threads is sufficient to guarantee that this can happen. In cases where the number of writes is relatively small when compared to the number of reads, it is possible that only 1 TC thread per 4 LQH threads is required to maintain transaction states. Conversely, in applications that perform a great many updates, it may be necessary for the ratio of TC threads to LDM threads to approach 1 (for example, 3 TC threads to 4 LDM threads).
Setting
tcto 0 causes TC handling to be done by the main thread. In most cases, this is effectively the same as setting it to 1.Range: 0 - 32
main: Data dictionary and transaction coordinator (DBDIHandDBTCkernel blocks), providing schema management. This is always handled by a single dedicated thread.Range: 1 only.
recv: Receive thread (CMVMIkernel block). Each receive thread handles one or more sockets for communicating with other nodes in an NDB Cluster, with one socket per node. NDB Cluster supports multiple receive threads; the maximum is 16 such threads.Range: 1 - 16
send: Send thread (CMVMIkernel block). To increase throughput, it is possible to perform sends from one or more separate, dedicated threads (maximum 8).In NDB 8.0.20 and later, due to changes in the multithreading implementation, using many send threads can have an adverse effect on scalability.
Previously, all threads handled their own sending directly; this can still be made to happen by setting the number of send threads to 0 (this also happens when
MaxNoOfExecutionThreadsis set less than 10). While doing so can have an adeverse impact on throughput, it can also in some cases provide decreased latency.Range: 0 - 16
rep: Replication thread (SUMAkernel block). Asynchronous replication operations are always handled by a single, dedicated thread.Range: 1 only.
io: File system and other miscellaneous operations. These are not demanding tasks, and are always handled as a group by a single, dedicated I/O thread.Range: 1 only.
watchdog: Parameters settings associated with this type are actually applied to several threads, each having a specific use. These threads include theSocketServerthread, which receives connection setups from other nodes; theSocketClientthread, which attempts to set up connections to other nodes; and the thread watchdog thread that checks that threads are progressing.Range: 1 only.
idxbld: Offline index build threads. Unlike the other thread types listed previously, which are permanent, these are temporary threads which are created and used only during node or system restarts, or when running ndb_restore--rebuild-indexes. They may be bound to CPU sets which overlap with CPU sets bound to permanent thread types.thread_prio,realtime, andspintimevalues cannot be set for offline index build threads. In addition,countis ignored for this type of thread.If
idxbldis not specified, the default behavior is as follows:Offline index build threads are not bound if the I/O thread is also not bound, and these threads use any available cores.
If the I/O thread is bound, then the offline index build threads are bound to the entire set of bound threads, due to the fact that there should be no other tasks for these threads to perform.
Range: 0 - 1.
Changing ThreadCOnfig normally requires a
system initial restart, but this requirement can be relaxed
under certain cirumstances:
If, following the change, the number of LDM threads remains the same as before, nothing more than a simple node restart (rolling restart, or N) is required to implement the change.
Otherwise (that is, if the number of LDM threads changes), it is still possible to effect the change using a node initial restart (NI) provided the following two conditions are met:
Each LDM thread handles a maximum of 8 fragments, and
The total number of table fragments is an integer multiple of the number of LDM threads.
In any other case, a system initial restart is needed to change this parameter.
NDB can distinguish between thread types by
both of the following criteria:
Whether the thread is an execution thread. Threads of type
main,ldm,recv,rep,tc, andsendare execution threads;io,watchdog, andidxbldthreads are not considered execution threads.Whether the allocation of threads to a given task is permanent or temporary. Currently all thread types except
idxbldare considered permanent;idxbldthreads are regarded as temporary threads.
Simple examples:
# Example 1.
ThreadConfig=ldm={count=2,cpubind=1,2},main={cpubind=12},rep={cpubind=11}
# Example 2.
Threadconfig=main={cpubind=0},ldm={count=4,cpubind=1,2,5,6},io={cpubind=3}
It is usually desirable when configuring thread usage for a data
node host to reserve one or more number of CPUs for operating
system and other tasks. Thus, for a host machine with 24 CPUs,
you might want to use 20 CPU threads (leaving 4 for other uses),
with 8 LDM threads, 4 TC threads (half the number of LDM
threads), 3 send threads, 3 receive threads, and 1 thread each
for schema management, asynchronous replication, and I/O
operations. (This is almost the same distribution of threads
used when
MaxNoOfExecutionThreads
is set equal to 20.) The following
ThreadConfig setting performs these
assignments, additionally binding all of these threads to
specific CPUs:
ThreadConfig=ldm{count=8,cpubind=1,2,3,4,5,6,7,8},main={cpubind=9},io={cpubind=9}, \
rep={cpubind=10},tc{count=4,cpubind=11,12,13,14},recv={count=3,cpubind=15,16,17}, \
send{count=3,cpubind=18,19,20}It should be possible in most cases to bind the main (schema management) thread and the I/O thread to the same CPU, as we have done in the example just shown.
The following example incorporates groups of CPUs defined using
both cpuset and cpubind,
as well as use of thread prioritization.
ThreadConfig=ldm={count=4,cpuset=0-3,thread_prio=8,spintime=200}, \
ldm={count=4,cpubind=4-7,thread_prio=8,spintime=200}, \
tc={count=4,cpuset=8-9,thread_prio=6},send={count=2,thread_prio=10,cpubind=10-11}, \
main={count=1,cpubind=10},rep={count=1,cpubind=11}
In this case we create two LDM groups; the first uses
cpubind and the second uses
cpuset. thread_prio and
spintime are set to the same values for each
group. This means there are eight LDM threads in total. (You
should ensure that
NoOfFragmentLogParts
is also set to 8.) The four TC threads use only two CPUs; it is
possible when using cpuset to specify fewer
CPUs than threads in the group. (This is not true for
cpubind.) The send threads use two threads
using cpubind to bind these threads to CPUs
10 and 11. The main and rep threads can reuse these CPUs.
This example shows how ThreadConfig and
NoOfFragmentLogParts might be set up for a
24-CPU host with hyperthreading, leaving CPUs 10, 11, 22, and 23
available for operating system functions and interrupts:
NoOfFragmentLogParts=10
ThreadConfig=ldm={count=10,cpubind=0-4,12-16,thread_prio=9,spintime=200}, \
tc={count=4,cpuset=6-7,18-19,thread_prio=8},send={count=1,cpuset=8}, \
recv={count=1,cpuset=20},main={count=1,cpuset=9,21},rep={count=1,cpuset=9,21}, \
io={count=1,cpuset=9,21,thread_prio=8},watchdog={count=1,cpuset=9,21,thread_prio=9}
The next few examples include settings for
idxbld. The first two of these demonstrate
how a CPU set defined for idxbld can overlap
those specified for other (permanent) thread types, the first
using cpuset and the second using
cpubind:
ThreadConfig=main,ldm={count=4,cpuset=1-4},tc={count=4,cpuset=5,6,7}, \
io={cpubind=8},idxbld={cpuset=1-8}
ThreadConfig=main,ldm={count=1,cpubind=1},idxbld={count=1,cpubind=1}The next example specifies a CPU for the I/O thread, but not for the index build threads:
ThreadConfig=main,ldm={count=4,cpuset=1-4},tc={count=4,cpuset=5,6,7}, \
io={cpubind=8}
Since the ThreadConfig setting just shown
locks threads to eight cores numbered 1 through 8, it is
equivalent to the setting shown here:
ThreadConfig=main,ldm={count=4,cpuset=1-4},tc={count=4,cpuset=5,6,7}, \
io={cpubind=8},idxbld={cpuset=1,2,3,4,5,6,7,8}
In order to take advantage of the enhanced stability that the
use of ThreadConfig offers, it is necessary
to insure that CPUs are isolated, and that they not subject to
interrupts, or to being scheduled for other tasks by the
operating system. On many Linux systems, you can do this by
setting IRQBALANCE_BANNED_CPUS in
/etc/sysconfig/irqbalance to
0xFFFFF0, and by using the
isolcpus boot option in
grub.conf. For specific information, see
your operating system or platform documentation.
Disk Data Configuration Parameters. Configuration parameters affecting Disk Data behavior include the following:
-
Table 22.170 This table provides type and value information for the DiskPageBufferEntries data node configuration parameter
Property Value Version (or later) NDB 8.0.13 Type or units 32K pages Default 10 Range 1 - 1000 Restart Type N Version (or later) NDB 8.0.19 Type or units bytes Default 64MB Range 4MB - 16TB Restart Type N This is the number of page entries (page references) to allocate. It is specified as a number of 32K pages in
DiskPageBufferMemory. The default is sufficient for most cases but you may need to increase the value of this parameter if you encounter problems with very large transactions on Disk Data tables. Each page entry requires approximately 100 bytes. -
Table 22.171 This table provides type and value information for the DiskPageBufferMemory data node configuration parameter
Property Value Version (or later) NDB 8.0.13 Type or units bytes Default 64M Range 4M - 1T Restart Type N Version (or later) NDB 8.0.19 Type or units bytes Default 64M Range 4M - 16T Restart Type N This determines the amount of space used for caching pages on disk, and is set in the
[ndbd]or[ndbd default]section of theconfig.inifile.NotePreviously, this paraeter was specified as a number of 32 KB pages. Beginning with NDB 8.0.19, it is specified as a number of bytes.
If the value for
DiskPageBufferMemoryis set too low in conjunction with using more than the default number of LDM threads inThreadConfig(for example{ldm=6...}), problems can arise when trying to add a large (for example 500G) data file to a disk-basedNDBtable, wherein the process takes indefinitely long while occupying one of the CPU cores.This is due to the fact that, as part of adding a data file to a tablespace, extent pages are locked into memory in an extra PGMAN worker thread, for quick metadata access. When adding a large file, this worker has insufficient memory for all of the data file metadata. In such cases, you should either increase
DiskPageBufferMemory, or add smaller tablespace files. You may also need to adjustDiskPageBufferEntries.You can query the
ndbinfo.diskpagebuffertable to help determine whether the value for this parameter should be increased to minimize unnecessary disk seeks. See Section 22.5.14.20, “The ndbinfo diskpagebuffer Table”, for more information. -
Table 22.172 This table provides type and value information for the SharedGlobalMemory data node configuration parameter
Property Value Version (or later) NDB 8.0.13 Type or units bytes Default 128M Range 0 - 64T Restart Type N This parameter determines the amount of memory that is used for log buffers, disk operations (such as page requests and wait queues), and metadata for tablespaces, log file groups,
UNDOfiles, and data files. The shared global memory pool also provides memory used for satisfying the memory requirements of theUNDO_BUFFER_SIZEoption used withCREATE LOGFILE GROUPandALTER LOGFILE GROUPstatements, including any default value implied for this options by the setting of theInitialLogFileGroupdata node configuration parameter.SharedGlobalMemorycan be set in the[ndbd]or[ndbd default]section of theconfig.iniconfiguration file, and is measured in bytes.The default value is
128M. -
Table 22.173 This table provides type and value information for the DiskIOThreadPool data node configuration parameter
Property Value Version (or later) NDB 8.0.13 Type or units threads Default 2 Range 0 - 4294967039 (0xFFFFFEFF) Restart Type N This parameter determines the number of unbound threads used for Disk Data file access. Before
DiskIOThreadPoolwas introduced, exactly one thread was spawned for each Disk Data file, which could lead to performance issues, particularly when using very large data files. WithDiskIOThreadPool, you can—for example—access a single large data file using several threads working in parallel.This parameter applies to Disk Data I/O threads only.
The optimum value for this parameter depends on your hardware and configuration, and includes these factors:
Physical distribution of Disk Data files. You can obtain better performance by placing data files, undo log files, and the data node file system on separate physical disks. If you do this with some or all of these sets of files, then you can (and should) set
DiskIOThreadPoolhigher to enable separate threads to handle the files on each disk.In NDB 8.0.19 and later, you should also disable
DiskDataUsingSameDiskwhen using a separate disk or disks for Disk Data files; this increases the rate at which checkpoints of Disk Data tablespaces can be performed.Disk performance and types. The number of threads that can be accommodated for Disk Data file handling is also dependent on the speed and throughput of the disks. Faster disks and higher throughput allow for more disk I/O threads. Our test results indicate that solid-state disk drives can handle many more disk I/O threads than conventional disks, and thus higher values for
DiskIOThreadPool.Decreasing
TimeBetweenGlobalCheckpointsis also recommended when using solid-state disk drives, in particular those using NVMe. See also Disk Data latency parameters.
The default value for this parameter is 2.
Disk Data file system parameters. The parameters in the following list make it possible to place NDB Cluster Disk Data files in specific directories without the need for using symbolic links.
-
Table 22.174 This table provides type and value information for the FileSystemPathDD data node configuration parameter
Property Value Version (or later) NDB 8.0.13 Type or units filename Default FileSystemPath Range ... Restart Type IN If this parameter is specified, then NDB Cluster Disk Data data files and undo log files are placed in the indicated directory. This can be overridden for data files, undo log files, or both, by specifying values for
FileSystemPathDataFiles,FileSystemPathUndoFiles, or both, as explained for these parameters. It can also be overridden for data files by specifying a path in theADD DATAFILEclause of aCREATE TABLESPACEorALTER TABLESPACEstatement, and for undo log files by specifying a path in theADD UNDOFILEclause of aCREATE LOGFILE GROUPorALTER LOGFILE GROUPstatement. IfFileSystemPathDDis not specified, thenFileSystemPathis used.If a
FileSystemPathDDdirectory is specified for a given data node (including the case where the parameter is specified in the[ndbd default]section of theconfig.inifile), then starting that data node with--initialcauses all files in the directory to be deleted. -
Table 22.175 This table provides type and value information for the FileSystemPathDataFiles data node configuration parameter
Property Value Version (or later) NDB 8.0.13 Type or units filename Default FileSystemPathDD Range ... Restart Type IN If this parameter is specified, then NDB Cluster Disk Data data files are placed in the indicated directory. This overrides any value set for
FileSystemPathDD. This parameter can be overridden for a given data file by specifying a path in theADD DATAFILEclause of aCREATE TABLESPACEorALTER TABLESPACEstatement used to create that data file. IfFileSystemPathDataFilesis not specified, thenFileSystemPathDDis used (orFileSystemPath, ifFileSystemPathDDhas also not been set).If a
FileSystemPathDataFilesdirectory is specified for a given data node (including the case where the parameter is specified in the[ndbd default]section of theconfig.inifile), then starting that data node with--initialcauses all files in the directory to be deleted. -
Table 22.176 This table provides type and value information for the FileSystemPathUndoFiles data node configuration parameter
Property Value Version (or later) NDB 8.0.13 Type or units filename Default FileSystemPathDD Range ... Restart Type IN If this parameter is specified, then NDB Cluster Disk Data undo log files are placed in the indicated directory. This overrides any value set for
FileSystemPathDD. This parameter can be overridden for a given data file by specifying a path in theADD UNDOclause of aCREATE LOGFILE GROUPorALTER LOGFILE GROUPstatement used to create that data file. IfFileSystemPathUndoFilesis not specified, thenFileSystemPathDDis used (orFileSystemPath, ifFileSystemPathDDhas also not been set).If a
FileSystemPathUndoFilesdirectory is specified for a given data node (including the case where the parameter is specified in the[ndbd default]section of theconfig.inifile), then starting that data node with--initialcauses all files in the directory to be deleted.
For more information, see Section 22.5.10.1, “NDB Cluster Disk Data Objects”.
-
Disk Data object creation parameters. The next two parameters enable you—when starting the cluster for the first time—to cause a Disk Data log file group, tablespace, or both, to be created without the use of SQL statements.
-
Table 22.177 This table provides type and value information for the InitialLogFileGroup data node configuration parameter
Property Value Version (or later) NDB 8.0.13 Type or units string Default [see documentation] Range ... Restart Type S This parameter can be used to specify a log file group that is created when performing an initial start of the cluster.
InitialLogFileGroupis specified as shown here:InitialLogFileGroup = [name=
name;] [undo_buffer_size=size;]file-specification-listfile-specification-list:file-specification[;file-specification[; ...]]file-specification:filename:sizeThe
nameof the log file group is optional and defaults toDEFAULT-LG. Theundo_buffer_sizeis also optional; if omitted, it defaults to64M. Eachfile-specificationcorresponds to an undo log file, and at least one must be specified in thefile-specification-list. Undo log files are placed according to any values that have been set forFileSystemPath,FileSystemPathDD, andFileSystemPathUndoFiles, just as if they had been created as the result of aCREATE LOGFILE GROUPorALTER LOGFILE GROUPstatement.Consider the following:
InitialLogFileGroup = name=LG1; undo_buffer_size=128M; undo1.log:250M; undo2.log:150M
This is equivalent to the following SQL statements:
CREATE LOGFILE GROUP LG1 ADD UNDOFILE 'undo1.log' INITIAL_SIZE 250M UNDO_BUFFER_SIZE 128M ENGINE NDBCLUSTER; ALTER LOGFILE GROUP LG1 ADD UNDOFILE 'undo2.log' INITIAL_SIZE 150M ENGINE NDBCLUSTER;This logfile group is created when the data nodes are started with
--initial.Resources for the initial log file group are added to the global memory pool along with those indicated by the value of
SharedGlobalMemory.This parameter, if used, should always be set in the
[ndbd default]section of theconfig.inifile. The behavior of an NDB Cluster when different values are set on different data nodes is not defined. -
Table 22.178 This table provides type and value information for the InitialTablespace data node configuration parameter
Property Value Version (or later) NDB 8.0.13 Type or units string Default [see documentation] Range ... Restart Type S This parameter can be used to specify an NDB Cluster Disk Data tablespace that is created when performing an initial start of the cluster.
InitialTablespaceis specified as shown here:InitialTablespace = [name=
name;] [extent_size=size;]file-specification-listThe
nameof the tablespace is optional and defaults toDEFAULT-TS. Theextent_sizeis also optional; it defaults to1M. Thefile-specification-listuses the same syntax as shown with theInitialLogfileGroupparameter, the only difference being that eachfile-specificationused withInitialTablespacecorresponds to a data file. At least one must be specified in thefile-specification-list. Data files are placed according to any values that have been set forFileSystemPath,FileSystemPathDD, andFileSystemPathDataFiles, just as if they had been created as the result of aCREATE TABLESPACEorALTER TABLESPACEstatement.For example, consider the following line specifying
InitialTablespacein the[ndbd default]section of theconfig.inifile (as withInitialLogfileGroup, this parameter should always be set in the[ndbd default]section, as the behavior of an NDB Cluster when different values are set on different data nodes is not defined):InitialTablespace = name=TS1; extent_size=8M; data1.dat:2G; data2.dat:4G
This is equivalent to the following SQL statements:
CREATE TABLESPACE TS1 ADD DATAFILE 'data1.dat' EXTENT_SIZE 8M INITIAL_SIZE 2G ENGINE NDBCLUSTER; ALTER TABLESPACE TS1 ADD DATAFILE 'data2.dat' INITIAL_SIZE 4G ENGINE NDBCLUSTER;This tablespace is created when the data nodes are started with
--initial, and can be used whenever creating NDB Cluster Disk Data tables thereafter.
-
Disk Data latency parameters. The two parameters listed here can be used to improve handling of latency issues with NDB Cluster Disk Data tables.
-
Table 22.179 This table provides type and value information for the MaxDiskDataLatency data node configuration parameter
Property Value Version (or later) NDB 8.0.19 Type or units ms Default 0 Range 0 - 8000 Restart Type N This parameter controls the maximum allowed mean latency for disk access (maximum 8000 milliseconds). When this limit is reached,
NDBbegins to abort transactions in order to decrease pressure on the Disk Data I/O subsystem. Use0to disable the latency check. -
Table 22.180 This table provides type and value information for the DiskDataUsingSameDisk data node configuration parameter
Property Value Version (or later) NDB 8.0.19 Type or units boolean Default true Range ... Restart Type N Set this parameter to
falseif your Disk Data tablespaces use one or more separate disks. Doing so allows checkpoints to tablespaces to be executed at a higher rate than normally used for when disks are shared.When
DiskDataUsingSameDiskistrue,NDBdecreases the rate of Disk Data checkpointing whenever an in-memory checkpoint is in progress to help ensure that disk load remains constant.
-
Disk Data and GCP Stop errors.
Errors encountered when using Disk Data tables such as
Node nodeid killed this
node because GCP stop was detected (error 2303)
are often referred to as “GCP stop errors”. Such
errors occur when the redo log is not flushed to disk quickly
enough; this is usually due to slow disks and insufficient
disk throughput.
You can help prevent these errors from occurring by using faster
disks, and by placing Disk Data files on a separate disk from
the data node file system. Reducing the value of
TimeBetweenGlobalCheckpoints
tends to decrease the amount of data to be written for each
global checkpoint, and so may provide some protection against
redo log buffer overflows when trying to write a global
checkpoint; however, reducing this value also permits less time
in which to write the GCP, so this must be done with caution.
In addition to the considerations given for
DiskPageBufferMemory as
explained previously, it is also very important that the
DiskIOThreadPool
configuration parameter be set correctly; having
DiskIOThreadPool set too
high is very likely to cause GCP stop errors (Bug #37227).
GCP stops can be caused by save or commit timeouts; the
TimeBetweenEpochsTimeout
data node configuration parameter determines the timeout for
commits. However, it is possible to disable both types of
timeouts by setting this parameter to 0.
Parameters for configuring send buffer memory allocation.
Send buffer memory is allocated dynamically from a memory pool
shared between all transporters, which means that the size of
the send buffer can be adjusted as necessary. (Previously, the
NDB kernel used a fixed-size send buffer for every node in the
cluster, which was allocated when the node started and could
not be changed while the node was running.) The
TotalSendBufferMemory
and OverLoadLimit data
node configuration parameters permit the setting of limits on
this memory allocation. For more information about the use of
these parameters (as well as
SendBufferMemory), see
Section 22.3.3.14, “Configuring NDB Cluster Send Buffer Parameters”.
This parameter specifies the amount of transporter send buffer memory to allocate in addition to any set using
TotalSendBufferMemory,SendBufferMemory, or both.This parameter is used to determine the total amount of memory to allocate on this node for shared send buffer memory among all configured transporters.
If this parameter is set, its minimum permitted value is 256KB; 0 indicates that the parameter has not been set. For more detailed information, see Section 22.3.3.14, “Configuring NDB Cluster Send Buffer Parameters”.
See also Section 22.5.7, “Adding NDB Cluster Data Nodes Online”.
Redo log over-commit handling.
It is possible to control a data node's handling of
operations when too much time is taken flushing redo logs to
disk. This occurs when a given redo log flush takes longer
than
RedoOverCommitLimit
seconds, more than
RedoOverCommitCounter
times, causing any pending transactions to be aborted. When
this happens, the API node that sent the transaction can
handle the operations that should have been committed either
by queuing the operations and re-trying them, or by aborting
them, as determined by
DefaultOperationRedoProblemAction.
The data node configuration parameters for setting the timeout
and number of times it may be exceeded before the API node
takes this action are described in the following list:
-
Table 22.181 This table provides type and value information for the RedoOverCommitCounter data node configuration parameter
Property Value Version (or later) NDB 8.0.13 Type or units numeric Default 3 Range 1 - 4294967039 (0xFFFFFEFF) Restart Type N Version (or later) NDB 8.0.19 Type or units numeric Default 3 Range 1 - 4294967039 (0xFFFFFEFF) Restart Type N When
RedoOverCommitLimitis exceeded when trying to write a given redo log to disk this many times or more, any transactions that were not committed as a result are aborted, and an API node where any of these transactions originated handles the operations making up those transactions according to its value forDefaultOperationRedoProblemAction(by either queuing the operations to be re-tried, or aborting them). -
Table 22.182 This table provides type and value information for the RedoOverCommitLimit data node configuration parameter
Property Value Version (or later) NDB 8.0.13 Type or units seconds Default 20 Range 1 - 4294967039 (0xFFFFFEFF) Restart Type N Version (or later) NDB 8.0.19 Type or units seconds Default 20 Range 1 - 4294967039 (0xFFFFFEFF) Restart Type N This parameter sets an upper limit in seconds for trying to write a given redo log to disk before timing out. The number of times the data node tries to flush this redo log, but takes longer than
RedoOverCommitLimit, is kept and compared withRedoOverCommitCounter, and when flushing takes too long more times than the value of that parameter, any transactions that were not committed as a result of the flush timeout are aborted. When this occurs, the API node where any of these transactions originated handles the operations making up those transactions according to itsDefaultOperationRedoProblemActionsetting (it either queues the operations to be re-tried, or aborts them).
Controlling restart attempts.
It is possible to exercise finely-grained control over restart
attempts by data nodes when they fail to start using the
MaxStartFailRetries
and
StartFailRetryDelay
data node configuration parameters.
MaxStartFailRetries
limits the total number of retries made before giving up on
starting the data node,
StartFailRetryDelay sets
the number of seconds between retry attempts. These parameters
are listed here:
-
Table 22.183 This table provides type and value information for the StartFailRetryDelay data node configuration parameter
Property Value Version (or later) NDB 8.0.13 Type or units unsigned Default 0 Range 0 - 4294967039 (0xFFFFFEFF) Restart Type N Use this parameter to set the number of seconds between restart attempts by the data node in the event on failure on startup. The default is 0 (no delay).
Both this parameter and
MaxStartFailRetriesare ignored unlessStopOnErroris equal to 0. -
Table 22.184 This table provides type and value information for the MaxStartFailRetries data node configuration parameter
Property Value Version (or later) NDB 8.0.13 Type or units unsigned Default 3 Range 0 - 4294967039 (0xFFFFFEFF) Restart Type N Use this parameter to limit the number restart attempts made by the data node in the event that it fails on startup. The default is 3 attempts.
Both this parameter and
StartFailRetryDelayare ignored unlessStopOnErroris equal to 0.
NDB index statistics parameters. The parameters in the following list relate to NDB index statistics generation.
-
Table 22.185 This table provides type and value information for the IndexStatAutoCreate data node configuration parameter
Property Value Version (or later) NDB 8.0.13 Type or units integer Default 0 Range 0, 1 Restart Type S Enable (set equal to 1) or disable (set equal to 0) automatic statistics collection when indexes are created. Disabled by default.
-
Table 22.186 This table provides type and value information for the IndexStatAutoUpdate data node configuration parameter
Property Value Version (or later) NDB 8.0.13 Type or units integer Default 0 Range 0, 1 Restart Type S Enable (set equal to 1) or disable (set equal to 0) monitoring of indexes for changes and trigger automatic statistics updates these are detected. The amount and degree of change needed to trigger the updates are determined by the settings for the
IndexStatTriggerPctandIndexStatTriggerScaleoptions. -
Table 22.187 This table provides type and value information for the IndexStatSaveSize data node configuration parameter
Property Value Version (or later) NDB 8.0.13 Type or units bytes Default 32768 Range 0 - 4294967039 (0xFFFFFEFF) Restart Type IN Maximum space in bytes allowed for the saved statistics of any given index in the
NDBsystem tables and in the mysqld memory cache.At least one sample is always produced, regardless of any size limit. This size is scaled by
IndexStatSaveScale.The size specified by
IndexStatSaveSizeis scaled by the value ofIndexStatTriggerPctfor a large index, times 0.01. This is further multiplied by the logarithm to the base 2 of the index size. SettingIndexStatTriggerPctequal to 0 disables the scaling effect. -
Table 22.188 This table provides type and value information for the IndexStatSaveScale data node configuration parameter
Property Value Version (or later) NDB 8.0.13 Type or units percentage Default 100 Range 0 - 4294967039 (0xFFFFFEFF) Restart Type IN The size specified by
IndexStatSaveSizeis scaled by the value ofIndexStatTriggerPctfor a large index, times 0.01. This is further multiplied by the logarithm to the base 2 of the index size. SettingIndexStatTriggerPctequal to 0 disables the scaling effect. -
Table 22.189 This table provides type and value information for the IndexStatTriggerPct data node configuration parameter
Property Value Version (or later) NDB 8.0.13 Type or units percentage Default 100 Range 0 - 4294967039 (0xFFFFFEFF) Restart Type IN Percentage change in updates that triggers an index statistics update. The value is scaled by
IndexStatTriggerScale. You can disable this trigger altogether by settingIndexStatTriggerPctto 0. -
Table 22.190 This table provides type and value information for the IndexStatTriggerScale data node configuration parameter
Property Value Version (or later) NDB 8.0.13 Type or units percentage Default 100 Range 0 - 4294967039 (0xFFFFFEFF) Restart Type IN Scale
IndexStatTriggerPctby this amount times 0.01 for a large index. A value of 0 disables scaling. -
Table 22.191 This table provides type and value information for the IndexStatUpdateDelay data node configuration parameter
Property Value Version (or later) NDB 8.0.13 Type or units seconds Default 60 Range 0 - 4294967039 (0xFFFFFEFF) Restart Type IN Minimum delay in seconds between automatic index statistics updates for a given index. Setting this variable to 0 disables any delay. The default is 60 seconds.
Restart types. Information about the restart types used by the parameter descriptions in this section is shown in the following table:
Table 22.192 NDB Cluster restart types
| Symbol | Restart Type | Description |
|---|---|---|
| N | Node | The parameter can be updated using a rolling restart (see Section 22.5.5, “Performing a Rolling Restart of an NDB Cluster”) |
| S | System | All cluster nodes must be shut down completely, then restarted, to effect a change in this parameter |
| I | Initial | Data nodes must be restarted using the
--initial option |
The [mysqld] and [api]
sections in the config.ini file define the
behavior of the MySQL servers (SQL nodes) and other applications
(API nodes) used to access cluster data. None of the parameters
shown is required. If no computer or host name is provided, any
host can use this SQL or API node.
Generally speaking, a [mysqld] section is
used to indicate a MySQL server providing an SQL interface to
the cluster, and an [api] section is used for
applications other than mysqld processes
accessing cluster data, but the two designations are actually
synonymous; you can, for instance, list parameters for a MySQL
server acting as an SQL node in an [api]
section.
For a discussion of MySQL server options for NDB Cluster, see Section 22.3.3.9.1, “MySQL Server Options for NDB Cluster”. For information about MySQL server system variables relating to NDB Cluster, see Section 22.3.3.9.2, “NDB Cluster System Variables”.
-
Table 22.193 This table provides type and value information for the Id API node configuration parameter
Property Value Version (or later) NDB 8.0.13 Type or units unsigned Default [none] Range 1 - 255 Restart Type IS The
Idis an integer value used to identify the node in all cluster internal messages. The permitted range of values is 1 to 255 inclusive. This value must be unique for each node in the cluster, regardless of the type of node.NoteIn NDB 8.0.18 and later, data node IDs must be less than 145. If you plan to deploy a large number of data nodes, it is a good idea to limit the node IDs for API nodes (and management nodes) to values greater than 144. (Previous to NDB 8.0.18, the maximum supported value for a data node ID was 48.)
NodeIdis the preferred parameter name to use when identifying API nodes. (Idcontinues to be supported for backward compatibility, but is now deprecated and generates a warning when used. It is also subject to future removal.) -
Table 22.194 This table provides type and value information for the ConnectionMap API node configuration parameter
Property Value Version (or later) NDB 8.0.13 Type or units string Default [none] Range ... Restart Type N Specifies which data nodes to connect.
-
Table 22.195 This table provides type and value information for the NodeId API node configuration parameter
Property Value Version (or later) NDB 8.0.13 Type or units unsigned Default [none] Range 1 - 255 Restart Type IS The
NodeIdis an integer value used to identify the node in all cluster internal messages. The permitted range of values is 1 to 255 inclusive. This value must be unique for each node in the cluster, regardless of the type of node.NoteIn NDB 8.0.18 and later, data node IDs must be less than 145. If you plan to deploy a large number of data nodes, it is a good idea to limit the node IDs for API nodes (and management nodes) to values greater than 144. (Previous to NDB 8.0.18, the maximum supported value for a data node ID was 48.)
NodeIdis the preferred parameter name to use when identifying management nodes. An alias,Id, was used for this purpose in very old versions of NDB Cluster, and continues to be supported for backward compatibility; it is now deprecated and generates a warning when used, and is subject to removal in a future release of NDB Cluster. -
Table 22.196 This table provides type and value information for the ExecuteOnComputer API node configuration parameter
Property Value Version (or later) NDB 8.0.13 Type or units name Default [none] Range ... Restart Type S This refers to the
Idset for one of the computers (hosts) defined in a[computer]section of the configuration file.ImportantThis parameter is deprecated, and is subject to removal in a future release. Use the
HostNameparameter instead. The node ID for this node can be given out only to connections that explicitly request it. A management server that requests “any” node ID cannot use this one. This parameter can be used when running multiple management servers on the same host, and
HostNameis not sufficient for distinguishing among processes. Intended for use in testing.-
Table 22.197 This table provides type and value information for the HostName API node configuration parameter
Property Value Version (or later) NDB 8.0.13 Type or units name or IP address Default [none] Range ... Restart Type N Specifying this parameter defines the hostname of the computer on which the SQL node (API node) is to reside. To specify a hostname, either this parameter or
ExecuteOnComputeris required.If no
HostNameorExecuteOnComputeris specified in a given[mysql]or[api]section of theconfig.inifile, then an SQL or API node may connect using the corresponding “slot” from any host which can establish a network connection to the management server host machine. This differs from the default behavior for data nodes, wherelocalhostis assumed forHostNameunless otherwise specified. -
Table 22.198 This table provides type and value information for the LocationDomainId API node configuration parameter
Property Value Version (or later) NDB 8.0.13 Type or units integer Default 0 Range 0 - 16 Restart Type S Assigns an SQL or other API node to a specific availability domain (also known as an availability zone) within a cloud. By informing
NDBwhich nodes are in which availability domains, performance can be improved in a cloud environment in the following ways:If requested data is not found on the same node, reads can be directed to another node in the same availability domain.
Communication between nodes in different availability domains are guaranteed to use
NDBtransporters' WAN support without any further manual intervention.The transporter's group number can be based on which availability domain is used, such that also SQL and other API nodes communicate with local data nodes in the same availability domain whenever possible.
The arbitrator can be selected from an availability domain in which no data nodes are present, or, if no such availability domain can be found, from a third availability domain.
LocationDomainIdtakes an integer value between 0 and 16 inclusive, with 0 being the default; using 0 is the same as leaving the parameter unset. -
Table 22.199 This table provides type and value information for the ArbitrationRank API node configuration parameter
Property Value Version (or later) NDB 8.0.13 Type or units 0-2 Default 0 Range 0 - 2 Restart Type N This parameter defines which nodes can act as arbitrators. Both management nodes and SQL nodes can be arbitrators. A value of 0 means that the given node is never used as an arbitrator, a value of 1 gives the node high priority as an arbitrator, and a value of 2 gives it low priority. A normal configuration uses the management server as arbitrator, setting its
ArbitrationRankto 1 (the default for management nodes) and those for all SQL nodes to 0 (the default for SQL nodes).By setting
ArbitrationRankto 0 on all management and SQL nodes, you can disable arbitration completely. You can also control arbitration by overriding this parameter; to do so, set theArbitrationparameter in the[ndbd default]section of theconfig.iniglobal configuration file. -
Table 22.200 This table provides type and value information for the ArbitrationDelay API node configuration parameter
Property Value Version (or later) NDB 8.0.13 Type or units milliseconds Default 0 Range 0 - 4294967039 (0xFFFFFEFF) Restart Type N Setting this parameter to any other value than 0 (the default) means that responses by the arbitrator to arbitration requests will be delayed by the stated number of milliseconds. It is usually not necessary to change this value.
-
Table 22.201 This table provides type and value information for the BatchByteSize API node configuration parameter
Property Value Version (or later) NDB 8.0.13 Type or units bytes Default 16K Range 1K - 1M Restart Type N For queries that are translated into full table scans or range scans on indexes, it is important for best performance to fetch records in properly sized batches. It is possible to set the proper size both in terms of number of records (
BatchSize) and in terms of bytes (BatchByteSize). The actual batch size is limited by both parameters.The speed at which queries are performed can vary by more than 40% depending upon how this parameter is set.
This parameter is measured in bytes. The default value is 16K.
-
Table 22.202 This table provides type and value information for the BatchSize API node configuration parameter
Property Value Version (or later) NDB 8.0.13 Type or units records Default 256 Range 1 - 992 Restart Type N This parameter is measured in number of records and is by default set to 256. The maximum size is 992.
-
Table 22.203 This table provides type and value information for the ExtraSendBufferMemory API node configuration parameter
Property Value Version (or later) NDB 8.0.13 Type or units bytes Default 0 Range 0 - 4294967039 (0xFFFFFEFF) Restart Type N This parameter specifies the amount of transporter send buffer memory to allocate in addition to any that has been set using
TotalSendBufferMemory,SendBufferMemory, or both. -
Table 22.204 This table provides type and value information for the HeartbeatThreadPriority API node configuration parameter
Property Value Version (or later) NDB 8.0.13 Type or units string Default [none] Range ... Restart Type S Use this parameter to set the scheduling policy and priority of heartbeat threads for management and API nodes. The syntax for setting this parameter is shown here:
HeartbeatThreadPriority =
policy[,priority]policy: {FIFO | RR}When setting this parameter, you must specify a policy. This is one of
FIFO(first in, first in) orRR(round robin). This followed optionally by the priority (an integer). -
Table 22.205 This table provides type and value information for the MaxScanBatchSize API node configuration parameter
Property Value Version (or later) NDB 8.0.13 Type or units bytes Default 256K Range 32K - 16M Restart Type N The batch size is the size of each batch sent from each data node. Most scans are performed in parallel to protect the MySQL Server from receiving too much data from many nodes in parallel; this parameter sets a limit to the total batch size over all nodes.
The default value of this parameter is set to 256KB. Its maximum size is 16MB.
-
Table 22.206 This table provides type and value information for the TotalSendBufferMemory API node configuration parameter
Property Value Version (or later) NDB 8.0.13 Type or units bytes Default 0 Range 256K - 4294967039 (0xFFFFFEFF) Restart Type N This parameter is used to determine the total amount of memory to allocate on this node for shared send buffer memory among all configured transporters.
If this parameter is set, its minimum permitted value is 256KB; 0 indicates that the parameter has not been set. For more detailed information, see Section 22.3.3.14, “Configuring NDB Cluster Send Buffer Parameters”.
-
Table 22.207 This table provides type and value information for the AutoReconnect API node configuration parameter
Property Value Version (or later) NDB 8.0.13 Type or units boolean Default false Range true, false Restart Type N This parameter is
falseby default. This forces disconnected API nodes (including MySQL Servers acting as SQL nodes) to use a new connection to the cluster rather than attempting to re-use an existing one, as re-use of connections can cause problems when using dynamically-allocated node IDs. (Bug #45921)NoteThis parameter can be overridden using the NDB API. For more information, see Ndb_cluster_connection::set_auto_reconnect(), and Ndb_cluster_connection::get_auto_reconnect().
DefaultOperationRedoProblemActionTable 22.208 This table provides type and value information for the DefaultOperationRedoProblemAction API node configuration parameter
Property Value Version (or later) NDB 8.0.13 Type or units enumeration Default QUEUE Range ABORT, QUEUE Restart Type S This parameter (along with
RedoOverCommitLimitandRedoOverCommitCounter) controls the data node's handling of operations when too much time is taken flushing redo logs to disk. This occurs when a given redo log flush takes longer thanRedoOverCommitLimitseconds, more thanRedoOverCommitCountertimes, causing any pending transactions to be aborted.When this happens, the node can respond in either of two ways, according to the value of
DefaultOperationRedoProblemAction, listed here:ABORT: Any pending operations from aborted transactions are also aborted.QUEUE: Pending operations from transactions that were aborted are queued up to be re-tried. This the default. Pending operations are still aborted when the redo log runs out of space—that is, when P_TAIL_PROBLEM errors occur.
-
Table 22.209 This table provides type and value information for the DefaultHashMapSize API node configuration parameter
Property Value Version (or later) NDB 8.0.13 Type or units buckets Default 3840 Range 0 - 3840 Restart Type N The size of the table hash maps used by
NDBis configurable using this parameter.DefaultHashMapSizecan take any of three possible values (0, 240, 3840). These values and their effects are described in the following table.Table 22.210 DefaultHashMapSize parameter values
Value Description / Effect 0Use the lowest value set, if any, for this parameter among all data nodes and API nodes in the cluster; if it is not set on any data or API node, use the default value. 240Old default hash map size 3840Hash map size used by default in NDB 8.0 The original intended use for this parameter was to facilitate upgrades and downgrades to and from older NDB Cluster versions, in which the hash map size differed, due to the fact that this change was not otherwise backward compatible. This is not an issue when upgrading to or downgrading from NDB Cluster 8.0.
-
Table 22.211 This table provides type and value information for the wan API node configuration parameter
Property Value Version (or later) NDB 8.0.13 Type or units boolean Default false Range true, false Restart Type N Use WAN TCP setting as default.
-
Table 22.212 This table provides type and value information for the ConnectBackoffMaxTime API node configuration parameter
Property Value Version (or later) NDB 8.0.13 Type or units integer Default 0 Range 0 - 4294967039 (0xFFFFFEFF) Restart Type N In an NDB Cluster with many unstarted data nodes, the value of this parameter can be raised to circumvent connection attempts to data nodes which have not yet begun to function in the cluster, as well as moderate high traffic to management nodes. As long as the API node is not connected to any new data nodes, the value of the
StartConnectBackoffMaxTimeparameter is applied; otherwise,ConnectBackoffMaxTimeis used to determine the length of time in milliseconds to wait between connection attempts.Time elapsed during node connection attempts is not taken into account when calculating elapsed time for this parameter. The timeout is applied with approximately 100 ms resolution, starting with a 100 ms delay; for each subsequent attempt, the length of this period is doubled until it reaches
ConnectBackoffMaxTimemilliseconds, up to a maximum of 100000 ms (100s).Once the API node is connected to a data node and that node reports (in a heartbeat message) that it has connected to other data nodes, connection attempts to those data nodes are no longer affected by this parameter, and are made every 100 ms thereafter until connected. Once a data node has started, it can take up
HeartbeatIntervalDbApifor the API node to be notified that this has occurred. -
Table 22.213 This table provides type and value information for the StartConnectBackoffMaxTime API node configuration parameter
Property Value Version (or later) NDB 8.0.13 Type or units integer Default 0 Range 0 - 4294967039 (0xFFFFFEFF) Restart Type N In an NDB Cluster with many unstarted data nodes, the value of this parameter can be raised to circumvent connection attempts to data nodes which have not yet begun to function in the cluster, as well as moderate high traffic to management nodes. As long as the API node is not connected to any new data nodes, the value of the
StartConnectBackoffMaxTimeparameter is applied; otherwise,ConnectBackoffMaxTimeis used to determine the length of time in milliseconds to wait between connection attempts.Time elapsed during node connection attempts is not taken into account when calculating elapsed time for this parameter. The timeout is applied with approximately 100 ms resolution, starting with a 100 ms delay; for each subsequent attempt, the length of this period is doubled until it reaches
StartConnectBackoffMaxTimemilliseconds, up to a maximum of 100000 ms (100s).Once the API node is connected to a data node and that node reports (in a heartbeat message) that it has connected to other data nodes, connection attempts to those data nodes are no longer affected by this parameter, and are made every 100 ms thereafter until connected. Once a data node has started, it can take up
HeartbeatIntervalDbApifor the API node to be notified that this has occurred.
API Node Debugging Parameters.
You can use the ApiVerbose configuration
parameter to enable debugging output from a given API node.
This parameter takes an integer value. 0 is the default, and
disables such debugging; 1 enables debugging output to the
cluster log; 2 adds DBDICT debugging output
as well. (Bug #20638450) See also
DUMP 1229.
You can also obtain information from a MySQL server running as
an NDB Cluster SQL node using SHOW
STATUS in the mysql client, as
shown here:
mysql> SHOW STATUS LIKE 'ndb%';
+-----------------------------+----------------+
| Variable_name | Value |
+-----------------------------+----------------+
| Ndb_cluster_node_id | 5 |
| Ndb_config_from_host | 198.51.100.112 |
| Ndb_config_from_port | 1186 |
| Ndb_number_of_storage_nodes | 4 |
+-----------------------------+----------------+
4 rows in set (0.02 sec)
For information about the status variables appearing in the output from this statement, see Section 22.3.3.9.3, “NDB Cluster Status Variables”.
To add new SQL or API nodes to the configuration of a running
NDB Cluster, it is necessary to perform a rolling restart of
all cluster nodes after adding new [mysqld]
or [api] sections to the
config.ini file (or files, if you are
using more than one management server). This must be done
before the new SQL or API nodes can connect to the cluster.
It is not necessary to perform any restart of the cluster if new SQL or API nodes can employ previously unused API slots in the cluster configuration to connect to the cluster.
Restart types. Information about the restart types used by the parameter descriptions in this section is shown in the following table:
Table 22.214 NDB Cluster restart types
| Symbol | Restart Type | Description |
|---|---|---|
| N | Node | The parameter can be updated using a rolling restart (see Section 22.5.5, “Performing a Rolling Restart of an NDB Cluster”) |
| S | System | All cluster nodes must be shut down completely, then restarted, to effect a change in this parameter |
| I | Initial | Data nodes must be restarted using the
--initial option |
The [system] section is used for parameters
applying to the cluster as a whole. The
Name system parameter
is used with MySQL Enterprise Monitor;
ConfigGenerationNumber
and PrimaryMGMNode are
not used in production environments. Except when using NDB
Cluster with MySQL Enterprise Monitor, is not necessary to have a
[system] section in the
config.ini file.
More information about these parameters can be found in the following list:
-
Table 22.215 This table provides type and value information for the ConfigGenerationNumber system configuration parameter
Property Value Version (or later) NDB 8.0.13 Type or units unsigned Default 0 Range 0 - 4294967039 (0xFFFFFEFF) Restart Type N Configuration generation number. This parameter is currently unused.
-
Table 22.216 This table provides type and value information for the Name system configuration parameter
Property Value Version (or later) NDB 8.0.13 Type or units string Default [none] Range ... Restart Type N Set a name for the cluster. This parameter is required for deployments with MySQL Enterprise Monitor; it is otherwise unused.
You can obtain the value of this parameter by checking the
Ndb_system_namestatus variable. In NDB API applications, you can also retrieve it usingget_system_name(). -
Table 22.217 This table provides type and value information for the PrimaryMGMNode system configuration parameter
Property Value Version (or later) NDB 8.0.13 Type or units unsigned Default 0 Range 0 - 4294967039 (0xFFFFFEFF) Restart Type N Node ID of the primary management node. This parameter is currently unused.
Restart types. Information about the restart types used by the parameter descriptions in this section is shown in the following table:
Table 22.218 NDB Cluster restart types
| Symbol | Restart Type | Description |
|---|---|---|
| N | Node | The parameter can be updated using a rolling restart (see Section 22.5.5, “Performing a Rolling Restart of an NDB Cluster”) |
| S | System | All cluster nodes must be shut down completely, then restarted, to effect a change in this parameter |
| I | Initial | Data nodes must be restarted using the
--initial option |
This section provides information about MySQL server options, server and status variables that are specific to NDB Cluster. For general information on using these, and for other options and variables not specific to NDB Cluster, see Section 5.1, “The MySQL Server”.
For NDB Cluster configuration parameters used in the cluster
configuration file (usually named config.ini),
see Section 22.3, “Configuration of NDB Cluster”.
This section provides descriptions of mysqld server options relating to NDB Cluster. For information about mysqld options not specific to NDB Cluster, and for general information about the use of options with mysqld, see Section 5.1.7, “Server Command Options”.
For information about command-line options used with other NDB
Cluster processes (ndbd,
ndb_mgmd, and ndb_mgm), see
Section 22.4.31, “Options Common to NDB Cluster Programs — Options Common to NDB Cluster Programs”. For
information about command-line options used with
NDB utility programs (such as
ndb_desc, ndb_size.pl, and
ndb_show_tables), see
Section 22.4, “NDB Cluster Programs”.
-
Property Value Command-Line Format --ndbcluster[=value]Disabled by skip-ndbclusterType Enumeration Default Value ONValid Values OFFFORCEThe
NDBCLUSTERstorage engine is necessary for using NDB Cluster. If a mysqld binary includes support for theNDBCLUSTERstorage engine, the engine is disabled by default. Use the--ndbclusteroption to enable it. Use--skip-ndbclusterto explicitly disable the engine.The
--ndbclusteroption is ignored (and theNDBstorage engine is not enabled) if--initializeis also used. (It is neither necessary nor desirable to use this option together with--initialize.) --ndb-allow-copying-alter-table=[ON|OFF]Property Value Command-Line Format --ndb-allow-copying-alter-table[={OFF|ON}]System Variable ndb_allow_copying_alter_tableScope Global, Session Dynamic Yes SET_VARHint AppliesNo Type Boolean Default Value ONLet
ALTER TABLEand other DDL statements use copying operations onNDBtables. Set toOFFto keep this from happening; doing so may improve performance of critical applications.-
Property Value Command-Line Format --ndb-batch-sizeSystem Variable ndb_batch_sizeScope Global Dynamic No SET_VARHint AppliesNo Type Integer Default Value 32768Minimum Value 0Maximum Value 31536000This sets the size in bytes that is used for NDB transaction batches.
--ndb-cluster-connection-pool=#Property Value Command-Line Format --ndb-cluster-connection-poolSystem Variable ndb_cluster_connection_poolSystem Variable ndb_cluster_connection_poolScope Global Scope Global Dynamic No Dynamic No SET_VARHint AppliesNo SET_VARHint AppliesNo Type Integer Default Value 1Minimum Value 1Maximum Value 63By setting this option to a value greater than 1 (the default), a mysqld process can use multiple connections to the cluster, effectively mimicking several SQL nodes. Each connection requires its own
[api]or[mysqld]section in the cluster configuration (config.ini) file, and counts against the maximum number of API connections supported by the cluster.Suppose that you have 2 cluster host computers, each running an SQL node whose mysqld process was started with
--ndb-cluster-connection-pool=4; this means that the cluster must have 8 API slots available for these connections (instead of 2). All of these connections are set up when the SQL node connects to the cluster, and are allocated to threads in a round-robin fashion.This option is useful only when running mysqld on host machines having multiple CPUs, multiple cores, or both. For best results, the value should be smaller than the total number of cores available on the host machine. Setting it to a value greater than this is likely to degrade performance severely.
ImportantBecause each SQL node using connection pooling occupies multiple API node slots—each slot having its own node ID in the cluster—you must not use a node ID as part of the cluster connection string when starting any mysqld process that employs connection pooling.
Setting a node ID in the connection string when using the
--ndb-cluster-connection-pooloption causes node ID allocation errors when the SQL node attempts to connect to the cluster.--ndb-cluster-connection-pool-nodeids=listProperty Value Command-Line Format --ndb-cluster-connection-pool-nodeidsSystem Variable ndb_cluster_connection_pool_nodeidsScope Global Dynamic No SET_VARHint AppliesNo Type Set Default Value Specifies a comma-separated list of node IDs for connections to the cluster used by an SQL node. The number of nodes in this list must be the same as the value set for the
--ndb-cluster-connection-pooloption.--ndb-blob-read-batch-bytes=bytesProperty Value Command-Line Format --ndb-blob-read-batch-bytesSystem Variable ndb_blob_read_batch_bytesScope Global, Session Dynamic Yes SET_VARHint AppliesNo Type Integer Default Value 65536Minimum Value 0Maximum Value 4294967295This option can be used to set the size (in bytes) for batching of
BLOBdata reads in NDB Cluster applications. When this batch size is exceeded by the amount ofBLOBdata to be read within the current transaction, any pendingBLOBread operations are immediately executed.The maximum value for this option is 4294967295; the default is 65536. Setting it to 0 has the effect of disabling
BLOBread batching.NoteIn NDB API applications, you can control
BLOBwrite batching with thesetMaxPendingBlobReadBytes()andgetMaxPendingBlobReadBytes()methods.--ndb-blob-write-batch-bytes=bytesProperty Value Command-Line Format --ndb-blob-write-batch-bytesSystem Variable ndb_blob_write_batch_bytesScope Global, Session Dynamic Yes SET_VARHint AppliesNo Type Integer Default Value 65536Minimum Value 0Maximum Value 4294967295This option can be used to set the size (in bytes) for batching of
BLOBdata writes in NDB Cluster applications. When this batch size is exceeded by the amount ofBLOBdata to be written within the current transaction, any pendingBLOBwrite operations are immediately executed.The maximum value for this option is 4294967295; the default is 65536. Setting it to 0 has the effect of disabling
BLOBwrite batching.NoteIn NDB API applications, you can control
BLOBwrite batching with thesetMaxPendingBlobWriteBytes()andgetMaxPendingBlobWriteBytes()methods.--ndb-connectstring=connection_stringProperty Value Command-Line Format --ndb-connectstringType String When using the
NDBCLUSTERstorage engine, this option specifies the management server that distributes cluster configuration data. See Section 22.3.3.3, “NDB Cluster Connection Strings”, for syntax.--ndb-default-column-format=[FIXED|DYNAMIC]Property Value Command-Line Format --ndb-default-column-format={FIXED|DYNAMIC}System Variable ndb_default_column_formatScope Global Dynamic Yes SET_VARHint AppliesNo Type Enumeration Default Value FIXEDValid Values FIXEDDYNAMICSets the default
COLUMN_FORMATandROW_FORMATfor new tables (see Section 13.1.20, “CREATE TABLE Statement”). The default isFIXED.--ndb-deferred-constraints=[0|1]Property Value Command-Line Format --ndb-deferred-constraintsSystem Variable ndb_deferred_constraintsScope Global, Session Dynamic Yes SET_VARHint AppliesNo Type Integer Default Value 0Minimum Value 0Maximum Value 1Controls whether or not constraint checks on unique indexes are deferred until commit time, where such checks are supported.
0is the default.This option is not normally needed for operation of NDB Cluster or NDB Cluster Replication, and is intended primarily for use in testing.
-
Property Value Command-Line Format --ndb-schema-dist-timeout=#Introduced 8.0.17-ndb-8.0.17 System Variable ndb_schema_dist_timeoutScope Global Dynamic No SET_VARHint AppliesNo Type Integer Default Value 120Minimum Value 5Maximum Value 1200Specifies the maximum time in seconds that this mysqld waits for a schema operation to complete before marking it as having timed out.
--ndb-distribution=[KEYHASH|LINHASH]Property Value Command-Line Format --ndb-distribution={KEYHASH|LINHASH}System Variable ndb_distributionScope Global Dynamic Yes SET_VARHint AppliesNo Type Enumeration Default Value KEYHASHValid Values LINHASHKEYHASHControls the default distribution method for
NDBtables. Can be set to either ofKEYHASH(key hashing) orLINHASH(linear hashing).KEYHASHis the default.-
Property Value Command-Line Format --ndb-log-apply-status[={OFF|ON}]System Variable ndb_log_apply_statusScope Global Dynamic No SET_VARHint AppliesNo Type Boolean Default Value OFFCauses a slave mysqld to log any updates received from its immediate master to the
mysql.ndb_apply_statustable in its own binary log using its own server ID rather than the server ID of the master. In a circular or chain replication setting, this allows such updates to propagate to themysql.ndb_apply_statustables of any MySQL servers configured as slaves of the current mysqld.In a chain replication setup, using this option allows downstream (slave) clusters to be aware of their positions relative to all of their upstream contributors (masters).
In a circular replication setup, this option causes changes to
ndb_apply_statustables to complete the entire circuit, eventually propagating back to the originating NDB Cluster. This also allows a cluster acting as a master to see when its changes (epochs) have been applied to the other clusters in the circle.This option has no effect unless the MySQL server is started with the
--ndbclusteroption. --ndb-log-empty-epochs=[ON|OFF]Property Value Command-Line Format --ndb-log-empty-epochs[={OFF|ON}]System Variable ndb_log_empty_epochsScope Global Dynamic Yes SET_VARHint AppliesNo Type Boolean Default Value OFFCauses epochs during which there were no changes to be written to the
ndb_apply_statusandndb_binlog_indextables, even whenlog_slave_updatesis enabled.By default this option is disabled. Disabling
--ndb-log-empty-epochscauses epoch transactions with no changes not to be written to the binary log, although a row is still written even for an empty epoch inndb_binlog_index.Because
--ndb-log-empty-epochs=1causes the size of thendb_binlog_indextable to increase independently of the size of the binary log, users should be prepared to manage the growth of this table, even if they expect the cluster to be idle a large part of the time.--ndb-log-empty-update=[ON|OFF]Property Value Command-Line Format --ndb-log-empty-update[={OFF|ON}]System Variable ndb_log_empty_updateScope Global Dynamic Yes SET_VARHint AppliesNo Type Boolean Default Value OFFCauses updates that produced no changes to be written to the
ndb_apply_statusandndb_binlog_indextables, when whenlog_slave_updatesis enabled.By default this option is disabled (
OFF). Disabling--ndb-log-empty-updatecauses updates with no changes not to be written to the binary log.--ndb-log-exclusive-reads=[0|1]Property Value Command-Line Format --ndb-log-exclusive-reads[={OFF|ON}]System Variable ndb_log_exclusive_readsScope Global, Session Dynamic Yes SET_VARHint AppliesNo Type Boolean Default Value 0Starting the server with this option causes primary key reads to be logged with exclusive locks, which allows for NDB Cluster Replication conflict detection and resolution based on read conflicts. You can also enable and disable these locks at runtime by setting the value of the
ndb_log_exclusive_readssystem variable to 1 or 0, respectively. 0 (disable locking) is the default.For more information, see Read conflict detection and resolution.
-
Property Value Command-Line Format --ndb-log-fail-terminateIntroduced 8.0.21-ndb-8.0.21 System Variable ndb_log_fail_terminateScope Global Dynamic No SET_VARHint AppliesNo Type Boolean Default Value FALSEWhen this option is specified, and complete logging of all found row events is not possible, the mysqld process is terminated.
-
Property Value Command-Line Format --ndb-log-orig[={OFF|ON}]System Variable ndb_log_origScope Global Dynamic No SET_VARHint AppliesNo Type Boolean Default Value OFFLog the originating server ID and epoch in the
ndb_binlog_indextable.NoteThis makes it possible for a given epoch to have multiple rows in
ndb_binlog_index, one for each originating epoch.For more information, see Section 22.6.4, “NDB Cluster Replication Schema and Tables”.
-
Property Value Command-Line Format --ndb-log-transaction-id[={OFF|ON}]System Variable ndb_log_transaction_idScope Global Dynamic No SET_VARHint AppliesNo Type Boolean Default Value OFFCauses a slave mysqld to write the NDB transaction ID in each row of the binary log. The default value is
FALSE.This option is not supported in mainline MySQL Server 8.0. It is required to enable NDB Cluster Replication conflict detection and resolution using the
NDB$EPOCH_TRANS()function (see NDB$EPOCH_TRANS()). For more information, see Section 22.6.11, “NDB Cluster Replication Conflict Resolution”.The deprecated
log_bin_use_v1_row_eventssystem variable, which defaults toOFF, must not be set toONwhen you use--ndb-log-transaction-id. -
Property Value Command-Line Format --ndb-log-update-minimal[={OFF|ON}]System Variable ndb_log_update_minimalScope Global Dynamic Yes SET_VARHint AppliesNo Type Boolean Default Value OFFLog updates in a minimal fashion, by writing only the primary key values in the before image, and only the changed columns in the after image. This may cause compatibility problems if replicating to storage engines other than
NDB. -
Property Value Command-Line Format --ndb-mgmd-host=host_name[:port_num]Type String Default Value localhost:1186Can be used to set the host and port number of a single management server for the program to connect to. If the program requires node IDs or references to multiple management servers (or both) in its connection information, use the
--ndb-connectstringoption instead. -
Property Value Command-Line Format --ndb-nodeid=#Status Variable Ndb_cluster_node_idScope Global Dynamic No Type Integer Minimum Value 1Maximum Value 255Maximum Value 63Set this MySQL server's node ID in an NDB Cluster.
The
--ndb-nodeidoption overrides any node ID set with--ndb-connectstring, regardless of the order in which the two options are used.In addition, if
--ndb-nodeidis used, then either a matching node ID must be found in a[mysqld]or[api]section ofconfig.ini, or there must be an “open”[mysqld]or[api]section in the file (that is, a section without aNodeIdorIdparameter specified). This is also true if the node ID is specified as part of the connection string.Regardless of how the node ID is determined, its is shown as the value of the global status variable
Ndb_cluster_node_idin the output ofSHOW STATUS, and ascluster_node_idin theconnectionrow of the output ofSHOW ENGINE NDBCLUSTER STATUS.For more information about node IDs for NDB Cluster SQL nodes, see Section 22.3.3.7, “Defining SQL and Other API Nodes in an NDB Cluster”.
-
Property Value Command-Line Format --ndbinfo[=value](≥ 8.0.13-ndb-8.0.13)Introduced 8.0.13-ndb-8.0.13 Type Enumeration Default Value ONValid Values OFFFORCEEnables the plugin for the
ndbinfoinformation database. By default this is ON wheneverNDBCLUSTERis enabled. --ndb-optimization-delay=millisecondsProperty Value Command-Line Format --ndb-optimization-delay=#System Variable ndb_optimization_delayScope Global Dynamic Yes SET_VARHint AppliesNo Type Integer Default Value 10Minimum Value 0Maximum Value 100000Set the number of milliseconds to wait between sets of rows by
OPTIMIZE TABLEstatements onNDBtables. The default is 10.--ndb-transid-mysql-connection-map=stateProperty Value Command-Line Format --ndb-transid-mysql-connection-map[=state]Type Enumeration Default Value ONValid Values ONOFFFORCEEnables or disables the plugin that handles the
ndb_transid_mysql_connection_maptable in theINFORMATION_SCHEMAdatabase. Takes one of the valuesON,OFF, orFORCE.ON(the default) enables the plugin.OFFdisables the plugin, which makesndb_transid_mysql_connection_mapinaccessible.FORCEkeeps the MySQL Server from starting if the plugin fails to load and start.You can see whether the
ndb_transid_mysql_connection_maptable plugin is running by checking the output ofSHOW PLUGINS.-
Property Value Command-Line Format --ndb-wait-connected=#System Variable ndb_wait_connectedScope Global Dynamic No SET_VARHint AppliesNo Type Integer Default Value 30Minimum Value 0Maximum Value 31536000This option sets the period of time that the MySQL server waits for connections to NDB Cluster management and data nodes to be established before accepting MySQL client connections. The time is specified in seconds. The default value is
30. -
Property Value Command-Line Format --ndb-wait-setup=#System Variable ndb_wait_setupScope Global Dynamic No SET_VARHint AppliesNo Type Integer Default Value 30Default Value 30Default Value 15Default Value 15Minimum Value 0Maximum Value 31536000This variable shows the period of time that the MySQL server waits for the
NDBstorage engine to complete setup before timing out and treatingNDBas unavailable. The time is specified in seconds. The default value is30. -
Property Value Command-Line Format --skip-ndbclusterDisable the
NDBCLUSTERstorage engine. This is the default for binaries that were built withNDBCLUSTERstorage engine support; the server allocates memory and other resources for this storage engine only if the--ndbclusteroption is given explicitly. See Section 22.3.1, “Quick Test Setup of NDB Cluster”, for an example.
This section provides detailed information about MySQL server
system variables that are specific to NDB Cluster and the
NDB storage engine. For system
variables not specific to NDB Cluster, see
Section 5.1.8, “Server System Variables”. For general information
on using system variables, see
Section 5.1.9, “Using System Variables”.
-
Property Value Command-Line Format --ndb-autoincrement-prefetch-sz=#System Variable ndb_autoincrement_prefetch_szScope Global, Session Dynamic Yes SET_VARHint AppliesNo Type Integer Default Value (≥ 8.0.19-ndb-8.0.19) 512Default Value (≤ 8.0.18-ndb-8.0.18) 1Minimum Value 1Maximum Value 65536Determines the probability of gaps in an autoincremented column. Set it to
1to minimize this. Setting it to a high value for optimization makes inserts faster, but decreases the likelihood of consecutive autoincrement numbers being used in a batch of inserts.This variable affects only the number of
AUTO_INCREMENTIDs that are fetched between statements; within a given statement, at least 32 IDs are obtained at a time.ImportantThis variable does not affect inserts performed using
INSERT ... SELECT. -
Property Value Command-Line Format --ndb-cache-check-time=#Deprecated Yes System Variable ndb_cache_check_timeScope Global Dynamic Yes SET_VARHint AppliesNo Type Integer Default Value 0The number of milliseconds that elapse between checks of NDB Cluster SQL nodes by the MySQL query cache. Setting this to 0 (the default and minimum value) means that the query cache checks for validation on every query.
The recommended maximum value for this variable is 1000, which means that the check is performed once per second. A larger value means that the check is performed and possibly invalidated due to updates on different SQL nodes less often. It is generally not desirable to set this to a value greater than 2000.
NoteThe query cache
ndb_cache_check_timeare deprecated in MySQL 5.7; the query cache was removed in MySQL 8.0. -
Property Value Command-Line Format --ndb-clear-apply-status[={OFF|ON}]System Variable ndb_clear_apply_statusScope Global Dynamic Yes SET_VARHint AppliesNo Type Boolean Default Value ONBy the default, executing
RESET SLAVEcauses an NDB Cluster replication slave to purge all rows from itsndb_apply_statustable. You can disable this by settingndb_clear_apply_status=OFF. -
Property Value Command-Line Format --ndb-data-node-neighbour=#System Variable ndb_data_node_neighbourScope Global Dynamic Yes SET_VARHint AppliesNo Type Integer Default Value 0Minimum Value 0Maximum Value 255Sets the ID of a “nearest” data node—that is, a preferred nonlocal data node is chosen to execute the transaction, rather than one running on the same host as the SQL or API node. This used to ensure that when a fully replicated table is accessed, we access it on this data node, to ensure that the local copy of the table is always used whenever possible. This can also be used for providing hints for transactions.
This can improve data access times in the case of a node that is physically closer than and thus has higher network throughput than others on the same host.
See Section 13.1.20.10, “Setting NDB_TABLE Options”, for further information.
NoteAn equivalent method
set_data_node_neighbour()is provided for use in NDB API applications. -
Property Value Command-Line Format --ndb-dbg-check-shares=#Introduced 8.0.13-ndb-8.0.13 System Variable ndb_dbg_check_sharesScope Global, Session Dynamic Yes SET_VARHint AppliesNo Type Integer Default Value 0Minimum Value 0Maximum Value 1When set to 1, check that no shares are lingering. Available in debug builds only.
Added in NDB 8.0.13.
-
Property Value Command-Line Format --ndb-default-column-format={FIXED|DYNAMIC}System Variable ndb_default_column_formatScope Global Dynamic Yes SET_VARHint AppliesNo Type Enumeration Default Value FIXEDValid Values FIXEDDYNAMICSets the default
COLUMN_FORMATandROW_FORMATfor new tables (see Section 13.1.20, “CREATE TABLE Statement”). The default isFIXED. -
Property Value Command-Line Format --ndb-deferred-constraints=#System Variable ndb_deferred_constraintsScope Global, Session Dynamic Yes SET_VARHint AppliesNo Type Integer Default Value 0Minimum Value 0Maximum Value 1Controls whether or not constraint checks are deferred, where these are supported.
0is the default.This variable is not normally needed for operation of NDB Cluster or NDB Cluster Replication, and is intended primarily for use in testing.
-
Property Value Command-Line Format --ndb-distribution={KEYHASH|LINHASH}System Variable ndb_distributionScope Global Dynamic Yes SET_VARHint AppliesNo Type Enumeration Default Value KEYHASHValid Values LINHASHKEYHASHControls the default distribution method for
NDBtables. Can be set to either ofKEYHASH(key hashing) orLINHASH(linear hashing).KEYHASHis the default. -
Property Value Command-Line Format --ndb-eventbuffer-free-percent=#System Variable ndb_eventbuffer_free_percentScope Global Dynamic Yes SET_VARHint AppliesNo Type Integer Default Value 20Minimum Value 1Maximum Value 99Sets the percentage of the maximum memory allocated to the event buffer (ndb_eventbuffer_max_alloc) that should be available in event buffer after reaching the maximum, before starting to buffer again.
-
Property Value Command-Line Format --ndb-eventbuffer-max-alloc=#System Variable ndb_eventbuffer_max_allocScope Global Dynamic Yes SET_VARHint AppliesNo Type Integer Default Value 0Minimum Value 0Maximum Value 4294967295Sets the maximum amount memory (in bytes) that can be allocated for buffering events by the NDB API. 0 means that no limit is imposed, and is the default.
-
Property Value Command-Line Format ndb_extra_logging=#System Variable ndb_extra_loggingScope Global Dynamic Yes SET_VARHint AppliesNo Type Integer Default Value 1This variable enables recording in the MySQL error log of information specific to the
NDBstorage engine.When this variable is set to 0, the only information specific to
NDBthat is written to the MySQL error log relates to transaction handling. If it set to a value greater than 0 but less than 10,NDBtable schema and connection events are also logged, as well as whether or not conflict resolution is in use, and otherNDBerrors and information. If the value is set to 10 or more, information aboutNDBinternals, such as the progress of data distribution among cluster nodes, is also written to the MySQL error log. The default is 1. -
Property Value Command-Line Format --ndb-force-send[={OFF|ON}]System Variable ndb_force_sendScope Global, Session Dynamic Yes SET_VARHint AppliesNo Type Boolean Default Value ONForces sending of buffers to
NDBimmediately, without waiting for other threads. Defaults toON. -
Property Value Command-Line Format --ndb-fully-replicated[={OFF|ON}]System Variable ndb_fully_replicatedScope Global, Session Dynamic Yes SET_VARHint AppliesNo Type Boolean Default Value OFFDetermines whether new
NDBtables are fully replicated. This setting can be overridden for an individual table usingCOMMENT="NDB_TABLE=FULLY_REPLICATED=..."in aCREATE TABLEorALTER TABLEstatement; see Section 13.1.20.10, “Setting NDB_TABLE Options”, for syntax and other information. -
Property Value Command-Line Format --ndb-index-stat-enable[={OFF|ON}]System Variable ndb_index_stat_enableScope Global, Session Dynamic Yes SET_VARHint AppliesNo Type Boolean Default Value ONUse
NDBindex statistics in query optimization. The default isON. -
Property Value Command-Line Format --ndb-index-stat-option=valueSystem Variable ndb_index_stat_optionScope Global, Session Dynamic Yes SET_VARHint AppliesNo Type String Default Value loop_checkon=1000ms,loop_idle=1000ms,loop_busy=100ms, update_batch=1,read_batch=4,idle_batch=32,check_batch=32, check_delay=1m,delete_batch=8,clean_delay=0,error_batch=4, error_delay=1m,evict_batch=8,evict_delay=1m,cache_limit=32M, cache_lowpct=90This variable is used for providing tuning options for NDB index statistics generation. The list consist of comma-separated name-value pairs of option names and values, and this list must not contain any space characters.
Options not used when setting
ndb_index_stat_optionare not changed from their default values. For example, you can setndb_index_stat_option = 'loop_idle=1000ms,cache_limit=32M'.Time values can be optionally suffixed with
h(hours),m(minutes), ors(seconds). Millisecond values can optionally be specified usingms; millisecond values cannot be specified usingh,m, ors.) Integer values can be suffixed withK,M, orG.The names of the options that can be set using this variable are shown in the table that follows. The table also provides brief descriptions of the options, their default values, and (where applicable) their minimum and maximum values.
Table 22.219 ndb_index_stat_option options and values
Name Description Default/Units Minimum/Maximum loop_enable1000 ms 0/4G loop_idleTime to sleep when idle 1000 ms 0/4G loop_busyTime to sleep when more work is waiting 100 ms 0/4G update_batch1 0/4G read_batch4 1/4G idle_batch32 1/4G check_batch8 1/4G check_delayHow often to check for new statistics 10 m 1/4G delete_batch8 0/4G clean_delay1 m 0/4G error_batch4 1/4G error_delay1 m 1/4G evict_batch8 1/4G evict_delayClean LRU cache, from read time 1 m 0/4G cache_limitMaximum amount of memory in bytes used for cached index statistics by this mysqld; clean up the cache when this is exceeded. 32 M 0/4G cache_lowpct90 0/100 zero_totalSetting this to 1 resets all accumulating counters in ndb_index_stat_statusto 0. This option value is also reset to 0 when this is done.0 0/1 -
Property Value System Variable ndb_join_pushdownScope Global, Session Dynamic Yes SET_VARHint AppliesNo Type Boolean Default Value ONThis variable controls whether joins on
NDBtables are pushed down to the NDB kernel (data nodes). Previously, a join was handled using multiple accesses ofNDBby the SQL node; however, whenndb_join_pushdownis enabled, a pushable join is sent in its entirety to the data nodes, where it can be distributed among the data nodes and executed in parallel on multiple copies of the data, with a single, merged result being returned to mysqld. This can reduce greatly the number of round trips between an SQL node and the data nodes required to handle such a join.By default,
ndb_join_pushdownis enabled.Conditions for NDB pushdown joins. In order for a join to be pushable, it must meet the following conditions:
Only columns can be compared, and all columns to be joined must use exactly the same data type. This means that (for example) a join on an
INTcolumn and aBIGINTcolumn also cannot be pushed down.Previously, expressions such as
t1.a = t2.a +could not be pushed down. This restriction is lifted in NDB 8.0.18 and later. The result of any operations on any column to be compared must yield the same type as the column itself.constantAlso beginning with NDB 8.0.18, expressions comparing columns from the same table can be pushed down. The columns (or the result of any operations on those columns) must be of exactly the same type, including the same signedness, length, character set and collation, precision, and scale, where these are applicable.
Explicit locking is not supported; however, the
NDBstorage engine's characteristic implicit row-based locking is enforced.This means that a join using
FOR UPDATEcannot be pushed down.In order for a join to be pushed down, child tables in the join must be accessed using one of the
ref,eq_ref, orconstaccess methods, or some combination of these methods.Outer joined child tables can only be pushed using
eq_ref.If the root of the pushed join is an
eq_reforconst, only child tables joined byeq_refcan be appended. (A table joined byrefis likely to become the root of another pushed join.)If the query optimizer decides on
Using join cachefor a candidate child table, that table cannot be pushed as a child. However, it may be the root of another set of pushed tables.Joins referencing tables explicitly partitioned by
[LINEAR] HASH,LIST, orRANGEcurrently cannot be pushed down.
You can see whether a given join can be pushed down by checking it with
EXPLAIN; when the join can be pushed down, you can see references to thepushed joinin theExtracolumn of the output, as shown in this example:mysql>
EXPLAIN->SELECT e.first_name, e.last_name, t.title, d.dept_name->FROM employees e->JOIN dept_emp de ON e.emp_no=de.emp_no->JOIN departments d ON d.dept_no=de.dept_no->JOIN titles t ON e.emp_no=t.emp_no\G*************************** 1. row *************************** id: 1 select_type: SIMPLE table: d type: ALL possible_keys: PRIMARY key: NULL key_len: NULL ref: NULL rows: 9 Extra: Parent of 4 pushed join@1 *************************** 2. row *************************** id: 1 select_type: SIMPLE table: de type: ref possible_keys: PRIMARY,emp_no,dept_no key: dept_no key_len: 4 ref: employees.d.dept_no rows: 5305 Extra: Child of 'd' in pushed join@1 *************************** 3. row *************************** id: 1 select_type: SIMPLE table: e type: eq_ref possible_keys: PRIMARY key: PRIMARY key_len: 4 ref: employees.de.emp_no rows: 1 Extra: Child of 'de' in pushed join@1 *************************** 4. row *************************** id: 1 select_type: SIMPLE table: t type: ref possible_keys: PRIMARY,emp_no key: emp_no key_len: 4 ref: employees.de.emp_no rows: 19 Extra: Child of 'e' in pushed join@1 4 rows in set (0.00 sec)NoteIf inner joined child tables are joined by
ref, and the result is ordered or grouped by a sorted index, this index cannot provide sorted rows, which forces writing to a sorted tempfile.Two additional sources of information about pushed join performance are available:
The status variables
Ndb_pushed_queries_defined,Ndb_pushed_queries_dropped,Ndb_pushed_queries_executed, andNdb_pushed_reads.The counters in the
ndbinfo.counterstable that belong to theDBSPJkernel block. See Section 22.5.14.10, “The ndbinfo counters Table”, for information about these counters. See also The DBSPJ Block, in the NDB Cluster API Developer Guide.
-
Property Value Command-Line Format --ndb-log-apply-status[={OFF|ON}]System Variable ndb_log_apply_statusScope Global Dynamic No SET_VARHint AppliesNo Type Boolean Default Value OFFA read-only variable which shows whether the server was started with the
--ndb-log-apply-statusoption. -
Property Value Command-Line Format --ndb-log-bin[={OFF|ON}]System Variable ndb_log_binScope Global, Session Dynamic Yes SET_VARHint AppliesNo Type Boolean Default Value (≥ 8.0.16-ndb-8.0.16) OFFDefault Value (≤ 8.0.15-ndb-8.0.15) ONCauses updates to
NDBtables to be written to the binary log. The setting for this variable has no effect if binary logging is not already enabled on the server usinglog_bin. In NDB 8.0.16 and later,ndb_log_bindefaults to 0 (FALSE). -
Property Value Command-Line Format --ndb-log-binlog-index[={OFF|ON}]System Variable ndb_log_binlog_indexScope Global Dynamic Yes SET_VARHint AppliesNo Type Boolean Default Value ONCauses a mapping of epochs to positions in the binary log to be inserted into the
ndb_binlog_indextable. Setting this variable has no effect if binary logging is not already enabled for the server usinglog_bin. (In addition,ndb_log_binmust not be disabled.)ndb_log_binlog_indexdefaults to1(ON); normally, there is never any need to change this value in a production environment. -
Property Value Command-Line Format --ndb-log-empty-epochs[={OFF|ON}]System Variable ndb_log_empty_epochsScope Global Dynamic Yes SET_VARHint AppliesNo Type Boolean Default Value OFFWhen this variable is set to 0, epoch transactions with no changes are not written to the binary log, although a row is still written even for an empty epoch in
ndb_binlog_index. -
Property Value Command-Line Format --ndb-log-empty-update[={OFF|ON}]System Variable ndb_log_empty_updateScope Global Dynamic Yes SET_VARHint AppliesNo Type Boolean Default Value OFFWhen this variable is set to
ON(1), update transactions with no changes are written to the binary log, even whenlog_slave_updatesis enabled. -
Property Value Command-Line Format --ndb-log-exclusive-reads[={OFF|ON}]System Variable ndb_log_exclusive_readsScope Global, Session Dynamic Yes SET_VARHint AppliesNo Type Boolean Default Value 0This variable determines whether primary key reads are logged with exclusive locks, which allows for NDB Cluster Replication conflict detection and resolution based on read conflicts. To enable these locks, set the value of
ndb_log_exclusive_readsto 1. 0, which disables such locking, is the default.For more information, see Read conflict detection and resolution.
-
Property Value Command-Line Format --ndb-log-orig[={OFF|ON}]System Variable ndb_log_origScope Global Dynamic No SET_VARHint AppliesNo Type Boolean Default Value OFFShows whether the originating server ID and epoch are logged in the
ndb_binlog_indextable. Set using the--ndb-log-origserver option. -
Property Value System Variable ndb_log_transaction_idScope Global Dynamic No SET_VARHint AppliesNo Type Boolean Default Value OFFThis read-only, Boolean system variable shows whether a slave mysqld writes NDB transaction IDs in the binary log (required to use “active-active” NDB Cluster Replication with
NDB$EPOCH_TRANS()conflict detection). To change the setting, use the--ndb-log-transaction-idoption.ndb_log_transaction_idis not supported in mainline MySQL Server 8.0.For more information, see Section 22.6.11, “NDB Cluster Replication Conflict Resolution”.
-
Property Value Command-Line Format --ndb-metadata-check[={OFF|ON}]Introduced 8.0.16-ndb-8.0.16 System Variable ndb_metadata_checkScope Global Dynamic Yes SET_VARHint AppliesNo Type Boolean Default Value ONBeginning with NDB 8.0.16,
NDBuses a background thread to check for metadata changes eachndb_metadata_check_intervalseconds as compared with the MySQL data dictionary. This metadata change detection thread can be disabled by settingndb_metadata_checktoOFF. The thread is enabled by default. -
Property Value Command-Line Format --ndb-metadata-check-interval=#Introduced 8.0.16-ndb-8.0.16 System Variable ndb_metadata_check_intervalScope Global Dynamic Yes SET_VARHint AppliesNo Type Integer Default Value 60Minimum Value 0Maximum Value 31536000In NDB 8.0.16 and later, NDB runs a metadata change detection thread in the background to determine when the NDB dictionary has changed with respect to the MySQL data dictionary. By default,the interval between such checks is 60 seconds; this can be adjusted by setting the value of
ndb_metadata_check_interval. To enable or disable the thread, usendb_metadata_check. -
Property Value Introduced 8.0.19-ndb-8.0.19 System Variable ndb_metadata_syncScope Global Dynamic Yes SET_VARHint AppliesNo Type Boolean Default Value falseSetting this variable causes the change monitor thread to override any values set for
ndb_metadata_checkorndb_metadata_check_interval, and to enter a period of continuous change detection. When the thread ascertains that there are no more changes to be detected, it stalls until the binary logging thread has finished synchronization of all detected objects.ndb_metadata_syncis then set tofalse, and the change monitor thread reverts to the behavior determined by the settings forndb_metadata_checkandndb_metadata_check_interval. -
Property Value Command-Line Format --ndb-optimized-node-selection=#System Variable ndb_optimized_node_selectionScope Global Dynamic No SET_VARHint AppliesNo Type Integer Default Value 3Minimum Value 0Maximum Value 3There are two forms of optimized node selection, described here:
The SQL node uses promixity to determine the transaction coordinator; that is, the “closest” data node to the SQL node is chosen as the transaction coordinator. For this purpose, a data node having a shared memory connection with the SQL node is considered to be “closest” to the SQL node; the next closest (in order of decreasing proximity) are: TCP connection to
localhost, followed by TCP connection from a host other thanlocalhost.The SQL thread uses distribution awareness to select the data node. That is, the data node housing the cluster partition accessed by the first statement of a given transaction is used as the transaction coordinator for the entire transaction. (This is effective only if the first statement of the transaction accesses no more than one cluster partition.)
This option takes one of the integer values
0,1,2, or3.3is the default. These values affect node selection as follows:0: Node selection is not optimized. Each data node is employed as the transaction coordinator 8 times before the SQL thread proceeds to the next data node.1: Proximity to the SQL node is used to determine the transaction coordinator.2: Distribution awareness is used to select the transaction coordinator. However, if the first statement of the transaction accesses more than one cluster partition, the SQL node reverts to the round-robin behavior seen when this option is set to0.3: If distribution awareness can be employed to determine the transaction coordinator, then it is used; otherwise proximity is used to select the transaction coordinator. (This is the default behavior.)
Proximity is determined as follows:
Start with the value set for the
Groupparameter (default 55).For an API node sharing the same host with other API nodes, decrement the value by 1. Assuming the default value for
Group, the effective value for data nodes on same host as the API node is 54, and for remote data nodes 55.Setting
ndb_data_node_neighbourfurther decreases the effectiveGroupvalue by 50, causing this node to be regarded as the nearest node. This is needed only when all data nodes are on hosts other than that hosts the API node and it is desirable to dedicate one of them to the API node. In normal cases, the default adjustment described previously is sufficient.
Frequent changes in
ndb_data_node_neighbourare not advisable, since this changes the state of the cluster connection and thus may disrupt the selection algorithm for new transactions from each thread until it stablilizes. -
Property Value Command-Line Format --ndb-read-backup[={OFF|ON}]System Variable ndb_read_backupScope Global Dynamic Yes SET_VARHint AppliesNo Type Boolean Default Value (≥ 8.0.19-ndb-8.0.19) ONDefault Value (≤ 8.0.18-ndb-8.0.18) OFFEnable read from any replica for any
NDBtable subsequently created; doing so greatly improves the table read performance at a relatively small cost to writes.To enable or disable read from any replica for an individual table, you can set the
NDB_TABLEoptionREAD_BACKUPfor the table accordingly, in aCREATE TABLEorALTER TABLEstatement; see Section 13.1.20.10, “Setting NDB_TABLE Options”, for more information. ndb_recv_thread_activation_thresholdProperty Value Command-Line Format --ndb-recv-thread-activation-threshold=#System Variable ndb_recv_thread_activation_thresholdScope Global Dynamic Yes SET_VARHint AppliesNo Type Integer Default Value 8Minimum Value 0 (MIN_ACTIVATION_THRESHOLD)Maximum Value 16 (MAX_ACTIVATION_THRESHOLD)When this number of concurrently active threads is reached, the receive thread takes over polling of the cluster connection.
This variable is global in scope. It can also be set at startup.
-
Property Value Command-Line Format --ndb-recv-thread-cpu-mask=maskSystem Variable ndb_recv_thread_cpu_maskScope Global Dynamic Yes SET_VARHint AppliesNo Type Bitmap Default Value [empty]CPU mask for locking receiver threads to specific CPUs. This is specified as a hexadecimal bitmask. For example,
0x33means that one CPU is used per receiver thread. An empty string is the default; settingndb_recv_thread_cpu_maskto this value removes any receiver thread locks previously set.This variable is global in scope. It can also be set at startup.
ndb_report_thresh_binlog_epoch_slipProperty Value Command-Line Format --ndb-report-thresh-binlog-epoch-slip=#System Variable ndb_report_thresh_binlog_epoch_slipScope Global Dynamic Yes SET_VARHint AppliesNo Type Integer Default Value 10Minimum Value 0Maximum Value 256This represents the threshold for the number of epochs completely buffered in the event buffer, but not yet consumed by the binlog injector thread. When this degree of slippage (lag) is exceeded, an event buffer status message is reported, with
BUFFERED_EPOCHS_OVER_THRESHOLDsupplied as the reason (see Section 22.5.2.3, “Event Buffer Reporting in the Cluster Log”). Slip is increased when an epoch is received from data nodes and buffered completely in the event buffer; it is decreased when an epoch is consumed by the binlog injector thread, it is reduced. Empty epochs are buffered and queued, and so included in this calculation only when this is enabled using theNdb::setEventBufferQueueEmptyEpoch()method from the NDB API.ndb_report_thresh_binlog_mem_usageProperty Value Command-Line Format --ndb-report-thresh-binlog-mem-usage=#System Variable ndb_report_thresh_binlog_mem_usageScope Global Dynamic Yes SET_VARHint AppliesNo Type Integer Default Value 10Minimum Value 0Maximum Value 10This is a threshold on the percentage of free memory remaining before reporting binary log status. For example, a value of
10(the default) means that if the amount of available memory for receiving binary log data from the data nodes falls below 10%, a status message is sent to the cluster log.-
Property Value System Variable ndb_row_checksumScope Global, Session Dynamic Yes SET_VARHint AppliesNo Type Integer Default Value 1Minimum Value 0Maximum Value 1Traditionally,
NDBhas created tables with row checksums, which checks for hardware issues at the expense of performance. Settingndb_row_checksumto 0 means that row checksums are not used for new or altered tables, which has a significant impact on performance for all types of queries. This variable is set to 1 by default, to provide backward-compatible behavior. ndb_schema_dist_lock_wait_timeoutProperty Value Command-Line Format --ndb-schema-dist-lock-wait-timeout=valueIntroduced 8.0.18-ndb-8.0.18 System Variable ndb_schema_dist_lock_wait_timeoutScope Global Dynamic Yes SET_VARHint AppliesNo Type Integer Default Value 30Minimum Value 0Maximum Value 1200Number of seconds to wait during schema distribution for the metadata lock taken on each SQL node in order to change its local data dictionary to reflect the DDL statement change. After this time has elapsed, a warning is returned to the effect that a given SQL node's data dictionary was not updated with the change. This avoids having the binary logging thread wait an excessive length of time while handling schema operations.
-
Property Value Command-Line Format --ndb-schema-dist-timeout=valueIntroduced 8.0.16-ndb-8.0.16 System Variable ndb_schema_dist_timeoutScope Global Dynamic No SET_VARHint AppliesNo Type Integer Default Value 120Minimum Value 5Maximum Value 1200Number of seconds to wait before detecting a timeout during schema distribution. This can indicate that other SQL nodes are experiencing excessive activity, or that they are somehow being prevented from acquiring necessary resources at this time.
ndb_schema_dist_upgrade_allowedProperty Value Command-Line Format --ndb-schema-dist-upgrade-allowed=valueIntroduced 8.0.17-ndb-8.0.17 System Variable ndb_schema_dist_upgrade_allowedScope Global Dynamic No SET_VARHint AppliesNo Type Boolean Default Value trueAllow upgrading of the schema distribution table when connecting to
NDB. When true (the default), this change is deferred until all SQL nodes have been upgraded to the same version of the NDB Cluster software.NoteThe performance of the schema distribution may be somewhat degraded until the upgrade has been performed.
ndb_show_foreign_key_mock_tablesProperty Value Command-Line Format --ndb-show-foreign-key-mock-tables[={OFF|ON}]System Variable ndb_show_foreign_key_mock_tablesScope Global Dynamic Yes SET_VARHint AppliesNo Type Boolean Default Value OFFShow the mock tables used by
NDBto supportforeign_key_checks=0. When this is enabled, extra warnings are shown when creating and dropping the tables. The real (internal) name of the table can be seen in the output ofSHOW CREATE TABLE.-
Property Value Command-Line Format --ndb-slave-conflict-role=valueSystem Variable ndb_slave_conflict_roleScope Global Dynamic Yes SET_VARHint AppliesNo Type Enumeration Default Value NONEValid Values NONEPRIMARYSECONDARYPASSDetermine the role of this SQL node (and NDB Cluster) in a circular (“active-active”) replication setup.
ndb_slave_conflict_rolecan take any one of the valuesPRIMARY,SECONDARY,PASS, orNULL(the default). The slave SQL thread must be stopped before you can changendb_slave_conflict_role. In addition, it is not possible to change directly betweenPASSand either ofPRIMARYorSECONDARYdirectly; in such cases, you must ensure that the SQL thread is stopped, then executeSET @@GLOBAL.ndb_slave_conflict_role = 'NONE'first.For more information, see Section 22.6.11, “NDB Cluster Replication Conflict Resolution”.
-
Property Value System Variable ndb_table_no_loggingScope Session Dynamic Yes SET_VARHint AppliesNo Type Boolean Default Value OFFWhen this variable is set to
ONor1, it causesNDBtables not to be checkpointed to disk. More specifically, this setting applies to tables which are created or altered usingENGINE NDBwhenndb_table_no_loggingis enabled, and continues to apply for the lifetime of the table, even ifndb_table_no_loggingis later changed. Suppose thatA,B,C, andDare tables that we create (and perhaps also alter), and that we also change the setting forndb_table_no_loggingas shown here:SET @@ndb_table_no_logging = 1; CREATE TABLE A ... ENGINE NDB; CREATE TABLE B ... ENGINE MYISAM; CREATE TABLE C ... ENGINE MYISAM; ALTER TABLE B ENGINE NDB; SET @@ndb_table_no_logging = 0; CREATE TABLE D ... ENGINE NDB; ALTER TABLE C ENGINE NDB; SET @@ndb_table_no_logging = 1;
After the previous sequence of events, tables
AandBare not checkpointed;Awas created withENGINE NDBand B was altered to useNDB, both whilendb_table_no_loggingwas enabled. However, tablesCandDare logged;Cwas altered to useNDBandDwas created usingENGINE NDB, both whilendb_table_no_loggingwas disabled. Settingndb_table_no_loggingback to1orONdoes not cause tableCorDto be checkpointed.Notendb_table_no_logginghas no effect on the creation ofNDBtable schema files; to suppress these, usendb_table_temporaryinstead. -
Property Value System Variable ndb_table_temporaryScope Session Dynamic Yes SET_VARHint AppliesNo Type Boolean Default Value OFFWhen set to
ONor1, this variable causesNDBtables not to be written to disk: This means that no table schema files are created, and that the tables are not logged.NoteSetting this variable currently has no effect. This is a known issue; see Bug #34036.
-
Property Value System Variable ndb_use_copying_alter_tableScope Global, Session Dynamic No SET_VARHint AppliesNo Forces
NDBto use copying of tables in the event of problems with onlineALTER TABLEoperations. The default value isOFF. -
Property Value System Variable ndb_use_exact_countScope Global, Session Dynamic Yes SET_VARHint AppliesNo Type Boolean Default Value OFFForces
NDBto use a count of records duringSELECT COUNT(*)query planning to speed up this type of query. The default value isOFF, which allows for faster queries overall. -
Property Value Command-Line Format --ndb-use-transactions[={OFF|ON}]System Variable ndb_use_transactionsScope Global, Session Dynamic Yes SET_VARHint AppliesNo Type Boolean Default Value ONYou can disable
NDBtransaction support by setting this variable's values toOFF(not recommended). The default isON. -
Property Value System Variable ndb_versionScope Global Dynamic No SET_VARHint AppliesNo Type String Default Value NDBengine version, as a composite integer. -
Property Value System Variable ndb_version_stringScope Global Dynamic No SET_VARHint AppliesNo Type String Default Value NDBengine version inndb-format.x.y.z -
Property Value Command-Line Format --server-id-bits=#System Variable server_id_bitsScope Global Dynamic No SET_VARHint AppliesNo Type Integer Default Value 32Minimum Value 7Maximum Value 32This variable indicates the number of least significant bits within the 32-bit
server_idwhich actually identify the server. Indicating that the server is actually identified by fewer than 32 bits makes it possible for some of the remaining bits to be used for other purposes, such as storing user data generated by applications using the NDB API's Event API within theAnyValueof anOperationOptionsstructure (NDB Cluster uses theAnyValueto store the server ID).When extracting the effective server ID from
server_idfor purposes such as detection of replication loops, the server ignores the remaining bits. Theserver_id_bitsvariable is used to mask out any irrelevant bits ofserver_idin the IO and SQL threads when deciding whether an event should be ignored based on the server ID.This data can be read from the binary log by mysqlbinlog, provided that it is run with its own
server_id_bitsvariable set to 32 (the default).If the value of
server_idgreater than or equal to 2 to the power ofserver_id_bits; otherwise, mysqld refuses to start.This system variable is supported only by NDB Cluster. It is not supported in the standard MySQL 8.0 Server.
-
Property Value Command-Line Format --slave-allow-batching[={OFF|ON}]System Variable slave_allow_batchingScope Global Dynamic Yes SET_VARHint AppliesNo Type Boolean Default Value OFFWhether or not batched updates are enabled on NDB Cluster replication slaves.
Setting this variable has an effect only when using replication with the
NDBstorage engine; in MySQL Server 8.0, it is present but does nothing. For more information, see Section 22.6.6, “Starting NDB Cluster Replication (Single Replication Channel)”. -
Property Value System Variable transaction_allow_batchingScope Session Dynamic Yes SET_VARHint AppliesNo Type Boolean Default Value OFFWhen set to
1orON, this variable enables batching of statements within the same transaction. To use this variable,autocommitmust first be disabled by setting it to0orOFF; otherwise, settingtransaction_allow_batchinghas no effect.It is safe to use this variable with transactions that performs writes only, as having it enabled can lead to reads from the “before” image. You should ensure that any pending transactions are committed (using an explicit
COMMITif desired) before issuing aSELECT.Importanttransaction_allow_batchingshould not be used whenever there is the possibility that the effects of a given statement depend on the outcome of a previous statement within the same transaction.This variable is currently supported for NDB Cluster only.
The system variables in the following list all relate to the
ndbinfo information database.
-
Property Value System Variable ndbinfo_databaseScope Global Dynamic No SET_VARHint AppliesNo Type String Default Value ndbinfoShows the name used for the
NDBinformation database; the default isndbinfo. This is a read-only variable whose value is determined at compile time; you can set it by starting the server using--ndbinfo-database=, which sets the value shown for this variable but does not actually change the name used for the NDB information database.name -
Property Value Command-Line Format --ndbinfo-max-bytes=#System Variable ndbinfo_max_bytesScope Global, Session Dynamic Yes SET_VARHint AppliesNo Type Integer Default Value 0Used in testing and debugging only.
-
Property Value Command-Line Format --ndbinfo-max-rows=#System Variable ndbinfo_max_rowsScope Global, Session Dynamic Yes SET_VARHint AppliesNo Type Integer Default Value 10Used in testing and debugging only.
-
Property Value System Variable ndbinfo_offlineScope Global Dynamic Yes SET_VARHint AppliesNo Type Boolean Default Value OFFPlace the
ndbinfodatabase into offline mode, in which tables and views can be opened even when they do not actually exist, or when they exist but have different definitions inNDB. No rows are returned from such tables (or views). -
Property Value Command-Line Format --ndbinfo-show-hidden[={OFF|ON}]System Variable ndbinfo_show_hiddenScope Global, Session Dynamic Yes SET_VARHint AppliesNo Type Boolean Default Value OFFWhether or not the
ndbinfodatabase's underlying internal tables are shown in themysqlclient. The default isOFF. -
Property Value Command-Line Format --ndbinfo-table-prefix=nameSystem Variable ndbinfo_table_prefixScope Global, Session Dynamic Yes SET_VARHint AppliesNo Type String Default Value ndb$The prefix used in naming the ndbinfo database's base tables (normally hidden, unless exposed by setting
ndbinfo_show_hidden). This is a read-only variable whose default value isndb$. You can start the server with the--ndbinfo-table-prefixoption, but this merely sets the variable and does not change the actual prefix used to name the hidden base tables; the prefix itself is determined at compile time. -
Property Value System Variable ndbinfo_versionScope Global Dynamic No SET_VARHint AppliesNo Type String Default Value Shows the version of the
ndbinfoengine in use; read-only.
This section provides detailed information about MySQL server
status variables that relate to NDB Cluster and the
NDB storage engine. For status
variables not specific to NDB Cluster, and for general information
on using status variables, see
Section 5.1.10, “Server Status Variables”.
The MySQL server can ask the
NDBCLUSTERstorage engine if it knows about a table with a given name. This is called discovery.Handler_discoverindicates the number of times that tables have been discovered using this mechanism.Ndb_api_bytes_sent_count_sessionAmount of data (in bytes) sent to the data nodes in this client session.
Although this variable can be read using either
SHOW GLOBAL STATUSorSHOW SESSION STATUS, it relates to the current session only, and is not affected by any other clients of this mysqld.For more information, see Section 22.5.13, “NDB API Statistics Counters and Variables”.
Ndb_api_bytes_sent_count_slaveAmount of data (in bytes) sent to the data nodes by this slave.
Although this variable can be read using either
SHOW GLOBAL STATUSorSHOW SESSION STATUS, it is effectively global in scope. If this MySQL server does not act as a replication slave, or does not use NDB tables, this value is always 0.For more information, see Section 22.5.13, “NDB API Statistics Counters and Variables”.
Amount of data (in bytes) sent to the data nodes by this MySQL Server (SQL node).
Although this variable can be read using either
SHOW GLOBAL STATUSorSHOW SESSION STATUS, it is effectively global in scope.For more information, see Section 22.5.13, “NDB API Statistics Counters and Variables”.
Ndb_api_bytes_received_count_sessionAmount of data (in bytes) received from the data nodes in this client session.
Although this variable can be read using either
SHOW GLOBAL STATUSorSHOW SESSION STATUS, it relates to the current session only, and is not affected by any other clients of this mysqld.For more information, see Section 22.5.13, “NDB API Statistics Counters and Variables”.
Ndb_api_bytes_received_count_slaveAmount of data (in bytes) received from the data nodes by this slave.
Although this variable can be read using either
SHOW GLOBAL STATUSorSHOW SESSION STATUS, it is effectively global in scope. If this MySQL server does not act as a replication slave, or does not use NDB tables, this value is always 0.For more information, see Section 22.5.13, “NDB API Statistics Counters and Variables”.
Amount of data (in bytes) received from the data nodes by this MySQL Server (SQL node).
Although this variable can be read using either
SHOW GLOBAL STATUSorSHOW SESSION STATUS, it is effectively global in scope.For more information, see Section 22.5.13, “NDB API Statistics Counters and Variables”.
Ndb_api_event_data_count_injectorThe number of row change events received by the NDB binlog injector thread.
Although this variable can be read using either
SHOW GLOBAL STATUSorSHOW SESSION STATUS, it is effectively global in scope.For more information, see Section 22.5.13, “NDB API Statistics Counters and Variables”.
The number of row change events received by this MySQL Server (SQL node).
Although this variable can be read using either
SHOW GLOBAL STATUSorSHOW SESSION STATUS, it is effectively global in scope.For more information, see Section 22.5.13, “NDB API Statistics Counters and Variables”.
Ndb_api_event_nondata_count_injectorThe number of events received, other than row change events, by the NDB binary log injector thread.
Although this variable can be read using either
SHOW GLOBAL STATUSorSHOW SESSION STATUS, it is effectively global in scope.For more information, see Section 22.5.13, “NDB API Statistics Counters and Variables”.
The number of events received, other than row change events, by this MySQL Server (SQL node).
Although this variable can be read using either
SHOW GLOBAL STATUSorSHOW SESSION STATUS, it is effectively global in scope.For more information, see Section 22.5.13, “NDB API Statistics Counters and Variables”.
Ndb_api_event_bytes_count_injectorThe number of bytes of events received by the NDB binlog injector thread.
Although this variable can be read using either
SHOW GLOBAL STATUSorSHOW SESSION STATUS, it is effectively global in scope.For more information, see Section 22.5.13, “NDB API Statistics Counters and Variables”.
The number of bytes of events received by this MySQL Server (SQL node).
Although this variable can be read using either
SHOW GLOBAL STATUSorSHOW SESSION STATUS, it is effectively global in scope.For more information, see Section 22.5.13, “NDB API Statistics Counters and Variables”.
The number of operations in this client session based on or using primary keys. This includes operations on blob tables, implicit unlock operations, and auto-increment operations, as well as user-visible primary key operations.
Although this variable can be read using either
SHOW GLOBAL STATUSorSHOW SESSION STATUS, it relates to the current session only, and is not affected by any other clients of this mysqld.For more information, see Section 22.5.13, “NDB API Statistics Counters and Variables”.
The number of operations by this slave based on or using primary keys. This includes operations on blob tables, implicit unlock operations, and auto-increment operations, as well as user-visible primary key operations.
Although this variable can be read using either
SHOW GLOBAL STATUSorSHOW SESSION STATUS, it is effectively global in scope. If this MySQL server does not act as a replication slave, or does not use NDB tables, this value is always 0.For more information, see Section 22.5.13, “NDB API Statistics Counters and Variables”.
The number of operations by this MySQL Server (SQL node) based on or using primary keys. This includes operations on blob tables, implicit unlock operations, and auto-increment operations, as well as user-visible primary key operations.
Although this variable can be read using either
SHOW GLOBAL STATUSorSHOW SESSION STATUS, it is effectively global in scope.For more information, see Section 22.5.13, “NDB API Statistics Counters and Variables”.
Ndb_api_pruned_scan_count_sessionThe number of scans in this client session that have been pruned to a single partition.
Although this variable can be read using either
SHOW GLOBAL STATUSorSHOW SESSION STATUS, it relates to the current session only, and is not affected by any other clients of this mysqld.For more information, see Section 22.5.13, “NDB API Statistics Counters and Variables”.
Ndb_api_pruned_scan_count_slaveThe number of scans by this slave that have been pruned to a single partition.
Although this variable can be read using either
SHOW GLOBAL STATUSorSHOW SESSION STATUS, it is effectively global in scope. If this MySQL server does not act as a replication slave, or does not use NDB tables, this value is always 0.For more information, see Section 22.5.13, “NDB API Statistics Counters and Variables”.
The number of scans by this MySQL Server (SQL node) that have been pruned to a single partition.
Although this variable can be read using either
SHOW GLOBAL STATUSorSHOW SESSION STATUS, it is effectively global in scope.For more information, see Section 22.5.13, “NDB API Statistics Counters and Variables”.
Ndb_api_range_scan_count_sessionThe number of range scans that have been started in this client session.
Although this variable can be read using either
SHOW GLOBAL STATUSorSHOW SESSION STATUS, it relates to the current session only, and is not affected by any other clients of this mysqld.For more information, see Section 22.5.13, “NDB API Statistics Counters and Variables”.
Ndb_api_range_scan_count_slaveThe number of range scans that have been started by this slave.
Although this variable can be read using either
SHOW GLOBAL STATUSorSHOW SESSION STATUS, it is effectively global in scope. If this MySQL server does not act as a replication slave, or does not use NDB tables, this value is always 0.For more information, see Section 22.5.13, “NDB API Statistics Counters and Variables”.
The number of range scans that have been started by this MySQL Server (SQL node).
Although this variable can be read using either
SHOW GLOBAL STATUSorSHOW SESSION STATUS, it is effectively global in scope.For more information, see Section 22.5.13, “NDB API Statistics Counters and Variables”.
Ndb_api_read_row_count_sessionThe total number of rows that have been read in this client session. This includes all rows read by any primary key, unique key, or scan operation made in this client session.
Although this variable can be read using either
SHOW GLOBAL STATUSorSHOW SESSION STATUS, it relates to the current session only, and is not affected by any other clients of this mysqld.For more information, see Section 22.5.13, “NDB API Statistics Counters and Variables”.
The total number of rows that have been read by this slave. This includes all rows read by any primary key, unique key, or scan operation made by this slave.
Although this variable can be read using either
SHOW GLOBAL STATUSorSHOW SESSION STATUS, it is effectively global in scope. If this MySQL server does not act as a replication slave, or does not use NDB tables, this value is always 0.For more information, see Section 22.5.13, “NDB API Statistics Counters and Variables”.
The total number of rows that have been read by this MySQL Server (SQL node). This includes all rows read by any primary key, unique key, or scan operation made by this MySQL Server (SQL node).
You should be aware that this value may not be completely accurate with regard to rows read by
SELECTCOUNT(*)queries, due to the fact that, in this case, the MySQL server actually reads pseudo-rows in the form[and sums the rows per fragment for all fragments in the table to derive an estimated count for all rows.table fragment ID]:[number of rows in fragment]Ndb_api_read_row_countuses this estimate and not the actual number of rows in the table.Although this variable can be read using either
SHOW GLOBAL STATUSorSHOW SESSION STATUS, it is effectively global in scope.For more information, see Section 22.5.13, “NDB API Statistics Counters and Variables”.
Ndb_api_scan_batch_count_sessionThe number of batches of rows received in this client session. 1 batch is defined as 1 set of scan results from a single fragment.
Although this variable can be read using either
SHOW GLOBAL STATUSorSHOW SESSION STATUS, it relates to the current session only, and is not affected by any other clients of this mysqld.For more information, see Section 22.5.13, “NDB API Statistics Counters and Variables”.
Ndb_api_scan_batch_count_slaveThe number of batches of rows received by this slave. 1 batch is defined as 1 set of scan results from a single fragment.
Although this variable can be read using either
SHOW GLOBAL STATUSorSHOW SESSION STATUS, it is effectively global in scope. If this MySQL server does not act as a replication slave, or does not use NDB tables, this value is always 0.For more information, see Section 22.5.13, “NDB API Statistics Counters and Variables”.
The number of batches of rows received by this MySQL Server (SQL node). 1 batch is defined as 1 set of scan results from a single fragment.
Although this variable can be read using either
SHOW GLOBAL STATUSorSHOW SESSION STATUS, it is effectively global in scope.For more information, see Section 22.5.13, “NDB API Statistics Counters and Variables”.
Ndb_api_table_scan_count_sessionThe number of table scans that have been started in this client session, including scans of internal tables,.
Although this variable can be read using either
SHOW GLOBAL STATUSorSHOW SESSION STATUS, it relates to the current session only, and is not affected by any other clients of this mysqld.For more information, see Section 22.5.13, “NDB API Statistics Counters and Variables”.
Ndb_api_table_scan_count_slaveThe number of table scans that have been started by this slave, including scans of internal tables,.
Although this variable can be read using either
SHOW GLOBAL STATUSorSHOW SESSION STATUS, it is effectively global in scope. If this MySQL server does not act as a replication slave, or does not use NDB tables, this value is always 0.For more information, see Section 22.5.13, “NDB API Statistics Counters and Variables”.
The number of table scans that have been started by this MySQL Server (SQL node), including scans of internal tables,.
Although this variable can be read using either
SHOW GLOBAL STATUSorSHOW SESSION STATUS, it is effectively global in scope.For more information, see Section 22.5.13, “NDB API Statistics Counters and Variables”.
Ndb_api_trans_abort_count_sessionThe number of transactions aborted in this client session.
Although this variable can be read using either
SHOW GLOBAL STATUSorSHOW SESSION STATUS, it relates to the current session only, and is not affected by any other clients of this mysqld.For more information, see Section 22.5.13, “NDB API Statistics Counters and Variables”.
Ndb_api_trans_abort_count_slaveThe number of transactions aborted by this slave.
Although this variable can be read using either
SHOW GLOBAL STATUSorSHOW SESSION STATUS, it is effectively global in scope. If this MySQL server does not act as a replication slave, or does not use NDB tables, this value is always 0.For more information, see Section 22.5.13, “NDB API Statistics Counters and Variables”.
The number of transactions aborted by this MySQL Server (SQL node).
Although this variable can be read using either
SHOW GLOBAL STATUSorSHOW SESSION STATUS, it is effectively global in scope.For more information, see Section 22.5.13, “NDB API Statistics Counters and Variables”.
Ndb_api_trans_close_count_sessionThe number of transactions closed in this client session. This value may be greater than the sum of
Ndb_api_trans_commit_count_sessionandNdb_api_trans_abort_count_session, since some transactions may have been rolled back.Although this variable can be read using either
SHOW GLOBAL STATUSorSHOW SESSION STATUS, it relates to the current session only, and is not affected by any other clients of this mysqld.For more information, see Section 22.5.13, “NDB API Statistics Counters and Variables”.
Ndb_api_trans_close_count_slaveThe number of transactions closed by this slave. This value may be greater than the sum of
Ndb_api_trans_commit_count_slaveandNdb_api_trans_abort_count_slave, since some transactions may have been rolled back.Although this variable can be read using either
SHOW GLOBAL STATUSorSHOW SESSION STATUS, it is effectively global in scope. If this MySQL server does not act as a replication slave, or does not use NDB tables, this value is always 0.For more information, see Section 22.5.13, “NDB API Statistics Counters and Variables”.
The number of transactions closed by this MySQL Server (SQL node). This value may be greater than the sum of
Ndb_api_trans_commit_countandNdb_api_trans_abort_count, since some transactions may have been rolled back.Although this variable can be read using either
SHOW GLOBAL STATUSorSHOW SESSION STATUS, it is effectively global in scope.For more information, see Section 22.5.13, “NDB API Statistics Counters and Variables”.
Ndb_api_trans_commit_count_sessionThe number of transactions committed in this client session.
Although this variable can be read using either
SHOW GLOBAL STATUSorSHOW SESSION STATUS, it relates to the current session only, and is not affected by any other clients of this mysqld.For more information, see Section 22.5.13, “NDB API Statistics Counters and Variables”.
Ndb_api_trans_commit_count_slaveThe number of transactions committed by this slave.
Although this variable can be read using either
SHOW GLOBAL STATUSorSHOW SESSION STATUS, it is effectively global in scope. If this MySQL server does not act as a replication slave, or does not use NDB tables, this value is always 0.For more information, see Section 22.5.13, “NDB API Statistics Counters and Variables”.
The number of transactions committed by this MySQL Server (SQL node).
Although this variable can be read using either
SHOW GLOBAL STATUSorSHOW SESSION STATUS, it is effectively global in scope.For more information, see Section 22.5.13, “NDB API Statistics Counters and Variables”.
Ndb_api_trans_local_read_row_count_sessionThe total number of rows that have been read in this client session. This includes all rows read by any primary key, unique key, or scan operation made in this client session.
Although this variable can be read using either
SHOW GLOBAL STATUSorSHOW SESSION STATUS, it relates to the current session only, and is not affected by any other clients of this mysqld.For more information, see Section 22.5.13, “NDB API Statistics Counters and Variables”.
Ndb_api_trans_local_read_row_count_slaveThe total number of rows that have been read by this slave. This includes all rows read by any primary key, unique key, or scan operation made by this slave.
Although this variable can be read using either
SHOW GLOBAL STATUSorSHOW SESSION STATUS, it is effectively global in scope. If this MySQL server does not act as a replication slave, or does not use NDB tables, this value is always 0.For more information, see Section 22.5.13, “NDB API Statistics Counters and Variables”.
Ndb_api_trans_local_read_row_countThe total number of rows that have been read by this MySQL Server (SQL node). This includes all rows read by any primary key, unique key, or scan operation made by this MySQL Server (SQL node).
Although this variable can be read using either
SHOW GLOBAL STATUSorSHOW SESSION STATUS, it is effectively global in scope.For more information, see Section 22.5.13, “NDB API Statistics Counters and Variables”.
Ndb_api_trans_start_count_sessionThe number of transactions started in this client session.
Although this variable can be read using either
SHOW GLOBAL STATUSorSHOW SESSION STATUS, it relates to the current session only, and is not affected by any other clients of this mysqld.For more information, see Section 22.5.13, “NDB API Statistics Counters and Variables”.
Ndb_api_trans_start_count_slaveThe number of transactions started by this slave.
Although this variable can be read using either
SHOW GLOBAL STATUSorSHOW SESSION STATUS, it is effectively global in scope. If this MySQL server does not act as a replication slave, or does not use NDB tables, this value is always 0.For more information, see Section 22.5.13, “NDB API Statistics Counters and Variables”.
The number of transactions started by this MySQL Server (SQL node).
Although this variable can be read using either
SHOW GLOBAL STATUSorSHOW SESSION STATUS, it is effectively global in scope.For more information, see Section 22.5.13, “NDB API Statistics Counters and Variables”.
The number of operations in this client session based on or using unique keys.
Although this variable can be read using either
SHOW GLOBAL STATUSorSHOW SESSION STATUS, it relates to the current session only, and is not affected by any other clients of this mysqld.For more information, see Section 22.5.13, “NDB API Statistics Counters and Variables”.
The number of operations by this slave based on or using unique keys.
Although this variable can be read using either
SHOW GLOBAL STATUSorSHOW SESSION STATUS, it is effectively global in scope. If this MySQL server does not act as a replication slave, or does not use NDB tables, this value is always 0.For more information, see Section 22.5.13, “NDB API Statistics Counters and Variables”.
The number of operations by this MySQL Server (SQL node) based on or using unique keys.
Although this variable can be read using either
SHOW GLOBAL STATUSorSHOW SESSION STATUS, it is effectively global in scope.For more information, see Section 22.5.13, “NDB API Statistics Counters and Variables”.
Ndb_api_wait_exec_complete_count_sessionThe number of times a thread has been blocked in this client session while waiting for execution of an operation to complete. This includes all
execute()calls as well as implicit executes for blob and auto-increment operations not visible to clients.Although this variable can be read using either
SHOW GLOBAL STATUSorSHOW SESSION STATUS, it relates to the current session only, and is not affected by any other clients of this mysqld.For more information, see Section 22.5.13, “NDB API Statistics Counters and Variables”.
Ndb_api_wait_exec_complete_count_slaveThe number of times a thread has been blocked by this slave while waiting for execution of an operation to complete. This includes all
execute()calls as well as implicit executes for blob and auto-increment operations not visible to clients.Although this variable can be read using either
SHOW GLOBAL STATUSorSHOW SESSION STATUS, it is effectively global in scope. If this MySQL server does not act as a replication slave, or does not use NDB tables, this value is always 0.For more information, see Section 22.5.13, “NDB API Statistics Counters and Variables”.
Ndb_api_wait_exec_complete_countThe number of times a thread has been blocked by this MySQL Server (SQL node) while waiting for execution of an operation to complete. This includes all
execute()calls as well as implicit executes for blob and auto-increment operations not visible to clients.Although this variable can be read using either
SHOW GLOBAL STATUSorSHOW SESSION STATUS, it is effectively global in scope.For more information, see Section 22.5.13, “NDB API Statistics Counters and Variables”.
Ndb_api_wait_meta_request_count_sessionThe number of times a thread has been blocked in this client session waiting for a metadata-based signal, such as is expected for DDL requests, new epochs, and seizure of transaction records.
Although this variable can be read using either
SHOW GLOBAL STATUSorSHOW SESSION STATUS, it relates to the current session only, and is not affected by any other clients of this mysqld.For more information, see Section 22.5.13, “NDB API Statistics Counters and Variables”.
Ndb_api_wait_meta_request_count_slaveThe number of times a thread has been blocked by this slave waiting for a metadata-based signal, such as is expected for DDL requests, new epochs, and seizure of transaction records.
Although this variable can be read using either
SHOW GLOBAL STATUSorSHOW SESSION STATUS, it is effectively global in scope. If this MySQL server does not act as a replication slave, or does not use NDB tables, this value is always 0.For more information, see Section 22.5.13, “NDB API Statistics Counters and Variables”.
Ndb_api_wait_meta_request_countThe number of times a thread has been blocked by this MySQL Server (SQL node) waiting for a metadata-based signal, such as is expected for DDL requests, new epochs, and seizure of transaction records.
Although this variable can be read using either
SHOW GLOBAL STATUSorSHOW SESSION STATUS, it is effectively global in scope.For more information, see Section 22.5.13, “NDB API Statistics Counters and Variables”.
Ndb_api_wait_nanos_count_sessionTotal time (in nanoseconds) spent in this client session waiting for any type of signal from the data nodes.
Although this variable can be read using either
SHOW GLOBAL STATUSorSHOW SESSION STATUS, it relates to the current session only, and is not affected by any other clients of this mysqld.For more information, see Section 22.5.13, “NDB API Statistics Counters and Variables”.
Ndb_api_wait_nanos_count_slaveTotal time (in nanoseconds) spent by this slave waiting for any type of signal from the data nodes.
Although this variable can be read using either
SHOW GLOBAL STATUSorSHOW SESSION STATUS, it is effectively global in scope. If this MySQL server does not act as a replication slave, or does not use NDB tables, this value is always 0.For more information, see Section 22.5.13, “NDB API Statistics Counters and Variables”.
Total time (in nanoseconds) spent by this MySQL Server (SQL node) waiting for any type of signal from the data nodes.
Although this variable can be read using either
SHOW GLOBAL STATUSorSHOW SESSION STATUS, it is effectively global in scope.For more information, see Section 22.5.13, “NDB API Statistics Counters and Variables”.
Ndb_api_wait_scan_result_count_sessionThe number of times a thread has been blocked in this client session while waiting for a scan-based signal, such as when waiting for more results from a scan, or when waiting for a scan to close.
Although this variable can be read using either
SHOW GLOBAL STATUSorSHOW SESSION STATUS, it relates to the current session only, and is not affected by any other clients of this mysqld.For more information, see Section 22.5.13, “NDB API Statistics Counters and Variables”.
Ndb_api_wait_scan_result_count_slaveThe number of times a thread has been blocked by this slave while waiting for a scan-based signal, such as when waiting for more results from a scan, or when waiting for a scan to close.
Although this variable can be read using either
SHOW GLOBAL STATUSorSHOW SESSION STATUS, it is effectively global in scope. If this MySQL server does not act as a replication slave, or does not use NDB tables, this value is always 0.For more information, see Section 22.5.13, “NDB API Statistics Counters and Variables”.
Ndb_api_wait_scan_result_countThe number of times a thread has been blocked by this MySQL Server (SQL node) while waiting for a scan-based signal, such as when waiting for more results from a scan, or when waiting for a scan to close.
Although this variable can be read using either
SHOW GLOBAL STATUSorSHOW SESSION STATUS, it is effectively global in scope.For more information, see Section 22.5.13, “NDB API Statistics Counters and Variables”.
If the server is acting as an NDB Cluster node, then the value of this variable its node ID in the cluster.
If the server is not part of an NDB Cluster, then the value of this variable is 0.
If the server is part of an NDB Cluster, the value of this variable is the host name or IP address of the Cluster management server from which it gets its configuration data.
If the server is not part of an NDB Cluster, then the value of this variable is an empty string.
If the server is part of an NDB Cluster, the value of this variable is the number of the port through which it is connected to the Cluster management server from which it gets its configuration data.
If the server is not part of an NDB Cluster, then the value of this variable is 0.
Shows the number of times that a row was rejected on the current SQL node due to NDB Cluster Replication conflict resolution using
NDB$MAX_DELETE_WIN(), since the last time that this mysqld was started.For more information, see Section 22.6.11, “NDB Cluster Replication Conflict Resolution”.
Used in NDB Cluster Replication conflict resolution, this variable shows the number of times that a row was not applied on the current SQL node due to “greatest timestamp wins” conflict resolution since the last time that this mysqld was started.
For more information, see Section 22.6.11, “NDB Cluster Replication Conflict Resolution”.
Used in NDB Cluster Replication conflict resolution, this variable shows the number of times that a row was not applied as the result of “same timestamp wins” conflict resolution on a given mysqld since the last time it was restarted.
For more information, see Section 22.6.11, “NDB Cluster Replication Conflict Resolution”.
Used in NDB Cluster Replication conflict resolution, this variable shows the number of rows found to be in conflict using
NDB$EPOCH()conflict resolution on a given mysqld since the last time it was restarted.For more information, see Section 22.6.11, “NDB Cluster Replication Conflict Resolution”.
Shows the number of rows found to be in conflict in NDB Cluster Replication conflict resolution, when using
NDB$EPOCH2(), on the master designated as the primary since the last time it was restarted.For more information, see NDB$EPOCH2().
Used in NDB Cluster Replication conflict resolution, this variable shows the number of rows found to be in conflict using
NDB$EPOCH_TRANS()conflict resolution on a given mysqld since the last time it was restarted.For more information, see Section 22.6.11, “NDB Cluster Replication Conflict Resolution”.
Used in NDB Cluster Replication conflict resolution, this variable shows the number of rows found to be in conflict using
NDB$EPOCH_TRANS2()conflict resolution on a given mysqld since the last time it was restarted.For more information, see NDB$EPOCH2_TRANS().
Ndb_conflict_last_conflict_epochThe most recent epoch in which a conflict was detected on this slave. You can compare this value with
Ndb_slave_max_replicated_epoch; ifNdb_slave_max_replicated_epochis greater thanNdb_conflict_last_conflict_epoch, no conflicts have yet been detected.See Section 22.6.11, “NDB Cluster Replication Conflict Resolution”, for more information.
Ndb_conflict_reflected_op_discard_countWhen using NDB Cluster Replication conflict resolution, this is the number of reflected operations that were not applied on the secondary, due to encountering an error during execution.
See Section 22.6.11, “NDB Cluster Replication Conflict Resolution”, for more information.
Ndb_conflict_reflected_op_prepare_countWhen using conflict resolution with NDB Cluster Replication, this status variable contains the number of reflected operations that have been defined (that is, prepared for execution on the secondary).
See Section 22.6.11, “NDB Cluster Replication Conflict Resolution”.
When using conflict resolution with NDB Cluster Replication, this gives the number of refresh operations that have been prepared for execution on the secondary.
See Section 22.6.11, “NDB Cluster Replication Conflict Resolution”, for more information.
Ndb_conflict_last_stable_epochNumber of rows found to be in conflict by a transactional conflict function
See Section 22.6.11, “NDB Cluster Replication Conflict Resolution”, for more information.
Ndb_conflict_trans_row_conflict_countUsed in NDB Cluster Replication conflict resolution, this status variable shows the number of rows found to be directly in-conflict by a transactional conflict function on a given mysqld since the last time it was restarted.
Currently, the only transactional conflict detection function supported by NDB Cluster is NDB$EPOCH_TRANS(), so this status variable is effectively the same as
Ndb_conflict_fn_epoch_trans.For more information, see Section 22.6.11, “NDB Cluster Replication Conflict Resolution”.
Ndb_conflict_trans_row_reject_countUsed in NDB Cluster Replication conflict resolution, this status variable shows the total number of rows realigned due to being determined as conflicting by a transactional conflict detection function. This includes not only
Ndb_conflict_trans_row_conflict_count, but any rows in or dependent on conflicting transactions.For more information, see Section 22.6.11, “NDB Cluster Replication Conflict Resolution”.
Ndb_conflict_trans_reject_countUsed in NDB Cluster Replication conflict resolution, this status variable shows the number of transactions found to be in conflict by a transactional conflict detection function.
For more information, see Section 22.6.11, “NDB Cluster Replication Conflict Resolution”.
Ndb_conflict_trans_detect_iter_countUsed in NDB Cluster Replication conflict resolution, this shows the number of internal iterations required to commit an epoch transaction. Should be (slightly) greater than or equal to
Ndb_conflict_trans_conflict_commit_count.For more information, see Section 22.6.11, “NDB Cluster Replication Conflict Resolution”.
Ndb_conflict_trans_conflict_commit_countUsed in NDB Cluster Replication conflict resolution, this shows the number of epoch transactions committed after they required transactional conflict handling.
For more information, see Section 22.6.11, “NDB Cluster Replication Conflict Resolution”.
When using delete-delete conflict detection, this is the number of delete-delete conflicts detected, where a delete operation is applied, but the indicated row does not exist.
Provides the number of round trips to the
NDBkernel made by operations.The epoch most recently committed by
NDB.The epoch most recently committed by this
NDBclient.The number of times since this server was last started that the NDB metadata change detection thread has discovered changes with respect to the MySQL data dictionary.
Added in NDB 8.0.16.
The number of metadata objects that the NDB binlog thread has been unable to synchronize on this SQL node since it was last restarted.
Should an object be excluded, it is not again considered for automatic synchronization until the user corrects the mismatch manually. This can be done by attempting to use the table with a statement such as
SHOW CREATE TABLE,tableSELECT * FROM, or any other statement that would trigger table discovery.tableAdded in NDB 8.0.18. Prior to NDB 8.0.22, this variable was named
Ndb_metadata_blacklist_size.The number of NDB metadata objects which have been synchronized on this SQL node since it was last restarted.
Added in NDB 8.0.18.
If the server is part of an NDB Cluster, the value of this variable is the number of data nodes in the cluster.
If the server is not part of an NDB Cluster, then the value of this variable is 0.
The total number of joins pushed down to the NDB kernel for distributed handling on the data nodes.
NoteJoins tested using
EXPLAINthat can be pushed down contribute to this number.The number of joins that were pushed down to the NDB kernel but that could not be handled there.
The number of joins successfully pushed down to
NDBand executed there.The number of rows returned to mysqld from the NDB kernel by joins that were pushed down.
This variable holds a count of the number of scans executed by
NDBCLUSTERsince the NDB Cluster was last started whereNDBCLUSTERwas able to use partition pruning.Using this variable together with
Ndb_scan_countcan be helpful in schema design to maximize the ability of the server to prune scans to a single table partition, thereby involving only a single data node.This variable holds a count of the total number of scans executed by
NDBCLUSTERsince the NDB Cluster was last started.Ndb_slave_max_replicated_epochThe most recently committed epoch on this slave. You can compare this value with
Ndb_conflict_last_conflict_epoch; ifNdb_slave_max_replicated_epochis the greater of the two, no conflicts have yet been detected.For more information, see Section 22.6.11, “NDB Cluster Replication Conflict Resolution”.
If this MySQL Server is connected to an NDB cluster, this read-only variable shows the cluster system name. Otherwise, the value is an empty string.
The number of transactions using hints that have been started in the current session. Compare with
Ndb_api_trans_start_count_sessionto obtain the proportion of all NDB transactions able to use hints. Added in NDB 8.0.17.
TCP/IP is the default transport mechanism for all connections between nodes in an NDB Cluster. Normally it is not necessary to define TCP/IP connections; NDB Cluster automatically sets up such connections for all data nodes, management nodes, and SQL or API nodes.
For an exception to this rule, see Section 22.3.3.11, “NDB Cluster TCP/IP Connections Using Direct Connections”.
To override the default connection parameters, it is necessary
to define a connection using one or more
[tcp] sections in the
config.ini file. Each
[tcp] section explicitly defines a TCP/IP
connection between two NDB Cluster nodes, and must contain at a
minimum the parameters
NodeId1 and
NodeId2, as well as any
connection parameters to override.
It is also possible to change the default values for these
parameters by setting them in the [tcp
default] section.
Any [tcp] sections in the
config.ini file should be listed
last, following all other sections in the
file. However, this is not required for a [tcp
default] section. This requirement is a known issue
with the way in which the config.ini file
is read by the NDB Cluster management server.
Connection parameters which can be set in
[tcp] and [tcp default]
sections of the config.ini file are listed
here:
-
Table 22.220 This table provides type and value information for the Checksum TCP configuration parameter
Property Value Version (or later) NDB 8.0.13 Type or units boolean Default false Range true, false Restart Type N This parameter is a boolean parameter (enabled by setting it to
Yor1, disabled by setting it toNor0). It is disabled by default. When it is enabled, checksums for all messages are calculated before they placed in the send buffer. This feature ensures that messages are not corrupted while waiting in the send buffer, or by the transport mechanism. When
ndb_optimized_node_selectionis enabled, node proximity is used in some cases to select which node to connect to. This parameter can be used to influence proximity by setting it to a lower value, which is interpreted as “closer”. See the description of the system variable for more information.-
Table 22.221 This table provides type and value information for the HostName1 TCP configuration parameter
Property Value Version (or later) NDB 8.0.13 Type or units name or IP address Default [none] Range ... Restart Type N The
HostName1andHostName2parameters can be used to specify specific network interfaces to be used for a given TCP connection between two nodes. The values used for these parameters can be host names or IP addresses. -
Table 22.222 This table provides type and value information for the HostName1 TCP configuration parameter
Property Value Version (or later) NDB 8.0.13 Type or units name or IP address Default [none] Range ... Restart Type N The
HostName1andHostName2parameters can be used to specify specific network interfaces to be used for a given TCP connection between two nodes. The values used for these parameters can be host names or IP addresses. -
Table 22.223 This table provides type and value information for the NodeId1 TCP configuration parameter
Property Value Version (or later) NDB 8.0.13 Type or units numeric Default [none] Range 1 - 255 Restart Type N To identify a connection between two nodes it is necessary to provide their node IDs in the
[tcp]section of the configuration file as the values ofNodeId1andNodeId2. These are the same uniqueIdvalues for each of these nodes as described in Section 22.3.3.7, “Defining SQL and Other API Nodes in an NDB Cluster”. -
Table 22.224 This table provides type and value information for the NodeId2 TCP configuration parameter
Property Value Version (or later) NDB 8.0.13 Type or units numeric Default [none] Range 1 - 255 Restart Type N To identify a connection between two nodes it is necessary to provide their node IDs in the
[tcp]section of the configuration file as the values ofNodeId1andNodeId2. These are the same uniqueIdvalues for each of these nodes as described in Section 22.3.3.7, “Defining SQL and Other API Nodes in an NDB Cluster”. -
Table 22.225 This table provides type and value information for the OverloadLimit TCP configuration parameter
Property Value Version (or later) NDB 8.0.13 Type or units bytes Default 0 Range 0 - 4294967039 (0xFFFFFEFF) Restart Type N When more than this many unsent bytes are in the send buffer, the connection is considered overloaded.
This parameter can be used to determine the amount of unsent data that must be present in the send buffer before the connection is considered overloaded. See Section 22.3.3.14, “Configuring NDB Cluster Send Buffer Parameters”, for more information.
-
Table 22.226 This table provides type and value information for the PreSendChecksum TCP configuration parameter
Property Value Version (or later) NDB 8.0.13 Type or units boolean Default false Range true, false Restart Type S If this parameter and
Checksumare both enabled, perform pre-send checksum checks, and check all TCP signals between nodes for errors. Has no effect ifChecksumis not also enabled. -
Table 22.227 This table provides type and value information for the ReceiveBufferMemory TCP configuration parameter
Property Value Version (or later) NDB 8.0.13 Type or units bytes Default 2M Range 16K - 4294967039 (0xFFFFFEFF) Restart Type N Specifies the size of the buffer used when receiving data from the TCP/IP socket.
The default value of this parameter is 2MB. The minimum possible value is 16KB; the theoretical maximum is 4GB.
-
Table 22.228 This table provides type and value information for the SendBufferMemory TCP configuration parameter
Property Value Version (or later) NDB 8.0.13 Type or units unsigned Default 2M Range 256K - 4294967039 (0xFFFFFEFF) Restart Type N TCP transporters use a buffer to store all messages before performing the send call to the operating system. When this buffer reaches 64KB its contents are sent; these are also sent when a round of messages have been executed. To handle temporary overload situations it is also possible to define a bigger send buffer.
If this parameter is set explicitly, then the memory is not dedicated to each transporter; instead, the value used denotes the hard limit for how much memory (out of the total available memory—that is,
TotalSendBufferMemory) that may be used by a single transporter. For more information about configuring dynamic transporter send buffer memory allocation in NDB Cluster, see Section 22.3.3.14, “Configuring NDB Cluster Send Buffer Parameters”.The default size of the send buffer is 2MB, which is the size recommended in most situations. The minimum size is 64 KB; the theoretical maximum is 4 GB.
-
Table 22.229 This table provides type and value information for the SendSignalId TCP configuration parameter
Property Value Version (or later) NDB 8.0.13 Type or units boolean Default false (debug builds: true) Range true, false Restart Type N To be able to retrace a distributed message datagram, it is necessary to identify each message. When this parameter is set to
Y, message IDs are transported over the network. This feature is disabled by default in production builds, and enabled in-debugbuilds. Setting this parameter to
TRUEor1bindsIP_ADDR_ANYso that connections can be made from anywhere (for autogenerated connections). The default isFALSE(0).-
Table 22.230 This table provides type and value information for the TcpSpinTime TCP configuration parameter
Property Value Version (or later) NDB 8.0.20 Type or units µsec Default 0 Range 0 - 2000 Restart Type N Controls spin for a TCP transporter; no enable, set to a nonzero value. This works for both the data node and management or SQL node side of the connection.
-
Table 22.231 This table provides type and value information for the TCP_MAXSEG_SIZE TCP configuration parameter
Property Value Version (or later) NDB 8.0.13 Type or units unsigned Default 0 Range 0 - 2G Restart Type N Determines the size of the memory set during TCP transporter initialization. The default is recommended for most common usage cases.
-
Table 22.232 This table provides type and value information for the TCP_RCV_BUF_SIZE TCP configuration parameter
Property Value Version (or later) NDB 8.0.13 Type or units unsigned Default 0 Range 0 - 2G Restart Type N Determines the size of the receive buffer set during TCP transporter initialization. The default and minimum value is 0, which allows the operating system or platform to set this value. The default is recommended for most common usage cases.
-
Table 22.233 This table provides type and value information for the TCP_SND_BUF_SIZE TCP configuration parameter
Property Value Version (or later) NDB 8.0.13 Type or units unsigned Default 0 Range 0 - 2G Restart Type N Determines the size of the send buffer set during TCP transporter initialization. The default and minimum value is 0, which allows the operating system or platform to set this value. The default is recommended for most common usage cases.
Restart types. Information about the restart types used by the parameter descriptions in this section is shown in the following table:
Table 22.234 NDB Cluster restart types
| Symbol | Restart Type | Description |
|---|---|---|
| N | Node | The parameter can be updated using a rolling restart (see Section 22.5.5, “Performing a Rolling Restart of an NDB Cluster”) |
| S | System | All cluster nodes must be shut down completely, then restarted, to effect a change in this parameter |
| I | Initial | Data nodes must be restarted using the
--initial option |
Setting up a cluster using direct connections between data nodes
requires specifying explicitly the crossover IP addresses of the
data nodes so connected in the [tcp] section
of the cluster config.ini file.
In the following example, we envision a cluster with at least
four hosts, one each for a management server, an SQL node, and
two data nodes. The cluster as a whole resides on the
172.23.72.* subnet of a LAN. In addition to
the usual network connections, the two data nodes are connected
directly using a standard crossover cable, and communicate with
one another directly using IP addresses in the
1.1.0.* address range as shown:
# Management Server [ndb_mgmd] Id=1 HostName=172.23.72.20 # SQL Node [mysqld] Id=2 HostName=172.23.72.21 # Data Nodes [ndbd] Id=3 HostName=172.23.72.22 [ndbd] Id=4 HostName=172.23.72.23 # TCP/IP Connections [tcp] NodeId1=3 NodeId2=4 HostName1=1.1.0.1 HostName2=1.1.0.2
The HostName1 and
HostName2 parameters are
used only when specifying direct connections.
The use of direct TCP connections between data nodes can improve the cluster's overall efficiency by enabling the data nodes to bypass an Ethernet device such as a switch, hub, or router, thus cutting down on the cluster's latency.
To take the best advantage of direct connections in this fashion with more than two data nodes, you must have a direct connection between each data node and every other data node in the same node group.
Communications between NDB cluster nodes are normally handled using TCP/IP. The shared memory (SHM) transporter is distinguished by the fact that signals are transmitted by writing in memory rather than on a socket. The shared-memory transporter (SHM) can improve performance by negating up to 20% of the overhead required by a TCP connection when running an API node (usually an SQL node) and a data node together on the same host. You can enable a shared memory connection in either of the two ways listed here:
By setting the
UseShmdata node configuration parameter to1, and settingHostNamefor the data node andHostNamefor the API node to the same value.By using
[shm]sections in the cluster configuration file, each containing settings forNodeId1andNodeId2. This method is described in more detail later in this section.
Suppose a cluster is running a data node which has node ID 1 and an SQL node having node ID 51 on the same host computer at 10.0.0.1. To enable an SHM connection between these two nodes, all that is necessary is to insure that the following entries are included in the cluster configuration file:
[ndbd] NodeId=1 HostName=10.0.0.1 UseShm=1 [mysqld] NodeId=51 HostName=10.0.0.1
The two entries just shown are in addition to any other entries and parameter settings needed by the cluster. A more complete example is shown later in this section.
Before starting data nodes that use SHM connections, it is also
necessary to make sure that the operating system on each
computer hosting such a data node has sufficient memory
allocated to shared memory segments. See the documentation for
your operating platform for information regarding this. In
setups where multiple hosts are each running a data node and an
API node, it is possible to enable shared memory on all such
hosts by setting UseShm in the [ndbd
default] section of the configuration file. This is
shown in the example later in this section.
While not strictly required, tuning for all SHM connections in
the cluster can be done by setting one or more of the following
parameters in the [shm default] section of
the cluster configuration (config.ini)
file:
ShmSize: Shared memory sizeShmSpinTime: Time in µs to spin before sleepingSendBufferMemory: Size of buffer for signals sent from this node, in bytes.SendSignalId: Indicates that a signal ID is included in each signal sent through the transporter.Checksum: Indicates that a checksum is included in each signal sent through the transporter.PreSendChecksum: Checks of the checksum are made prior to sending the signal; Checksum must also be enabled for this to work
This example shows a simple setup with SHM connections definied on multiple hosts, in an NDB Cluster using 3 computers listed here by host name, hosting the node types shown:
10.0.0.0: The management server10.0.0.1: A data node and an SQL node10.0.0.2: A data node and an SQL node
In this scenario, each data node communicates with both the management server and the other data node using TCP transporters; each SQL node uses a shared memory transporter to communicate with the data nodes that is local to it, and a TCP transporter to communicate with the remote data node. A basic configuration reflecting this setup is enabled by the config.ini file whose contents are shown here:
[ndbd default] DataDir=/path/to/datadirUseShm=1 [shm default] ShmSize=8M ShmSpintime=200 SendBufferMemory=4M [tcp default] SendBufferMemory=8M [ndb_mgmd] NodeId=49 Hostname=10.0.0.0 DataDir=/path/to/datadir[ndbd] NodeId=1 Hostname=10.0.0.1 DataDir=/path/to/datadir[ndbd] NodeId=2 Hostname=10.0.0.2 DataDir=/path/to/datadir[mysqld] NodeId=51 Hostname=10.0.0.1 [mysqld] NodeId=52 Hostname=10.0.0.2 [api] [api]
Parameters affecting all shared memory transporters are set in
the [shm default] section; these can be
overridden on a per-connection basis in one or more
[shm] sections. Each such section must be
associated with a given SHM connection using
NodeId1 and
NodeId2; the values
required for these parameters are the node IDs of the two nodes
connected by the transporter. You can also identify the nodes by
host name using HostName1
and HostName2, but these
parameters are not required.
The API nodes for which no host names are set use the TCP
transporter to communicate with data nodes independent of the
hosts on which they are started; the parameters and values set
in the [tcp default] section of the
configuration file apply to all TCP transporters in the cluster.
For optimum performance, you can define a spin time for the SHM
transporter (ShmSpinTime
parameter); this affects both the data node receiver thread and
the poll owner (receive thread or user thread) in
NDB.
-
Table 22.235 This table provides type and value information for the Checksum shared memory configuration parameter
Property Value Version (or later) NDB 8.0.13 Type or units boolean Default true Range true, false Restart Type N This parameter is a boolean (
Y/N) parameter which is disabled by default. When it is enabled, checksums for all messages are calculated before being placed in the send buffer.This feature prevents messages from being corrupted while waiting in the send buffer. It also serves as a check against data being corrupted during transport.
-
Table 22.236 This table provides type and value information for the Group shared memory configuration parameter
Property Value Version (or later) NDB 8.0.13 Type or units unsigned Default 35 Range 0 - 200 Restart Type N Determines the group proximity; a smaller value is interpreted as being closer. The default value is sufficient for most conditions.
-
Table 22.237 This table provides type and value information for the HostName1 shared memory configuration parameter
Property Value Version (or later) NDB 8.0.13 Type or units name or IP address Default [none] Range ... Restart Type N The
HostName1andHostName2parameters can be used to specify specific network interfaces to be used for a given SHM connection between two nodes. The values used for these parameters can be host names or IP addresses. -
Table 22.238 This table provides type and value information for the HostName1 shared memory configuration parameter
Property Value Version (or later) NDB 8.0.13 Type or units name or IP address Default [none] Range ... Restart Type N The
HostName1andHostName2parameters can be used to specify specific network interfaces to be used for a given SHM connection between two nodes. The values used for these parameters can be host names or IP addresses. -
Table 22.239 This table provides type and value information for the NodeId1 shared memory configuration parameter
Property Value Version (or later) NDB 8.0.13 Type or units numeric Default [none] Range 1 - 255 Restart Type N To identify a connection between two nodes it is necessary to provide node identifiers for each of them, as
NodeId1andNodeId2. -
Table 22.240 This table provides type and value information for the NodeId2 shared memory configuration parameter
Property Value Version (or later) NDB 8.0.13 Type or units numeric Default [none] Range 1 - 255 Restart Type N To identify a connection between two nodes it is necessary to provide node identifiers for each of them, as
NodeId1andNodeId2. -
Table 22.241 This table provides type and value information for the NodeIdServer shared memory configuration parameter
Property Value Version (or later) NDB 8.0.13 Type or units numeric Default [none] Range 1 - 63 Restart Type N Identify the server end of a shared memory connection. By default, this is the node ID of the data node.
-
Table 22.242 This table provides type and value information for the OverloadLimit shared memory configuration parameter
Property Value Version (or later) NDB 8.0.13 Type or units bytes Default 0 Range 0 - 4294967039 (0xFFFFFEFF) Restart Type N When more than this many unsent bytes are in the send buffer, the connection is considered overloaded. See Section 22.3.3.14, “Configuring NDB Cluster Send Buffer Parameters”, and Section 22.5.14.47, “The ndbinfo transporters Table”, for more information.
-
Table 22.243 This table provides type and value information for the PreSendChecksum shared memory configuration parameter
Property Value Version (or later) NDB 8.0.13 Type or units boolean Default false Range true, false Restart Type S If this parameter and
Checksumare both enabled, perform pre-send checksum checks, and check all SHM signals between nodes for errors. Has no effect ifChecksumis not also enabled. -
Table 22.244 This table provides type and value information for the SendBufferMemory shared memory configuration parameter
Property Value Version (or later) NDB 8.0.13 Type or units integer Default 2M Range 256K - 4294967039 (0xFFFFFEFF) Restart Type N Size (in bytes) of the shared memory buffer for signals sent from this node using a shared memory connection.
-
Table 22.245 This table provides type and value information for the SendSignalId shared memory configuration parameter
Property Value Version (or later) NDB 8.0.13 Type or units boolean Default false Range true, false Restart Type N To retrace the path of a distributed message, it is necessary to provide each message with a unique identifier. Setting this parameter to
Ycauses these message IDs to be transported over the network as well. This feature is disabled by default in production builds, and enabled in-debugbuilds. -
Table 22.246 This table provides type and value information for the ShmKey shared memory configuration parameter
Property Value Version (or later) NDB 8.0.13 Type or units unsigned Default 0 Range 0 - 4294967039 (0xFFFFFEFF) Restart Type N When setting up shared memory segments, a node ID, expressed as an integer, is used to identify uniquely the shared memory segment to use for the communication. There is no default value. If
UseShmis enabled, the shared memory key is calculated automatically byNDB. -
Table 22.247 This table provides type and value information for the ShmSize shared memory configuration parameter
Property Value Version (or later) NDB 8.0.13 Type or units bytes Default 4M Range 64K - 4294967039 (0xFFFFFEFF) Restart Type N Each SHM connection has a shared memory segment where messages between nodes are placed by the sender and read by the reader. The size of this segment is defined by
ShmSize. The default value is 4MB. -
Table 22.248 This table provides type and value information for the ShmSpinTime shared memory configuration parameter
Property Value Version (or later) NDB 8.0.13 Type or units integer Default 0 Range 0 - 2000 Restart Type S When receiving, the time to wait before sleeping, in microseconds.
-
Table 22.249 This table provides type and value information for the Signum shared memory configuration parameter
Property Value Version (or later) NDB 8.0.13 Type or units unsigned Default [none] Range 0 - 4294967039 (0xFFFFFEFF) Restart Type N This parameter was used formerly to override operating system signal numbers; in NDB 8.0, it is no longer used, and any setting for it is ignored.
Restart types. Information about the restart types used by the parameter descriptions in this section is shown in the following table:
Table 22.250 NDB Cluster restart types
| Symbol | Restart Type | Description |
|---|---|---|
| N | Node | The parameter can be updated using a rolling restart (see Section 22.5.5, “Performing a Rolling Restart of an NDB Cluster”) |
| S | System | All cluster nodes must be shut down completely, then restarted, to effect a change in this parameter |
| I | Initial | Data nodes must be restarted using the
--initial option |
All memory allocation for a data node is performed when the node
is started. This ensures that the data node can run in a stable
manner without using swap memory, so that
NDB can be used for
latency-sensitive (realtime) applications. The following types
of memory are allocated on data node startup:
Data memory
Shared global memory
Redo log buffers
Job buffers
Send buffers
Page cache for disk data records
Schema transaction memory
Transaction memory
Undo log buffer
Query memory
Block objects
Schema memory
Block data structures
Long signal memory
Shared memory communication buffers
The NDB memory manager, which
regulates most data node memory, handles the following memory
resources:
Data Memory (
DataMemory)Redo log buffers (
RedoBuffer)Job buffers
Send buffers (
SendBufferMemory,TotalSendBufferMemory,ExtraSendBufferMemory,ReservedSendBufferMemory)Disk Data record page cache (
DiskPageBufferMemory,DiskPageBufferEntries)Transaction memory (
TransactionMemory)Query memory
Disk access records
File buffers
Each of these resources is set up with a reserved memory area and a maximum memory area. The reserved memory area can be used only by the resource for which it is reserved and cannot be shared with other resources; a given resource can never allocate more than the maximum memory allowed for the resource. A resource that has no maximum memory can expand to use all the shared memory in the memory manager.
The size of the global shared memory for these resources is
controlled by the
SharedGlobalMemory
configuration parameter (default: 128 MB).
Data memory is always reserved and never acquires any memory
from shared memory. It is controlled using the
DataMemory configuration
parameter, whose maximum is 16384 GB.
DataMemory is where records are stored,
including hash indexes (approximately 15 bytes per row), ordered
indexes (10-12 bytes per row per index), and row headers (16-32
bytes per row).
Redo log buffers also use reserved memory only; this is
controlled by the
RedoBuffer configuration
parameter, which sets the size of the redo log buffer per LDM
thread. This means that the actual amount of memory used is the
value of this parameter multiplied by the number of LDM threads
in the data node.
Job buffers use reserved memory only; the size of this memory is
calculated by NDB, based on the
numbers of threads of various types.
Send buffers have a reserved part but can also allocate an additional 25% of shared global memory. The send buffer reserved size is calculated in two steps:
Use the value of the
TotalSendBufferMemoryconfiguration parameter (no default value) or the sum of the individual send buffers used by all individual connections to the data node. A data node is connected to all other data nodes, to all API nodes, and to all management nodes. This means that, in a cluster with 2 data nodes, 2 management nodes, and 10 API nodes each data node has 13 node connections. Since the default value forSendBufferMemoryfor a data node connection is 2 MByte, this works out to 26 MB total.To obtain the total reserved size for the send buffer, the value of the
ExtraSendBufferMemoryconfiguration parameter, if any (default value 0). is added to the value obtained in the previous step.
In other words, if TotalSendBufferMemory has
been set, the send buffer size is TotalSendBufferMemory
+ ExtraSendBufferMemory; otherwise, the size of the
send buffer is equal to ([.
number of node
connections] * SendBufferMemory) +
ExtraSendBufferMemory
The page cache for disk data records uses a reserved resource
only; the size of this resource is controlled by the
DiskPageBufferMemory
configuration parameter (default 64 MB). Memory for 32 KB disk
page entries is also allocated; the number of these is
determined by the
DiskPageBufferEntries
configuration parameter (default 10).
Transaction memory has a reserved part that either is calculated
by NDB, or is set explicitly using the
TransactionMemory
configuration parameter introduced in NDB 8.0.19 (in previous
releases, this value was always calculated by
NDB); transaction memory can also
use an unlimited amount of shared global memory. Transaction
memory is used for all operational resources handling
transactions, scans, locks, scan buffers, and trigger
operations. It also holds table rows as they are updated, before
the next commit writes them to data memory.
In NDB 8.0.16 and earlier, operational records used dedicated
resources whose sizes were controlled by a number of
configuration parameters. Beginning with NDB 8.0.17, these are
all allocated from a common transaction memory resource and can
also use resources from global shared memory. In NDB 8.0.19 and
later, the size of this resource can be controlled using a
single TransactionMemory
configuration parameter.
Reserved memory for undo log buffers can be set using the
InitialLogFileGroup
configuration parameter. If an undo log buffer is created as
part of a CREATE LOGFILE GROUP
SQL statement, the memory is taken from the transaction memory.
A number of resources relating to metadata for Disk Data resources also have no reserved part, and use shared global memory only. Shared global shared memory is thus shared between send buffers, transaction memory, and Disk Data metadata.
If TransactionMemory is
not set, it is calculated based on the following parameters:
When TransactionMemory
is set explicitly, none of the configuration parameters just
listed are used to calculate memory size. In addition, the
parameters
MaxNoOfConcurrentIndexOperations,
MaxNoOfFiredTriggers,
MaxNoOfLocalOperations,
and MaxNoOfLocalScans
are incompatible with TransactionMemory and
cannot be set concurrently with it; if
TransactionMemory is set and any of these
four parameters are also set in the
config.ini configuration file, the
management server cannot start. These four parameters are
deprecated in NDB 8.0.19, and will be removed from a future
release of MySQL NDB Cluster.
The transaction memory resource contains a large number of memory pools. Each memory pool represents an object type and contains a set of objects; each pool includes a reserved part allocated to the pool at startup; this reserved memory is never returned to shared global memory. Reserved records are found using a data structure having only a single level for fast retrieval, which means that a number of records in each pool should be reserved. The number of reserved records in each pool has some impact on performance and reserved memory allocation, but is generally necessary only in certain very advanced use cases to set the reserved sizes explicitly.
The size of the reserved part of the pool can be controlled by setting the following configuration parameters:
If the parameters just listed are not set, the reserved setting
is 25% of transaction memory. The number of reserved records is
per data node; these records are split among the threads
handling them (LDM and TC threads) on each node. In most cases,
it is sufficient to set TransactionMemory
alone, and to allow the number of records in pools to be
governed by its value.
MaxNoOfConcurrentScans
limits the number of concurrent scans that can be active in each
TC thread. This is important in guarding against cluster
overload.
MaxNoOfConcurrentOperations
limits the number of operations that can be active at any one
time in updating transactions. (Simple reads are not affected by
this parameter.) This number needs to be limited because it is
necessary to preallocate memory for node failure handling, and a
resource must be available for handling the maximum number of
active operations in one TC thread when conmtending with node
failures. It is imperative that
MaxNoOfConcurrentOperations be set to the
same number on all nodes (this can be done most easily by
setting a value for it once, in the [ndbd
default] section of the
config.ini global configuration file).
While its value can be increased using a rolling restart (see
Section 22.5.5, “Performing a Rolling Restart of an NDB Cluster”), decreasing it
in this way is not considered safe due to the possibility of a
node failure occurring during the rolling restart.
It is possible to limit the size of a single transaction in NDB
Cluster through the
MaxDMLOperationsPerTransaction
parameter. If this is not set, the size of one transaction is
limited by MaxNoOfConcurrentOperations since
this parameter limits the total number of concurrent operations
per TC thread.
Schema memory size is controlled by the following set of configuration parameters:
The number of nodes and the number of LDM threads also have a major impact on the size of schema memory since the number of partitions in each table and each partition (and its replicas) have to be represented in schema memory.
In addition, a number of other records are allocated during startup. These are relatively small. Each block in each thread contains block objects that use memory. This memory size is also normally quite small compared to the other data node memory structures.
The NDB kernel employs a unified send buffer
whose memory is allocated dynamically from a pool shared by all
transporters. This means that the size of the send buffer can be
adjusted as necessary. Configuration of the unified send buffer
can accomplished by setting the following parameters:
TotalSendBufferMemory. This parameter can be set for all types of NDB Cluster nodes—that is, it can be set in the
[ndbd],[mgm], and[api](or[mysql]) sections of theconfig.inifile. It represents the total amount of memory (in bytes) to be allocated by each node for which it is set for use among all configured transporters. If set, its minimum is 256KB; the maximum is 4294967039.To be backward-compatible with existing configurations, this parameter takes as its default value the sum of the maximum send buffer sizes of all configured transporters, plus an additional 32KB (one page) per transporter. The maximum depends on the type of transporter, as shown in the following table:
Table 22.251 Transporter types with maximum send buffer sizes
Transporter Maximum Send Buffer Size (bytes) TCP SendBufferMemory(default = 2M)SHM 20K This enables existing configurations to function in close to the same way as they did with NDB Cluster 6.3 and earlier, with the same amount of memory and send buffer space available to each transporter. However, memory that is unused by one transporter is not available to other transporters.
OverloadLimit. This parameter is used in the
config.inifile[tcp]section, and denotes the amount of unsent data (in bytes) that must be present in the send buffer before the connection is considered overloaded. When such an overload condition occurs, transactions that affect the overloaded connection fail with NDB API Error 1218 (Send Buffers overloaded in NDB kernel) until the overload status passes. The default value is 0, in which case the effective overload limit is calculated asSendBufferMemory * 0.8for a given connection. The maximum value for this parameter is 4G.SendBufferMemory. This value denotes a hard limit for the amount of memory that may be used by a single transporter out of the entire pool specified by
TotalSendBufferMemory. However, the sum ofSendBufferMemoryfor all configured transporters may be greater than theTotalSendBufferMemorythat is set for a given node. This is a way to save memory when many nodes are in use, as long as the maximum amount of memory is never required by all transporters at the same time.
You can use the
ndbinfo.transporters table to
monitor send buffer memory usage, and to detect slowdown and
overload conditions that can adversely affect performance.
Even before design of NDBCLUSTER
began in 1996, it was evident that one of the major problems to be
encountered in building parallel databases would be communication
between the nodes in the network. For this reason,
NDBCLUSTER was designed from the very
beginning to permit the use of a number of different data
transport mechanisms. In this Manual, we use the term
transporter for these.
The NDB Cluster codebase provides for four different transporters:
TCP/IP using 100 Mbps or gigabit Ethernet, as discussed in Section 22.3.3.10, “NDB Cluster TCP/IP Connections”.
Direct (machine-to-machine) TCP/IP; although this transporter uses the same TCP/IP protocol as mentioned in the previous item, it requires setting up the hardware differently and is configured differently as well. For this reason, it is considered a separate transport mechanism for NDB Cluster. See Section 22.3.3.11, “NDB Cluster TCP/IP Connections Using Direct Connections”, for details.
Shared memory (SHM). For more information about SHM, see Section 22.3.3.12, “NDB Cluster Shared-Memory Connections”.
Scalable Coherent Interface (SCI).
NoteUsing SCI transporters in NDB Cluster requires specialized hardware, software, and MySQL binaries not available with NDB 8.0.
Most users today employ TCP/IP over Ethernet because it is ubiquitous. TCP/IP is also by far the best-tested transporter for use with NDB Cluster.
Regardless of the transporter used, NDB
attempts to make sure that communication with data node processes
is done using chunks that are as large as possible since this
benefits all types of data transmission.
- 22.4.1 ndbd — The NDB Cluster Data Node Daemon
- 22.4.2 ndbinfo_select_all — Select From ndbinfo Tables
- 22.4.3 ndbmtd — The NDB Cluster Data Node Daemon (Multi-Threaded)
- 22.4.4 ndb_mgmd — The NDB Cluster Management Server Daemon
- 22.4.5 ndb_mgm — The NDB Cluster Management Client
- 22.4.6 ndb_blob_tool — Check and Repair BLOB and TEXT columns of NDB Cluster Tables
- 22.4.7 ndb_config — Extract NDB Cluster Configuration Information
- 22.4.8 ndb_delete_all — Delete All Rows from an NDB Table
- 22.4.9 ndb_desc — Describe NDB Tables
- 22.4.10 ndb_drop_index — Drop Index from an NDB Table
- 22.4.11 ndb_drop_table — Drop an NDB Table
- 22.4.12 ndb_error_reporter — NDB Error-Reporting Utility
- 22.4.13 ndb_import — Import CSV Data Into NDB
- 22.4.14 ndb_index_stat — NDB Index Statistics Utility
- 22.4.15 ndb_move_data — NDB Data Copy Utility
- 22.4.16 ndb_perror — Obtain NDB Error Message Information
- 22.4.17 ndb_print_backup_file — Print NDB Backup File Contents
- 22.4.18 ndb_print_file — Print NDB Disk Data File Contents
- 22.4.19 ndb_print_frag_file — Print NDB Fragment List File Contents
- 22.4.20 ndb_print_schema_file — Print NDB Schema File Contents
- 22.4.21 ndb_print_sys_file — Print NDB System File Contents
- 22.4.22 ndb_redo_log_reader — Check and Print Content of Cluster Redo Log
- 22.4.23 ndb_restore — Restore an NDB Cluster Backup
- 22.4.24 ndb_select_all — Print Rows from an NDB Table
- 22.4.25 ndb_select_count — Print Row Counts for NDB Tables
- 22.4.26 ndb_setup.py — Start browser-based Auto-Installer for NDB Cluster
- 22.4.27 ndb_show_tables — Display List of NDB Tables
- 22.4.28 ndb_size.pl — NDBCLUSTER Size Requirement Estimator
- 22.4.29 ndb_top — View CPU usage information for NDB threads
- 22.4.30 ndb_waiter — Wait for NDB Cluster to Reach a Given Status
- 22.4.31 Options Common to NDB Cluster Programs — Options Common to NDB Cluster Programs
Using and managing an NDB Cluster requires several specialized programs, which we describe in this chapter. We discuss the purposes of these programs in an NDB Cluster, how to use the programs, and what startup options are available for each of them.
These programs include the NDB Cluster data, management, and SQL node processes (ndbd, ndbmtd, ndb_mgmd, and mysqld) and the management client (ndb_mgm).
Information about the program ndb_setup.py, used to start the NDB Cluster Auto-Installer, is also included in this section. You should be aware that Section 22.4.26, “ndb_setup.py — Start browser-based Auto-Installer for NDB Cluster”, contains information about the command-line client only; for information about using the GUI installer spawned by this program to configure and deploy an NDB Cluster, see The NDB Cluster Auto-Installer (NDB 7.5).
For information about using mysqld as an NDB Cluster process, see Section 22.5.9, “MySQL Server Usage for NDB Cluster”.
Other NDB utility, diagnostic, and
example programs are included with the NDB Cluster distribution.
These include ndb_restore,
ndb_show_tables, and
ndb_config. These programs are also covered in
this section.
The final portion of this section contains tables of options that are common to all the various NDB Cluster programs.
ndbd is the process that is used to handle all the data in tables using the NDB Cluster storage engine. This is the process that empowers a data node to accomplish distributed transaction handling, node recovery, checkpointing to disk, online backup, and related tasks.
In an NDB Cluster, a set of ndbd processes cooperate in handling data. These processes can execute on the same computer (host) or on different computers. The correspondences between data nodes and Cluster hosts is completely configurable.
The following table includes command options specific to the NDB Cluster data node program ndbd. Additional descriptions follow the table. For options common to most NDB Cluster programs (including ndbd), see Section 22.4.31, “Options Common to NDB Cluster Programs — Options Common to NDB Cluster Programs”.
Table 22.252 Command-line options for the ndbd program
| Format | Description | Added, Deprecated, or Removed |
|---|---|---|
| Local bind address | (Supported in all MySQL 8.0 based releases) |
|
| Time to wait between attempts to contact a management server, in seconds; 0 means do not wait between attempts | (Supported in all MySQL 8.0 based releases) |
|
| Set the number of times to retry a connection before giving up; 0 means 1 attempt only (and no retries) | (Supported in all MySQL 8.0 based releases) |
|
| Time to wait between attempts to contact a management server, in seconds; 0 means do not wait between attempts | (Supported in all MySQL 8.0 based releases) |
|
| Start ndbd as daemon (default); override with --nodaemon | (Supported in all MySQL 8.0 based releases) |
|
| Run ndbd in foreground, provided for debugging purposes (implies --nodaemon) | (Supported in all MySQL 8.0 based releases) |
|
| Perform initial start of ndbd, including cleaning the file system. Consult the documentation before using this option | (Supported in all MySQL 8.0 based releases) |
|
| Perform partial initial start (requires --nowait-nodes) | (Supported in all MySQL 8.0 based releases) |
|
| Used to install the data node process as a Windows service. Does not apply on non-Windows platforms | (Supported in all MySQL 8.0 based releases) |
|
| Control size of log buffer. For use when debugging with many log messages being generated; default is sufficient for normal operations | (Supported in all MySQL 8.0 based releases) |
|
| Do not start ndbd as daemon; provided for testing purposes | (Supported in all MySQL 8.0 based releases) |
|
| Do not start ndbd immediately; ndbd waits for command to start from ndb_mgmd | (Supported in all MySQL 8.0 based releases) |
|
| Do not wait for these data nodes to start (takes comma-separated list of node IDs). Also requires --ndb-nodeid to be used | (Supported in all MySQL 8.0 based releases) |
|
| Used to remove a data node process that was previously installed as a Windows service. Does not apply on non-Windows platforms | (Supported in all MySQL 8.0 based releases) |
|
| Causes the data log to write extra debugging information to the node log | (Supported in all MySQL 8.0 based releases) |
All of these options also apply to the multithreaded version of this program (ndbmtd) and you may substitute “ndbmtd” for “ndbd” wherever the latter occurs in this section.
-
Property Value Command-Line Format --bind-address=nameType String Default Value Causes ndbd to bind to a specific network interface (host name or IP address). This option has no default value.
-
Property Value Command-Line Format --connect-delay=#Deprecated Yes Type Numeric Default Value 5Minimum Value 0Maximum Value 3600Determines the time to wait between attempts to contact a management server when starting (the number of attempts is controlled by the
--connect-retriesoption). The default is 5 seconds.This option is deprecated, and is subject to removal in a future release of NDB Cluster. Use
--connect-retry-delayinstead. -
Property Value Command-Line Format --connect-retries=#Type Numeric Default Value 12Minimum Value 0Maximum Value 65535Set the number of times to retry a connection before giving up; 0 means 1 attempt only (and no retries). The default is 12 attempts. The time to wait between attempts is controlled by the
--connect-retry-delayoption. -
Property Value Command-Line Format --connect-retry-delay=#Type Numeric Default Value 5Minimum Value 0Maximum Value 4294967295Determines the time to wait between attempts to contact a management server when starting (the time between attempts is controlled by the
--connect-retriesoption). The default is 5 seconds.This option takes the place of the
--connect-delayoption, which is now deprecated and subject to removal in a future release of NDB Cluster. -
Property Value Command-Line Format --daemonType Boolean Default Value TRUEInstructs ndbd or ndbmtd to execute as a daemon process. This is the default behavior.
--nodaemoncan be used to prevent the process from running as a daemon.This option has no effect when running ndbd or ndbmtd on Windows platforms.
-
Property Value Command-Line Format --foregroundType Boolean Default Value FALSECauses ndbd or ndbmtd to execute as a foreground process, primarily for debugging purposes. This option implies the
--nodaemonoption.This option has no effect when running ndbd or ndbmtd on Windows platforms.
-
Property Value Command-Line Format --initialType Boolean Default Value FALSEInstructs ndbd to perform an initial start. An initial start erases any files created for recovery purposes by earlier instances of ndbd. It also re-creates recovery log files. On some operating systems, this process can take a substantial amount of time.
An
--initialstart is to be used only when starting the ndbd process under very special circumstances; this is because this option causes all files to be removed from the NDB Cluster file system and all redo log files to be re-created. These circumstances are listed here:When performing a software upgrade which has changed the contents of any files.
When restarting the node with a new version of ndbd.
As a measure of last resort when for some reason the node restart or system restart repeatedly fails. In this case, be aware that this node can no longer be used to restore data due to the destruction of the data files.
WarningTo avoid the possibility of eventual data loss, it is recommended that you not use the
--initialoption together withStopOnError = 0. Instead, setStopOnErrorto 0 inconfig.inionly after the cluster has been started, then restart the data nodes normally—that is, without the--initialoption. See the description of theStopOnErrorparameter for a detailed explanation of this issue. (Bug #24945638)Use of this option prevents the
StartPartialTimeoutandStartPartitionedTimeoutconfiguration parameters from having any effect.ImportantThis option does not affect backup files that have already been created by the affected node.
Prior to NDB 8.0.21, the
--initialoption also did not affect any Disk Data files. In NDB 8.0.21 and later, when used to perform an initial restart of the cluster, the option causes the removal of all data files associated with Disk Data tablespaces and undo log files associated with log file groups that existed previously on this data node (see Section 22.5.10, “NDB Cluster Disk Data Tables”).This option also has no effect on recovery of data by a data node that is just starting (or restarting) from data nodes that are already running (unless they also were started with
--initial, as part of an initial restart). This recovery of data occurs automatically, and requires no user intervention in an NDB Cluster that is running normally.It is permissible to use this option when starting the cluster for the very first time (that is, before any data node files have been created); however, it is not necessary to do so.
-
Property Value Command-Line Format --initial-startType Boolean Default Value FALSEThis option is used when performing a partial initial start of the cluster. Each node should be started with this option, as well as
--nowait-nodes.Suppose that you have a 4-node cluster whose data nodes have the IDs 2, 3, 4, and 5, and you wish to perform a partial initial start using only nodes 2, 4, and 5—that is, omitting node 3:
shell>
ndbd --ndb-nodeid=2 --nowait-nodes=3 --initial-startshell>ndbd --ndb-nodeid=4 --nowait-nodes=3 --initial-startshell>ndbd --ndb-nodeid=5 --nowait-nodes=3 --initial-startWhen using this option, you must also specify the node ID for the data node being started with the
--ndb-nodeidoption.ImportantDo not confuse this option with the
--nowait-nodesoption for ndb_mgmd, which can be used to enable a cluster configured with multiple management servers to be started without all management servers being online. -
Property Value Command-Line Format --install[=name]Platform Specific Windows Type String Default Value ndbdCauses ndbd to be installed as a Windows service. Optionally, you can specify a name for the service; if not set, the service name defaults to
ndbd. Although it is preferable to specify other ndbd program options in amy.iniormy.cnfconfiguration file, it is possible to use together with--install. However, in such cases, the--installoption must be specified first, before any other options are given, for the Windows service installation to succeed.It is generally not advisable to use this option together with the
--initialoption, since this causes the data node file system to be wiped and rebuilt every time the service is stopped and started. Extreme care should also be taken if you intend to use any of the other ndbd options that affect the starting of data nodes—including--initial-start,--nostart, and--nowait-nodes—together with--install, and you should make absolutely certain you fully understand and allow for any possible consequences of doing so.The
--installoption has no effect on non-Windows platforms. -
Property Value Command-Line Format --logbuffer-size=#Type Integer Default Value 32768Minimum Value 2048Maximum Value 4294967295Sets the size of the data node log buffer. When debugging with high amounts of extra logging, it is possible for the log buffer to run out of space if there are too many log messages, in which case some log messages can be lost. This should not occur during normal operations.
-
Property Value Command-Line Format --nodaemonType Boolean Default Value FALSEPrevents ndbd or ndbmtd from executing as a daemon process. This option overrides the
--daemonoption. This is useful for redirecting output to the screen when debugging the binary.The default behavior for ndbd and ndbmtd on Windows is to run in the foreground, making this option unnecessary on Windows platforms, where it has no effect.
-
Property Value Command-Line Format --nostartType Boolean Default Value FALSEInstructs ndbd not to start automatically. When this option is used, ndbd connects to the management server, obtains configuration data from it, and initializes communication objects. However, it does not actually start the execution engine until specifically requested to do so by the management server. This can be accomplished by issuing the proper
STARTcommand in the management client (see Section 22.5.1, “Commands in the NDB Cluster Management Client”). --nowait-nodes=node_id_1[,node_id_2[, ...]]Property Value Command-Line Format --nowait-nodes=listType String Default Value This option takes a list of data nodes which for which the cluster will not wait for before starting.
This can be used to start the cluster in a partitioned state. For example, to start the cluster with only half of the data nodes (nodes 2, 3, 4, and 5) running in a 4-node cluster, you can start each ndbd process with
--nowait-nodes=3,5. In this case, the cluster starts as soon as nodes 2 and 4 connect, and does not waitStartPartitionedTimeoutmilliseconds for nodes 3 and 5 to connect as it would otherwise.If you wanted to start up the same cluster as in the previous example without one ndbd (say, for example, that the host machine for node 3 has suffered a hardware failure) then start nodes 2, 4, and 5 with
--nowait-nodes=3. Then the cluster will start as soon as nodes 2, 4, and 5 connect and will not wait for node 3 to start.-
Property Value Command-Line Format --remove[=name]Platform Specific Windows Type String Default Value ndbdCauses an ndbd process that was previously installed as a Windows service to be removed. Optionally, you can specify a name for the service to be uninstalled; if not set, the service name defaults to
ndbd.The
--removeoption has no effect on non-Windows platforms. Causes extra debug output to be written to the node log.
You can also use
NODELOG DEBUG ONandNODELOG DEBUG OFFto enable and disable this extra logging while the data node is running.
ndbd generates a set of log files which are
placed in the directory specified by
DataDir in the
config.ini configuration file.
These log files are listed below.
node_id is and represents the node's
unique identifier. For example,
ndb_2_error.log is the error log generated
by the data node whose node ID is 2.
ndb_is a file containing records of all crashes which the referenced ndbd process has encountered. Each record in this file contains a brief error string and a reference to a trace file for this crash. A typical entry in this file might appear as shown here:node_id_error.logDate/Time: Saturday 30 July 2004 - 00:20:01 Type of error: error Message: Internal program error (failed ndbrequire) Fault ID: 2341 Problem data: DbtupFixAlloc.cpp Object of reference: DBTUP (Line: 173) ProgramName: NDB Kernel ProcessID: 14909 TraceFile: ndb_2_trace.log.2 ***EOM***
Listings of possible ndbd exit codes and messages generated when a data node process shuts down prematurely can be found in Data Node Error Messages.
ImportantThe last entry in the error log file is not necessarily the newest one (nor is it likely to be). Entries in the error log are not listed in chronological order; rather, they correspond to the order of the trace files as determined in the
ndb_file (see below). Error log entries are thus overwritten in a cyclical and not sequential fashion.node_id_trace.log.nextndb_is a trace file describing exactly what happened just before the error occurred. This information is useful for analysis by the NDB Cluster development team.node_id_trace.log.trace_idIt is possible to configure the number of these trace files that will be created before old files are overwritten.
trace_idis a number which is incremented for each successive trace file.ndb_is the file that keeps track of the next trace file number to be assigned.node_id_trace.log.nextndb_is a file containing any data output by the ndbd process. This file is created only if ndbd is started as a daemon, which is the default behavior.node_id_out.logndb_is a file containing the process ID of the ndbd process when started as a daemon. It also functions as a lock file to avoid the starting of nodes with the same identifier.node_id.pidndb_is a file used only in debug versions of ndbd, where it is possible to trace all incoming, outgoing, and internal messages with their data in the ndbd process.node_id_signal.log
It is recommended not to use a directory mounted through NFS
because in some environments this can cause problems whereby the
lock on the .pid file remains in effect
even after the process has terminated.
To start ndbd, it may also be necessary to specify the host name of the management server and the port on which it is listening. Optionally, one may also specify the node ID that the process is to use.
shell> ndbd --connect-string="nodeid=2;host=ndb_mgmd.mysql.com:1186"
See Section 22.3.3.3, “NDB Cluster Connection Strings”, for additional information about this issue. Section 22.4.31, “Options Common to NDB Cluster Programs — Options Common to NDB Cluster Programs”, describes other command-line options which can be used with ndbd. For information about data node configuration parameters, see Section 22.3.3.6, “Defining NDB Cluster Data Nodes”.
When ndbd starts, it actually initiates two processes. The first of these is called the “angel process”; its only job is to discover when the execution process has been completed, and then to restart the ndbd process if it is configured to do so. Thus, if you attempt to kill ndbd using the Unix kill command, it is necessary to kill both processes, beginning with the angel process. The preferred method of terminating an ndbd process is to use the management client and stop the process from there.
The execution process uses one thread for reading, writing, and scanning data, as well as all other activities. This thread is implemented asynchronously so that it can easily handle thousands of concurrent actions. In addition, a watch-dog thread supervises the execution thread to make sure that it does not hang in an endless loop. A pool of threads handles file I/O, with each thread able to handle one open file. Threads can also be used for transporter connections by the transporters in the ndbd process. In a multi-processor system performing a large number of operations (including updates), the ndbd process can consume up to 2 CPUs if permitted to do so.
For a machine with many CPUs it is possible to use several ndbd processes which belong to different node groups; however, such a configuration is still considered experimental and is not supported for MySQL 8.0 in a production setting. See Section 22.1.7, “Known Limitations of NDB Cluster”.
ndbinfo_select_all is a client program that
selects all rows and columns from one or more tables in the
ndbinfo database
Not all ndbinfo tables available in the
mysql client can be read by this program. In
addition, ndbinfo_select_all can show
information about some tables internal to
ndbinfo which cannot be accessed using SQL,
including the tables and
columns metadata tables.
To select from one or more ndbinfo tables
using ndbinfo_select_all, it is necessary to
supply the names of the tables when invoking the program as
shown here:
shell> ndbinfo_select_all table_name1 [table_name2] [...]
For example:
shell> ndbinfo_select_all logbuffers logspaces
== logbuffers ==
node_id log_type log_id log_part total used high
5 0 0 0 33554432 262144 0
6 0 0 0 33554432 262144 0
7 0 0 0 33554432 262144 0
8 0 0 0 33554432 262144 0
== logspaces ==
node_id log_type log_id log_part total used high
5 0 0 0 268435456 0 0
5 0 0 1 268435456 0 0
5 0 0 2 268435456 0 0
5 0 0 3 268435456 0 0
6 0 0 0 268435456 0 0
6 0 0 1 268435456 0 0
6 0 0 2 268435456 0 0
6 0 0 3 268435456 0 0
7 0 0 0 268435456 0 0
7 0 0 1 268435456 0 0
7 0 0 2 268435456 0 0
7 0 0 3 268435456 0 0
8 0 0 0 268435456 0 0
8 0 0 1 268435456 0 0
8 0 0 2 268435456 0 0
8 0 0 3 268435456 0 0
shell>
The following table includes options that are specific to ndbinfo_select_all. Additional descriptions follow the table. For options common to most NDB Cluster programs (including ndbinfo_select_all), see Section 22.4.31, “Options Common to NDB Cluster Programs — Options Common to NDB Cluster Programs”.
Table 22.253 Command-line options for the ndbinfo_select_all program
| Format | Description | Added, Deprecated, or Removed |
|---|---|---|
| Set the delay in seconds between loops. Default is 5 | (Supported in all MySQL 8.0 based releases) |
|
| Set the number of times to perform the select. Default is 1 | (Supported in all MySQL 8.0 based releases) |
|
| Name of the database where the table located | (Supported in all MySQL 8.0 based releases) |
|
| Set the degree of parallelism | (Supported in all MySQL 8.0 based releases) |
-
Property Value Command-Line Format --delay=#Type Numeric Default Value 5Minimum Value 0Maximum Value MAX_INTThis option sets the number of seconds to wait between executing loops. Has no effect if
--loopsis set to 0 or 1. -
Property Value Command-Line Format --loops=#Type Numeric Default Value 1Minimum Value 0Maximum Value MAX_INTThis option sets the number of times to execute the select. Use
--delayto set the time between loops.
ndbmtd is a multithreaded version of
ndbd, the process that is used to handle all
the data in tables using the
NDBCLUSTER storage engine.
ndbmtd is intended for use on host computers
having multiple CPU cores. Except where otherwise noted,
ndbmtd functions in the same way as
ndbd; therefore, in this section, we
concentrate on the ways in which ndbmtd
differs from ndbd, and you should consult
Section 22.4.1, “ndbd — The NDB Cluster Data Node Daemon”, for additional
information about running NDB Cluster data nodes that apply to
both the single-threaded and multithreaded versions of the data
node process.
Command-line options and configuration parameters used with ndbd also apply to ndbmtd. For more information about these options and parameters, see Section 22.4.1, “ndbd — The NDB Cluster Data Node Daemon”, and Section 22.3.3.6, “Defining NDB Cluster Data Nodes”, respectively.
ndbmtd is also file system-compatible with
ndbd. In other words, a data node running
ndbd can be stopped, the binary replaced with
ndbmtd, and then restarted without any loss
of data. (However, when doing this, you must make sure that
MaxNoOfExecutionThreads
is set to an apppriate value before restarting the node if you
wish for ndbmtd to run in multithreaded
fashion.) Similarly, an ndbmtd binary can be
replaced with ndbd simply by stopping the
node and then starting ndbd in place of the
multithreaded binary. It is not necessary when switching between
the two to start the data node binary using
--initial.
Using ndbmtd differs from using ndbd in two key respects:
Because ndbmtd runs by default in single-threaded mode (that is, it behaves like ndbd), you must configure it to use multiple threads. This can be done by setting an appropriate value in the
config.inifile for theMaxNoOfExecutionThreadsconfiguration parameter or theThreadConfigconfiguration parameter. UsingMaxNoOfExecutionThreadsis simpler, butThreadConfigoffers more flexibility. For more information about these configuration parameters and their use, see Multi-Threading Configuration Parameters (ndbmtd).Trace files are generated by critical errors in ndbmtd processes in a somewhat different fashion from how these are generated by ndbd failures. These differences are discussed in more detail in the next few paragraphs.
Like ndbd, ndbmtd
generates a set of log files which are placed in the directory
specified by DataDir in
the config.ini configuration file. Except
for trace files, these are generated in the same way and have
the same names as those generated by ndbd.
In the event of a critical error, ndbmtd
generates trace files describing what happened just prior to the
error' occurrence. These files, which can be found in the
data node's
DataDir, are useful for
analysis of problems by the NDB Cluster Development and Support
teams. One trace file is generated for each
ndbmtd thread. The names of these files have
the following pattern:
ndb_node_id_trace.log.trace_id_tthread_id,
In this pattern, node_id stands for
the data node's unique node ID in the cluster,
trace_id is a trace sequence number,
and thread_id is the thread ID. For
example, in the event of the failure of an
ndbmtd process running as an NDB Cluster data
node having the node ID 3 and with
MaxNoOfExecutionThreads
equal to 4, four trace files are generated in the data
node's data directory. If the is the first time this node
has failed, then these files are named
ndb_3_trace.log.1_t1,
ndb_3_trace.log.1_t2,
ndb_3_trace.log.1_t3, and
ndb_3_trace.log.1_t4. Internally, these
trace files follow the same format as ndbd
trace files.
The ndbd exit codes and messages that are generated when a data node process shuts down prematurely are also used by ndbmtd. See Data Node Error Messages, for a listing of these.
The management server is the process that reads the cluster configuration file and distributes this information to all nodes in the cluster that request it. It also maintains a log of cluster activities. Management clients can connect to the management server and check the cluster's status.
The following table includes options that are specific to the NDB Cluster management server program ndb_mgmd. Additional descriptions follow the table. For options common to most NDB Cluster programs (including ndb_mgmd), see Section 22.4.31, “Options Common to NDB Cluster Programs — Options Common to NDB Cluster Programs”.
Table 22.254 Command-line options for the ndb_mgmd program
| Format | Description | Added, Deprecated, or Removed |
|---|---|---|
| Local bind address | (Supported in all MySQL 8.0 based releases) |
|
| Enable the management server configuration cache; TRUE by default | (Supported in all MySQL 8.0 based releases) |
|
| Specify the cluster configuration file; in NDB-6.4.0 and later, needs --reload or --initial to override configuration cache if present | (Supported in all MySQL 8.0 based releases) |
|
| Specify the cluster management server's configuration cache directory | (Supported in all MySQL 8.0 based releases) |
|
| Run ndb_mgmd in daemon mode (default) | (Supported in all MySQL 8.0 based releases) |
|
| Causes the management server reload its configuration data from the configuration file, bypassing the configuration cache | (Supported in all MySQL 8.0 based releases) |
|
| Used to install the management server process as a Windows service. Does not apply on non-Windows platforms | (Supported in all MySQL 8.0 based releases) |
|
| Run ndb_mgmd in interactive mode (not officially supported in production; for testing purposes only) | (Supported in all MySQL 8.0 based releases) |
|
| A name to use when writing messages applying to this node in the cluster log | (Supported in all MySQL 8.0 based releases) |
|
| Read cluster configuration data from the my.cnf file | (Supported in all MySQL 8.0 based releases) |
|
| Do not provide any node id checks | (Supported in all MySQL 8.0 based releases) |
|
| Do not run ndb_mgmd as a daemon | (Supported in all MySQL 8.0 based releases) |
|
| Do not wait for these management nodes when starting this management server. Also requires --ndb-nodeid to be used | (Supported in all MySQL 8.0 based releases) |
|
| Print full configuration and exit | (Supported in all MySQL 8.0 based releases) |
|
| Causes the management server to compare the configuration file with its configuration cache | (Supported in all MySQL 8.0 based releases) |
|
| Used to remove a management server process that was previously installed as a Windows service, optionally specifying the name of the service to be removed. Does not apply on non-Windows platforms | (Supported in all MySQL 8.0 based releases) |
|
| Write additional information to the log | (Supported in all MySQL 8.0 based releases) |
-
Property Value Command-Line Format --bind-address=hostType String Default Value [none]Causes the management server to bind to a specific network interface (host name or IP address). This option has no default value.
-
Property Value Command-Line Format --config-cache[=TRUE|FALSE]Type Boolean Default Value TRUEThis option, whose default value is
1(orTRUE, orON), can be used to disable the management server's configuration cache, so that it reads its configuration fromconfig.inievery time it starts (see Section 22.3.3, “NDB Cluster Configuration Files”). You can do this by starting the ndb_mgmd process with any one of the following options:Using one of the options just listed is effective only if the management server has no stored configuration at the time it is started. If the management server finds any configuration cache files, then the
--config-cacheoption or the--skip-config-cacheoption is ignored. Therefore, to disable configuration caching, the option should be used the first time that the management server is started. Otherwise—that is, if you wish to disable configuration caching for a management server that has already created a configuration cache—you must stop the management server, delete any existing configuration cache files manually, then restart the management server with--skip-config-cache(or with--config-cacheset equal to 0,OFF, orFALSE).Configuration cache files are normally created in a directory named
mysql-clusterunder the installation directory (unless this location has been overridden using the--configdiroption). Each time the management server updates its configuration data, it writes a new cache file. The files are named sequentially in order of creation using the following format:ndb_
node-id_config.bin.seq-numbernode-idis the management server's node ID;seq-numberis a sequence number, beginning with 1. For example, if the management server's node ID is 5, then the first three configuration cache files would, when they are created, be namedndb_5_config.bin.1,ndb_5_config.bin.2, andndb_5_config.bin.3.If your intent is to purge or reload the configuration cache without actually disabling caching, you should start ndb_mgmd with one of the options
--reloador--initialinstead of--skip-config-cache.To re-enable the configuration cache, simply restart the management server, but without the
--config-cacheor--skip-config-cacheoption that was used previously to disable the configuration cache.ndb_mgmd does not check for the configuration directory (
--configdir) or attempts to create one when--skip-config-cacheis used. (Bug #13428853) --config-file=,filename-ffilenameProperty Value Command-Line Format --config-file=fileType File name Default Value [none]Instructs the management server as to which file it should use for its configuration file. By default, the management server looks for a file named
config.iniin the same directory as the ndb_mgmd executable; otherwise the file name and location must be specified explicitly.This option has no default value, and is ignored unless the management server is forced to read the configuration file, either because ndb_mgmd was started with the
--reloador--initialoption, or because the management server could not find any configuration cache. This option is also read if ndb_mgmd was started with--config-cache=OFF. See Section 22.3.3, “NDB Cluster Configuration Files”, for more information.-
Property Value Command-Line Format --configdir=directory--config-dir=directoryType File name Default Value $INSTALLDIR/mysql-clusterSpecifies the cluster management server's configuration cache directory.
--config-diris an alias for this option. -
Property Value Command-Line Format --daemonType Boolean Default Value TRUEInstructs ndb_mgmd to start as a daemon process. This is the default behavior.
This option has no effect when running ndb_mgmd on Windows platforms.
-
Property Value Command-Line Format --initialType Boolean Default Value FALSEConfiguration data is cached internally, rather than being read from the cluster global configuration file each time the management server is started (see Section 22.3.3, “NDB Cluster Configuration Files”). Using the
--initialoption overrides this behavior, by forcing the management server to delete any existing cache files, and then to re-read the configuration data from the cluster configuration file and to build a new cache.This differs in two ways from the
--reloadoption. First,--reloadforces the server to check the configuration file against the cache and reload its data only if the contents of the file are different from the cache. Second,--reloaddoes not delete any existing cache files.If ndb_mgmd is invoked with
--initialbut cannot find a global configuration file, the management server cannot start.When a management server starts, it checks for another management server in the same NDB Cluster and tries to use the other management server's configuration data. This behavior has implications when performing a rolling restart of an NDB Cluster with multiple management nodes. See Section 22.5.5, “Performing a Rolling Restart of an NDB Cluster”, for more information.
When used together with the
--config-fileoption, the cache is cleared only if the configuration file is actually found. -
Property Value Command-Line Format --install[=name]Platform Specific Windows Type String Default Value ndb_mgmdCauses ndb_mgmd to be installed as a Windows service. Optionally, you can specify a name for the service; if not set, the service name defaults to
ndb_mgmd. Although it is preferable to specify other ndb_mgmd program options in amy.iniormy.cnfconfiguration file, it is possible to use them together with--install. However, in such cases, the--installoption must be specified first, before any other options are given, for the Windows service installation to succeed.It is generally not advisable to use this option together with the
--initialoption, since this causes the configuration cache to be wiped and rebuilt every time the service is stopped and started. Care should also be taken if you intend to use any other ndb_mgmd options that affect the starting of the management server, and you should make absolutely certain you fully understand and allow for any possible consequences of doing so.The
--installoption has no effect on non-Windows platforms. -
Property Value Command-Line Format --interactiveType Boolean Default Value FALSEStarts ndb_mgmd in interactive mode; that is, an ndb_mgm client session is started as soon as the management server is running. This option does not start any other NDB Cluster nodes.
-
Property Value Command-Line Format --log-name=nameType String Default Value MgmtSrvrProvides a name to be used for this node in the cluster log.
-
Property Value Command-Line Format --mycnfType Boolean Default Value FALSERead configuration data from the
my.cnffile. -
Property Value Command-Line Format --no-nodeid-checksType Boolean Default Value FALSEDo not perform any checks of node IDs.
-
Property Value Command-Line Format --nodaemonType Boolean Default Value FALSEInstructs ndb_mgmd not to start as a daemon process.
The default behavior for ndb_mgmd on Windows is to run in the foreground, making this option unnecessary on Windows platforms.
-
Property Value Command-Line Format --nowait-nodes=listType Numeric Default Value Minimum Value 1Maximum Value 255When starting an NDB Cluster is configured with two management nodes, each management server normally checks to see whether the other ndb_mgmd is also operational and whether the other management server's configuration is identical to its own. However, it is sometimes desirable to start the cluster with only one management node (and perhaps to allow the other ndb_mgmd to be started later). This option causes the management node to bypass any checks for any other management nodes whose node IDs are passed to this option, permitting the cluster to start as though configured to use only the management node that was started.
For purposes of illustration, consider the following portion of a
config.inifile (where we have omitted most of the configuration parameters that are not relevant to this example):[ndbd] NodeId = 1 HostName = 198.51.100.101 [ndbd] NodeId = 2 HostName = 198.51.100.102 [ndbd] NodeId = 3 HostName = 198.51.100.103 [ndbd] NodeId = 4 HostName = 198.51.100.104 [ndb_mgmd] NodeId = 10 HostName = 198.51.100.150 [ndb_mgmd] NodeId = 11 HostName = 198.51.100.151 [api] NodeId = 20 HostName = 198.51.100.200 [api] NodeId = 21 HostName = 198.51.100.201
Assume that you wish to start this cluster using only the management server having node ID
10and running on the host having the IP address 198.51.100.150. (Suppose, for example, that the host computer on which you intend to the other management server is temporarily unavailable due to a hardware failure, and you are waiting for it to be repaired.) To start the cluster in this way, use a command line on the machine at 198.51.100.150 to enter the following command:shell>
ndb_mgmd --ndb-nodeid=10 --nowait-nodes=11As shown in the preceding example, when using
--nowait-nodes, you must also use the--ndb-nodeidoption to specify the node ID of this ndb_mgmd process.You can then start each of the cluster's data nodes in the usual way. If you wish to start and use the second management server in addition to the first management server at a later time without restarting the data nodes, you must start each data node with a connection string that references both management servers, like this:
shell>
ndbd -c 198.51.100.150,198.51.100.151The same is true with regard to the connection string used with any mysqld processes that you wish to start as NDB Cluster SQL nodes connected to this cluster. See Section 22.3.3.3, “NDB Cluster Connection Strings”, for more information.
When used with ndb_mgmd, this option affects the behavior of the management node with regard to other management nodes only. Do not confuse it with the
--nowait-nodesoption used with ndbd or ndbmtd to permit a cluster to start with fewer than its full complement of data nodes; when used with data nodes, this option affects their behavior only with regard to other data nodes.Multiple management node IDs may be passed to this option as a comma-separated list. Each node ID must be no less than 1 and no greater than 255. In practice, it is quite rare to use more than two management servers for the same NDB Cluster (or to have any need for doing so); in most cases you need to pass to this option only the single node ID for the one management server that you do not wish to use when starting the cluster.
NoteWhen you later start the “missing” management server, its configuration must match that of the management server that is already in use by the cluster. Otherwise, it fails the configuration check performed by the existing management server, and does not start.
-
Property Value Command-Line Format --print-full-configType Boolean Default Value FALSEShows extended information regarding the configuration of the cluster. With this option on the command line the ndb_mgmd process prints information about the cluster setup including an extensive list of the cluster configuration sections as well as parameters and their values. Normally used together with the
--config-file(-f) option. -
Property Value Command-Line Format --reloadType Boolean Default Value FALSENDB Cluster configuration data is stored internally rather than being read from the cluster global configuration file each time the management server is started (see Section 22.3.3, “NDB Cluster Configuration Files”). Using this option forces the management server to check its internal data store against the cluster configuration file and to reload the configuration if it finds that the configuration file does not match the cache. Existing configuration cache files are preserved, but not used.
This differs in two ways from the
--initialoption. First,--initialcauses all cache files to be deleted. Second,--initialforces the management server to re-read the global configuration file and construct a new cache.If the management server cannot find a global configuration file, then the
--reloadoption is ignored.When
--reloadis used, the management server must be able to communicate with data nodes and any other management servers in the cluster before it attempts to read the global configuration file; otherwise, the management server fails to start. This can happen due to changes in the networking environment, such as new IP addresses for nodes or an altered firewall configuration. In such cases, you must use--initialinstead to force the exsiting cached configuration to be discarded and reloaded from the file. See Section 22.5.5, “Performing a Rolling Restart of an NDB Cluster”, for additional information. -
Property Value Command-Line Format --remove[=name]Platform Specific Windows Type String Default Value ndb_mgmdRemove a management server process that has been installed as a Windows service, optionally specifying the name of the service to be removed. Applies only to Windows platforms.
-
Property Value Command-Line Format --verboseType Boolean Default Value FALSERemove a management server process that has been installed as a Windows service, optionally specifying the name of the service to be removed. Applies only to Windows platforms.
It is not strictly necessary to specify a connection string when starting the management server. However, if you are using more than one management server, a connection string should be provided and each node in the cluster should specify its node ID explicitly.
See Section 22.3.3.3, “NDB Cluster Connection Strings”, for information about using connection strings. Section 22.4.4, “ndb_mgmd — The NDB Cluster Management Server Daemon”, describes other options for ndb_mgmd.
The following files are created or used by
ndb_mgmd in its starting directory, and are
placed in the DataDir as
specified in the config.ini configuration
file. In the list that follows,
node_id is the unique node
identifier.
config.iniis the configuration file for the cluster as a whole. This file is created by the user and read by the management server. Section 22.3, “Configuration of NDB Cluster”, discusses how to set up this file.ndb_is the cluster events log file. Examples of such events include checkpoint startup and completion, node startup events, node failures, and levels of memory usage. A complete listing of cluster events with descriptions may be found in Section 22.5, “Management of NDB Cluster”.node_id_cluster.logBy default, when the size of the cluster log reaches one million bytes, the file is renamed to
ndb_, wherenode_id_cluster.log.seq_idseq_idis the sequence number of the cluster log file. (For example: If files with the sequence numbers 1, 2, and 3 already exist, the next log file is named using the number4.) You can change the size and number of files, and other characteristics of the cluster log, using theLogDestinationconfiguration parameter.ndb_is the file used fornode_id_out.logstdoutandstderrwhen running the management server as a daemon.ndb_is the process ID file used when running the management server as a daemon.node_id.pid
The ndb_mgm management client process is actually not needed to run the cluster. Its value lies in providing a set of commands for checking the cluster's status, starting backups, and performing other administrative functions. The management client accesses the management server using a C API. Advanced users can also employ this API for programming dedicated management processes to perform tasks similar to those performed by ndb_mgm.
To start the management client, it is necessary to supply the host name and port number of the management server:
shell> ndb_mgm [host_name [port_num]]
For example:
shell> ndb_mgm ndb_mgmd.mysql.com 1186
The default host name and port number are
localhost and 1186, respectively.
The following table includes options that are specific to the NDB Cluster management client program ndb_mgm. Additional descriptions follow the table. For options common to most NDB Cluster programs (including ndb_mgm), see Section 22.4.31, “Options Common to NDB Cluster Programs — Options Common to NDB Cluster Programs”.
Table 22.255 Command-line options for the ndb_mgm program
| Format | Description | Added, Deprecated, or Removed |
|---|---|---|
| Set the number of times to retry a connection before giving up; 0 means 1 attempt only (and no retries) | (Supported in all MySQL 8.0 based releases) |
|
| Set the number of times to retry a connection before giving up; synonym for --connect-retries | (Supported in all MySQL 8.0 based releases) |
|
| Execute command and exit | (Supported in all MySQL 8.0 based releases) |
-
Property Value Command-Line Format --connect-retries=#Type Numeric Default Value 3Minimum Value 0Maximum Value 4294967295This option specifies the number of times following the first attempt to retry a connection before giving up (the client always tries the connection at least once). The length of time to wait per attempt is set using
--connect-retry-delay.This option is synonymous with the
--try-reconnectoption, which is now deprecated.The default for this option this option differs from its default when used with other
NDBprograms. See Section 22.4.31, “Options Common to NDB Cluster Programs — Options Common to NDB Cluster Programs”, for more information. -
Property Value Command-Line Format --execute=nameThis option can be used to send a command to the NDB Cluster management client from the system shell. For example, either of the following is equivalent to executing
SHOWin the management client:shell>
ndb_mgm -e "SHOW"shell>ndb_mgm --execute="SHOW"This is analogous to how the
--executeor-eoption works with the mysql command-line client. See Section 4.2.2.1, “Using Options on the Command Line”.NoteIf the management client command to be passed using this option contains any space characters, then the command must be enclosed in quotation marks. Either single or double quotation marks may be used. If the management client command contains no space characters, the quotation marks are optional.
-
Property Value Command-Line Format --try-reconnect=#Deprecated Yes Type Numeric Type Integer Default Value 12Default Value 3Minimum Value 0Maximum Value 4294967295If the connection to the management server is broken, the node tries to reconnect to it every 5 seconds until it succeeds. By using this option, it is possible to limit the number of attempts to
numberbefore giving up and reporting an error instead.This option is deprecated and subject to removal in a future release. Use
--connect-retries, instead.
Additional information about using ndb_mgm can be found in Section 22.5.1, “Commands in the NDB Cluster Management Client”.
This tool can be used to check for and remove orphaned BLOB
column parts from NDB tables, as
well as to generate a file listing any orphaned parts. It is
sometimes useful in diagnosing and repairing corrupted or
damaged NDB tables containing
BLOB or
TEXT columns.
The basic syntax for ndb_blob_tool is shown here:
ndb_blob_tool [options]table[column, ...]
Unless you use the --help
option, you must specify an action to be performed by including
one or more of the options
--check-orphans,
--delete-orphans, or
--dump-file. These options
cause ndb_blob_tool to check for orphaned
BLOB parts, remove any orphaned BLOB parts, and generate a dump
file listing orphaned BLOB parts, respectively, and are
described in more detail later in this section.
You must also specify the name of a table when invoking
ndb_blob_tool. In addition, you can
optionally follow the table name with the (comma-separated)
names of one or more BLOB or
TEXT columns from that table. If
no columns are listed, the tool works on all of the table's
BLOB and
TEXT columns. If you need to
specify a database, use the
--database
(-d) option.
The --verbose option
provides additional information in the output about the
tool's progress.
The following table includes options that are specific to ndb_blob_tool. Additional descriptions follow the table. For options common to most NDB Cluster programs (including ndb_blob_tool), see Section 22.4.31, “Options Common to NDB Cluster Programs — Options Common to NDB Cluster Programs”.
Table 22.256 Command-line options for the ndb_blob_tool program
| Format | Description | Added, Deprecated, or Removed |
|---|---|---|
| Write dummy blob parts to take place of those which are missing | ADDED: NDB 8.0.20 |
|
| Check for blobs having inline parts but missing one or more parts from parts table | ADDED: NDB 8.0.20 |
|
| Check for blob parts having no corresponding inline parts | (Supported in all MySQL 8.0 based releases) |
|
| Database to find the table in | (Supported in all MySQL 8.0 based releases) |
|
| Delete blob parts having no corresponding inline parts | (Supported in all MySQL 8.0 based releases) |
|
| Write orphan keys to specified file | (Supported in all MySQL 8.0 based releases) |
|
| Verbose output | (Supported in all MySQL 8.0 based releases) |
-
Property Value Command-Line Format --add-missingIntroduced 8.0.20-ndb-8.0.20 Type Boolean Default Value FALSEFor each inline part in NDB Cluster tables which has no corresponding BLOB part, write a dummy BLOB part of the required length, consisting of spaces.
-
Property Value Command-Line Format --check-missingIntroduced 8.0.20-ndb-8.0.20 Type Boolean Default Value FALSECheck for inline parts in NDB Cluster tables which have no corresponding BLOB parts.
-
Property Value Command-Line Format --check-orphansType Boolean Default Value FALSECheck for BLOB parts in NDB Cluster tables which have no corresponding inline parts.
-
Property Value Command-Line Format --database=db_nameType String Default Value [none]Specify the database to find the table in.
-
Property Value Command-Line Format --delete-orphansType Boolean Default Value FALSERemove BLOB parts from NDB Cluster tables which have no corresponding inline parts.
-
Property Value Command-Line Format --dump-file=fileType File name Default Value [none]Writes a list of orphaned BLOB column parts to
file. The information written to the file includes the table key and BLOB part number for each orphaned BLOB part. -
Property Value Command-Line Format --verboseType Boolean Default Value FALSEProvide extra information in the tool's output regarding its progress.
Example
First we create an NDB table in the
test database, using the
CREATE TABLE statement shown
here:
USE test;
CREATE TABLE btest (
c0 BIGINT UNSIGNED NOT NULL AUTO_INCREMENT PRIMARY KEY,
c1 TEXT,
c2 BLOB
) ENGINE=NDB;Then we insert a few rows into this table, using a series of statements similar to this one:
INSERT INTO btest VALUES (NULL, 'x', REPEAT('x', 1000));
When run with
--check-orphans against
this table, ndb_blob_tool generates the
following output:
shell> ndb_blob_tool --check-orphans --verbose -d test btest
connected
processing 2 blobs
processing blob #0 c1 NDB$BLOB_19_1
NDB$BLOB_19_1: nextResult: res=1
total parts: 0
orphan parts: 0
processing blob #1 c2 NDB$BLOB_19_2
NDB$BLOB_19_2: nextResult: res=0
NDB$BLOB_19_2: nextResult: res=0
NDB$BLOB_19_2: nextResult: res=0
NDB$BLOB_19_2: nextResult: res=0
NDB$BLOB_19_2: nextResult: res=0
NDB$BLOB_19_2: nextResult: res=0
NDB$BLOB_19_2: nextResult: res=0
NDB$BLOB_19_2: nextResult: res=0
NDB$BLOB_19_2: nextResult: res=0
NDB$BLOB_19_2: nextResult: res=0
NDB$BLOB_19_2: nextResult: res=1
total parts: 10
orphan parts: 0
disconnected
NDBT_ProgramExit: 0 - OK
The tool reports that there are no NDB BLOB
column parts associated with column c1, even
though c1 is a
TEXT column. This is due to the
fact that, in an NDB table, only
the first 256 bytes of a BLOB or
TEXT column value are stored
inline, and only the excess, if any, is stored separately; thus,
if there are no values using more than 256 bytes in a given
column of one of these types, no BLOB column
parts are created by NDB for this column. See
Section 11.7, “Data Type Storage Requirements”, for more information.
This tool extracts current configuration information for data
nodes, SQL nodes, and API nodes from one of a number of sources:
an NDB Cluster management node, or its
config.ini or my.cnf
file. By default, the management node is the source for the
configuration data; to override the default, execute ndb_config
with the --config-file or
--mycnf option. It is also
possible to use a data node as the source by specifying its node
ID with
--config_from_node=.
node_id
ndb_config can also provide an offline dump
of all configuration parameters which can be used, along with
their default, maximum, and minimum values and other
information. The dump can be produced in either text or XML
format; for more information, see the discussion of the
--configinfo and
--xml options later in this
section).
You can filter the results by section (DB,
SYSTEM, or CONNECTIONS)
using one of the options
--nodes,
--system, or
--connections.
The following table includes options that are specific to ndb_config. Additional descriptions follow the table. For options common to most NDB Cluster programs (including ndb_config), see Section 22.4.31, “Options Common to NDB Cluster Programs — Options Common to NDB Cluster Programs”.
Table 22.257 Command-line options for the ndb_config program
| Format | Description | Added, Deprecated, or Removed |
|---|---|---|
| Set the path to config.ini file | (Supported in all MySQL 8.0 based releases) |
|
| Obtain configuration data from the node having this ID (must be a data node) | (Supported in all MySQL 8.0 based releases) |
|
| Dumps information about all NDB configuration parameters in text format with default, maximum, and minimum values. Use with --xml to obtain XML output | (Supported in all MySQL 8.0 based releases) |
|
| Print connections information ([tcp], [tcp default], [sci], [sci default], [shm], or [shm default] sections of cluster configuration file) only. Cannot be used with --system or --nodes | (Supported in all MySQL 8.0 based releases) |
|
| Print only configuration parameters that have non-default values | (Supported in all MySQL 8.0 based releases) |
|
| Field separator | (Supported in all MySQL 8.0 based releases) |
|
| Specify host | (Supported in all MySQL 8.0 based releases) |
|
| Read configuration data from my.cnf file | (Supported in all MySQL 8.0 based releases) |
|
| Get configuration of node with this ID | (Supported in all MySQL 8.0 based releases) |
|
| Print node information ([ndbd] or [ndbd default] section of cluster configuration file) only. Cannot be used with --system or --connections | (Supported in all MySQL 8.0 based releases) |
|
| Short form for --ndb-connectstring | (Supported in all MySQL 8.0 based releases) |
|
| One or more query options (attributes) | (Supported in all MySQL 8.0 based releases) |
|
| Dumps all parameters and values to a single comma-delimited string | (Supported in all MySQL 8.0 based releases) |
|
| Row separator | (Supported in all MySQL 8.0 based releases) |
|
| Print SYSTEM section information only (see ndb_config --configinfo output). Cannot be used with --nodes or --connections | (Supported in all MySQL 8.0 based releases) |
|
| Specify node type | (Supported in all MySQL 8.0 based releases) |
|
| Use --xml with --configinfo to obtain a dump of all NDB configuration parameters in XML format with default, maximum, and minimum values | (Supported in all MySQL 8.0 based releases) |
The
--configinfooption causes ndb_config to dump a list of each NDB Cluster configuration parameter supported by the NDB Cluster distribution of which ndb_config is a part, including the following information:A brief description of each parameter's purpose, effects, and usage
The section of the
config.inifile where the parameter may be usedThe parameter's data type or unit of measurement
Where applicable, the parameter's default, minimum, and maximum values
NDB Cluster release version and build information
By default, this output is in text format. Part of this output is shown here:
shell>
ndb_config --configinfo****** SYSTEM ****** Name (String) Name of system (NDB Cluster) MANDATORY PrimaryMGMNode (Non-negative Integer) Node id of Primary ndb_mgmd(MGM) node Default: 0 (Min: 0, Max: 4294967039) ConfigGenerationNumber (Non-negative Integer) Configuration generation number Default: 0 (Min: 0, Max: 4294967039) ****** DB ****** MaxNoOfSubscriptions (Non-negative Integer) Max no of subscriptions (default 0 == MaxNoOfTables) Default: 0 (Min: 0, Max: 4294967039) MaxNoOfSubscribers (Non-negative Integer) Max no of subscribers (default 0 == 2 * MaxNoOfTables) Default: 0 (Min: 0, Max: 4294967039) …Use this option together with the
--xmloption to obtain output in XML format.-
Property Value Command-Line Format --config-file=file_nameType File name Default Value Gives the path to the management server's configuration file (
config.ini). This may be a relative or absolute path. If the management node resides on a different host from the one on which ndb_config is invoked, then an absolute path must be used. -
Property Value Command-Line Format --config-from-node=#Type Numeric Default Value noneMinimum Value 1Maximum Value 48Obtain the cluster's configuration data from the data node that has this ID.
If the node having this ID is not a data node, ndb_config fails with an error. (To obtain configuration data from the management node instead, simply omit this option.)
-
Property Value Command-Line Format --connectionsType Boolean Default Value FALSETells ndb_config to print
CONNECTIONSinformation only—that is, information about parameters found in the[tcp],[tcp default],[shm], or[shm default]sections of the cluster configuration file (see Section 22.3.3.10, “NDB Cluster TCP/IP Connections”, and Section 22.3.3.12, “NDB Cluster Shared-Memory Connections”, for more information).This option is mutually exclusive with
--nodesand--system; only one of these 3 options can be used. -
Property Value Command-Line Format --diff-defaultType Boolean Default Value FALSEPrint only configuration parameters that have non-default values.
--fields=,delimiter-fdelimiterProperty Value Command-Line Format --fields=stringType String Default Value Specifies a
delimiterstring used to separate the fields in the result. The default is,(the comma character).NoteIf the
delimitercontains spaces or escapes (such as\nfor the linefeed character), then it must be quoted.-
Property Value Command-Line Format --host=nameType String Default Value Specifies the host name of the node for which configuration information is to be obtained.
NoteWhile the hostname
localhostusually resolves to the IP address127.0.0.1, this may not necessarily be true for all operating platforms and configurations. This means that it is possible, whenlocalhostis used inconfig.ini, for ndb_config--host=localhostto fail if ndb_config is run on a different host wherelocalhostresolves to a different address (for example, on some versions of SUSE Linux, this is127.0.0.2). In general, for best results, you should use numeric IP addresses for all NDB Cluster configuration values relating to hosts, or verify that all NDB Cluster hosts handlelocalhostin the same fashion. -
Property Value Command-Line Format --mycnfType Boolean Default Value FALSERead configuration data from the
my.cnffile. --ndb-connectstring=,connection_string-cconnection_stringProperty Value Command-Line Format --ndb-connectstring=connectstring--connect-string=connectstringType String Default Value localhost:1186Specifies the connection string to use in connecting to the management server. The format for the connection string is the same as described in Section 22.3.3.3, “NDB Cluster Connection Strings”, and defaults to
localhost:1186.-
Property Value Command-Line Format --ndb-nodeid=#Type Numeric Default Value 0Specify the node ID of the node for which configuration information is to be obtained.
-
Property Value Command-Line Format --nodesType Boolean Default Value FALSETells ndb_config to print information relating only to parameters defined in an
[ndbd]or[ndbd default]section of the cluster configuration file (see Section 22.3.3.6, “Defining NDB Cluster Data Nodes”).This option is mutually exclusive with
--connectionsand--system; only one of these 3 options can be used. --query=,query-options-qquery-optionsProperty Value Command-Line Format --query=stringType String Default Value This is a comma-delimited list of query options—that is, a list of one or more node attributes to be returned. These include
nodeid(node ID), type (node type—that is,ndbd,mysqld, orndb_mgmd), and any configuration parameters whose values are to be obtained.For example,
--query=nodeid,type,datamemory,datadirreturns the node ID, node type,DataMemory, andDataDirfor each node.NoteIf a given parameter is not applicable to a certain type of node, than an empty string is returned for the corresponding value. See the examples later in this section for more information.
-
Property Value Command-Line Format --query-allType String Default Value Returns a comma-delimited list of all query options (node attributes; note that this list is a single string.
--rows=,separator-rseparatorProperty Value Command-Line Format --rows=stringType String Default Value Specifies a
separatorstring used to separate the rows in the result. The default is a space character.NoteIf the
separatorcontains spaces or escapes (such as\nfor the linefeed character), then it must be quoted.-
Property Value Command-Line Format --systemType Boolean Default Value FALSETells ndb_config to print
SYSTEMinformation only. This consists of system variables that cannot be changed at run time; thus, there is no corresponding section of the cluster configuration file for them. They can be seen (prefixed with****** SYSTEM ******) in the output of ndb_config--configinfo.This option is mutually exclusive with
--nodesand--connections; only one of these 3 options can be used. -
Property Value Command-Line Format --type=nameType Enumeration Default Value [none]Valid Values ndbdmysqldndb_mgmdFilters results so that only configuration values applying to nodes of the specified
node_type(ndbd,mysqld, orndb_mgmd) are returned. -
Property Value Command-Line Format --help--usageCauses ndb_config to print a list of available options, and then exit.
-
Property Value Command-Line Format --versionCauses ndb_config to print a version information string, and then exit.
-
Property Value Command-Line Format --configinfo --xmlType Boolean Default Value falseCause ndb_config
--configinfoto provide output as XML by adding this option. A portion of such output is shown in this example:shell>
ndb_config --configinfo --xml<configvariables protocolversion="1" ndbversionstring="5.7.30-ndb-7.5.19" ndbversion="460032" ndbversionmajor="7" ndbversionminor="5" ndbversionbuild="0"> <section name="SYSTEM"> <param name="Name" comment="Name of system (NDB Cluster)" type="string" mandatory="true"/> <param name="PrimaryMGMNode" comment="Node id of Primary ndb_mgmd(MGM) node" type="unsigned" default="0" min="0" max="4294967039"/> <param name="ConfigGenerationNumber" comment="Configuration generation number" type="unsigned" default="0" min="0" max="4294967039"/> </section> <section name="MYSQLD" primarykeys="NodeId"> <param name="wan" comment="Use WAN TCP setting as default" type="bool" default="false"/> <param name="HostName" comment="Name of computer for this node" type="string" default=""/> <param name="Id" comment="NodeId" type="unsigned" mandatory="true" min="1" max="255" deprecated="true"/> <param name="NodeId" comment="Number identifying application node (mysqld(API))" type="unsigned" mandatory="true" min="1" max="255"/> <param name="ExecuteOnComputer" comment="HostName" type="string" deprecated="true"/> … </section> … </configvariables>NoteNormally, the XML output produced by ndb_config
--configinfo--xmlis formatted using one line per element; we have added extra whitespace in the previous example, as well as the next one, for reasons of legibility. This should not make any difference to applications using this output, since most XML processors either ignore nonessential whitespace as a matter of course, or can be instructed to do so.The XML output also indicates when changing a given parameter requires that data nodes be restarted using the
--initialoption. This is shown by the presence of aninitial="true"attribute in the corresponding<param>element. In addition, the restart type (systemornode) is also shown; if a given parameter requires a system restart, this is indicated by the presence of arestart="system"attribute in the corresponding<param>element. For example, changing the value set for theDisklessparameter requires a system initial restart, as shown here (with therestartandinitialattributes highlighted for visibility):<param name="Diskless" comment="Run wo/ disk" type="bool" default="false" restart="system" initial="true"/>Currently, no
initialattribute is included in the XML output for<param>elements corresponding to parameters which do not require initial restarts; in other words,initial="false"is the default, and the valuefalseshould be assumed if the attribute is not present. Similarly, the default restart type isnode(that is, an online or “rolling” restart of the cluster), but therestartattribute is included only if the restart type issystem(meaning that all cluster nodes must be shut down at the same time, then restarted).Deprecated parameters are indicated in the XML output by the
deprecatedattribute, as shown here:<param name="NoOfDiskPagesToDiskAfterRestartACC" comment="DiskCheckpointSpeed" type="unsigned" default="20" min="1" max="4294967039" deprecated="true"/>In such cases, the
commentrefers to one or more parameters that supersede the deprecated parameter. Similarly toinitial, thedeprecatedattribute is indicated only when the parameter is deprecated, withdeprecated="true", and does not appear at all for parameters which are not deprecated. (Bug #21127135)Beginning with NDB 7.5.0, parameters that are required are indicated with
mandatory="true", as shown here:<param name="NodeId" comment="Number identifying application node (mysqld(API))" type="unsigned" mandatory="true" min="1" max="255"/>In much the same way that the
initialordeprecatedattribute is displayed only for a parameter that requires an intial restart or that is deprecated, themandatoryattribute is included only if the given parameter is actually required.ImportantThe
--xmloption can be used only with the--configinfooption. Using--xmlwithout--configinfofails with an error.Unlike the options used with this program to obtain current configuration data,
--configinfoand--xmluse information obtained from the NDB Cluster sources when ndb_config was compiled. For this reason, no connection to a running NDB Cluster or access to aconfig.iniormy.cnffile is required for these two options.
Combining other ndb_config options (such as
--query or
--type) with
--configinfo (with or without the
--xml option is not supported. Currently, if
you attempt to do so, the usual result is that all other options
besides --configinfo or --xml
are simply ignored. However, this behavior is not
guaranteed and is subject to change at any time. In
addition, since ndb_config, when used with
the --configinfo option, does not access the
NDB Cluster or read any files, trying to specify additional
options such as --ndb-connectstring or
--config-file with
--configinfo serves no purpose.
Examples
To obtain the node ID and type of each node in the cluster:
shell>
./ndb_config --query=nodeid,type --fields=':' --rows='\n'1:ndbd 2:ndbd 3:ndbd 4:ndbd 5:ndb_mgmd 6:mysqld 7:mysqld 8:mysqld 9:mysqldIn this example, we used the
--fieldsoptions to separate the ID and type of each node with a colon character (:), and the--rowsoptions to place the values for each node on a new line in the output.To produce a connection string that can be used by data, SQL, and API nodes to connect to the management server:
shell>
./ndb_config --config-file=usr/local/mysql/cluster-data/config.ini \ --query=hostname,portnumber --fields=: --rows=, --type=ndb_mgmd198.51.100.179:1186This invocation of ndb_config checks only data nodes (using the
--typeoption), and shows the values for each node's ID and host name, as well as the values set for itsDataMemoryandDataDirparameters:shell>
./ndb_config --type=ndbd --query=nodeid,host,datamemory,datadir -f ' : ' -r '\n'1 : 198.51.100.193 : 83886080 : /usr/local/mysql/cluster-data 2 : 198.51.100.112 : 83886080 : /usr/local/mysql/cluster-data 3 : 198.51.100.176 : 83886080 : /usr/local/mysql/cluster-data 4 : 198.51.100.119 : 83886080 : /usr/local/mysql/cluster-dataIn this example, we used the short options
-fand-rfor setting the field delimiter and row separator, respectively, as well as the short option-qto pass a list of parameters to be obtained.To exclude results from any host except one in particular, use the
--hostoption:shell>
./ndb_config --host=198.51.100.176 -f : -r '\n' -q id,type3:ndbd 5:ndb_mgmdIn this example, we also used the short form
-qto determine the attributes to be queried.Similarly, you can limit results to a node with a specific ID using the
--nodeidoption.
ndb_delete_all deletes all rows from the
given NDB table. In some cases,
this can be much faster than
DELETE or even
TRUNCATE TABLE.
Usage
ndb_delete_all -cconnection_stringtbl_name-ddb_name
This deletes all rows from the table named
tbl_name in the database named
db_name. It is exactly equivalent to
executing TRUNCATE
in MySQL.
db_name.tbl_name
The following table includes options that are specific to ndb_delete_all. Additional descriptions follow the table. For options common to most NDB Cluster programs (including ndb_delete_all), see Section 22.4.31, “Options Common to NDB Cluster Programs — Options Common to NDB Cluster Programs”.
Table 22.258 Command-line options for the ndb_delete_all program
| Format | Description | Added, Deprecated, or Removed |
|---|---|---|
|
Name of the database in which the table is found | (Supported in all MySQL 8.0 based releases) |
| Perform the delete in a single transaction (may run out of operations) | (Supported in all MySQL 8.0 based releases) |
|
|
Run tup scan | (Supported in all MySQL 8.0 based releases) |
|
Run disk scan | (Supported in all MySQL 8.0 based releases) |
Prior to NDB 8.0.18, this program printed
NDBT_ProgramExit -
upon completion of
its run, due to an unnecessary dependency on the
statusNDBT testing library. This dependency has
been removed, eliminating the extraneous output.
ndb_desc provides a detailed description of
one or more NDB tables.
Usage
ndb_desc -cconnection_stringtbl_name-ddb_name[options] ndb_desc -cconnection_stringindex_name-ddb_name-ttbl_name
Additional options that can be used with ndb_desc are listed later in this section.
Sample Output
MySQL table creation and population statements:
USE test;
CREATE TABLE fish (
id INT NOT NULL AUTO_INCREMENT,
name VARCHAR(20) NOT NULL,
length_mm INT NOT NULL,
weight_gm INT NOT NULL,
PRIMARY KEY pk (id),
UNIQUE KEY uk (name)
) ENGINE=NDB;
INSERT INTO fish VALUES
(NULL, 'guppy', 35, 2), (NULL, 'tuna', 2500, 150000),
(NULL, 'shark', 3000, 110000), (NULL, 'manta ray', 1500, 50000),
(NULL, 'grouper', 900, 125000), (NULL ,'puffer', 250, 2500);Output from ndb_desc:
shell> ./ndb_desc -c localhost fish -d test -p
-- fish --
Version: 2
Fragment type: HashMapPartition
K Value: 6
Min load factor: 78
Max load factor: 80
Temporary table: no
Number of attributes: 4
Number of primary keys: 1
Length of frm data: 337
Max Rows: 0
Row Checksum: 1
Row GCI: 1
SingleUserMode: 0
ForceVarPart: 1
PartitionCount: 2
FragmentCount: 2
PartitionBalance: FOR_RP_BY_LDM
ExtraRowGciBits: 0
ExtraRowAuthorBits: 0
TableStatus: Retrieved
Table options:
HashMap: DEFAULT-HASHMAP-3840-2
-- Attributes --
id Int PRIMARY KEY DISTRIBUTION KEY AT=FIXED ST=MEMORY AUTO_INCR
name Varchar(20;latin1_swedish_ci) NOT NULL AT=SHORT_VAR ST=MEMORY DYNAMIC
length_mm Int NOT NULL AT=FIXED ST=MEMORY DYNAMIC
weight_gm Int NOT NULL AT=FIXED ST=MEMORY DYNAMIC
-- Indexes --
PRIMARY KEY(id) - UniqueHashIndex
PRIMARY(id) - OrderedIndex
uk(name) - OrderedIndex
uk$unique(name) - UniqueHashIndex
-- Per partition info --
Partition Row count Commit count Frag fixed memory Frag varsized memory Extent_space Free extent_space
0 2 2 32768 32768 0 0
1 4 4 32768 32768 0 0
NDBT_ProgramExit: 0 - OK
Information about multiple tables can be obtained in a single invocation of ndb_desc by using their names, separated by spaces. All of the tables must be in the same database.
You can obtain additional information about a specific index
using the --table (short form:
-t) option and supplying the name of the index
as the first argument to ndb_desc, as shown
here:
shell> ./ndb_desc uk -d test -t fish
-- uk --
Version: 2
Base table: fish
Number of attributes: 1
Logging: 0
Index type: OrderedIndex
Index status: Retrieved
-- Attributes --
name Varchar(20;latin1_swedish_ci) NOT NULL AT=SHORT_VAR ST=MEMORY
-- IndexTable 10/uk --
Version: 2
Fragment type: FragUndefined
K Value: 6
Min load factor: 78
Max load factor: 80
Temporary table: yes
Number of attributes: 2
Number of primary keys: 1
Length of frm data: 0
Max Rows: 0
Row Checksum: 1
Row GCI: 1
SingleUserMode: 2
ForceVarPart: 0
PartitionCount: 2
FragmentCount: 2
FragmentCountType: ONE_PER_LDM_PER_NODE
ExtraRowGciBits: 0
ExtraRowAuthorBits: 0
TableStatus: Retrieved
Table options:
-- Attributes --
name Varchar(20;latin1_swedish_ci) NOT NULL AT=SHORT_VAR ST=MEMORY
NDB$TNODE Unsigned [64] PRIMARY KEY DISTRIBUTION KEY AT=FIXED ST=MEMORY
-- Indexes --
PRIMARY KEY(NDB$TNODE) - UniqueHashIndex
NDBT_ProgramExit: 0 - OK
When an index is specified in this way, the
--extra-partition-info and
--extra-node-info options have
no effect.
The Version column in the output contains the
table's schema object version. For information about
interpreting this value, see
NDB Schema Object Versions.
Three of the table properties that can be set using
NDB_TABLE comments embedded in
CREATE TABLE and
ALTER TABLE statements are also
visible in ndb_desc output. The table's
FRAGMENT_COUNT_TYPE is always shown in the
FragmentCountType column.
READ_ONLY and
FULLY_REPLICATED, if set to 1, are shown in
the Table options column. You can see this
after executing the following ALTER
TABLE statement in the mysql
client:
mysql>ALTER TABLE fish COMMENT='NDB_TABLE=READ_ONLY=1,FULLY_REPLICATED=1';1 row in set, 1 warning (0.00 sec) mysql>SHOW WARNINGS\G+---------+------+---------------------------------------------------------------------------------------------------------+ | Level | Code | Message | +---------+------+---------------------------------------------------------------------------------------------------------+ | Warning | 1296 | Got error 4503 'Table property is FRAGMENT_COUNT_TYPE=ONE_PER_LDM_PER_NODE but not in comment' from NDB | +---------+------+---------------------------------------------------------------------------------------------------------+ 1 row in set (0.00 sec)
The warning is issued because READ_ONLY=1
requires that the table's fragment count type is (or be set
to) ONE_PER_LDM_PER_NODE_GROUP;
NDB sets this automatically in such cases.
You can check that the ALTER TABLE statement
has the desired effect using SHOW CREATE
TABLE:
mysql> SHOW CREATE TABLE fish\G
*************************** 1. row ***************************
Table: fish
Create Table: CREATE TABLE `fish` (
`id` int(11) NOT NULL AUTO_INCREMENT,
`name` varchar(20) NOT NULL,
`length_mm` int(11) NOT NULL,
`weight_gm` int(11) NOT NULL,
PRIMARY KEY (`id`),
UNIQUE KEY `uk` (`name`)
) ENGINE=ndbcluster DEFAULT CHARSET=latin1
COMMENT='NDB_TABLE=READ_BACKUP=1,FULLY_REPLICATED=1'
1 row in set (0.01 sec)
Because FRAGMENT_COUNT_TYPE was not set
explicitly, its value is not shown in the comment text printed
by SHOW CREATE TABLE.
ndb_desc, however, displays the updated value
for this attribute. The Table options column
shows the binary properties just enabled. You can see this in
the output shown here (emphasized text):
shell> ./ndb_desc -c localhost fish -d test -p
-- fish --
Version: 4
Fragment type: HashMapPartition
K Value: 6
Min load factor: 78
Max load factor: 80
Temporary table: no
Number of attributes: 4
Number of primary keys: 1
Length of frm data: 380
Max Rows: 0
Row Checksum: 1
Row GCI: 1
SingleUserMode: 0
ForceVarPart: 1
PartitionCount: 1
FragmentCount: 1
FragmentCountType: ONE_PER_LDM_PER_NODE_GROUP
ExtraRowGciBits: 0
ExtraRowAuthorBits: 0
TableStatus: Retrieved
Table options: readbackup, fullyreplicated
HashMap: DEFAULT-HASHMAP-3840-1
-- Attributes --
id Int PRIMARY KEY DISTRIBUTION KEY AT=FIXED ST=MEMORY AUTO_INCR
name Varchar(20;latin1_swedish_ci) NOT NULL AT=SHORT_VAR ST=MEMORY DYNAMIC
length_mm Int NOT NULL AT=FIXED ST=MEMORY DYNAMIC
weight_gm Int NOT NULL AT=FIXED ST=MEMORY DYNAMIC
-- Indexes --
PRIMARY KEY(id) - UniqueHashIndex
PRIMARY(id) - OrderedIndex
uk(name) - OrderedIndex
uk$unique(name) - UniqueHashIndex
-- Per partition info --
Partition Row count Commit count Frag fixed memory Frag varsized memory Extent_space Free extent_space
NDBT_ProgramExit: 0 - OK
For more information about these table properties, see Section 13.1.20.10, “Setting NDB_TABLE Options”.
The Extent_space and Free
extent_space columns are applicable only to
NDB tables having columns on disk; for tables
having only in-memory columns, these columns always contain the
value 0.
To illustrate their use, we modify the previous example. First, we must create the necessary Disk Data objects, as shown here:
CREATE LOGFILE GROUP lg_1
ADD UNDOFILE 'undo_1.log'
INITIAL_SIZE 16M
UNDO_BUFFER_SIZE 2M
ENGINE NDB;
ALTER LOGFILE GROUP lg_1
ADD UNDOFILE 'undo_2.log'
INITIAL_SIZE 12M
ENGINE NDB;
CREATE TABLESPACE ts_1
ADD DATAFILE 'data_1.dat'
USE LOGFILE GROUP lg_1
INITIAL_SIZE 32M
ENGINE NDB;
ALTER TABLESPACE ts_1
ADD DATAFILE 'data_2.dat'
INITIAL_SIZE 48M
ENGINE NDB;(For more information on the statements just shown and the objects created by them, see Section 22.5.10.1, “NDB Cluster Disk Data Objects”, as well as Section 13.1.16, “CREATE LOGFILE GROUP Statement”, and Section 13.1.21, “CREATE TABLESPACE Statement”.)
Now we can create and populate a version of the
fish table that stores 2 of its columns on
disk (deleting the previous version of the table first, if it
already exists):
DROP TABLE IF EXISTS fish;
CREATE TABLE fish (
id INT NOT NULL AUTO_INCREMENT,
name VARCHAR(20) NOT NULL,
length_mm INT NOT NULL,
weight_gm INT NOT NULL,
PRIMARY KEY pk (id),
UNIQUE KEY uk (name)
) TABLESPACE ts_1 STORAGE DISK
ENGINE=NDB;
INSERT INTO fish VALUES
(NULL, 'guppy', 35, 2), (NULL, 'tuna', 2500, 150000),
(NULL, 'shark', 3000, 110000), (NULL, 'manta ray', 1500, 50000),
(NULL, 'grouper', 900, 125000), (NULL ,'puffer', 250, 2500);When run against this version of the table, ndb_desc displays the following output:
shell> ./ndb_desc -c localhost fish -d test -p
-- fish --
Version: 1
Fragment type: HashMapPartition
K Value: 6
Min load factor: 78
Max load factor: 80
Temporary table: no
Number of attributes: 4
Number of primary keys: 1
Length of frm data: 1001
Max Rows: 0
Row Checksum: 1
Row GCI: 1
SingleUserMode: 0
ForceVarPart: 1
PartitionCount: 2
FragmentCount: 2
PartitionBalance: FOR_RP_BY_LDM
ExtraRowGciBits: 0
ExtraRowAuthorBits: 0
TableStatus: Retrieved
Table options: readbackup
HashMap: DEFAULT-HASHMAP-3840-2
Tablespace id: 16
Tablespace: ts_1
-- Attributes --
id Int PRIMARY KEY DISTRIBUTION KEY AT=FIXED ST=MEMORY AUTO_INCR
name Varchar(80;utf8mb4_0900_ai_ci) NOT NULL AT=SHORT_VAR ST=MEMORY
length_mm Int NOT NULL AT=FIXED ST=DISK
weight_gm Int NOT NULL AT=FIXED ST=DISK
-- Indexes --
PRIMARY KEY(id) - UniqueHashIndex
PRIMARY(id) - OrderedIndex
uk(name) - OrderedIndex
uk$unique(name) - UniqueHashIndex
-- Per partition info --
Partition Row count Commit count Frag fixed memory Frag varsized memory Extent_space Free extent_space
0 2 2 32768 32768 1048576 1044440
1 4 4 32768 32768 1048576 1044400
NDBT_ProgramExit: 0 - OK
This means that 1048576 bytes are allocated from the tablespace
for this table on each partition, of which 1044440 bytes remain
free for additional storage. In other words, 1048576 - 1044440 =
4136 bytes per partition is currently being used to store the
data from this table's disk-based columns. The number of
bytes shown as Free extent_space is available
for storing on-disk column data from the fish
table only; for this reason, it is not visible when selecting
from the INFORMATION_SCHEMA.FILES
table.
Tablespace id and
Tablespace are displayed for Disk Data tables
beginning with NDB 8.0.21.
For fully replicated tables, ndb_desc shows
only the nodes holding primary partition fragment replicas;
nodes with copy fragment replicas (only) are ignored. You can
obtain such information, using the mysql
client, from the
table_distribution_status,
table_fragments,
table_info, and
table_replicas tables in the
ndbinfo database.
The following table includes options that are specific to ndb_desc. Additional descriptions follow the table. For options common to most NDB Cluster programs (including ndb_desc), see Section 22.4.31, “Options Common to NDB Cluster Programs — Options Common to NDB Cluster Programs”.
Table 22.259 Command-line options for the ndb_desc program
| Format | Description | Added, Deprecated, or Removed |
|---|---|---|
| Show next value for AUTO_INCREMENT oolumn if table has one | ADDED: NDB 8.0.21 |
|
| Include partition information for BLOB tables in output. Requires that the -p option also be used | (Supported in all MySQL 8.0 based releases) |
|
| Show extra information for table such as database, schema, name, internal ID | ADDED: NDB 8.0.21 |
|
| Name of database containing table | (Supported in all MySQL 8.0 based releases) |
|
| Include partition-to-data-node mappings in output. Requires that the -p option also be used | (Supported in all MySQL 8.0 based releases) |
|
| Display information about partitions | (Supported in all MySQL 8.0 based releases) |
|
| Number of times to retry the connection (once per second) | (Supported in all MySQL 8.0 based releases) |
|
| Specify the table in which to find an index. When this option is used, -p and -n have no effect and are ignored | (Supported in all MySQL 8.0 based releases) |
|
| Use unqualified table names | (Supported in all MySQL 8.0 based releases) |
Show the next value for a table's
AUTO_INCREMENTcolumn, if it has one.Include information about subordinate
BLOBandTEXTcolumns.Use of this option also requires the use of the
--extra-partition-info(-p) option.Show additional contextual information for the table such as schema, database name, table name, and the table's internal ID.
Specify the database in which the table should be found.
Include information about the mappings between table partitions and the data nodes upon which they reside. This information can be useful for verifying distribution awareness mechanisms and supporting more efficient application access to the data stored in NDB Cluster.
Use of this option also requires the use of the
--extra-partition-info(-p) option.Print additional information about the table's partitions.
Try to connect this many times before giving up. One connect attempt is made per second.
Specify the table in which to look for an index.
Use unqualified table names.
Table indexes listed in the output are ordered by ID.
ndb_drop_index drops the specified index from
an NDB table. It is
recommended that you use this utility only as an example for
writing NDB API applications—see the Warning
later in this section for details.
Usage
ndb_drop_index -cconnection_stringtable_nameindex-ddb_name
The statement shown above drops the index named
index from the
table in the
database.
The following table includes options that are specific to ndb_drop_index. Additional descriptions follow the table. For options common to most NDB Cluster programs (including ndb_drop_index), see Section 22.4.31, “Options Common to NDB Cluster Programs — Options Common to NDB Cluster Programs”.
Table 22.260 Command-line options for the ndb_drop_index program
| Format | Description | Added, Deprecated, or Removed |
|---|---|---|
|
Name of the database in which the table is found | (Supported in all MySQL 8.0 based releases) |
Operations performed on Cluster table indexes using the NDB API are not visible to MySQL and make the table unusable by a MySQL server. If you use this program to drop an index, then try to access the table from an SQL node, an error results, as shown here:
shell>./ndb_drop_index -c localhost dogs ix -d ctest1Dropping index dogs/idx...OK NDBT_ProgramExit: 0 - OK shell>./mysql -u jon -p ctest1Enter password: ******* Reading table information for completion of table and column names You can turn off this feature to get a quicker startup with -A Welcome to the MySQL monitor. Commands end with ; or \g. Your MySQL connection id is 7 to server version: 5.7.30-ndb-7.5.19 Type 'help;' or '\h' for help. Type '\c' to clear the buffer. mysql>SHOW TABLES;+------------------+ | Tables_in_ctest1 | +------------------+ | a | | bt1 | | bt2 | | dogs | | employees | | fish | +------------------+ 6 rows in set (0.00 sec) mysql>SELECT * FROM dogs;ERROR 1296 (HY000): Got error 4243 'Index not found' from NDBCLUSTER
In such a case, your only option for making
the table available to MySQL again is to drop the table and
re-create it. You can use either the SQL
statementDROP TABLE or the
ndb_drop_table utility (see
Section 22.4.11, “ndb_drop_table — Drop an NDB Table”) to drop
the table.
ndb_drop_table drops the specified
NDB table. (If you try to use this
on a table created with a storage engine other than
NDB, the attempt fails with the
error 723: No such table exists.) This
operation is extremely fast; in some cases, it can be an order
of magnitude faster than using a MySQL DROP
TABLE statement on an NDB
table.
Usage
ndb_drop_table -cconnection_stringtbl_name-ddb_name
The following table includes options that are specific to ndb_drop_table. Additional descriptions follow the table. For options common to most NDB Cluster programs (including ndb_drop_table), see Section 22.4.31, “Options Common to NDB Cluster Programs — Options Common to NDB Cluster Programs”.
Table 22.261 Command-line options for the ndb_drop_table program
| Format | Description | Added, Deprecated, or Removed |
|---|---|---|
|
Name of the database in which the table is found | (Supported in all MySQL 8.0 based releases) |
Prior to NDB 8.0.17, an NDB table dropped
using this utility persisted in the MySQL data dictionary but
could not be dropped using DROP TABLE in the
mysql client. In NDB 8.0.17 and later, such
“orphan” tables can be dropped using DROP
TABLE. (Bug #29125206, Bug #93672)
ndb_error_reporter creates an archive from data node and management node log files that can be used to help diagnose bugs or other problems with a cluster. It is highly recommended that you make use of this utility when filing reports of bugs in NDB Cluster.
The following table includes command options specific to the NDB Cluster program ndb_error_reporter. Additional descriptions follow the table. For options common to most NDB Cluster programs (including ndb_error_reporter), see Section 22.4.31, “Options Common to NDB Cluster Programs — Options Common to NDB Cluster Programs”.
Table 22.262 Command-line options for the ndb_error_reporter program
| Format | Description | Added, Deprecated, or Removed |
|---|---|---|
| Number of seconds to wait when connecting to nodes before timing out | (Supported in all MySQL 8.0 based releases) |
|
| Disable scp with remote hosts; used only for testing | (Supported in all MySQL 8.0 based releases) |
|
| Include file system data in error report; can use a large amount of disk space | (Supported in all MySQL 8.0 based releases) |
|
| Skip all nodes in the node group having this ID | (Supported in all MySQL 8.0 based releases) |
Usage
ndb_error_reporterpath/to/config-file[username] [options]
This utility is intended for use on a management node host, and
requires the path to the management host configuration file
(usually named config.ini). Optionally, you
can supply the name of a user that is able to access the
cluster's data nodes using SSH, to copy the data node log files.
ndb_error_reporter then includes all of these
files in archive that is created in the same directory in which
it is run. The archive is named
ndb_error_report_,
where YYYYMMDDhhmmss.tar.bz2YYYYMMDDhhmmss is a datetime
string.
ndb_error_reporter also accepts the options listed here:
-
Property Value Command-Line Format --connection-timeout=timeoutType Integer Default Value 0Wait this many seconds when trying to connect to nodes before timing out.
-
Property Value Command-Line Format --dry-scpType Boolean Default Value TRUERun ndb_error_reporter without using scp from remote hosts. Used for testing only.
-
Property Value Command-Line Format --fsType Boolean Default Value FALSECopy the data node file systems to the management host and include them in the archive.
Because data node file systems can be extremely large, even after being compressed, we ask that you please do not send archives created using this option to Oracle unless you are specifically requested to do so.
-
Property Value Command-Line Format --connection-timeout=timeoutType Integer Default Value 0Skip all nodes belong to the node group having the supplied node group ID.
ndb_import imports CSV-formatted data, such
as that produced by mysqldump
--tab, directly into
NDB using the NDB API.
ndb_import requires a connection to an NDB
management server (ndb_mgmd) to function; it
does not require a connection to a MySQL Server.
Usage
ndb_importdb_namefile_nameoptions
ndb_import requires two arguments.
db_name is the name of the database
where the table into which to import the data is found;
file_name is the name of the CSV file
from which to read the data; this must include the path to this
file if it is not in the current directory. The name of the file
must match that of the table; the file's extension, if any,
is not taken into consideration. Options supported by
ndb_import include those for specifying field
separators, escapes, and line terminators, and are described
later in this section. ndb_import must be
able to connect to an NDB Cluster management server; for this
reason, there must be an unused [api] slot in
the cluster config.ini file.
To duplicate an existing table that uses a different storage
engine, such as InnoDB, as an
NDB table, use the mysql
client to perform a
SELECT INTO
OUTFILE statement to export the existing table to a
CSV file, then to execute a
CREATE TABLE
LIKE statement to create a new table having the same
structure as the existing table, then perform
ALTER TABLE ...
ENGINE=NDB on the new table; after this, from the
system shell, invoke ndb_import to load the
data into the new NDB table. For example, an
existing InnoDB table named
myinnodb_table in a database named
myinnodb can be exported into an
NDB table named
myndb_table in a database named
myndb as shown here, assuming that you are
already logged in as a MySQL user with the appropriate
privileges:
In the mysql client:
mysql>
USE myinnodb;mysql>SELECT * INTO OUTFILE '/tmp/myndb_table.csv'>FIELDS TERMINATED BY ',' OPTIONALLY ENCLOSED BY '"' ESCAPED BY '\\'>LINES TERMINATED BY '\n'>FROM myinnodbtable;mysql>CREATE DATABASE myndb;mysql>USE myndb;mysql>CREATE TABLE myndb_table LIKE myinnodb.myinnodb_table;mysql>ALTER TABLE myndb_table ENGINE=NDB;mysql>EXIT;Bye shell>Once the target database and table have been created, a running mysqld is no longer required. You can stop it using mysqladmin shutdown or another method before proceeding, if you wish.
In the system shell:
# if you are not already in the MySQL bin directory: shell>
cdshell>path-to-mysql-bin-dirndb_import myndb /tmp/myndb_table.csv --fields-optionally-enclosed-by='"' \--fields-terminated-by="," --fields-escaped-by='\\'The output should resemble what is shown here:
job-1 import myndb.myndb_table from /tmp/myndb_table.csv job-1 [running] import myndb.myndb_table from /tmp/myndb_table.csv job-1 [success] import myndb.myndb_table from /tmp/myndb_table.csv job-1 imported 19984 rows in 0h0m9s at 2277 rows/s jobs summary: defined: 1 run: 1 with success: 1 with failure: 0 shell>
The following table includes options that are specific to ndb_import. Additional descriptions follow the table. For options common to most NDB Cluster programs (including ndb_import), see Section 22.4.31, “Options Common to NDB Cluster Programs — Options Common to NDB Cluster Programs”.
Table 22.263 Command-line options for the ndb_import program
| Format | Description | Added, Deprecated, or Removed |
|---|---|---|
| Dump core on any fatal error; used for debugging | (Supported in all MySQL 8.0 based releases) |
|
| For table with hidden PK, specify autoincrement increment. See mysqld | (Supported in all MySQL 8.0 based releases) |
|
| For table with hidden PK, specify autoincrement offset. See mysqld | (Supported in all MySQL 8.0 based releases) |
|
| For table with hidden PK, specify number of autoincrement values that are prefetched. See mysqld | (Supported in all MySQL 8.0 based releases) |
|
| Number of cluster connections to create | (Supported in all MySQL 8.0 based releases) |
|
| When job fails, continue to next job | (Supported in all MySQL 8.0 based releases) |
|
| Number of threads, per data node, executing database operations | (Supported in all MySQL 8.0 based releases) |
|
| Error insert type, for testing purposes; use "list" to obtain all possible values | (Supported in all MySQL 8.0 based releases) |
|
| Error insert delay in milliseconds; random variation is added | (Supported in all MySQL 8.0 based releases) |
|
| Same as FIELDS ENCLOSED BY option for LOAD DATA statements. For CSV input this is same as using --fields-optionally-enclosed-by | (Supported in all MySQL 8.0 based releases) |
|
| Same as FIELDS ESCAPED BY option for LOAD DATA statements | (Supported in all MySQL 8.0 based releases) |
|
| Same as FIELDS OPTIONALLY ENCLOSED BY option for LOAD DATA statements | (Supported in all MySQL 8.0 based releases) |
|
| Same as FIELDS TERMINATED BY option for LOAD DATA statements | (Supported in all MySQL 8.0 based releases) |
|
| Number of milliseconds to sleep waiting for more to do | (Supported in all MySQL 8.0 based releases) |
|
| Number of times to re-try before idlesleep | (Supported in all MySQL 8.0 based releases) |
|
| Ignore first # lines in input file. Used to skip a non-data header | (Supported in all MySQL 8.0 based releases) |
|
| Input type: random or csv | (Supported in all MySQL 8.0 based releases) |
|
| Number of threads processing input. Must be 2 or more if --input-type is csv | (Supported in all MySQL 8.0 based releases) |
|
| State files (except non-empty *.rej files) are normally removed on job completion. Using this option causes all state files to be preserved instead | (Supported in all MySQL 8.0 based releases) |
|
| Same as LINES TERMINATED BY option for LOAD DATA statements | (Supported in all MySQL 8.0 based releases) |
|
| Import only this number of input data rows; default is 0, which imports all rows | (Supported in all MySQL 8.0 based releases) |
|
| Periodically print status of running job if something has changed (status, rejected rows, temporary errors). Value 0 disables. Value 1 prints any change seen. Higher values reduce status printing exponentially up to some pre-defined limit | (Supported in all MySQL 8.0 based releases) |
|
| Run database operations as batches, in single transactions | (Supported in all MySQL 8.0 based releases) |
|
| Do not use distribution key hint to select data node (TC) | (Supported in all MySQL 8.0 based releases) |
|
| A db execution batch is a set of transactions and operations sent to NDB kernel. This option limits NDB operations (including blob operations) in a db execution batch. Therefore it also limits number of asynch transactions. Value 0 is not valid | (Supported in all MySQL 8.0 based releases) |
|
| Limit bytes in execution batch (default 0 = no limit) | (Supported in all MySQL 8.0 based releases) |
|
| Output type: ndb is default, null used for testing | (Supported in all MySQL 8.0 based releases) |
|
| Number of threads processing output or relaying database operations | (Supported in all MySQL 8.0 based releases) |
|
| Align I/O buffers to given size | (Supported in all MySQL 8.0 based releases) |
|
| Size of I/O buffers as multiple of page size. CSV input worker allocates a double-sized buffer | (Supported in all MySQL 8.0 based releases) |
|
| Timeout per poll for completed asynchonous transactions; polling continues until all polls are completed, or error occurs | (Supported in all MySQL 8.0 based releases) |
|
| Limit number of rejected rows (rows with permanent error) in data load. Default is 0 which means that any rejected row causes a fatal error. The row exceeding the limit is also added to *.rej | (Supported in all MySQL 8.0 based releases) |
|
| If job aborted (temporary error, user interrupt), resume with rows not yet processed | (Supported in all MySQL 8.0 based releases) |
|
| Limit rows in row queues (default 0 = no limit); must be 1 or more if --input-type is random | (Supported in all MySQL 8.0 based releases) |
|
| Limit bytes in row queues (0 = no limit) | (Supported in all MySQL 8.0 based releases) |
|
| Where to write state files; currect directory is default | (Supported in all MySQL 8.0 based releases) |
|
| Save performance related options and internal statistics in *.sto and *.stt files. These files are kept on successful completion even if --keep-state is not used | (Supported in all MySQL 8.0 based releases) |
|
| Number of milliseconds to sleep between temporary errors | (Supported in all MySQL 8.0 based releases) |
|
| Number of times a transaction can fail due to a temporary error, per execution batch; 0 means any temporary error is fatal. Such errors do not cause any rows to be written to .rej file | (Supported in all MySQL 8.0 based releases) |
|
| Enable verbose output | (Supported in all MySQL 8.0 based releases) |
-
Property Value Command-Line Format --abort-on-errorType Boolean Default Value FALSEDump core on any fatal error; used for debugging only.
-
Property Value Command-Line Format --ai-increment=#Type Integer Default Value 1Minimum Value 1Maximum Value 4294967295For a table with a hidden primary key, specify the autoincrement increment, like the
auto_increment_incrementsystem variable does in the MySQL Server. -
Property Value Command-Line Format --ai-offset=#Type Integer Default Value 1Minimum Value 1Maximum Value 4294967295For a table with hidden primary key, specify the autoincrement offset. Similar to the
auto_increment_offsetsystem variable. -
Property Value Command-Line Format --ai-prefetch-sz=#Type Integer Default Value 1024Minimum Value 1Maximum Value 4294967295For a table with a hidden primary key, specify the number of autoincrement values that are prefetched. Behaves like the
ndb_autoincrement_prefetch_szsystem variable does in the MySQL Server. -
Property Value Command-Line Format --connections=#Type Integer Default Value 1Minimum Value 1Maximum Value 4294967295Number of cluster connections to create.
-
Property Value Command-Line Format --continueType Boolean Default Value FALSEWhen a job fails, continue to the next job.
-
Property Value Command-Line Format --db-workers=#Type Integer Default Value 4Minimum Value 1Maximum Value 4294967295Number of threads, per data node, executing database operations.
-
Property Value Command-Line Format --errins-type=nameType Enumeration Default Value [none]Valid Values stopjobstopallsighupsigintlistError insert type; use
listas thenamevalue to obtain all possible values. This option is used for testing purposes only. -
Property Value Command-Line Format --errins-delay=#Type Integer Default Value 1000Minimum Value 0Maximum Value 4294967295Error insert delay in milliseconds; random variation is added. This option is used for testing purposes only.
-
Property Value Command-Line Format --fields-enclosed-by=charType String Default Value [none]This works in the same way as the
FIELDS ENCLOSED BYoption does for theLOAD DATAstatement, specifying a character to be interpeted as quoting field values. For CSV input, this is the same as--fields-optionally-enclosed-by. -
Property Value Command-Line Format --fields-escaped-by=nameType String Default Value \Specify an escape character in the same way as the
FIELDS ESCAPED BYoption does for the SQLLOAD DATAstatement. --fields-optionally-enclosed-by=charProperty Value Command-Line Format --fields-optionally-enclosed-by=charType String Default Value [none]This works in the same way as the
FIELDS OPTIONALLY ENCLOSED BYoption does for theLOAD DATAstatement, specifying a character to be interpeted as optionally quoting field values. For CSV input, this is the same as--fields-enclosed-by.-
Property Value Command-Line Format --fields-terminated-by=charType String Default Value \tThis works in the same way as the
FIELDS TERMINATED BYoption does for theLOAD DATAstatement, specifying a character to be interpeted as the field separator. -
Property Value Command-Line Format --idlesleep=#Type Integer Default Value 1Minimum Value 1Maximum Value 4294967295Number of milliseconds to sleep waiting for more work to perform.
-
Property Value Command-Line Format --idlespin=#Type Integer Default Value 0Minimum Value 0Maximum Value 4294967295Number of times to retry before sleeping.
-
Property Value Command-Line Format --ignore-lines=#Type Integer Default Value 0Minimum Value 0Maximum Value 4294967295Cause ndb_import to ignore the first
#lines of the input file. This can be employed to skip a file header that does not contain any data. -
Property Value Command-Line Format --input-type=nameType Enumeration Default Value csvValid Values randomcsvSet the type of input type. The default is
csv;randomis intended for testing purposes only. . -
Property Value Command-Line Format --input-workers=#Type Integer Default Value 4Minimum Value 1Maximum Value 4294967295Set the number of threads processing input.
-
Property Value Command-Line Format --keep-stateType Boolean Default Value falseBy default, ndb_import removes all state files (except non-empty
*.rejfiles) when it completes a job. Specify this option (nor argument is required) to force the program to retain all state files instead. -
Property Value Command-Line Format --lines-terminated-by=nameType String Default Value \nThis works in the same way as the
LINES TERMINATED BYoption does for theLOAD DATAstatement, specifying a character to be interpeted as end-of-line. -
Property Value Command-Line Format --log-level=#Type Integer Default Value 0Minimum Value 0Maximum Value 2Performs internal logging at the given level. This option is intended primarily for internal and development use.
In debug builds of NDB only, the logging level can be set using this option to a maximum of 4.
-
Property Value Command-Line Format --max-rows=#Type Integer Default Value 0Minimum Value 0Maximum Value 4294967295Import only this number of input data rows; the default is 0, which imports all rows.
-
Property Value Command-Line Format --monitor=#Type Integer Default Value 2Minimum Value 0Maximum Value 4294967295Periodically print the status of a running job if something has changed (status, rejected rows, temporary errors). Set to 0 to disable this reporting. Setting to 1 prints any change that is seen. Higher values reduce the frequency of this status reporting.
-
Property Value Command-Line Format --no-asynchType Boolean Default Value FALSERun database operations as batches, in single transactions.
-
Property Value Command-Line Format --no-hintType Boolean Default Value FALSEDo not use distribution key hinting to select a data node.
-
Property Value Command-Line Format --opbatch=#Type Integer Default Value 256Minimum Value 1Maximum Value 4294967295Set a limit on the number of operations (including blob operations), and thus the number of asynchronous transactions, per execution batch.
-
Property Value Command-Line Format --opbytes=#Type Integer Default Value 0Minimum Value 0Maximum Value 4294967295Set a limit on the number of bytes per execution batch. Use 0 for no limit.
-
Property Value Command-Line Format --output-type=nameType Enumeration Default Value ndbValid Values nullSet the output type.
ndbis the default.nullis used only for testing. -
Property Value Command-Line Format --output-workers=#Type Integer Default Value 2Minimum Value 1Maximum Value 4294967295Set the number of threads processing output or relaying database operations.
-
Property Value Command-Line Format --pagesize=#Type Integer Default Value 4096Minimum Value 1Maximum Value 4294967295Align I/O buffers to the given size.
-
Property Value Command-Line Format --pagecnt=#Type Integer Default Value 64Minimum Value 1Maximum Value 4294967295Set the size of I/O buffers as multiple of page size. The CSV input worker allocates buffer that is doubled in size.
-
Property Value Command-Line Format --polltimeout=#Type Integer Default Value 1000Minimum Value 1Maximum Value 4294967295Set a timeout per poll for completed asynchonous transactions; polling continues until all polls are completed, or until an error occurs.
-
Property Value Command-Line Format --rejects=#Type Integer Default Value 0Minimum Value 0Maximum Value 4294967295Limit the number of rejected rows (rows with permanent errors) in the data load. The default is 0, which means that any rejected row causes a fatal error. Any rows causing the limit to be exceeded are added to the
.rejfile.The limit imposed by this option is effective for the duration of the current run. A run restarted using
--resumeis considered a “new” run for this purpose. -
Property Value Command-Line Format --resumeType Boolean Default Value FALSEIf a job is aborted (due to a temporary db error or when interrupted by the user), resume with any rows not yet processed.
-
Property Value Command-Line Format --rowbatch=#Type Integer Default Value 0Minimum Value 0Maximum Value 4294967295Set a limit on the number of rows per row queue. Use 0 for no limit.
-
Property Value Command-Line Format --rowbytes=#Type Integer Default Value 262144Minimum Value 0Maximum Value 4294967295Set a limit on the number of bytes per row queue. Use 0 for no limit.
-
Property Value Command-Line Format --statsType Boolean Default Value falseSave information about options related to performance and other internal statistics in files named
*.stoand*.stt. These files are always kept on successful completion (even if--keep-stateis not also specified). -
Property Value Command-Line Format --state-dir=nameType String Default Value .Where to write the state files (
tbl_name.maptbl_name.rejtbl_name.restbl_name.stt -
Property Value Command-Line Format --tempdelay=#Type Integer Default Value 10Minimum Value 0Maximum Value 4294967295Number of milliseconds to sleep between temporary errors.
-
Property Value Command-Line Format --temperrors=#Type Integer Default Value 0Minimum Value 0Maximum Value 4294967295Number of times a transaction can fail due to a temporary error, per execution batch. The default is 0, which means that any temporary error is fatal. Temporary errors do not cause any rows to be added to the
.rejfile. -
Property Value Command-Line Format --verboseType Boolean Default Value falseEnable verbose output.
As with LOAD DATA, options for
field and line formatting much match those used to create the
CSV file, whether this was done using
SELECT INTO ...
OUTFILE, or by some other means. There is no
equivalent to the LOAD DATA
statement STARTING WITH option.
ndb_import was added in NDB 7.6.2.
ndb_index_stat provides per-fragment
statistical information about indexes on NDB
tables. This includes cache version and age, number of index
entries per partition, and memory consumption by indexes.
Usage
To obtain basic index statistics about a given
NDB table, invoke
ndb_index_stat as shown here, with the name
of the table as the first argument and the name of the database
containing this table specified immediately following it, using
the --database
(-d) option:
ndb_index_stattable-ddatabase
In this example, we use ndb_index_stat to
obtain such information about an NDB table
named mytable in the test
database:
shell> ndb_index_stat -d test mytable
table:City index:PRIMARY fragCount:2
sampleVersion:3 loadTime:1399585986 sampleCount:1994 keyBytes:7976
query cache: valid:1 sampleCount:1994 totalBytes:27916
times in ms: save: 7.133 sort: 1.974 sort per sample: 0.000
NDBT_ProgramExit: 0 - OK
sampleVersion is the version number of the
cache from which the statistics data is taken. Running
ndb_index_stat with the
--update option causes
sampleVersion to be incremented.
loadTime shows when the cache was last
updated. This is expressed as seconds since the Unix Epoch.
sampleCount is the number of index entries
found per partition. You can estimate the total number of
entries by multiplying this by the number of fragments (shown as
fragCount).
sampleCount can be compared with the
cardinality of SHOW INDEX or
INFORMATION_SCHEMA.STATISTICS,
although the latter two provide a view of the table as a whole,
while ndb_index_stat provides a per-fragment
average.
keyBytes is the number of bytes used by the
index. In this example, the primary key is an integer, which
requires four bytes for each index, so
keyBytes can be calculated in this case as
shown here:
keyBytes = sampleCount * (4 bytes per index) = 1994 * 4 = 7976
This information can also be obtained using the corresponding
column definitions from
INFORMATION_SCHEMA.COLUMNS (this
requires a MySQL Server and a MySQL client application).
totalBytes is the total memory consumed by
all indexes on the table, in bytes.
Timings shown in the preceding examples are specific to each invocation of ndb_index_stat.
The --verbose option
provides some additional output, as shown here:
shell> ndb_index_stat -d test mytable --verbose
random seed 1337010518
connected
loop 1 of 1
table:mytable index:PRIMARY fragCount:4
sampleVersion:2 loadTime:1336751773 sampleCount:0 keyBytes:0
read stats
query cache created
query cache: valid:1 sampleCount:0 totalBytes:0
times in ms: save: 20.766 sort: 0.001
disconnected
NDBT_ProgramExit: 0 - OK
shell>
If the only output from the program is
NDBT_ProgramExit: 0 - OK, this may indicate
that no statistics yet exist. To force them to be created (or
updated if they already exist), invoke
ndb_index_stat with the
--update option, or
execute ANALYZE TABLE on the
table in the mysql client.
Options
The following table includes options that are specific to the NDB Cluster ndb_index_stat utility. Additional descriptions are listed following the table. For options common to most NDB Cluster programs (including ndb_index_stat), see Section 22.4.31, “Options Common to NDB Cluster Programs — Options Common to NDB Cluster Programs”.
Table 22.264 Command-line options for the ndb_index_stat program
| Format | Description | Added, Deprecated, or Removed |
|---|---|---|
| Name of the database containing the table | (Supported in all MySQL 8.0 based releases) |
|
| Delete index statistics for the given table, stopping any auto-update previously configured | (Supported in all MySQL 8.0 based releases) |
|
| Update index statistics for the given table, restarting any auto-update previously configured | (Supported in all MySQL 8.0 based releases) |
|
| Print the query cache | (Supported in all MySQL 8.0 based releases) |
|
| Perform a number of random range queries on first key attr (must be int unsigned) | (Supported in all MySQL 8.0 based releases) |
|
| Drop any statistics tables and events in NDB kernel (all statistics are lost) | (Supported in all MySQL 8.0 based releases) |
|
| Create all statistics tables and events in NDB kernel, if none of them already exist | (Supported in all MySQL 8.0 based releases) |
|
| Create any statistics tables and events in NDB kernel that do not already exist | (Supported in all MySQL 8.0 based releases) |
|
| Create any statistics tables or events that do not already exist in the NDB kernel. after dropping any that are invalid | (Supported in all MySQL 8.0 based releases) |
|
| Verify that NDB system index statistics and event tables exist | (Supported in all MySQL 8.0 based releases) |
|
| Do not apply sys-* options to tables | (Supported in all MySQL 8.0 based releases) |
|
| Do not apply sys-* options to events | (Supported in all MySQL 8.0 based releases) |
|
| Turn on verbose output | (Supported in all MySQL 8.0 based releases) |
|
| Set the number of times to perform a given command. Default is 0 | (Supported in all MySQL 8.0 based releases) |
ndb_index_stat statistics options. The following options are used to generate index statistics. They work with a given table and database. They cannot be mixed with system options (see ndb_index_stat system options).
-
Property Value Command-Line Format --database=nameType String Default Value [none]Minimum Value Maximum Value The name of the database that contains the table being queried.
-
Property Value Command-Line Format --deleteType Boolean Default Value falseMinimum Value Maximum Value Delete the index statistics for the given table, stopping any auto-update that was previously configured.
-
Property Value Command-Line Format --updateType Boolean Default Value falseMinimum Value Maximum Value Update the index statistics for the given table, and restart any auto-update that was previously configured.
-
Property Value Command-Line Format --dumpType Boolean Default Value falseMinimum Value Maximum Value Dump the contents of the query cache.
-
Property Value Command-Line Format --query=#Type Numeric Default Value 0Minimum Value 0Maximum Value MAX_INTPerform random range queries on first key attribute (must be int unsigned).
ndb_index_stat system options. The following options are used to generate and update the statistics tables in the NDB kernel. None of these options can be mixed with statistics options (see ndb_index_stat statistics options).
-
Property Value Command-Line Format --sys-dropType Boolean Default Value falseMinimum Value Maximum Value Drop all statistics tables and events in the NDB kernel. This causes all statistics to be lost.
-
Property Value Command-Line Format --sys-createType Boolean Default Value falseMinimum Value Maximum Value Create all statistics tables and events in the NDB kernel. This works only if none of them exist previously.
-
Property Value Command-Line Format --sys-create-if-not-existType Boolean Default Value falseMinimum Value Maximum Value Create any NDB system statistics tables or events (or both) that do not already exist when the program is invoked.
-
Property Value Command-Line Format --sys-create-if-not-validType Boolean Default Value falseMinimum Value Maximum Value Create any NDB system statistics tables or events that do not already exist, after dropping any that are invalid.
-
Property Value Command-Line Format --sys-checkType Boolean Default Value falseMinimum Value Maximum Value Verify that all required system statistics tables and events exist in the NDB kernel.
-
Property Value Command-Line Format --sys-skip-tablesType Boolean Default Value falseMinimum Value Maximum Value Do not apply any
--sys-*options to any statistics tables. -
Property Value Command-Line Format --sys-skip-eventsType Boolean Default Value falseMinimum Value Maximum Value Do not apply any
--sys-*options to any events. -
Property Value Command-Line Format --verboseType Boolean Default Value falseMinimum Value Maximum Value Turn on verbose output.
-
Property Value Command-Line Format --loops=#Type Numeric Default Value 0Minimum Value 0Maximum Value MAX_INTRepeat commands this number of times (for use in testing).
ndb_move_data copies data from one NDB table to another.
Usage
The program is invoked with the names of the source and target tables; either or both of these may be qualified optionally with the database name. Both tables must use the NDB storage engine.
ndb_move_dataoptionssourcetarget
The following table includes options that are specific to ndb_move_data. Additional descriptions follow the table. For options common to most NDB Cluster programs (including ndb_move_data), see Section 22.4.31, “Options Common to NDB Cluster Programs — Options Common to NDB Cluster Programs”.
Table 22.265 Command-line options for the ndb_move_data program
| Format | Description | Added, Deprecated, or Removed |
|---|---|---|
| Dump core on permanent error (debug option) | (Supported in all MySQL 8.0 based releases) |
|
| Directory where character sets are | (Supported in all MySQL 8.0 based releases) |
|
| Name of the database in which the table is found | (Supported in all MySQL 8.0 based releases) |
|
| Drop source table after all rows have been moved | (Supported in all MySQL 8.0 based releases) |
|
| Insert random temporary errors (testing option) | (Supported in all MySQL 8.0 based releases) |
|
| Ignore extra columns in source or target table | (Supported in all MySQL 8.0 based releases) |
|
| Allow attribute data to be truncated when converted to a smaller type | (Supported in all MySQL 8.0 based releases) |
|
| Allow attribute data to be converted to a larger type | (Supported in all MySQL 8.0 based releases) |
|
| Specify tries on temporary errors. Format is x[,y[,z]] where x=max tries (0=no limit), y=min delay (ms), z=max delay (ms) | (Supported in all MySQL 8.0 based releases) |
|
| Enable verbose messages | (Supported in all MySQL 8.0 based releases) |
-
Property Value Command-Line Format --abort-on-errorType Boolean Default Value FALSEDump core on permanent error (debug option).
-
Property Value Command-Line Format --character-sets-dir=nameType String Default Value [none]Directory where character sets are.
-
Property Value Command-Line Format --database=dbnameType String Default Value TEST_DBName of the database in which the table is found.
-
Property Value Command-Line Format --drop-sourceType Boolean Default Value FALSEDrop source table after all rows have been moved.
-
Property Value Command-Line Format --error-insertType Boolean Default Value FALSEInsert random temporary errors (testing option).
-
Property Value Command-Line Format --exclude-missing-columnsType Boolean Default Value FALSEIgnore extra columns in source or target table.
-
Property Value Command-Line Format --lossy-conversionsType Boolean Default Value FALSEAllow attribute data to be truncated when converted to a smaller type.
-
Property Value Command-Line Format --promote-attributesType Boolean Default Value FALSEAllow attribute data to be converted to a larger type.
-
Property Value Command-Line Format --staging-tries=x[,y[,z]]Type String Default Value 0,1000,60000Specify tries on temporary errors. Format is x[,y[,z]] where x=max tries (0=no limit), y=min delay (ms), z=max delay (ms).
-
Property Value Command-Line Format --verboseType Boolean Default Value FALSEEnable verbose messages.
ndb_perror shows information about an NDB
error, given its error code. This includes the error message,
the type of error, and whether the error is permanent or
temporary. Added to the MySQL NDB Cluster distribution in NDB
7.6.4, it is intended as a drop-in replacement for
perror --ndb.
Usage
ndb_perror [options]error_code
ndb_perror does not need to access a running NDB Cluster, or any nodes (including SQL nodes). To view information about a given NDB error, invoke the program, using the error code as an argument, like this:
shell> ndb_perror 323
NDB error code 323: Invalid nodegroup id, nodegroup already existing: Permanent error: Application error
To display only the error message, invoke
ndb_perror with the
--silent option (short form
-s), as shown here:
shell> ndb_perror -s 323
Invalid nodegroup id, nodegroup already existing: Permanent error: Application error
Like perror, ndb_perror accepts multiple error codes:
shell> ndb_perror 321 1001
NDB error code 321: Invalid nodegroup id: Permanent error: Application error
NDB error code 1001: Illegal connect string
Additional program options for ndb_perror are described later in this section.
ndb_perror replaces perror
--ndb, which is deprecated as of NDB 7.6.4 and
subject to removal in a future release of MySQL NDB Cluster. To
make substitution easier in scripts and other applications that
might depend on perror for obtaining NDB
error information, ndb_perror supports its
own “dummy”
--ndb option, which does
nothing.
The following table includes all options that are specific to the NDB Cluster program ndb_perror. Additional descriptions follow the table.
Table 22.266 Command-line options for the ndb_perror program
| Format | Description | Added, Deprecated, or Removed |
|---|---|---|
| Display help text | (Supported in all MySQL 8.0 based releases) |
|
| For compatibility with applications depending on old versions of perror; does nothing | (Supported in all MySQL 8.0 based releases) |
|
| Show error message only | (Supported in all MySQL 8.0 based releases) |
|
| Print program version information and exit | (Supported in all MySQL 8.0 based releases) |
|
| Verbose output; disable with --silent | (Supported in all MySQL 8.0 based releases) |
Additional Options
-
Property Value Command-Line Format --helpType Boolean Default Value TRUEDisplay program help text and exit.
-
Property Value Command-Line Format --ndbType Boolean Default Value TRUEFor compatibility with applications depending on old versions of perror that use that program's
--ndboption. The option when used with ndb_perror does nothing, and is ignored by it. -
Property Value Command-Line Format --silentType Boolean Default Value TRUEShow error message only.
-
Property Value Command-Line Format --versionType Boolean Default Value TRUEPrint program version information and exit.
-
Property Value Command-Line Format --verboseType Boolean Default Value TRUEVerbose output; disable with
--silent.
ndb_print_backup_file obtains diagnostic information from a cluster backup file.
Usage
ndb_print_backup_file file_name
file_name is the name of a cluster
backup file. This can be any of the files
(.Data, .ctl, or
.log file) found in a cluster backup
directory. These files are found in the data node's backup
directory under the subdirectory
BACKUP-, where
## is the sequence number for the
backup. For more information about cluster backup files and
their contents, see
Section 22.5.8.1, “NDB Cluster Backup Concepts”.
Like ndb_print_schema_file and
ndb_print_sys_file (and unlike most of the
other NDB utilities that are
intended to be run on a management server host or to connect to
a management server) ndb_print_backup_file
must be run on a cluster data node, since it accesses the data
node file system directly. Because it does not make use of the
management server, this utility can be used when the management
server is not running, and even when the cluster has been
completely shut down.
In NDB 8.0.17 and later, this program can also be used to read undo log files.
Additional Options
None.
ndb_print_file obtains information from an NDB Cluster Disk Data file.
Usage
ndb_print_file [-v] [-q] file_name+
file_name is the name of an NDB
Cluster Disk Data file. Multiple filenames are accepted,
separated by spaces.
Like ndb_print_schema_file and
ndb_print_sys_file (and unlike most of the
other NDB utilities that are
intended to be run on a management server host or to connect to
a management server) ndb_print_file must be
run on an NDB Cluster data node, since it accesses the data node
file system directly. Because it does not make use of the
management server, this utility can be used when the management
server is not running, and even when the cluster has been
completely shut down.
Additional Options
ndb_print_file supports the following options:
-v: Make output verbose.-q: Suppress output (quiet mode).--help,-h,-?: Print help message.
For more information, see Section 22.5.10, “NDB Cluster Disk Data Tables”.
ndb_print_frag_file obtains information from a cluster fragment list file. It is intended for use in helping to diagnose issues with data node restarts.
Usage
ndb_print_frag_file file_name
file_name is the name of a cluster
fragment list file, which matches the pattern
S,
where X.FragListX is a digit in the range 2-9
inclusive, and are found in the data node file system of the
data node having the node ID nodeid,
in directories named
ndb_,
where nodeid_fs/DN/DBDIH/N is 1 or
2. Each fragment file contains records of the
fragments belonging to each NDB table. For
more information about cluster fragment files, see
NDB Cluster Data Node File System Directory.
Like ndb_print_backup_file,
ndb_print_sys_file, and
ndb_print_schema_file (and unlike most of the
other NDB utilities that are
intended to be run on a management server host or to connect to
a management server), ndb_print_frag_file
must be run on a cluster data node, since it accesses the data
node file system directly. Because it does not make use of the
management server, this utility can be used when the management
server is not running, and even when the cluster has been
completely shut down.
Additional Options
None.
Sample Output
shell> ndb_print_frag_file /usr/local/mysqld/data/ndb_3_fs/D1/DBDIH/S2.FragList
Filename: /usr/local/mysqld/data/ndb_3_fs/D1/DBDIH/S2.FragList with size 8192
noOfPages = 1 noOfWords = 182
Table Data
----------
Num Frags: 2 NoOfReplicas: 2 hashpointer: 4294967040
kvalue: 6 mask: 0x00000000 method: HashMap
Storage is on Logged and checkpointed, survives SR
------ Fragment with FragId: 0 --------
Preferred Primary: 2 numStoredReplicas: 2 numOldStoredReplicas: 0 distKey: 0 LogPartId: 0
-------Stored Replica----------
Replica node is: 2 initialGci: 2 numCrashedReplicas = 0 nextLcpNo = 1
LcpNo[0]: maxGciCompleted: 1 maxGciStarted: 2 lcpId: 1 lcpStatus: valid
LcpNo[1]: maxGciCompleted: 0 maxGciStarted: 0 lcpId: 0 lcpStatus: invalid
-------Stored Replica----------
Replica node is: 3 initialGci: 2 numCrashedReplicas = 0 nextLcpNo = 1
LcpNo[0]: maxGciCompleted: 1 maxGciStarted: 2 lcpId: 1 lcpStatus: valid
LcpNo[1]: maxGciCompleted: 0 maxGciStarted: 0 lcpId: 0 lcpStatus: invalid
------ Fragment with FragId: 1 --------
Preferred Primary: 3 numStoredReplicas: 2 numOldStoredReplicas: 0 distKey: 0 LogPartId: 1
-------Stored Replica----------
Replica node is: 3 initialGci: 2 numCrashedReplicas = 0 nextLcpNo = 1
LcpNo[0]: maxGciCompleted: 1 maxGciStarted: 2 lcpId: 1 lcpStatus: valid
LcpNo[1]: maxGciCompleted: 0 maxGciStarted: 0 lcpId: 0 lcpStatus: invalid
-------Stored Replica----------
Replica node is: 2 initialGci: 2 numCrashedReplicas = 0 nextLcpNo = 1
LcpNo[0]: maxGciCompleted: 1 maxGciStarted: 2 lcpId: 1 lcpStatus: valid
LcpNo[1]: maxGciCompleted: 0 maxGciStarted: 0 lcpId: 0 lcpStatus: invalid
ndb_print_schema_file obtains diagnostic information from a cluster schema file.
Usage
ndb_print_schema_file file_name
file_name is the name of a cluster
schema file. For more information about cluster schema files,
see NDB Cluster Data Node File System Directory.
Like ndb_print_backup_file and
ndb_print_sys_file (and unlike most of the
other NDB utilities that are
intended to be run on a management server host or to connect to
a management server) ndb_print_schema_file
must be run on a cluster data node, since it accesses the data
node file system directly. Because it does not make use of the
management server, this utility can be used when the management
server is not running, and even when the cluster has been
completely shut down.
Additional Options
None.
ndb_print_sys_file obtains diagnostic information from an NDB Cluster system file.
Usage
ndb_print_sys_file file_name
file_name is the name of a cluster
system file (sysfile). Cluster system files are located in a
data node's data directory
(DataDir); the path
under this directory to system files matches the pattern
ndb_.
In each case, the #_fs/D#/DBDIH/P#.sysfile# represents a
number (not necessarily the same number). For more information,
see NDB Cluster Data Node File System Directory.
Like ndb_print_backup_file and
ndb_print_schema_file (and unlike most of the
other NDB utilities that are
intended to be run on a management server host or to connect to
a management server) ndb_print_backup_file
must be run on a cluster data node, since it accesses the data
node file system directly. Because it does not make use of the
management server, this utility can be used when the management
server is not running, and even when the cluster has been
completely shut down.
Additional Options
None.
Reads a redo log file, checking it for errors, printing its contents in a human-readable format, or both. ndb_redo_log_reader is intended for use primarily by NDB Cluster developers and Support personnel in debugging and diagnosing problems.
This utility remains under development, and its syntax and behavior are subject to change in future NDB Cluster releases.
The C++ source files for ndb_redo_log_reader
can be found in the directory
/storage/ndb/src/kernel/blocks/dblqh/redoLogReader.
The following table includes options that are specific to the NDB Cluster program ndb_redo_log_reader. Additional descriptions follow the table. For options common to most NDB Cluster programs (including ndb_redo_log_reader), see Section 22.4.31, “Options Common to NDB Cluster Programs — Options Common to NDB Cluster Programs”.
Table 22.267 Command-line options for the ndb_redo_log_reader program
| Format | Description | Added, Deprecated, or Removed |
|---|---|---|
| Print dump info | (Supported in all MySQL 8.0 based releases) |
|
| Print file descriptors only | (Supported in all MySQL 8.0 based releases) |
|
| Print usage information | (Supported in all MySQL 8.0 based releases) |
|
| Provide lap info, with max GCI started and completed | (Supported in all MySQL 8.0 based releases) |
|
| Starting megabyte | (Supported in all MySQL 8.0 based releases) |
|
| Show only the first page header of every megabyte in the file | (Supported in all MySQL 8.0 based releases) |
|
| Do not check records for errors | (Supported in all MySQL 8.0 based releases) |
|
| Do not print records | (Supported in all MySQL 8.0 based releases) |
|
| Start with this page | (Supported in all MySQL 8.0 based releases) |
|
| Show page headers only | (Supported in all MySQL 8.0 based releases) |
|
| Start with this page index | (Supported in all MySQL 8.0 based releases) |
|
| Bit-shifted dump | (Supported in all MySQL 8.0 based releases) |
Usage
ndb_redo_log_readerfile_name[options]
file_name is the name of a cluster
redo log file. redo log files are located in the numbered
directories under the data node's data directory
(DataDir); the path
under this directory to the redo log files matches the pattern
ndb_.
nodeid_fs/D#/DBLQH/S#.FragLognodeid is the data node's node
ID. The two instances of # each
represent a number (not necessarily the same number); the number
following D is in the range 8-39 inclusive;
the range of the number following S varies
according to the value of the
NoOfFragmentLogFiles
configuration parameter, whose default value is 16; thus, the
default range of the number in the file name is 0-15 inclusive.
For more information, see
NDB Cluster Data Node File System Directory.
The name of the file to be read may be followed by one or more of the options listed here:
-
Property Value Command-Line Format -dumpType Boolean Default Value FALSEPrint dump info.
-
Property Value Command-Line Format -filedescriptorsType Boolean Default Value FALSE-filedescriptors: Print file descriptors only. -
Property Value Command-Line Format --help--help: Print usage information. -
Property Value Command-Line Format -lapType Boolean Default Value FALSEProvide lap info, with max GCI started and completed.
-
Property Value Command-Line Format -mbyte #Type Numeric Default Value 0Minimum Value 0Maximum Value 15-mbyte: Starting megabyte.##is an integer in the range 0 to 15, inclusive. -
Property Value Command-Line Format -mbyteheadersType Boolean Default Value FALSE-mbyteheaders: Show only the first page header of every megabyte in the file. -
Property Value Command-Line Format -noprintType Boolean Default Value FALSE-noprint: Do not print the contents of the log file. -
Property Value Command-Line Format -nocheckType Boolean Default Value FALSE-nocheck: Do not check the log file for errors. -
Property Value Command-Line Format -page #Type Integer Default Value 0Minimum Value 0Maximum Value 31-page: Start at this page.##is an integer in the range 0 to 31, inclusive. -
Property Value Command-Line Format -pageheadersType Boolean Default Value FALSE-pageheaders: Show page headers only. -
Property Value Command-Line Format -pageindex #Type Integer Default Value 12Minimum Value 12Maximum Value 8191-pageindex: Start at this page index.##is an integer between 12 and 8191, inclusive. -
Property Value Command-Line Format -twiddleType Boolean Default Value FALSEBit-shifted dump.
Like ndb_print_backup_file and
ndb_print_schema_file (and unlike most of the
NDB utilities that are intended to
be run on a management server host or to connect to a management
server) ndb_redo_log_reader must be run on a
cluster data node, since it accesses the data node file system
directly. Because it does not make use of the management server,
this utility can be used when the management server is not
running, and even when the cluster has been completely shut
down.
The NDB Cluster restoration program is implemented as a separate
command-line utility ndb_restore, which can
normally be found in the MySQL bin
directory. This program reads the files created as a result of
the backup and inserts the stored information into the database.
Beginning with NDB 8.0.17, this program no longer prints
NDBT_ProgramExit: ... when it finishes its
run. Applications depending on this behavior should be
modified accordingly when upgrading from NDB 8.0.16 or earlier
to a NDB 8.0 later release.
ndb_restore must be executed once for each of
the backup files that were created by the
START BACKUP command used to
create the backup (see
Section 22.5.8.2, “Using The NDB Cluster Management Client to Create a Backup”).
This is equal to the number of data nodes in the cluster at the
time that the backup was created.
Before using ndb_restore, it is recommended that the cluster be running in single user mode, unless you are restoring multiple data nodes in parallel. See Section 22.5.6, “NDB Cluster Single User Mode”, for more information.
The following table includes options that are specific to the NDB Cluster native backup restoration program ndb_restore. Additional descriptions follow the table. For options common to most NDB Cluster programs (including ndb_restore), see Section 22.4.31, “Options Common to NDB Cluster Programs — Options Common to NDB Cluster Programs”.
Table 22.268 Command-line options for the ndb_restore program
| Format | Description | Added, Deprecated, or Removed |
|---|---|---|
| Allow changes to set of columns making up table's primary key | ADDED: NDB 8.0.21 |
|
| Append data to a tab-delimited file | (Supported in all MySQL 8.0 based releases) |
|
| Path to backup files directory | (Supported in all MySQL 8.0 based releases) |
|
| Restore from the backup with the given ID | (Supported in all MySQL 8.0 based releases) |
|
| Alias for --connectstring | (Supported in all MySQL 8.0 based releases) |
|
| Causes indexes from a backup to be ignored; may decrease time needed to restore data | (Supported in all MySQL 8.0 based releases) |
|
| Do not ignore system table during restore. Experimental only; not for production use | (Supported in all MySQL 8.0 based releases) |
|
| List of one or more databases to exclude (includes those not named) | (Supported in all MySQL 8.0 based releases) |
|
| If TRUE (the default), do not restore any intermediate tables (having names prefixed with '#sql-') that were left over from copying ALTER TABLE operations | (Supported in all MySQL 8.0 based releases) |
|
| Causes columns from the backup version of a table that are missing from the version of the table in the database to be ignored | (Supported in all MySQL 8.0 based releases) |
|
| Causes tables from the backup that are missing from the database to be ignored | (Supported in all MySQL 8.0 based releases) |
|
| List of one or more tables to exclude (includes those in the same database that are not named); each table reference must include the database name | (Supported in all MySQL 8.0 based releases) |
|
| Fields are enclosed with the indicated character | (Supported in all MySQL 8.0 based releases) |
|
| Fields are optionally enclosed with the indicated character | (Supported in all MySQL 8.0 based releases) |
|
| Fields are terminated by the indicated character | (Supported in all MySQL 8.0 based releases) |
|
| Print binary types in hexadecimal format | (Supported in all MySQL 8.0 based releases) |
|
| Ignore log entries containing updates to columns now included in extended primary key | ADDED: NDB 8.0.21 |
|
| List of one or more databases to restore (excludes those not named) | (Supported in all MySQL 8.0 based releases) |
|
| Restore shared users and grants to ndb_sql_metadata table | ADDED: NDB 8.0.19 |
|
| List of one or more tables to restore (excludes those in same database that are not named); each table reference must include the database name | (Supported in all MySQL 8.0 based releases) |
|
| Lines are terminated by the indicated character | (Supported in all MySQL 8.0 based releases) |
|
| Allow lossy conversions of column values (type demotions or changes in sign) when restoring data from backup | (Supported in all MySQL 8.0 based releases) |
|
| If a mysqld is connected and using binary logging, do not log the restored data | (Supported in all MySQL 8.0 based releases) |
|
| Do not restore objects relating to Disk Data | (Supported in all MySQL 8.0 based releases) |
|
| Do not upgrade array type for varsize attributes which do not already resize VAR data, and do not change column attributes | (Supported in all MySQL 8.0 based releases) |
|
| Nodegroup map for NDBCLUSTER storage engine. Syntax: list of (source_nodegroup, destination_nodegroup) | (Supported in all MySQL 8.0 based releases) |
|
| ID of node where backup was taken | (Supported in all MySQL 8.0 based releases) |
|
| Number of slices to apply when restoring by slice | ADDED: NDB 8.0.20 |
|
| Number of parallel transactions to use while restoring data | (Supported in all MySQL 8.0 based releases) |
|
| Allow preservation of trailing spaces (including padding) when promoting fixed-width string types to variable-width types | (Supported in all MySQL 8.0 based releases) |
|
| Print metadata, data and log to stdout (equivalent to --print-meta --print-data --print-log) | (Supported in all MySQL 8.0 based releases) |
|
| Print data to stdout | (Supported in all MySQL 8.0 based releases) |
|
| Print to stdout | (Supported in all MySQL 8.0 based releases) |
|
| Print metadata to stdout | (Supported in all MySQL 8.0 based releases) |
|
| Write SQL log to stdout; default is FALSE | (Supported in all MySQL 8.0 based releases) |
|
| Print status of restoration each given number of seconds | (Supported in all MySQL 8.0 based releases) |
|
| Allow attributes to be promoted when restoring data from backup | (Supported in all MySQL 8.0 based releases) |
|
| Causes multithreaded rebuilding of ordered indexes found in the backup. Number of threads used is determined by setting BuildIndexThreads parameter | (Supported in all MySQL 8.0 based releases) |
|
| Apply offset to value of specified column using indicated function and arguments | ADDED: NDB 8.0.21 |
|
| Restore table data and logs into NDB Cluster using the NDB API | (Supported in all MySQL 8.0 based releases) |
|
| Restore epoch info into the status table. Convenient on a MySQL Cluster replication slave for starting replication. The row in mysql.ndb_apply_status with id 0 will be updated/inserted | (Supported in all MySQL 8.0 based releases) |
|
| Restore metadata to NDB Cluster using the NDB API | (Supported in all MySQL 8.0 based releases) |
|
| Restore MySQL privilege tables that were previously moved to NDB | DEPRECATED: NDB 8.0.16 |
|
| Restores to a database with a different name than the original | (Supported in all MySQL 8.0 based releases) |
|
| Causes missing blob tables in the backup file to be ignored | (Supported in all MySQL 8.0 based releases) |
|
| Skip table structure check during restoring of data | (Supported in all MySQL 8.0 based releases) |
|
| Causes schema objects not recognized by ndb_restore to be ignored when restoring a backup made from a newer MySQL Cluster version to an older version | (Supported in all MySQL 8.0 based releases) |
|
| Slice ID, when restoring by slices | ADDED: NDB 8.0.20 |
|
| Creates a tab-separated .txt file for each table in the given path | (Supported in all MySQL 8.0 based releases) |
|
| Level of verbosity in output | (Supported in all MySQL 8.0 based releases) |
Typical options for this utility are shown here:
ndb_restore [-cconnection_string] -nnode_id-bbackup_id\ [-m] -r --backup-path=/path/to/backup/files
Normally, when restoring from an NDB Cluster backup,
ndb_restore requires at a minimum the
--nodeid (short form:
-n),
--backupid (short form:
-b), and
--backup-path options.
Prior to NDB 8.0.19, when ndb_restore was
used to restore any tables containing unique indexes, it was
necessary to include
--disable-indexes or
--rebuild-indexes. Beginning
with NDB 8.0.19, when automatic metadata synchronization is
enabled, this is no longer necessary.
The -c option is used to specify a connection
string which tells ndb_restore where to
locate the cluster management server (see
Section 22.3.3.3, “NDB Cluster Connection Strings”). If this
option is not used, then ndb_restore attempts
to connect to a management server on
localhost:1186. This utility acts as a
cluster API node, and so requires a free connection
“slot” to connect to the cluster management server.
This means that there must be at least one
[api] or [mysqld] section
that can be used by it in the cluster
config.ini file. It is a good idea to keep
at least one empty [api] or
[mysqld] section in
config.ini that is not being used for a
MySQL server or other application for this reason (see
Section 22.3.3.7, “Defining SQL and Other API Nodes in an NDB Cluster”).
You can verify that ndb_restore is connected to the cluster by using the SHOW command in the ndb_mgm management client. You can also accomplish this from a system shell, as shown here:
shell> ndb_mgm -e "SHOW"
More detailed information about all options used by ndb_restore can be found in the following list:
-
Property Value Command-Line Format --allow-pk-changes[=0|1]Introduced 8.0.21-ndb-8.0.21 Type Integer Default Value 0Minimum Value 0Maximum Value 1When this option is set to
1, ndb_restore allows the primary keys in a table definition to differ from that of the same table in the backup. This may be desirable when backing up and restoring between different schema versions with primary key changes on one or more tables, and it appears that performing the restore operation using ndb_restore is simpler or mor efficient than issuing manyALTER TABLEstatements after restoring table schemas and data.The following changes in primary key definitions are supported by
--allow-pk-changes:Extending the primary key: A non-nullable column that exists in the table schema in the backup becomes part of the table's primary key in the database.
ImportantWhen extending a table's primary key, any columns which become part of primary key must not be updated while the backup is being taken; any such updates discovered by ndb_restore cause the restore operation to fail, even when no change in value takes place. In some cases, it may be possible to override this behavior using the
--ignore-extended-pk-updatesoption; see the description of this option for more information.Contracting the primary key (1): A column that is already part of the table's primary key in the backup schema is no longer part of the primary key, but remains in the table.
Contracting the primary key (2): A column that is already part of the table's primary key in the backup schema is removed from the table entirely.
These differences can be combined with other schema differences supported by ndb_restore, including changes to blob and text columns requiring the use of staging tables.
Basic steps in a typical scenario using primary key schema changes are listed here:
Restore table schemas using ndb_restore
--restore-metaAlter schema to that desired, or create it
Back up the desired schema
Run ndb_restore
--disable-indexesusing the backup from the previous step, to drop indexes and constraintsRun ndb_restore
--allow-pk-changes(possibly along with--ignore-extended-pk-updates,--disable-indexes, and possibly other options as needed) to restore all dataRun ndb_restore
--rebuild-indexesusing the backup made with the desired schema, to rebuild indexes and constraints
When extending the primary key, it may be necessary for ndb_restore to use a temporary secondary unique index during the restore operation to map from the old primary key to the new one. Such an index is created only when necessary to apply events from the backup log to a table which has an extended primary key. This index is named
NDB$RESTORE_PK_MAPPING, and is created on each table requiring it; it can be shared, if necessary, by multiple instances of ndb_restore instances running in parallel. (Running ndb_restore--rebuild-indexesat the end of the restore process causes this index to be dropped.) -
Property Value Command-Line Format --appendWhen used with the
--taband--print-dataoptions, this causes the data to be appended to any existing files having the same names. -
Property Value Command-Line Format --backup-path=dir_nameType Directory name Default Value ./The path to the backup directory is required; this is supplied to ndb_restore using the
--backup-pathoption, and must include the subdirectory corresponding to the ID backup of the backup to be restored. For example, if the data node'sDataDiris/var/lib/mysql-cluster, then the backup directory is/var/lib/mysql-cluster/BACKUP, and the backup files for the backup with the ID 3 can be found in/var/lib/mysql-cluster/BACKUP/BACKUP-3. The path may be absolute or relative to the directory in which the ndb_restore executable is located, and may be optionally prefixed withbackup-path=.It is possible to restore a backup to a database with a different configuration than it was created from. For example, suppose that a backup with backup ID
12, created in a cluster with two storage nodes having the node IDs2and3, is to be restored to a cluster with four nodes. Then ndb_restore must be run twice—once for each storage node in the cluster where the backup was taken. However, ndb_restore cannot always restore backups made from a cluster running one version of MySQL to a cluster running a different MySQL version.ImportantIt is not possible to restore a backup made from a newer version of NDB Cluster using an older version of ndb_restore. You can restore a backup made from a newer version of MySQL to an older cluster, but you must use a copy of ndb_restore from the newer NDB Cluster version to do so.
For example, to restore a cluster backup taken from a cluster running NDB Cluster 7.5.19 to a cluster running NDB Cluster 7.4.29, you must use the ndb_restore that comes with the NDB Cluster 7.5.19 distribution.
For more rapid restoration, the data may be restored in parallel, provided that there is a sufficient number of cluster connections available. That is, when restoring to multiple nodes in parallel, you must have an
[api]or[mysqld]section in the clusterconfig.inifile available for each concurrent ndb_restore process. However, the data files must always be applied before the logs. -
Property Value Command-Line Format --backupid=#Type Numeric Default Value noneThis option is used to specify the ID or sequence number of the backup, and is the same number shown by the management client in the
Backupmessage displayed upon completion of a backup. (See Section 22.5.8.2, “Using The NDB Cluster Management Client to Create a Backup”.)backup_idcompletedImportantWhen restoring cluster backups, you must be sure to restore all data nodes from backups having the same backup ID. Using files from different backups will at best result in restoring the cluster to an inconsistent state, and may fail altogether.
In NDB 8.0.15 and later, this option is required.
-
Property Value Command-Line Format --connectType String Default Value localhost:1186Alias for
--ndb-connectstring. -
Property Value Command-Line Format --disable-indexesDisable restoration of indexes during restoration of the data from a native
NDBbackup. Afterwards, you can restore indexes for all tables at once with multithreaded building of indexes using--rebuild-indexes, which should be faster than rebuilding indexes concurrently for very large tables. -
Property Value Command-Line Format --dont-ignore-systab-0Normally, when restoring table data and metadata, ndb_restore ignores the copy of the
NDBsystem table that is present in the backup.--dont-ignore-systab-0causes the system table to be restored. This option is intended for experimental and development use only, and is not recommended in a production environment. -
Property Value Command-Line Format --exclude-databases=db-listType String Default Value Comma-delimited list of one or more databases which should not be restored.
This option is often used in combination with
--exclude-tables; see that option's description for further information and examples. --exclude-intermediate-sql-tables[=TRUE|FALSE]Property Value Command-Line Format --exclude-intermediate-sql-tables[=TRUE|FALSE]Type Boolean Default Value TRUEWhen performing copying
ALTER TABLEoperations, mysqld creates intermediate tables (whose names are prefixed with#sql-). WhenTRUE, the--exclude-intermediate-sql-tablesoption keeps ndb_restore from restoring such tables that may have been left over from these operations. This option isTRUEby default.-
Property Value Command-Line Format --exclude-missing-columnsIt is possible to restore only selected table columns using this option, which causes ndb_restore to ignore any columns missing from tables being restored as compared to the versions of those tables found in the backup. This option applies to all tables being restored. If you wish to apply this option only to selected tables or databases, you can use it in combination with one or more of the
--include-*or--exclude-*options described elsewhere in this section to do so, then restore data to the remaining tables using a complementary set of these options. -
Property Value Command-Line Format --exclude-missing-tablesIt is possible to restore only selected tables using this option, which causes ndb_restore to ignore any tables from the backup that are not found in the target database.
-
Property Value Command-Line Format --exclude-tables=table-listType String Default Value List of one or more tables to exclude; each table reference must include the database name. Often used together with
--exclude-databases.When
--exclude-databasesor--exclude-tablesis used, only those databases or tables named by the option are excluded; all other databases and tables are restored by ndb_restore.This table shows several invocations of ndb_restore usng
--exclude-*options (other options possibly required have been omitted for clarity), and the effects these options have on restoring from an NDB Cluster backup:Table 22.269 Several invocations of ndb_restore using --exclude-* options, and the effects these options have on restoring from an NDB Cluster backup.
Option Result --exclude-databases=db1All tables in all databases except db1are restored; no tables indb1are restored--exclude-databases=db1,db2(or--exclude-databases=db1--exclude-databases=db2)All tables in all databases except db1anddb2are restored; no tables indb1ordb2are restored--exclude-tables=db1.t1All tables except t1in databasedb1are restored; all other tables indb1are restored; all tables in all other databases are restored--exclude-tables=db1.t2,db2.t1(or--exclude-tables=db1.t2--exclude-tables=db2.t1)All tables in database db1except fort2and all tables in databasedb2except for tablet1are restored; no other tables indb1ordb2are restored; all tables in all other databases are restoredYou can use these two options together. For example, the following causes all tables in all databases except for databases
db1anddb2, and tablest1andt2in databasedb3, to be restored:shell>
ndb_restore [...] --exclude-databases=db1,db2 --exclude-tables=db3.t1,db3.t2(Again, we have omitted other possibly necessary options in the interest of clarity and brevity from the example just shown.)
You can use
--include-*and--exclude-*options together, subject to the following rules:The actions of all
--include-*and--exclude-*options are cumulative.All
--include-*and--exclude-*options are evaluated in the order passed to ndb_restore, from right to left.In the event of conflicting options, the first (rightmost) option takes precedence. In other words, the first option (going from right to left) that matches against a given database or table “wins”.
For example, the following set of options causes ndb_restore to restore all tables from database
db1exceptdb1.t1, while restoring no other tables from any other databases:--include-databases=db1 --exclude-tables=db1.t1
However, reversing the order of the options just given simply causes all tables from database
db1to be restored (includingdb1.t1, but no tables from any other database), because the--include-databasesoption, being farthest to the right, is the first match against databasedb1and thus takes precedence over any other option that matchesdb1or any tables indb1:--exclude-tables=db1.t1 --include-databases=db1
-
Property Value Command-Line Format --fields-enclosed-by=charType String Default Value Each column value is enclosed by the string passed to this option (regardless of data type; see the description of
--fields-optionally-enclosed-by). --fields-optionally-enclosed-byProperty Value Command-Line Format --fields-optionally-enclosed-byType String Default Value The string passed to this option is used to enclose column values containing character data (such as
CHAR,VARCHAR,BINARY,TEXT, orENUM).-
Property Value Command-Line Format --fields-terminated-by=charType String Default Value \t (tab)The string passed to this option is used to separate column values. The default value is a tab character (
\t). -
Property Value Command-Line Format --hexIf this option is used, all binary values are output in hexadecimal format.
-
Property Value Command-Line Format --ignore-extended-pk-updates[=0|1]Introduced 8.0.21-ndb-8.0.21 Type Integer Default Value 0Minimum Value 0Maximum Value 1When using
--allow-pk-changes, columns which become part of a table's primary key must not be updated while the backup is being taken; such columns should keep the same values from the time values are inserted into them until the rows containing the values are deleted. If ndb_restore encounters updates to these columns when restoring a backup, the restore fails. Because some applications may set values for all columns when updating a row, even when some column values are not changed, the backup may include log events appearing to update columns which are not in fact modified. In such cases you can set--ignore-extended-pk-updatesto1, forcing ndb_restore to ignore such updates.ImportantWhen causing these updates to be ignored, the user is responsible for ensuring that there are no updates to the values of any columns that become part of the primary key.
For more information, see the description of
--allow-pk-changes. -
Property Value Command-Line Format --include-databases=db-listType String Default Value Comma-delimited list of one or more databases to restore. Often used together with
--include-tables; see the description of that option for further information and examples. -
Property Value Command-Line Format --include-stored-grantsIntroduced 8.0.19-ndb-8.0.19 Type Boolean Default Value FALSEIn NDB 8.0.19 and later, ndb_restore does not by default restore shared users and grants (see Section 22.5.12, “Distributed MySQL Privileges with NDB_STORED_USER”) to the
ndb_sql_metadatatable. Specifying this option causes it to do so. -
Property Value Command-Line Format --include-tables=table-listType String Default Value Comma-delimited list of tables to restore; each table reference must include the database name.
When
--include-databasesor--include-tablesis used, only those databases or tables named by the option are restored; all other databases and tables are excluded by ndb_restore, and are not restored.The following table shows several invocations of ndb_restore using
--include-*options (other options possibly required have been omitted for clarity), and the effects these have on restoring from an NDB Cluster backup:Table 22.270 Several invocations of ndb_restore using --include-* options, and their effects on restoring from an NDB Cluster backup.
Option Result --include-databases=db1Only tables in database db1are restored; all tables in all other databases are ignored--include-databases=db1,db2(or--include-databases=db1--include-databases=db2)Only tables in databases db1anddb2are restored; all tables in all other databases are ignored--include-tables=db1.t1Only table t1in databasedb1is restored; no other tables indb1or in any other database are restored--include-tables=db1.t2,db2.t1(or--include-tables=db1.t2--include-tables=db2.t1)Only the table t2in databasedb1and the tablet1in databasedb2are restored; no other tables indb1,db2, or any other database are restoredYou can also use these two options together. For example, the following causes all tables in databases
db1anddb2, together with the tablest1andt2in databasedb3, to be restored (and no other databases or tables):shell>
ndb_restore [...] --include-databases=db1,db2 --include-tables=db3.t1,db3.t2(Again we have omitted other, possibly required, options in the example just shown.)
It also possible to restore only selected databases, or selected tables from a single database, without any
--include-*(or--exclude-*) options, using the syntax shown here:ndb_restore
other_optionsdb_name,[db_name[,...] |tbl_name[,tbl_name][,...]]In other words, you can specify either of the following to be restored:
All tables from one or more databases
One or more tables from a single database
-
Property Value Command-Line Format --lines-terminated-by=charType String Default Value \n (linebreak)Specifies the string used to end each line of output. The default is a linefeed character (
\n). -
Property Value Command-Line Format --lossy-conversionsType Boolean Default Value FALSE(If option is not used)This option is intended to complement the
--promote-attributesoption. Using--lossy-conversionsallows lossy conversions of column values (type demotions or changes in sign) when restoring data from backup. With some exceptions, the rules governing demotion are the same as for MySQL replication; see Section 17.5.1.9.2, “Replication of Columns Having Different Data Types”, for information about specific type conversions currently supported by attribute demotion.ndb_restore reports any truncation of data that it performs during lossy conversions once per attribute and column.
-
Property Value Command-Line Format --no-binlogThis option prevents any connected SQL nodes from writing data restored by ndb_restore to their binary logs.
-
Property Value Command-Line Format --no-restore-disk-objectsType Boolean Default Value FALSEThis option stops ndb_restore from restoring any NDB Cluster Disk Data objects, such as tablespaces and log file groups; see Section 22.5.10, “NDB Cluster Disk Data Tables”, for more information about these.
-
Property Value Command-Line Format --no-upgradeWhen using ndb_restore to restore a backup,
VARCHARcolumns created using the old fixed format are resized and recreated using the variable-width format now employed. This behavior can be overridden by specifying--no-upgrade. -
Property Value Command-Line Format --ndb-nodegroup-map=mapThis option can be used to restore a backup taken from one node group to a different node group. Its argument is a list of the form
source_node_group,target_node_group -
Property Value Command-Line Format --nodeid=#Type Numeric Default Value noneSpecify the node ID of the data node on which the backup was taken.
When restoring to a cluster with different number of data nodes from that where the backup was taken, this information helps identify the correct set or sets of files to be restored to a given node. (In such cases, multiple files usually need to be restored to a single data node.) See Section 22.4.23.1, “Restoring to a different number of data nodes”, for additional information and examples.
In NDB 8.0.15 and later, this option is required.
-
Property Value Command-Line Format --num-slices=#Introduced 8.0.20-ndb-8.0.20 Type Integer Default Value 1Minimum Value 1Maximum Value 1024When restoring a backup by slices, this option sets the number of slices into which to divide the backup. This allows multiple instances of ndb_restore to restore disjoint subsets in parallel, potentially reducing the amount of time required to perform the restore operation.
A slice is a subset of the data in a given backup; that is, it is a set of fragments having the same slice ID, specified using the
--slice-idoption. The two options must always be used together, and the value set by--slice-idmust always be less than the number of slices.ndb_restore encounters fragments and assigns each one a fragment counter. When restoring by slices, a slice ID is assigned to each fragment; this slice ID is in the range 0 to 1 less than the number of slices. For a table that is not a
BLOBtable, the slice to which a given fragment belongs is determined using the formula shown here:[
slice_ID] = [fragment_counter] % [number_of_slices]For a
BLOBtable, a fragment counter is not used; the fragment number is used instead, along with the ID of the main table for theBLOBtable (recall thatNDBstoresBLOBvalues in a separate table internally). In this case, the slice ID for a given fragment is calculated as shown here:[
slice_ID] = ([main_table_ID] + [fragment_ID]) % [number_of_slices]Thus, restoring by
Nslices means runningNinstances of ndb_restore, all with--num-slices=(along with any other necessary options) and one each withN--slice-id=1,--slice-id=2,--slice-id=3, and so on throughslice-id=.N-1Example. Assume that you want to restore a backup named
BACKUP-1, found in the default directory/var/lib/mysql-cluster/BACKUP/BACKUP-3on the node file system on each data node, to a cluster with four data nodes having the node IDs 1, 2, 3, and 4. To perform this operation using five slices, execute the sets of commands shown in the following list:Restore the cluster metadata using ndb_restore as shown here:
shell>
ndb_restore -b 1 -n 1 -m --disable-indexes --backup-path=/home/ndbuser/backupsRestore the cluster data to the data nodes invoking ndb_restore as shown here:
shell>
ndb_restore -b 1 -n 1 -r --num-slices=5 --slice-id=0 --backup-path=/var/lib/mysql-cluster/BACKUP/BACKUP-1shell>ndb_restore -b 1 -n 1 -r --num-slices=5 --slice-id=1 --backup-path=/var/lib/mysql-cluster/BACKUP/BACKUP-1shell>ndb_restore -b 1 -n 1 -r --num-slices=5 --slice-id=2 --backup-path=/var/lib/mysql-cluster/BACKUP/BACKUP-1shell>ndb_restore -b 1 -n 1 -r --num-slices=5 --slice-id=3 --backup-path=/var/lib/mysql-cluster/BACKUP/BACKUP-1shell>ndb_restore -b 1 -n 1 -r --num-slices=5 --slice-id=4 --backup-path=/var/lib/mysql-cluster/BACKUP/BACKUP-1shell>ndb_restore -b 1 -n 2 -r --num-slices=5 --slice-id=0 --backup-path=/var/lib/mysql-cluster/BACKUP/BACKUP-1shell>ndb_restore -b 1 -n 2 -r --num-slices=5 --slice-id=1 --backup-path=/var/lib/mysql-cluster/BACKUP/BACKUP-1shell>ndb_restore -b 1 -n 2 -r --num-slices=5 --slice-id=2 --backup-path=/var/lib/mysql-cluster/BACKUP/BACKUP-1shell>ndb_restore -b 1 -n 2 -r --num-slices=5 --slice-id=3 --backup-path=/var/lib/mysql-cluster/BACKUP/BACKUP-1shell>ndb_restore -b 1 -n 2 -r --num-slices=5 --slice-id=4 --backup-path=/var/lib/mysql-cluster/BACKUP/BACKUP-1shell>ndb_restore -b 1 -n 3 -r --num-slices=5 --slice-id=0 --backup-path=/var/lib/mysql-cluster/BACKUP/BACKUP-1shell>ndb_restore -b 1 -n 3 -r --num-slices=5 --slice-id=1 --backup-path=/var/lib/mysql-cluster/BACKUP/BACKUP-1shell>ndb_restore -b 1 -n 3 -r --num-slices=5 --slice-id=2 --backup-path=/var/lib/mysql-cluster/BACKUP/BACKUP-1shell>ndb_restore -b 1 -n 3 -r --num-slices=5 --slice-id=3 --backup-path=/var/lib/mysql-cluster/BACKUP/BACKUP-1shell>ndb_restore -b 1 -n 3 -r --num-slices=5 --slice-id=4 --backup-path=/var/lib/mysql-cluster/BACKUP/BACKUP-1shell>ndb_restore -b 1 -n 4 -r --num-slices=5 --slice-id=0 --backup-path=/var/lib/mysql-cluster/BACKUP/BACKUP-1shell>ndb_restore -b 1 -n 4 -r --num-slices=5 --slice-id=1 --backup-path=/var/lib/mysql-cluster/BACKUP/BACKUP-1shell>ndb_restore -b 1 -n 4 -r --num-slices=5 --slice-id=2 --backup-path=/var/lib/mysql-cluster/BACKUP/BACKUP-1shell>ndb_restore -b 1 -n 4 -r --num-slices=5 --slice-id=3 --backup-path=/var/lib/mysql-cluster/BACKUP/BACKUP-1shell>ndb_restore -b 1 -n 4 -r --num-slices=5 --slice-id=4 --backup-path=/var/lib/mysql-cluster/BACKUP/BACKUP-1All of the commands just shown in this step can be executed in parallel, provided there are enough slots for connections to the cluster (see the description for the
--backup-pathoption).Restore indexes as usual, as shown here:
shell>
ndb_restore -b 1 -n 1 --rebuild-indexes --backup-path=/var/lib/mysql-cluster/BACKUP/BACKUP-1Finally, restore the epoch, using the command shown here:
shell>
ndb_restore -b 1 -n 1 --restore-epoch --backup-path=/var/lib/mysql-cluster/BACKUP/BACKUP-1
You should use slicing to restore the cluster data only; it is not necessary to employ
--num-slicesor--slice-idwhen restoring the metadata, indexes, or epoch information. If either or both of these options are used with the ndb_restore options controlling restoration of these, the program ignores them.The effects of using the
--parallelismoption on the speed of restoration are independent of those produced by slicing or parallel restoration using multiple instances of ndb_restore (--parallelismspecifies the number of parallel transactions executed by a single ndb_restore thread), but it can be used together with either or both of these. You should be aware that increasing--parallelismcauses ndb_restore to impose a greater load on the cluster; if the system can handle this, restoration should complete even more quickly.The value of
--num-slicesis not directly dependent on values relating to hardware such as number of CPUs or CPU cores, amount of RAM, and so forth, nor does it depend on the number of LDMs.It is possible to employ different values for this option on different data nodes as part of the same restoration; doing so should not in and of itself produce any ill effects.
-
Property Value Command-Line Format --parallelism=#Type Numeric Default Value 128Minimum Value 1Maximum Value 1024ndb_restore uses single-row transactions to apply many rows concurrently. This parameter determines the number of parallel transactions (concurrent rows) that an instance of ndb_restore tries to use. By default, this is 128; the minimum is 1, and the maximum is 1024.
The work of performing the inserts is parallelized across the threads in the data nodes involved. This mechanism is employed for restoring bulk data from the
.Datafile—that is, the fuzzy snapshot of the data; it is not used for building or rebuilding indexes. The change log is applied serially; index drops and builds are DDL operations and handled separately. There is no thread-level parallelism on the client side of the restore. --preserve-trailing-spaces,-PProperty Value Command-Line Format --preserve-trailing-spacesCause trailing spaces to be preserved when promoting a fixed-width character data type to its variable-width equivalent—that is, when promoting a
CHARcolumn value toVARCHAR, or aBINARYcolumn value toVARBINARY. Otherwise, any trailing spaces are dropped from such column values when they are inserted into the new columns.-
Property Value Command-Line Format --printType Boolean Default Value FALSECauses ndb_restore to print all data, metadata, and logs to
stdout. Equivalent to using the--print-data,--print-meta, and--print-logoptions together.NoteUse of
--printor any of the--print_*options is in effect performing a dry run. Including one or more of these options causes any output to be redirected tostdout; in such cases, ndb_restore makes no attempt to restore data or metadata to an NDB Cluster. -
Property Value Command-Line Format --print-dataType Boolean Default Value FALSECause ndb_restore to direct its output to
stdout. Often used together with one or more of--tab,--fields-enclosed-by,--fields-optionally-enclosed-by,--fields-terminated-by,--hex, and--append.TEXTandBLOBcolumn values are always truncated. Such values are truncated to the first 256 bytes in the output. This cannot currently be overridden when using--print-data. -
Property Value Command-Line Format --print-logType Boolean Default Value FALSECause ndb_restore to output its log to
stdout. -
Property Value Command-Line Format --print-metaType Boolean Default Value FALSEPrint all metadata to
stdout. -
Property Value Command-Line Format --print-sql-logType Boolean Default Value FALSELog SQL statements to
stdout. Use the option to enable; normally this behavior is disabled. The option checks before attempting to log whether all the tables being restored have explicitly defined primary keys; queries on a table having only the hidden primary key implemented byNDBcannot be converted to valid SQL.This option does not work with tables having
BLOBcolumns. -
Property Value Command-Line Format --progress-frequency=#Type Numeric Default Value 0Minimum Value 0Maximum Value 65535Print a status report each
Nseconds while the backup is in progress. 0 (the default) causes no status reports to be printed. The maximum is 65535. -
Property Value Command-Line Format --promote-attributesndb_restore supports limited attribute promotion in much the same way that it is supported by MySQL replication; that is, data backed up from a column of a given type can generally be restored to a column using a “larger, similar” type. For example, data from a
CHAR(20)column can be restored to a column declared asVARCHAR(20),VARCHAR(30), orCHAR(30); data from aMEDIUMINTcolumn can be restored to a column of typeINTorBIGINT. See Section 17.5.1.9.2, “Replication of Columns Having Different Data Types”, for a table of type conversions currently supported by attribute promotion.Attribute promotion by ndb_restore must be enabled explicitly, as follows:
Prepare the table to which the backup is to be restored. ndb_restore cannot be used to re-create the table with a different definition from the original; this means that you must either create the table manually, or alter the columns which you wish to promote using
ALTER TABLEafter restoring the table metadata but before restoring the data.Invoke ndb_restore with the
--promote-attributesoption (short form-A) when restoring the table data. Attribute promotion does not occur if this option is not used; instead, the restore operation fails with an error.
When converting between character data types and
TEXTorBLOB, only conversions between character types (CHARandVARCHAR) and binary types (BINARYandVARBINARY) can be performed at the same time. For example, you cannot promote anINTcolumn toBIGINTwhile promoting aVARCHARcolumn toTEXTin the same invocation of ndb_restore.Converting between
TEXTcolumns using different character sets is not supported, and is expressly disallowed.When performing conversions of character or binary types to
TEXTorBLOBwith ndb_restore, you may notice that it creates and uses one or more staging tables namedtable_name$STnode_id -
Property Value Command-Line Format --rebuild-indexesEnable multithreaded rebuilding of the ordered indexes while restoring a native
NDBbackup. The number of threads used for building ordered indexes by ndb_restore with this option is controlled by theBuildIndexThreadsdata node configuration parameter and the number of LDMs.It is necessary to use this option only for the first run of ndb_restore; this causes all ordered indexes to be rebuilt without using
--rebuild-indexesagain when restoring subsequent nodes. You should use this option prior to inserting new rows into the database; otherwise, it is possible for a row to be inserted that later causes a unique constraint violation when trying to rebuild the indexes.Building of ordered indices is parallelized with the number of LDMs by default. Offline index builds performed during node and system restarts can be made faster using the
BuildIndexThreadsdata node configuration parameter; this parameter has no effect on dropping and rebuilding of indexes by ndb_restore, which is performed online.Rebuilding of unique indexes uses disk write bandwidth for redo logging and local checkpointing. An insufficient amount of this bandwith can lead to redo buffer overload or log overload errors. In such cases you can run ndb_restore
--rebuild-indexesagain; the process resumes at the point where the error occurred. You can also do this when you have encountered temporary errors. You can repeat execution of ndb_restore--rebuild-indexesindefinitely; you may be able to stop such errors by reducing the value of--parallelism. If the problem is insufficient space, you can increase the size of the redo log (FragmentLogFileSizenode configuration parameter), or you can increase the speed at which LCPs are performed (MaxDiskWriteSpeedand related parameters), in order to free space more quickly. --remap-column=db.tbl.col:fn:argsProperty Value Command-Line Format --remap-column=[db].[tbl].[col]:[fn]:[args]Introduced 8.0.21-ndb-8.0.21 Type String Default Value [none]When used together with
--restore-data, this option applies a function to the value of the indicated column. Values in the argument string are listed here:db: Database name, following any renames performed by--rewrite-database.tbl: Table name.col: Name of the column to be updated. This column must be of one of the integer typesTINYINT,SMALLINT,MEDIUMINT,BIGINT, orINT(INTEGER).fn: Function name; currently, the only supported name isoffset.args: Arguments supplied to the function. Currently, only a single argument, the size of the offset to be added by theoffsetfunction, is supported. Negative values are supported. The size of the argument cannot exceed that of the signed variant of the column's type; for example, ifcolis aMEDIUMINTcolumn, then the allowed range of the argument passed to theoffsetfunction is-8388608to-8388607(see Section 11.1.2, “Integer Types (Exact Value) - INTEGER, INT, SMALLINT, TINYINT, MEDIUMINT, BIGINT”).If applying the offset value to the column would cause an overflow or underflow, the restore operation fails. This could happen, for example, if the column is a
TINYINT, and the option attempts to apply an offset value of 8 on a row in which the column value is 125, since125 + 8 = 133 > 127.
This option can be useful when you wish to merge data stored in multiple source instances of NDB Cluster (all using the same schema) into a single destination NDB Cluster, using NDB native backup (see Section 22.5.8.2, “Using The NDB Cluster Management Client to Create a Backup”) and ndb_restore to merge the data, where primary and unique key values are overlapping between source clusters, and it is necessary as part of the process to remap these values to ranges that do not overlap. It may also be necessary to preserve other relationships between tables. To fulfill such requirements, it is possible to use the option multiple times in the same invocation of ndb_restore to remap columns of different tables, as shown here:
shell>
ndb_restore --restore-data --remap-column=hr.employee.id:offset:1000 \ --remap-column=hr.manager.id:offset:1000 --remap-column=hr.firstaiders.id:offset:1000(Other options not shown here may also be used.)
--remap-columncan also be used to update multiple columns of the same table. Combinations of multiple tables and columns are possible. Different offset values can also be used for different columns of the same table, like this:shell>
ndb_restore --restore-data --remap-column=hr.employee.salary:offset:10000 \ --remap-column=hr.employee.hours:offset:-10When source backups contain duplicate tables which should not be merged, you can handle this by using
--exclude-tables,--exclude-databases, or by some other means in your application.Information about the structure and other characteristics of tables to be merged can obtained using
SHOW CREATE TABLE; the ndb_desc tool; andMAX(),MIN(),LAST_INSERT_ID(), and other MySQL functions.Replication of changes from merged to unmerged tables, or from unmerged to merged tables, in separate instances of NDB Cluster is not supported.
-
Property Value Command-Line Format --restore-dataType Boolean Default Value FALSEOutput
NDBtable data and logs. -
Property Value Command-Line Format --restore-epochAdd (or restore) epoch information to the cluster replication status table. This is useful for starting replication on an NDB Cluster replication slave. When this option is used, the row in the
mysql.ndb_apply_statushaving0in theidcolumn is updated if it already exists; such a row is inserted if it does not already exist. (See Section 22.6.9, “NDB Cluster Backups With NDB Cluster Replication”.) -
Property Value Command-Line Format --restore-metaType Boolean Default Value FALSEThis option causes ndb_restore to print
NDBtable metadata.The first time you run the ndb_restore restoration program, you also need to restore the metadata. In other words, you must re-create the database tables—this can be done by running it with the
--restore-meta(-m) option. Restoring the metadata need be done only on a single data node; this is sufficient to restore it to the entire cluster.In older versions of NDB Cluster, tables whose schemas were restored using this option used the same number of partitions as they did on the original cluster, even if it had a differing number of data nodes from the new cluster. In NDB 8.0, when restoring metadata, this is no longer an issue; ndb_restore now uses the default number of partitions for the target cluster, unless the number of local data manager threads is also changed from what it was for data nodes in the original cluster.
When using this option in NDB 8.0.16 or later, it is recommended that auto synchronization be disabled by setting
ndb_metadata_check=OFFuntil ndb_restore has completed restoring the metadata, after which it can it turned on again to synchronize objects newly created in the NDB dictionary.NoteThe cluster should have an empty database when starting to restore a backup. (In other words, you should start the data nodes with
--initialprior to performing the restore.) -
Property Value Command-Line Format --restore-privilege-tablesDeprecated 8.0.16-ndb-8.0.16 Type Boolean Default Value FALSE(If option is not used)ndb_restore does not by default restore distributed MySQL privilege tables created in releases of NDB Cluster prior to version 8.0, which does not support distrubuted privileges as implemented in NDB 7.6 and earlier. This option causes ndb_restore to restore them.
In NDB 8.0.16 and later, such tables are not used for access control; as part of the MySQL server's upgrade process, the server creates
InnoDBcopies of these tables local to itself. For more information, see Section 22.2.8, “Upgrading and Downgrading NDB Cluster”, as well as Section 6.2.3, “Grant Tables”. --rewrite-database=olddb,newdbProperty Value Command-Line Format --rewrite-database=olddb,newdbType String Default Value noneThis option makes it possible to restore to a database having a different name from that used in the backup. For example, if a backup is made of a database named
products, you can restore the data it contains to a database namedinventory, use this option as shown here (omitting any other options that might be required):shell> ndb_restore --rewrite-database=product,inventory
The option can be employed multiple times in a single invocation of ndb_restore. Thus it is possible to restore simultaneously from a database named
db1to a database nameddb2and from a database nameddb3to one nameddb4using--rewrite-database=db1,db2 --rewrite-database=db3,db4. Other ndb_restore options may be used between multiple occurrences of--rewrite-database.In the event of conflicts between multiple
--rewrite-databaseoptions, the last--rewrite-databaseoption used, reading from left to right, is the one that takes effect. For example, if--rewrite-database=db1,db2 --rewrite-database=db1,db3is used, only--rewrite-database=db1,db3is honored, and--rewrite-database=db1,db2is ignored. It is also possible to restore from multiple databases to a single database, so that--rewrite-database=db1,db3 --rewrite-database=db2,db3restores all tables and data from databasesdb1anddb2into databasedb3.ImportantWhen restoring from multiple backup databases into a single target database using
--rewrite-database, no check is made for collisions between table or other object names, and the order in which rows are restored is not guaranteed. This means that it is possible in such cases for rows to be overwritten and updates to be lost.-
Property Value Command-Line Format --skip-broken-objectsThis option causes ndb_restore to ignore corrupt tables while reading a native
NDBbackup, and to continue restoring any remaining tables (that are not also corrupted). Currently, the--skip-broken-objectsoption works only in the case of missing blob parts tables. -
Property Value Command-Line Format --skip-table-checkIt is possible to restore data without restoring table metadata. By default when doing this, ndb_restore fails with an error if a mismatch is found between the table data and the table schema; this option overrides that behavior.
Some of the restrictions on mismatches in column definitions when restoring data using ndb_restore are relaxed; when one of these types of mismatches is encountered, ndb_restore does not stop with an error as it did previously, but rather accepts the data and inserts it into the target table while issuing a warning to the user that this is being done. This behavior occurs whether or not either of the options
--skip-table-checkor--promote-attributesis in use. These differences in column definitions are of the following types:Different
COLUMN_FORMATsettings (FIXED,DYNAMIC,DEFAULT)Different
STORAGEsettings (MEMORY,DISK)Different default values
Different distribution key settings
-
Property Value Command-Line Format --skip-unknown-objectsThis option causes ndb_restore to ignore any schema objects it does not recognize while reading a native
NDBbackup. This can be used for restoring a backup made from a cluster running (for example) NDB 7.6 to a cluster running NDB Cluster 7.5. -
Property Value Command-Line Format --slice-id=#Introduced 8.0.20-ndb-8.0.20 Type Integer Default Value 0Minimum Value 0Maximum Value 1023When restoring by slices, this is the ID of the slice to restore. This option is always used together with
--num-slices, and its value must be always less than that of--num-slices.For more information, see the description of the
--num-sliceselsewhere in this section. -
Property Value Command-Line Format --tab=dir_nameType Directory name Causes
--print-datato create dump files, one per table, each namedtbl_name.txt.for the current directory. -
Property Value Command-Line Format --verbose=#Type Numeric Default Value 1Minimum Value 0Maximum Value 255Sets the level for the verbosity of the output. The minimum is 0; the maximum is 255. The default value is 1.
Error reporting.
ndb_restore reports both temporary and
permanent errors. In the case of temporary errors, it may able
to recover from them, and reports Restore successful,
but encountered temporary error, please look at
configuration in such cases.
After using ndb_restore to initialize an
NDB Cluster for use in circular replication, binary logs on
the SQL node acting as the replication slave are not
automatically created, and you must cause them to be created
manually. To cause the binary logs to be created, issue a
SHOW TABLES statement on that
SQL node before running START
SLAVE. This is a known issue in NDB Cluster.
Restoring a backup to a previous version of NDB Cluster.
You may encounter issues when restoring a backup taken from a
later version of NDB Cluster to a previous one, due to the use
of features which do not exist in the earlier version. For
example, tables created in NDB 8.0 by default use the
utf8mb4_ai_ci character set, which is not
available in NDB 7.6 and earlier, and so cannot be read by an
ndb_restore binary from one of these
earlier versions.
It is possible to restore from an NDB backup to a cluster having a different number of data nodes than the original from which the backup was taken. The following two sections discuss, respectively, the cases where the target cluster has a lesser or greater number of data nodes than the source of the backup.
You can restore to a cluster having fewer data nodes than the original provided that the larger number of nodes is an even multiple of the smaller number. In the following example, we use a backup taken on a cluster having four data nodes to a cluster having two data nodes.
The management server for the original cluster is on host
host10. The original cluster has four data nodes, with the node IDs and host names shown in the following extract from the management server'sconfig.inifile:[ndbd]
NodeId=2HostName=host2 [ndbd] NodeId=4 HostName=host4 [ndbd] NodeId=6 HostName=host6 [ndbd] NodeId=8 HostName=host8We assume that each data node was originally started with ndbmtd
--ndb-connectstring=host10or the equivalent.Perform a backup in the normal manner. See Section 22.5.8.2, “Using The NDB Cluster Management Client to Create a Backup”, for information about how to do this.
The files created by the backup on each data node are listed here, where
Nis the node ID andBis the backup ID.BACKUP-B-0.N.DataBACKUP-B.N.ctlBACKUP-B.N.log
These files are found under
BackupDataDir/BACKUP/BACKUP-, on each data node. For the rest of this example, we assume that the backup ID is 1.BHave all of these files available for later copying to the new data nodes (where they can be accessed on the data node's local file system by ndb_restore). It is simplest to copy them all to a single location; we assume that this is what you have done.
The management server for the target cluster is on host
host20, and the target has two data nodes, with the node IDs and host names shown, from the management serverconfig.inifile onhost20:[ndbd] NodeId=3 hostname=host3 [ndbd] NodeId=5 hostname=host5
Each of the data node processes on
host3andhost5should be started with ndbmtd-c host20--initialor the equivalent, so that the new (target) cluster starts with clean data node file systems.Copy two different sets of two backup files to each of the target data nodes. For this example, copy the backup files from nodes 2 and 4 from the original cluster to node 3 in the target cluster. These files are listed here:
BACKUP-1-0.2.DataBACKUP-1.2.ctlBACKUP-1.2.logBACKUP-1-0.6.DataBACKUP-1.6.ctlBACKUP-1.6.log
Then copy the backup files from nodes 6 and 8 to node 5; these files are shown in the following list:
BACKUP-1-0.4.DataBACKUP-1.4.ctlBACKUP-1.4.logBACKUP-1-0.8.DataBACKUP-1.8.ctlBACKUP-1.8.log
For the remainder of this example, we assume that the respective backup files have been saved to the directory
/BACKUP-1on each of nodes 3 and 5.On each of the two target data nodes, you must restore from both sets of backups. First, restore the backups from nodes 2 and 4 to node 3 by invoking ndb_restore on
host3as shown here:shell>
ndb_restore -c host20shell>--nodeid=2--backupid=1--restore-data--backup-path=/BACKUP-1ndb_restore -c host20 --nodeid=4 --backupid=1 --restore-data --backup-path=/BACKUP-1Then restore the backups from nodes 6 and 8 to node 5 by invoking ndb_restore on
host5, like this:shell>
ndb_restore -c host20 --nodeid=6 --backupid=1 --restore-data --backup-path=/BACKUP-1shell>ndb_restore -c host20 --nodeid=8 --backupid=1 --restore-data --backup-path=/BACKUP-1
The node ID specified for a given ndb_restore command is that of the node in the original backup and not that of the data node to restore it to. When performing a backup using the method described in this section, ndb_restore connects to the management server and obtains a list of data nodes in the cluster the backup is being restored to. The restored data is distributed accordingly, so that the number of nodes in the target cluster does not need to be to be known or calculated when performing the backup.
When changing the total number of LCP threads or LQH threads per node group, you should recreate the schema from backup created using mysqldump.
Create the backup of the data. You can do this by invoking the ndb_mgm client
START BACKUPcommand from the system shell, like this:shell>
ndb_mgm -e "START BACKUP 1"This assumes that the desired backup ID is 1.
Create a backup of the schema. This step is necessary only if the total number of LCP threads or LQH threads per node group is changed.
shell>
mysqldump --no-data --routines --events --triggers --databases > myschema.sqlImportantOnce you have created the
NDBnative backup using ndb_mgm, you must not make any schema changes before creating the backup of the schema, if you do so.Copy the backup directory to the new cluster. For example if the backup you want to restore has ID 1 and
BackupDataDir=/backups/node_, then the path to the backup on this node isnodeid/backups/node_1/BACKUP/BACKUP-1. Inside this directory there are three files, listed here:BACKUP-1-0.1.DataBACKUP-1.1.ctlBACKUP-1.1.log
You should copy the entire directory to the new node.
If you needed to create a schema file, copy this to a location on an SQL node where it can be read by mysqld.
There is no requirement for the backup to be restored from a specific node or nodes.
To restore from the backup just created, perform the following steps:
Restore the schema.
If you created a separate schema backup file using mysqldump, import this file using the mysql client, similar to what is shown here:
shell>
mysql < myschema.sqlWhen importing the schema file, you may need to specify the
--userand--passwordoptions (and possibly others) in addition to what is shown, in order for the mysql client to be able to connect to the MySQL server.If you did not need to create a schema file, you can re-create the schema using ndb_restore
--restore-meta(short form-m), similar to what is shown here:shell> ndb_restore --nodeid=1 --backupid=1 --restore-meta --backup-path=/backups/node_1/BACKUP/BACKUP-1
ndb_restore must be able to contact the management server; add the
--ndb-connectstringoption if and as needed to make this possible.
Restore the data. This needs to be done once for each data node in the original cluster, each time using that data node's node ID. Assuming that there were 4 data nodes originally, the set of commands required would look something like this:
ndb_restore --nodeid=1 --backupid=1 --restore-data --backup-path=/backups/node_1/BACKUP/BACKUP-1 --disable-indexes ndb_restore --nodeid=2 --backupid=1 --restore-data --backup-path=/backups/node_2/BACKUP/BACKUP-1 --disable-indexes ndb_restore --nodeid=3 --backupid=1 --restore-data --backup-path=/backups/node_3/BACKUP/BACKUP-1 --disable-indexes ndb_restore --nodeid=4 --backupid=1 --restore-data --backup-path=/backups/node_4/BACKUP/BACKUP-1 --disable-indexes
These can be run in parallel.
Be sure to add the
--ndb-connectstringoption as needed.Rebuild the indexes. These were disabled by the
--disable-indexesoption used in the commands just shown. Recreating the indexes avoids errors due to the restore not being consistent at all points. Rebuilding the indexes can also improve performance in some cases. To rebuild the indexes, execute the following command once, on a single node:shell>
ndb_restore --nodeid=1 --backupid=1 --backup-path=/backups/node_1/BACKUP/BACKUP-1 --rebuild-indexesAs mentioned previously, you may need to add the
--ndb-connectstringoption, so that ndb_restore can contact the management server.
Beginning with NDB Cluster 8.0.16, it is possible to take parallel backups on each data node using ndbmtd with multiple LDMs (see Section 22.5.8.5, “Taking an NDB Backup with Parallel Data Nodes”). The next two sections describe how to restore backups that were taken in this fashion.
Restoring a parallel backup in parallel requires an ndb_restore binary from an NDB Cluster distribution version 8.0.16 or later. The process is not substantially different from that outlined in the general usage section under the description of the ndb_restore program, and consists of executing ndb_restore twice, similarly to what is shown here:
shell> ndb_restore -n 1 -b 1 -m --backup-path=path/to/backup_dir/BACKUP/BACKUP-backup_idshell> ndb_restore -n 1 -b 1 -r --backup-path=path/to/backup_dir/BACKUP/BACKUP-backup_id
backup_id is the ID of the backup
to be restored. In the general case, no additional special
arguments are required; ndb_restore
always checks for the existence of parallel subdirectories
under the directory indicated by the
--backup-path option and
restores the metadata (serially) and then the table data (in
parallel).
It is possible to restore a backup that was made using
parallelism on the data nodes in serial fashion. To do this,
invoke ndb_restore with
--backup-path pointing
to the subdirectories created by each LDM under the main
backup directory, once to any one of the subdirectories to
restore the metadata (it does not matter which one, since
each subdirectory contains a complete copy of the metadata),
then to each of the subdirectories in turn to restore the
data. Suppose that we want to restore the backup having
backup ID 100 that was taken with four LDMs, and that the
BackupDataDir is
/opt. To restore the metadata in this
case, we can invoke ndb_restore like
this:
shell> ndb_restore -n 1 -b 1 -m --backup-path=opt/BACKUP/BACKUP-100/BACKUP-100-PART-1-OF-4
To restore the table data, execute ndb_restore four times, each time using one of the subdirectories in turn, as shown here:
shell> ndb_restore -n 1 -b 1 -r --backup-path=opt/BACKUP/BACKUP-100/BACKUP-100-PART-1-OF-4 shell> ndb_restore -n 1 -b 1 -r --backup-path=opt/BACKUP/BACKUP-100/BACKUP-100-PART-2-OF-4 shell> ndb_restore -n 1 -b 1 -r --backup-path=opt/BACKUP/BACKUP-100/BACKUP-100-PART-3-OF-4 shell> ndb_restore -n 1 -b 1 -r --backup-path=opt/BACKUP/BACKUP-100/BACKUP-100-PART-4-OF-4
You can employ the same technique to restore a parallel backup to an older version of NDB Cluster (prior to NDB 8.0.16) that does not support parallel backups, using the ndb_restore binary supplied with the older version of the NDB Cluster software.
ndb_select_all prints all rows from an
NDB table to
stdout.
Usage
ndb_select_all -cconnection_stringtbl_name-ddb_name[>file_name]
The following table includes options that are specific to the NDB Cluster native backup restoration program ndb_select_all. Additional descriptions follow the table. For options common to most NDB Cluster programs (including ndb_select_all), see Section 22.4.31, “Options Common to NDB Cluster Programs — Options Common to NDB Cluster Programs”.
Table 22.271 Command-line options for the ndb_select_all program
| Format | Description | Added, Deprecated, or Removed |
|---|---|---|
| Name of the database in which the table is found | (Supported in all MySQL 8.0 based releases) |
|
| Degree of parallelism | (Supported in all MySQL 8.0 based releases) |
|
| Lock type | (Supported in all MySQL 8.0 based releases) |
|
| Sort resultset according to index whose name is supplied | (Supported in all MySQL 8.0 based releases) |
|
| Sort resultset in descending order (requires order flag) | (Supported in all MySQL 8.0 based releases) |
|
| Print header (set to 0|FALSE to disable headers in output) | (Supported in all MySQL 8.0 based releases) |
|
| Output numbers in hexadecimal format | (Supported in all MySQL 8.0 based releases) |
|
| Set a column delimiter | (Supported in all MySQL 8.0 based releases) |
|
| Print disk references (useful only for Disk Data tables having nonindexed columns) | (Supported in all MySQL 8.0 based releases) |
|
| Print rowid | (Supported in all MySQL 8.0 based releases) |
|
| Include GCI in output | (Supported in all MySQL 8.0 based releases) |
|
| Include GCI and row epoch in output | (Supported in all MySQL 8.0 based releases) |
|
| Scan in tup order | (Supported in all MySQL 8.0 based releases) |
|
| Do not print table column data | (Supported in all MySQL 8.0 based releases) |
Name of the database in which the table is found. The default value is
TEST_DB.Specifies the degree of parallelism.
--lock=,lock_type-llock_typeEmploys a lock when reading the table. Possible values for
lock_typeare:0: Read lock1: Read lock with hold2: Exclusive read lock
There is no default value for this option.
--order=,index_name-oindex_nameOrders the output according to the index named
index_name.NoteThis is the name of an index, not of a column; the index must have been explicitly named when created.
Sorts the output in descending order. This option can be used only in conjunction with the
-o(--order) option.Excludes column headers from the output.
Causes all numeric values to be displayed in hexadecimal format. This does not affect the output of numerals contained in strings or datetime values.
--delimiter=,character-DcharacterCauses the
characterto be used as a column delimiter. Only table data columns are separated by this delimiter.The default delimiter is the tab character.
Adds a disk reference column to the output. The column is nonempty only for Disk Data tables having nonindexed columns.
Adds a
ROWIDcolumn providing information about the fragments in which rows are stored.Adds a
GCIcolumn to the output showing the global checkpoint at which each row was last updated. See Section 22.1, “NDB Cluster Overview”, and Section 22.5.3.2, “NDB Cluster Log Events”, for more information about checkpoints.Adds a
ROW$GCI64column to the output showing the global checkpoint at which each row was last updated, as well as the number of the epoch in which this update occurred.Scan the table in the order of the tuples.
Causes any table data to be omitted.
Sample Output
Output from a MySQL SELECT
statement:
mysql> SELECT * FROM ctest1.fish;
+----+-----------+
| id | name |
+----+-----------+
| 3 | shark |
| 6 | puffer |
| 2 | tuna |
| 4 | manta ray |
| 5 | grouper |
| 1 | guppy |
+----+-----------+
6 rows in set (0.04 sec)
Output from the equivalent invocation of ndb_select_all:
shell> ./ndb_select_all -c localhost fish -d ctest1
id name
3 [shark]
6 [puffer]
2 [tuna]
4 [manta ray]
5 [grouper]
1 [guppy]
6 rows returned
NDBT_ProgramExit: 0 - OK
All string values are enclosed by square brackets
([...]) in the output of
ndb_select_all. For another example, consider
the table created and populated as shown here:
CREATE TABLE dogs (
id INT(11) NOT NULL AUTO_INCREMENT,
name VARCHAR(25) NOT NULL,
breed VARCHAR(50) NOT NULL,
PRIMARY KEY pk (id),
KEY ix (name)
)
TABLESPACE ts STORAGE DISK
ENGINE=NDBCLUSTER;
INSERT INTO dogs VALUES
('', 'Lassie', 'collie'),
('', 'Scooby-Doo', 'Great Dane'),
('', 'Rin-Tin-Tin', 'Alsatian'),
('', 'Rosscoe', 'Mutt');This demonstrates the use of several additional ndb_select_all options:
shell> ./ndb_select_all -d ctest1 dogs -o ix -z --gci --disk
GCI id name breed DISK_REF
834461 2 [Scooby-Doo] [Great Dane] [ m_file_no: 0 m_page: 98 m_page_idx: 0 ]
834878 4 [Rosscoe] [Mutt] [ m_file_no: 0 m_page: 98 m_page_idx: 16 ]
834463 3 [Rin-Tin-Tin] [Alsatian] [ m_file_no: 0 m_page: 34 m_page_idx: 0 ]
835657 1 [Lassie] [Collie] [ m_file_no: 0 m_page: 66 m_page_idx: 0 ]
4 rows returned
NDBT_ProgramExit: 0 - OK
ndb_select_count prints the number of rows in
one or more NDB tables. With a
single table, the result is equivalent to that obtained by using
the MySQL statement SELECT COUNT(*) FROM
.
tbl_name
Usage
ndb_select_count [-cconnection_string] -ddb_nametbl_name[,tbl_name2[, ...]]
The following table includes options that are specific to the NDB Cluster native backup restoration program ndb_select_count. Additional descriptions follow the table. For options common to most NDB Cluster programs (including ndb_select_count), see Section 22.4.31, “Options Common to NDB Cluster Programs — Options Common to NDB Cluster Programs”.
Table 22.272 Command-line options for the ndb_select_count program
| Format | Description | Added, Deprecated, or Removed |
|---|---|---|
|
Name of the database in which the table is found | (Supported in all MySQL 8.0 based releases) |
|
Degree of parallelism | (Supported in all MySQL 8.0 based releases) |
|
Lock type | (Supported in all MySQL 8.0 based releases) |
You can obtain row counts from multiple tables in the same database by listing the table names separated by spaces when invoking this command, as shown under Sample Output.
Sample Output
shell> ./ndb_select_count -c localhost -d ctest1 fish dogs
6 records in table fish
4 records in table dogs
NDBT_ProgramExit: 0 - OK
ndb_setup.py starts the NDB Cluster Auto-Installer and opens the installer's Start page in the default Web browser.
This program is intended to be invoked as a normal user, and
not with the mysql, system
root or other administrative account.
This section describes usage of and program options for the command-line tool only. For information about using the Auto-Installer GUI that is spawned when ndb_setup.py is invoked, see The NDB Cluster Auto-Installer (NDB 7.5).
Usage
All platforms:
ndb_setup.py [options]
Additionally, on Windows platforms only:
setup.bat [options]
The following table includes all options that are supported by the NDB Cluster installation and configuration program ndb_setup.py. Additional descriptions follow the table.
Table 22.273 Command-line options for the ndb_setup.py program
| Format | Description | Added, Deprecated, or Removed |
|---|---|---|
| Page that the web browser opens when starting | (Supported in all MySQL 8.0 based releases) |
|
| File containing list of client certificates allowed to connect to the server | (Supported in all MySQL 8.0 based releases) |
|
| File containing X509 certificate that identifies the server. (Default: mcc/cfg.pem in the installation share directory) | (Supported in all MySQL 8.0 based releases) |
|
| Python logging module debug level. One of DEBUG, INFO, WARNING (default), ERROR, or CRITICAL | (Supported in all MySQL 8.0 based releases) |
|
| Print help message | (Supported in all MySQL 8.0 based releases) |
|
| Specify file containing private key (if not included in --cert-file) | (Supported in all MySQL 8.0 based releases) |
|
| Do not open the start page in a browser, merely start the tool | (Supported in all MySQL 8.0 based releases) |
|
| Specify the port used by the web server | (Supported in all MySQL 8.0 based releases) |
|
| Log requests to this file. Use '-' to force logging to stderr instead | (Supported in all MySQL 8.0 based releases) |
|
| The name of the server to connect with | (Supported in all MySQL 8.0 based releases) |
|
| Use unencrypted (HTTP) client/server connection | (Supported in all MySQL 8.0 based releases) |
|
| Use encrypted (HTTPS) client/server connection | (Supported in all MySQL 8.0 based releases) |
-
Property Value Command-Line Format --browser-start-page=filenameType String Default Value index.htmlSpecify the file to open in the browser as the installation and configuration Start page. The default is
index.html. -
Property Value Command-Line Format --ca-certs-file=filenameType File name Default Value [none]Specify a file containing a list of client certificates which are allowed to connect to the server. The default is an empty string, which means that no client authentication is used.
-
Property Value Command-Line Format --cert-file=filenameType File name Default Value /usr/share/mysql/mcc/cfg.pemSpecify a file containing an X509 certificate which identifies the server. It is possible for the certificate to be self-signed. The default is
cfg.pem. -
Property Value Command-Line Format --debug-level=levelType Enumeration Default Value WARNINGValid Values WARNINGDEBUGINFOERRORCRITICALSet the Python logging module debug level. This is one of
DEBUG,INFO,WARNING,ERROR, orCRITICAL.WARNINGis the default. -
Property Value Command-Line Format --helpPrint a help message.
-
Property Value Command-Line Format --key-file=fileType File name Default Value [none]Specify a file containing the private key if this is not included in the X509 certificate file (
--cert-file). The default is an empty string, which means that no such file is used. -
Property Value Command-Line Format --no-browserStart the installation and configuration tool, but do not open the Start page in a browser.
-
Property Value Command-Line Format --port=#Type Numeric Default Value 8081Minimum Value 1Maximum Value 65535Set the port used by the web server. The default is 8081.
-
Property Value Command-Line Format --server-log-file=fileType File name Default Value ndb_setup.logValid Values ndb_setup.log-(Log to stderr)Log requests to this file. The default is
ndb_setup.log. To specify logging tostderr, rather than to a file, use a-(dash character) for the file name. -
Property Value Command-Line Format --server-name=nameType String Default Value localhostSpecify the host name or IP address for the browser to use when connecting. The default is
localhost. -
Property Value Command-Line Format --use-httpMake the browser use HTTP to connect with the server. This means that the connection is unencrypted and not secured in any way.
-
Property Value Command-Line Format --use-httpsMake the browser use a secure (HTTPS) connection with the server.
ndb_show_tables displays a list of all
NDB database objects in the
cluster. By default, this includes not only both user-created
tables and NDB system tables, but
NDB-specific indexes, internal
triggers, and NDB Cluster Disk Data objects as well.
The following table includes options that are specific to the NDB Cluster native backup restoration program ndb_show_tables. Additional descriptions follow the table. For options common to most NDB Cluster programs (including ndb_show_tables), see Section 22.4.31, “Options Common to NDB Cluster Programs — Options Common to NDB Cluster Programs”.
Table 22.274 Command-line options for the ndb_show_tables program
| Format | Description | Added, Deprecated, or Removed |
|---|---|---|
| Specifies database in which table is found; database name must be followed by table name | (Supported in all MySQL 8.0 based releases) |
|
| Number of times to repeat output | (Supported in all MySQL 8.0 based releases) |
|
| Return output suitable for MySQL LOAD DATA statement | (Supported in all MySQL 8.0 based releases) |
|
| Show table temporary flag | (Supported in all MySQL 8.0 based releases) |
|
| Limit output to objects of this type | (Supported in all MySQL 8.0 based releases) |
|
| Do not qualify table names | (Supported in all MySQL 8.0 based releases) |
Usage
ndb_show_tables [-c connection_string]
Specifies the name of the database in which the desired table is found. If this option is given, the name of a table must follow the database name.
If this option has not been specified, and no tables are found in the
TEST_DBdatabase, ndb_show_tables issues a warning.Specifies the number of times the utility should execute. This is 1 when this option is not specified, but if you do use the option, you must supply an integer argument for it.
Using this option causes the output to be in a format suitable for use with
LOAD DATA.If specified, this causes temporary tables to be displayed.
Can be used to restrict the output to one type of object, specified by an integer type code as shown here:
1: System table2: User-created table3: Unique hash index
Any other value causes all
NDBdatabase objects to be listed (the default).If specified, this causes unqualified object names to be displayed.
Only user-created NDB Cluster tables may be accessed from
MySQL; system tables such as SYSTAB_0 are
not visible to mysqld. However, you can
examine the contents of system tables using
NDB API applications such as
ndb_select_all (see
Section 22.4.24, “ndb_select_all — Print Rows from an NDB Table”).
Prior to NDB 8.0.20, this program printed
NDBT_ProgramExit -
upon completion of
its run, due to an unnecessary dependency on the
statusNDBT testing library. This dependency has
been removed, eliminating the extraneous output.
This is a Perl script that can be used to estimate the amount of
space that would be required by a MySQL database if it were
converted to use the NDBCLUSTER
storage engine. Unlike the other utilities discussed in this
section, it does not require access to an NDB Cluster (in fact,
there is no reason for it to do so). However, it does need to
access the MySQL server on which the database to be tested
resides.
Requirements
A running MySQL server. The server instance does not have to provide support for NDB Cluster.
A working installation of Perl.
The
DBImodule, which can be obtained from CPAN if it is not already part of your Perl installation. (Many Linux and other operating system distributions provide their own packages for this library.)A MySQL user account having the necessary privileges. If you do not wish to use an existing account, then creating one using
GRANT USAGE ON—wheredb_name.*db_nameis the name of the database to be examined—is sufficient for this purpose.
ndb_size.pl can also be found in the MySQL
sources in storage/ndb/tools.
The following table includes options that are specific to the NDB Cluster program ndb_size.pl. Additional descriptions follow the table. For options common to most NDB Cluster programs (including ndb_size.pl), see Section 22.4.31, “Options Common to NDB Cluster Programs — Options Common to NDB Cluster Programs”.
Table 22.275 Command-line options for the ndb_size.pl program
| Format | Description | Added, Deprecated, or Removed |
|---|---|---|
| The database or databases to examine; accepts a comma-delimited list; the default is ALL (use all databases found on the server) | (Supported in all MySQL 8.0 based releases) |
|
| Specify host and optional port as host[:port] | (Supported in all MySQL 8.0 based releases) |
|
| Specify a socket to connect to | (Supported in all MySQL 8.0 based releases) |
|
| Specify a MySQL user name | (Supported in all MySQL 8.0 based releases) |
|
| Specify a MySQL user password | (Supported in all MySQL 8.0 based releases) |
|
| Set output format (text or HTML) | (Supported in all MySQL 8.0 based releases) |
|
| Skip any tables in a comma-separated list of tables | (Supported in all MySQL 8.0 based releases) |
|
| Skip any databases in a comma-separated list of databases | (Supported in all MySQL 8.0 based releases) |
|
| Saves all queries to the database into the file specified | (Supported in all MySQL 8.0 based releases) |
|
| Loads all queries from the file specified; does not connect to a database | (Supported in all MySQL 8.0 based releases) |
|
| Designates a table to handle unique index size calculations | (Supported in all MySQL 8.0 based releases) |
Usage
perl ndb_size.pl [--database={db_name|ALL}] [--hostname=host[:port]] [--socket=socket] \
[--user=user] [--password=password] \
[--help|-h] [--format={html|text}] \
[--loadqueries=file_name] [--savequeries=file_name]
By default, this utility attempts to analyze all databases on
the server. You can specify a single database using the
--database option; the default behavior can be
made explicit by using ALL for the name of
the database. You can also exclude one or more databases by
using the --excludedbs option with a
comma-separated list of the names of the databases to be
skipped. Similarly, you can cause specific tables to be skipped
by listing their names, separated by commas, following the
optional --excludetables option. A host name
can be specified using --hostname; the default
is localhost. You can specify a port in
addition to the host using
host:port
format for the value of --hostname. The default
port number is 3306. If necessary, you can also specify a
socket; the default is /var/lib/mysql.sock.
A MySQL user name and password can be specified the
corresponding options shown. It also possible to control the
format of the output using the --format option;
this can take either of the values html or
text, with text being the
default. An example of the text output is shown here:
shell> ndb_size.pl --database=test --socket=/tmp/mysql.sock
ndb_size.pl report for database: 'test' (1 tables)
--------------------------------------------------
Connected to: DBI:mysql:host=localhost;mysql_socket=/tmp/mysql.sock
Including information for versions: 4.1, 5.0, 5.1
test.t1
-------
DataMemory for Columns (* means varsized DataMemory):
Column Name Type Varsized Key 4.1 5.0 5.1
HIDDEN_NDB_PKEY bigint PRI 8 8 8
c2 varchar(50) Y 52 52 4*
c1 int(11) 4 4 4
-- -- --
Fixed Size Columns DM/Row 64 64 12
Varsize Columns DM/Row 0 0 4
DataMemory for Indexes:
Index Name Type 4.1 5.0 5.1
PRIMARY BTREE 16 16 16
-- -- --
Total Index DM/Row 16 16 16
IndexMemory for Indexes:
Index Name 4.1 5.0 5.1
PRIMARY 33 16 16
-- -- --
Indexes IM/Row 33 16 16
Summary (for THIS table):
4.1 5.0 5.1
Fixed Overhead DM/Row 12 12 16
NULL Bytes/Row 4 4 4
DataMemory/Row 96 96 48
(Includes overhead, bitmap and indexes)
Varsize Overhead DM/Row 0 0 8
Varsize NULL Bytes/Row 0 0 4
Avg Varside DM/Row 0 0 16
No. Rows 0 0 0
Rows/32kb DM Page 340 340 680
Fixedsize DataMemory (KB) 0 0 0
Rows/32kb Varsize DM Page 0 0 2040
Varsize DataMemory (KB) 0 0 0
Rows/8kb IM Page 248 512 512
IndexMemory (KB) 0 0 0
Parameter Minimum Requirements
------------------------------
* indicates greater than default
Parameter Default 4.1 5.0 5.1
DataMemory (KB) 81920 0 0 0
NoOfOrderedIndexes 128 1 1 1
NoOfTables 128 1 1 1
IndexMemory (KB) 18432 0 0 0
NoOfUniqueHashIndexes 64 0 0 0
NoOfAttributes 1000 3 3 3
NoOfTriggers 768 5 5 5
For debugging purposes, the Perl arrays containing the queries
run by this script can be read from the file specified using can
be saved to a file using --savequeries; a file
containing such arrays to be read during script execution can be
specified using --loadqueries. Neither of these
options has a default value.
To produce output in HTML format, use the
--format option and redirect the output to a
file, as shown here:
shell> ndb_size.pl --database=test --socket=/tmp/mysql.sock --format=html > ndb_size.html
(Without the redirection, the output is sent to
stdout.)
The output from this script includes the following information:
Minimum values for the
DataMemory,IndexMemory,MaxNoOfTables,MaxNoOfAttributes,MaxNoOfOrderedIndexes, andMaxNoOfTriggersconfiguration parameters required to accommodate the tables analyzed.Memory requirements for all of the tables, attributes, ordered indexes, and unique hash indexes defined in the database.
The
IndexMemoryandDataMemoryrequired per table and table row.
ndb_top displays running information in the terminal about CPU usage by NDB threads on an NDB Cluster data node. Each thread is represented by two rows in the output, the first showing system statistics, the second showing the measured statistics for the thread.
ndb_top is available beginning with MySQL NDB Cluster 7.6.3.
Usage
ndb_top [-hhostname] [-tport] [-uuser] [-ppass] [-nnode_id]
ndb_top connects to a MySQL Server running as
an SQL node of the cluster. By default, it attempts to connect
to a mysqld running on
localhost and port 3306, as the MySQL
root user with no password specified. You can
override the default host and port using, respectively,
--host (-h) and
--port (-t). To
specify a MySQL user and password, use the
--user (-u) and
--passwd (-p)
options. This user must be able to read tables in the
ndbinfo database
(ndb_top uses information from
ndbinfo.cpustat and related
tables).
For more information about MySQL user accounts and passwords, see Section 6.2, “Access Control and Account Management”.
Output is available as plain text or an ASCII graph; you can
specify this using the --text
(-x) and
--graph (-g)
options, respectively. These two display modes provide the same
information; they can be used concurrently. At least one display
mode must be in use.
Color display of the graph is supported and enabled by default
(--color or -c
option). With color support enabled, the graph display shows OS
user time in blue, OS system time in green, and idle time as
blank. For measured load, blue is used for execution time,
yellow for send time, red for time spent in send buffer full
waits, and blank spaces for idle time. The percentage shown in
the graph display is the sum of percentages for all threads
which are not idle. Colors are not currently configurable; you
can use grayscale instead by using
--skip-color.
The sorted view (--sort,
-r) is based on the maximum of the measured
load and the load reported by the OS. Display of these can be
enabled and disabled using the
--measured-load
(-m) and
--os-load (-o)
options. Display of at least one of these loads must be enabled.
The program tries to obtain statistics from a data node having
the node ID given by the
--node-id (-n)
option; if unspecified, this is 1. ndb_top
cannot provide information about other types of nodes.
The view adjusts itself to the height and width of the terminal window; the minimum supported width is 76 characters.
Once started, ndb_top runs continuously until
forced to exit; you can quit the program using
Ctrl-C. The display updates once per second;
to set a different delay interval, use
--sleep-time
(-s).
ndb_top is available on macOS, Linux, and Solaris. It is not currently supported on Windows platforms.
The following table includes all options that are specific to the NDB Cluster program ndb_top. Additional descriptions follow the table.
Table 22.276 Command-line options for the ndb_top program
| Format | Description | Added, Deprecated, or Removed |
|---|---|---|
| Show ASCII graphs in color; use --skip-colors to disable | (Supported in all MySQL 8.0 based releases) |
|
| Display data using graphs; use --skip-graphs to disable | (Supported in all MySQL 8.0 based releases) |
|
| Show program usage information | (Supported in all MySQL 8.0 based releases) |
|
| Host name or IP address of MySQL Server to connect to | (Supported in all MySQL 8.0 based releases) |
|
| Show measured load by thread | (Supported in all MySQL 8.0 based releases) |
|
| Watch node having this node ID | (Supported in all MySQL 8.0 based releases) |
|
| Show load measured by operating system | (Supported in all MySQL 8.0 based releases) |
|
| Connect using this password | (Supported in all MySQL 8.0 based releases) |
|
|
Port number to use when connecting to MySQL Server | (Supported in all MySQL 8.0 based releases) |
| Time to wait between display refreshes, in seconds | (Supported in all MySQL 8.0 based releases) |
|
| Socket file to use for connection | (Supported in all MySQL 8.0 based releases) |
|
| Sort threads by usage; use --skip-sort to disable | (Supported in all MySQL 8.0 based releases) |
|
|
Display data using text | (Supported in all MySQL 8.0 based releases) |
| Connect as this MySQL user | (Supported in all MySQL 8.0 based releases) |
In NDB 7.6.6 and later, ndb_top also supports
the common NDB program options
--defaults-file,
--defaults-extra-file,
--print-defaults,
--no-defaults, and
--defaults-group-suffix. (Bug
#86614, Bug #26236298)
Additional Options
-
Property Value Command-Line Format --colorType Boolean Default Value TRUEShow ASCII graphs in color; use
--skip-colorsto disable. -
Property Value Command-Line Format --graphType Boolean Default Value TRUEDisplay data using graphs; use
--skip-graphsto disable. This option or--textmust be true; both options may be true. -
Property Value Command-Line Format --helpType Boolean Default Value TRUEShow program usage information.
-
Property Value Command-Line Format --host[=name]Type String Default Value localhostHost name or IP address of MySQL Server to connect to.
-
Property Value Command-Line Format --measured-loadType Boolean Default Value FALSEShow measured load by thread. This option or
--os-loadmust be true; both options may be true. -
Property Value Command-Line Format --node-id[=#]Type Integer Default Value 1Watch the data node having this node ID.
-
Property Value Command-Line Format --os-loadType Boolean Default Value TRUEShow load measured by operating system. This option or
--measured-loadmust be true; both options may be true. -
Property Value Command-Line Format --passwd[=password]Type Boolean Default Value NULLConnect using this password.
This option is deprecated in NDB 7.6.4. It is removed in NDB 7.6.6, where it is replaced by the
--passwordoption. (Bug #26907833) -
Property Value Command-Line Format --password[=password]Type Boolean Default Value NULLConnect using this password.
This option was added in NDB 7.6.6 as a replacement for the
--passwdoption used previously. (Bug #26907833) --port[=#],-t(NDB 7.6.6 and later:-P)Property Value Command-Line Format --port[=#]Type Integer Default Value 3306Port number to use when connecting to MySQL Server.
Beginning with NDB 7.6.6, the short form for this option is
-P, and-tis repurposed as the short form for the--textoption. (Bug #26907833)-
Property Value Command-Line Format --sleep-time[=seconds]Type Integer Default Value 1Time to wait between display refreshes, in seconds.
-
Property Value Command-Line Format --socketType Path name Default Value [none]Use the specified socket file for the connection.
Added in NDB 7.6.6. (Bug #86614, Bug #26236298)
-
Property Value Command-Line Format --sortType Boolean Default Value TRUESort threads by usage; use
--skip-sortto disable. -
Property Value Command-Line Format --textType Boolean Default Value FALSEDisplay data using text. This option or
--graphmust be true; both options may be true.The short form for this option was
-xin previous versions of NDB Cluster, but this is no longer supported. -
Property Value Command-Line Format --user[=name]Type String Default Value rootConnect as this MySQL user.
Sample Output.
The next figure shows ndb_top running in a
terminal window on a Linux system with an
ndbmtd data node under a moderate load.
Here, the program has been invoked using
ndb_top
-n8
-x to provide
both text and graph output:

Beginning with NDB 8.0.20, ndb_top also shows spin times for threads, displayed in green.
ndb_waiter repeatedly (each 100 milliseconds)
prints out the status of all cluster data nodes until either the
cluster reaches a given status or the
--timeout limit is exceeded,
then exits. By default, it waits for the cluster to achieve
STARTED status, in which all nodes have
started and connected to the cluster. This can be overridden
using the --no-contact and
--not-started options.
The node states reported by this utility are as follows:
NO_CONTACT: The node cannot be contacted.UNKNOWN: The node can be contacted, but its status is not yet known. Usually, this means that the node has received aSTARTorRESTARTcommand from the management server, but has not yet acted on it.NOT_STARTED: The node has stopped, but remains in contact with the cluster. This is seen when restarting the node using the management client'sRESTARTcommand.STARTING: The node's ndbd process has started, but the node has not yet joined the cluster.STARTED: The node is operational, and has joined the cluster.SHUTTING_DOWN: The node is shutting down.SINGLE USER MODE: This is shown for all cluster data nodes when the cluster is in single user mode.
The following table includes options that are specific to the NDB Cluster native backup restoration program ndb_waiter. Additional descriptions follow the table. For options common to most NDB Cluster programs (including ndb_waiter), see Section 22.4.31, “Options Common to NDB Cluster Programs — Options Common to NDB Cluster Programs”.
Table 22.277 Command-line options for the ndb_waiter program
| Format | Description | Added, Deprecated, or Removed |
|---|---|---|
| Wait for cluster to reach NO CONTACT state | (Supported in all MySQL 8.0 based releases) |
|
| Wait for cluster to reach NOT STARTED state | (Supported in all MySQL 8.0 based releases) |
|
| Wait for cluster to enter single user mode | (Supported in all MySQL 8.0 based releases) |
|
| Wait this many seconds, then exit whether or not cluster has reached desired state; default is 2 minutes (120 seconds) | (Supported in all MySQL 8.0 based releases) |
|
| List of nodes not to be waited for | (Supported in all MySQL 8.0 based releases) |
|
| List of nodes to be waited for | (Supported in all MySQL 8.0 based releases) |
Usage
ndb_waiter [-c connection_string]
Additional Options
Instead of waiting for the
STARTEDstate, ndb_waiter continues running until the cluster reachesNO_CONTACTstatus before exiting.Instead of waiting for the
STARTEDstate, ndb_waiter continues running until the cluster reachesNOT_STARTEDstatus before exiting.Time to wait. The program exits if the desired state is not achieved within this number of seconds. The default is 120 seconds (1200 reporting cycles).
The program waits for the cluster to enter single user mode.
When this option is used, ndb_waiter does not wait for the nodes whose IDs are listed. The list is comma-delimited; ranges can be indicated by dashes, as shown here:
shell>
ndb_waiter --nowait-nodes=1,3,7-9ImportantDo not use this option together with the
--wait-nodesoption.When this option is used, ndb_waiter waits only for the nodes whose IDs are listed. The list is comma-delimited; ranges can be indicated by dashes, as shown here:
shell>
ndb_waiter --wait-nodes=2,4-6,10ImportantDo not use this option together with the
--nowait-nodesoption.
Sample Output.
Shown here is the output from ndb_waiter
when run against a 4-node cluster in which two nodes have been
shut down and then started again manually. Duplicate reports
(indicated by ...) are omitted.
shell> ./ndb_waiter -c localhost
Connecting to mgmsrv at (localhost)
State node 1 STARTED
State node 2 NO_CONTACT
State node 3 STARTED
State node 4 NO_CONTACT
Waiting for cluster enter state STARTED
...
State node 1 STARTED
State node 2 UNKNOWN
State node 3 STARTED
State node 4 NO_CONTACT
Waiting for cluster enter state STARTED
...
State node 1 STARTED
State node 2 STARTING
State node 3 STARTED
State node 4 NO_CONTACT
Waiting for cluster enter state STARTED
...
State node 1 STARTED
State node 2 STARTING
State node 3 STARTED
State node 4 UNKNOWN
Waiting for cluster enter state STARTED
...
State node 1 STARTED
State node 2 STARTING
State node 3 STARTED
State node 4 STARTING
Waiting for cluster enter state STARTED
...
State node 1 STARTED
State node 2 STARTED
State node 3 STARTED
State node 4 STARTING
Waiting for cluster enter state STARTED
...
State node 1 STARTED
State node 2 STARTED
State node 3 STARTED
State node 4 STARTED
Waiting for cluster enter state STARTED
If no connection string is specified, then
ndb_waiter tries to connect to a management
on localhost, and reports
Connecting to mgmsrv at (null).
Prior to NDB 8.0.20, this program printed
NDBT_ProgramExit -
upon completion of
its run, due to an unnecessary dependency on the
statusNDBT testing library. This dependency has
been removed, eliminating the extraneous output.
All NDB Cluster programs accept the options described in this section, with the following exceptions:
Users of earlier NDB Cluster versions should note that some of
these options have been changed to make them consistent with
one another, and also with mysqld. You can
use the --help option with any NDB Cluster
program—with the exception of
ndb_print_backup_file,
ndb_print_schema_file, and
ndb_print_sys_file—to view a list of
the options which the program supports.
The options in the following table are common to all NDB Cluster executables (except those noted previously in this section).
Table 22.278 Command-line options common to all MySQL NDB Cluster programs
| Format | Description | Added, Deprecated, or Removed |
|---|---|---|
| Directory where character sets are installed | (Supported in all MySQL 8.0 based releases) |
|
| Set the number of times to retry a connection before giving up | (Supported in all MySQL 8.0 based releases) |
|
| Time to wait between attempts to contact a management server, in seconds | (Supported in all MySQL 8.0 based releases) |
|
| Write core on errors (defaults to TRUE in debug builds) | (Supported in all MySQL 8.0 based releases) |
|
| Enable output from debug calls. Can be used only for versions compiled with debugging enabled | (Supported in all MySQL 8.0 based releases) |
|
| Read this file after global option files are read | (Supported in all MySQL 8.0 based releases) |
|
| Read default options from this file | (Supported in all MySQL 8.0 based releases) |
|
| Also read groups with names ending in this suffix | (Supported in all MySQL 8.0 based releases) |
|
| Display help message and exit | (Supported in all MySQL 8.0 based releases) |
|
| Read this path from the login file | (Supported in all MySQL 8.0 based releases) |
|
|
Set connection string for connecting to ndb_mgmd. Syntax: [nodeid=<id>;][host=]<hostname>[:<port>]. Overrides entries specified in NDB_CONNECTSTRING or my.cnf | (Supported in all MySQL 8.0 based releases) |
| Set the host (and port, if desired) for connecting to management server | (Supported in all MySQL 8.0 based releases) |
|
| Set node id for this node | (Supported in all MySQL 8.0 based releases) |
|
| Select nodes for transactions in a more optimal way | (Supported in all MySQL 8.0 based releases) |
|
| Do not read default options from any option file other than login file | (Supported in all MySQL 8.0 based releases) |
|
| Print the program argument list and exit | (Supported in all MySQL 8.0 based releases) |
|
| Output version information and exit | (Supported in all MySQL 8.0 based releases) |
For options specific to individual NDB Cluster programs, see Section 22.4, “NDB Cluster Programs”.
See Section 22.3.3.9.1, “MySQL Server Options for NDB Cluster”, for mysqld options relating to NDB Cluster.
-
Property Value Command-Line Format --character-sets-dir=dir_nameType Directory name Default Value Tells the program where to find character set information.
-
Property Value Command-Line Format --connect-retries=#Type Numeric Default Value 12Minimum Value 0Maximum Value 4294967295This option specifies the number of times following the first attempt to retry a connection before giving up (the client always tries the connection at least once). The length of time to wait per attempt is set using
--connect-retry-delay.NoteWhen used with ndb_mgm, this option has 3 as its default. See Section 22.4.5, “ndb_mgm — The NDB Cluster Management Client”, for more information.
-
Property Value Command-Line Format --connect-retry-delay=#Type Numeric Default Value 5Minimum Value 1Minimum Value 0Maximum Value 4294967295This option specifies the length of time to wait per attempt a connection before giving up. The number of times to try connecting is set by
--connect-retries. -
Property Value Command-Line Format --core-fileType Boolean Default Value FALSEWrite a core file if the program dies. The name and location of the core file are system-dependent. (For NDB Cluster programs nodes running on Linux, the default location is the program's working directory—for a data node, this is the node's
DataDir.) For some systems, there may be restrictions or limitations. For example, it might be necessary to execute ulimit -c unlimited before starting the server. Consult your system documentation for detailed information.If NDB Cluster was built using the
--debugoption for configure, then--core-fileis enabled by default. For regular builds,--core-fileis disabled by default. -
Property Value Command-Line Format --debug=optionsType String Default Value d:t:O,/tmp/ndb_restore.traceThis option can be used only for versions compiled with debugging enabled. It is used to enable output from debug calls in the same manner as for the mysqld process.
--defaults-extra-file=filenameProperty Value Command-Line Format --defaults-extra-file=filenameType String Default Value [none]Read this file after global option files are read.
For additional information about this and other option-file options, see Section 4.2.2.3, “Command-Line Options that Affect Option-File Handling”.
-
Property Value Command-Line Format --defaults-file=filenameType String Default Value [none]Read default options from this file.
For additional information about this and other option-file options, see Section 4.2.2.3, “Command-Line Options that Affect Option-File Handling”.
-
Property Value Command-Line Format --defaults-group-suffixType String Default Value [none]Also read groups with names ending in this suffix.
For additional information about this and other option-file options, see Section 4.2.2.3, “Command-Line Options that Affect Option-File Handling”.
-
Property Value Command-Line Format --help--usagePrints a short list with descriptions of the available command options.
-
Property Value Command-Line Format --login-path=pathType String Default Value [none]Read this path from the login file.
For additional information about this and other option-file options, see Section 4.2.2.3, “Command-Line Options that Affect Option-File Handling”.
--ndb-connectstring=,connection_string--connect-string=,connection_string-cconnection_stringProperty Value Command-Line Format --ndb-connectstring=connectstring--connect-string=connectstringType String Default Value localhost:1186This option takes an NDB Cluster connection string that specifies the management server for the application to connect to, as shown here:
shell>
ndbd --ndb-connectstring="nodeid=2;host=ndb_mgmd.mysql.com:1186"For more information, see Section 22.3.3.3, “NDB Cluster Connection Strings”.
-
Property Value Command-Line Format --ndb-mgmd-host=host[:port]Type String Default Value localhost:1186Can be used to set the host and port number of a single management server for the program to connect to. If the program requires node IDs or references to multiple management servers (or both) in its connection information, use the
--ndb-connectstringoption instead. -
Property Value Command-Line Format --ndb-nodeid=#Type Numeric Default Value 0Sets this node's NDB Cluster node ID. The range of permitted values depends on the node's type (data, management, or API) and the NDB Cluster software version. See Section 22.1.7.2, “Limits and Differences of NDB Cluster from Standard MySQL Limits”, for more information.
-
Property Value Command-Line Format --no-defaultsType Boolean Default Value TRUEDo not read default options from any option file other than login file.
For additional information about this and other option-file options, see Section 4.2.2.3, “Command-Line Options that Affect Option-File Handling”.
--ndb-optimized-node-selectionProperty Value Command-Line Format --ndb-optimized-node-selectionType Boolean Default Value TRUEOptimize selection of nodes for transactions. Enabled by default.
-
Property Value Command-Line Format --print-defaultsType Boolean Default Value TRUEPrint the program argument list and exit.
For additional information about this and other option-file options, see Section 4.2.2.3, “Command-Line Options that Affect Option-File Handling”.
-
Property Value Command-Line Format --versionPrints the NDB Cluster version number of the executable. The version number is relevant because not all versions can be used together, and the NDB Cluster startup process verifies that the versions of the binaries being used can co-exist in the same cluster. This is also important when performing an online (rolling) software upgrade or downgrade of NDB Cluster.
See Section 22.5.5, “Performing a Rolling Restart of an NDB Cluster”), for more information.
- 22.5.1 Commands in the NDB Cluster Management Client
- 22.5.2 NDB Cluster Log Messages
- 22.5.3 Event Reports Generated in NDB Cluster
- 22.5.4 Summary of NDB Cluster Start Phases
- 22.5.5 Performing a Rolling Restart of an NDB Cluster
- 22.5.6 NDB Cluster Single User Mode
- 22.5.7 Adding NDB Cluster Data Nodes Online
- 22.5.8 Online Backup of NDB Cluster
- 22.5.9 MySQL Server Usage for NDB Cluster
- 22.5.10 NDB Cluster Disk Data Tables
- 22.5.11 Online Operations with ALTER TABLE in NDB Cluster
- 22.5.12 Distributed MySQL Privileges with NDB_STORED_USER
- 22.5.13 NDB API Statistics Counters and Variables
- 22.5.14 ndbinfo: The NDB Cluster Information Database
- 22.5.15 INFORMATION_SCHEMA Tables for NDB Cluster
- 22.5.16 Quick Reference: NDB Cluster SQL Statements
- 22.5.17 NDB Cluster Security Issues
Managing an NDB Cluster involves a number of tasks, the first of which is to configure and start NDB Cluster. This is covered in Section 22.3, “Configuration of NDB Cluster”, and Section 22.4, “NDB Cluster Programs”.
The next few sections cover the management of a running NDB Cluster.
For information about security issues relating to management and deployment of an NDB Cluster, see Section 22.5.17, “NDB Cluster Security Issues”.
There are essentially two methods of actively managing a running NDB
Cluster. The first of these is through the use of commands entered
into the management client whereby cluster status can be checked,
log levels changed, backups started and stopped, and nodes stopped
and started. The second method involves studying the contents of the
cluster log
ndb_;
this is usually found in the management server's
node_id_cluster.logDataDir directory, but this
location can be overridden using the
LogDestination option.
(Recall that node_id represents the
unique identifier of the node whose activity is being logged.) The
cluster log contains event reports generated by
ndbd. It is also possible to send cluster log
entries to a Unix system log.
Some aspects of the cluster's operation can be also be
monitored from an SQL node using the
SHOW ENGINE NDB
STATUS statement.
More detailed information about NDB Cluster operations is available
in real time through an SQL interface using the
ndbinfo database. For more
information, see Section 22.5.14, “ndbinfo: The NDB Cluster Information Database”.
NDB statistics counters provide improved monitoring using the
mysql client. These counters, implemented in the
NDB kernel, relate to operations performed by or affecting
Ndb objects, such as starting,
closing, and aborting transactions; primary key and unique key
operations; table, range, and pruned scans; blocked threads waiting
for various operations to complete; and data and events sent and
received by NDB Cluster. The counters are incremented by the NDB
kernel whenever NDB API calls are made or data is sent to or
received by the data nodes.
mysqld exposes the NDB API statistics counters as
system status variables, which can be identified from the prefix
common to all of their names (Ndb_api_). The
values of these variables can be read in the
mysql client from the output of a
SHOW STATUS statement, or by querying
either the Performance Schema
session_status or
global_status table. By comparing the
values of the status variables before and after the execution of an
SQL statement that acts on NDB tables,
you can observe the actions taken on the NDB API level that
correspond to this statement, which can be beneficial for monitoring
and performance tuning of NDB Cluster.
MySQL Cluster Manager provides an advanced command-line interface that simplifies many otherwise complex NDB Cluster management tasks, such as starting, stopping, or restarting an NDB Cluster with a large number of nodes. The MySQL Cluster Manager client also supports commands for getting and setting the values of most node configuration parameters as well as mysqld server options and variables relating to NDB Cluster. MySQL Cluster Manager version 1.4.8 provides experimental support for NDB 8.0. See MySQL™ Cluster Manager 1.4.8 User Manual, for more information.
In addition to the central configuration file, a cluster may also be controlled through a command-line interface available through the management client ndb_mgm. This is the primary administrative interface to a running cluster.
Commands for the event logs are given in Section 22.5.3, “Event Reports Generated in NDB Cluster”; commands for creating backups and restoring from them are provided in Section 22.5.8, “Online Backup of NDB Cluster”.
Using ndb_mgm with MySQL Cluster Manager.
MySQL Cluster Manager 1.4.8 provides expermental support for NDB 8.0. MySQL Cluster Manager
handles starting and stopping processes and tracks their states
internally, so it is not necessary to use
ndb_mgm for these tasks for an NDB Cluster
that is under MySQL Cluster Manager control. It is recommended
not to use the ndb_mgm
command-line client that comes with the NDB Cluster distribution
to perform operations that involve starting or stopping nodes.
These include but are not limited to the
START,
STOP,
RESTART, and
SHUTDOWN commands. For more
information, see MySQL Cluster Manager Process Commands.
The management client has the following basic commands. In the
listing that follows, node_id denotes
either a data node ID or the keyword ALL, which
indicates that the command should be applied to all of the
cluster's data nodes.
Displays information on all available commands.
Connects to the management server indicated by the connection string. If the client is already connected to this server, the client reconnects.
Displays information on the cluster's status. Possible node status values include
UNKNOWN,NO_CONTACT,NOT_STARTED,STARTING,STARTED,SHUTTING_DOWN, andRESTARTING.The output from this command also indicates when the cluster is in single user mode (status
SINGLE USER MODE). In NDB 8.0.17 and later, it also indicates which API or SQL node has exclusive access when this mode is in effect; this works only when all data nodes and management nodes connected to the cluster are version 8.0.17 or later.Brings online the data node identified by
node_id(or all data nodes).ALL STARTworks on all data nodes only, and does not affect management nodes.ImportantTo use this command to bring a data node online, the data node must have been started using
--nostartor-n.Stops the data or management node identified by
node_id.NoteALL STOPworks to stop all data nodes only, and does not affect management nodes.A node affected by this command disconnects from the cluster, and its associated ndbd or ndb_mgmd process terminates.
The
-aoption causes the node to be stopped immediately, without waiting for the completion of any pending transactions.Normally,
STOPfails if the result would cause an incomplete cluster. The-foption forces the node to shut down without checking for this. If this option is used and the result is an incomplete cluster, the cluster immediately shuts down.WarningUse of the
-aoption also disables the safety check otherwise performed whenSTOPis invoked to insure that stopping the node does not cause an incomplete cluster. In other words, you should exercise extreme care when using the-aoption with theSTOPcommand, due to the fact that this option makes it possible for the cluster to undergo a forced shutdown because it no longer has a complete copy of all data stored inNDB.node_idRESTART [-n] [-i] [-a] [-f]Restarts the data node identified by
node_id(or all data nodes).Using the
-ioption withRESTARTcauses the data node to perform an initial restart; that is, the node's file system is deleted and recreated. The effect is the same as that obtained from stopping the data node process and then starting it again using ndbd--initialfrom the system shell.NoteBackup files and Disk Data files are not removed when this option is used.
Using the
-noption causes the data node process to be restarted, but the data node is not actually brought online until the appropriateSTARTcommand is issued. The effect of this option is the same as that obtained from stopping the data node and then starting it again using ndbd--nostartor ndbd-nfrom the system shell.Using the
-acauses all current transactions relying on this node to be aborted. No GCP check is done when the node rejoins the cluster.Normally,
RESTARTfails if taking the node offline would result in an incomplete cluster. The-foption forces the node to restart without checking for this. If this option is used and the result is an incomplete cluster, the entire cluster is restarted.Displays status information for the data node identified by
node_id(or for all data nodes).The output from this command also indicates when the cluster is in single user mode.
Displays a report of type
report-typefor the data node identified bynode_id, or for all data nodes usingALL.Currently, there are three accepted values for
report-type:BackupStatusprovides a status report on a cluster backup in progressMemoryUsagedisplays how much data memory and index memory is being used by each data node as shown in this example:ndb_mgm>
ALL REPORT MEMORYNode 1: Data usage is 5%(177 32K pages of total 3200) Node 1: Index usage is 0%(108 8K pages of total 12832) Node 2: Data usage is 5%(177 32K pages of total 3200) Node 2: Index usage is 0%(108 8K pages of total 12832)This information is also available from the
ndbinfo.memoryusagetable.EventLogreports events from the event log buffers of one or more data nodes.
report-typeis case-insensitive and “fuzzy”; forMemoryUsage, you can useMEMORY(as shown in the prior example),memory, or even simplyMEM(ormem). You can abbreviateBackupStatusin a similar fashion.ENTER SINGLE USER MODEnode_idEnters single user mode, whereby only the MySQL server identified by the node ID
node_idis permitted to access the database.Beginning with NDB 8.0.17, the ndb_mgm client provides a clear acknowledgement that this command has been issued and has taken effect, as shown here:
ndb_mgm>
ENTER SINGLE USER MODE 100Single user mode entered Access is granted for API node 100 only.Also in NDB 8.0.17 and later, the API or SQL node having exclusive access when in single user mode is indicated in the output of the
SHOWcommand, like this:ndb_mgm>
SHOWCluster Configuration --------------------- [ndbd(NDB)] 2 node(s) id=5 @127.0.0.1 (mysql-8.0.17 ndb-8.0.17, single user mode, Nodegroup: 0, *) id=6 @127.0.0.1 (mysql-8.0.17 ndb-8.0.17, single user mode, Nodegroup: 0) [ndb_mgmd(MGM)] 1 node(s) id=50 @127.0.0.1 (mysql-8.0.17 ndb-8.0.17) [mysqld(API)] 2 node(s) id=100 @127.0.0.1 (mysql-8.0.17 ndb-8.0.17, allowed single user) id=101 (not connected, accepting connect from any host)NoteAll data and management nodes must be running version 8.0.17 of the NDB Cluster software for this feature to be enabled.
Exits single user mode, enabling all SQL nodes (that is, all running mysqld processes) to access the database.
NoteIt is possible to use
EXIT SINGLE USER MODEeven when not in single user mode, although the command has no effect in this case.Terminates the management client.
This command does not affect any nodes connected to the cluster.
Shuts down all cluster data nodes and management nodes. To exit the management client after this has been done, use
EXITorQUIT.This command does not shut down any SQL nodes or API nodes that are connected to the cluster.
CREATE NODEGROUPnodeid[,nodeid, ...]Creates a new NDB Cluster node group and causes data nodes to join it.
This command is used after adding new data nodes online to an NDB Cluster, and causes them to join a new node group and thus to begin participating fully in the cluster. The command takes as its sole parameter a comma-separated list of node IDs—these are the IDs of the nodes just added and started that are to join the new node group. The number of nodes must be the same as the number of nodes in each node group that is already part of the cluster (each NDB Cluster node group must have the same number of nodes). In other words, if the NDB Cluster has 2 node groups of 2 data nodes each, then the new node group must also have 2 data nodes.
The node group ID of the new node group created by this command is determined automatically, and always the next highest unused node group ID in the cluster; it is not possible to set it manually.
For more information, see Section 22.5.7, “Adding NDB Cluster Data Nodes Online”.
Drops the NDB Cluster node group with the given
nodegroup_id.This command can be used to drop a node group from an NDB Cluster.
DROP NODEGROUPtakes as its sole argument the node group ID of the node group to be dropped.DROP NODEGROUPacts only to remove the data nodes in the effected node group from that node group. It does not stop data nodes, assign them to a different node group, or remove them from the cluster's configuration. A data node that does not belong to a node group is indicated in the output of the management clientSHOWcommand withno nodegroupin place of the node group ID, like this (indicated using bold text):id=3 @10.100.2.67 (8.0.21-ndb-8.0.21, no nodegroup)DROP NODEGROUPworks only when all data nodes in the node group to be dropped are completely empty of any table data and table definitions. Since there is currently no way using ndb_mgm or the mysql client to remove all data from a specific data node or node group, this means that the command succeeds only in the two following cases:After issuing
CREATE NODEGROUPin the ndb_mgm client, but before issuing anyALTER TABLE ... REORGANIZE PARTITIONstatements in the mysql client.After dropping all
NDBCLUSTERtables usingDROP TABLE.TRUNCATE TABLEdoes not work for this purpose because this removes only the table data; the data nodes continue to store anNDBCLUSTERtable's definition until aDROP TABLEstatement is issued that causes the table metadata to be dropped.
For more information about
DROP NODEGROUP, see Section 22.5.7, “Adding NDB Cluster Data Nodes Online”.Changes the prompt shown by ndb_mgm to the string literal
prompt.promptshould not be quoted (unless you want the prompt to include the quotation marks). Unlike the case with the mysql client, special character sequences and escapes are not recognized. If called without an argument, the command resets the prompt to the default value (ndb_mgm>).Some examples are shown here:
ndb_mgm>
PROMPT mgm#1:mgm#1:SHOWCluster Configuration ... mgm#1:PROMPT mymgm >mymgm >PROMPT 'mymgm:''mymgm:'PROMPT mymgm:mymgm:PROMPTndb_mgm>EXITjon@valhaj:~/bin>Note that leading spaces and spaces within the
promptstring are not trimmed. Trailing spaces are removed.node_idNODELOG DEBUG {ON|OFF}Toggles debug logging in the node log, as though the effected data node or nodes had been started with the
--verboseoption.NODELOG DEBUG ONstarts debug logging;NODELOG DEBUG OFFswitches debug logging off.
Additional commands. A number of other commands available in the ndb_mgm client are described elsewhere, as shown in the following list:
START BACKUPis used to perform an online backup in the ndb_mgm client; theABORT BACKUPcommand is used to cancel a backup already in progress. For more information, see Section 22.5.8, “Online Backup of NDB Cluster”.The
CLUSTERLOGcommand is used to perform various logging functions. See Section 22.5.3, “Event Reports Generated in NDB Cluster”, for more information and examples.NODELOG DEBUGactivates or deactivates debug printouts in node logs, as described previously in this section.For testing and diagnostics work, the client supports a
DUMPcommand which can be used to execute internal commands on the cluster. It should never be used in a production setting unless directed to do so by MySQL Support. For more information, see MySQL NDB Cluster Internals Manual.
This section contains information about the messages written to
the cluster log in response to different cluster log events. It
provides additional, more specific information on
NDB transporter errors.
The following table lists the most common
NDB cluster log messages. For
information about the cluster log, log events, and event types,
see Section 22.5.3, “Event Reports Generated in NDB Cluster”. These log
messages also correspond to log event types in the MGM API; see
The Ndb_logevent_type Type, for related information
of interest to Cluster API developers.
Table 22.279 Common NDB cluster log messages
| Log Message | Description | Event Name | Event Type | Priority | Severity |
|---|---|---|---|---|---|
Node |
The data node having node ID node_id has
connected to the management server (node
mgm_node_id). |
Connected |
Connection |
8 | INFO |
Node |
The data node having node ID data_node_id has
disconnected from the management server (node
mgm_node_id). |
Disconnected |
Connection |
8 | ALERT |
Node |
The API node or SQL node having node ID
api_node_id is no longer
communicating with data node
data_node_id. |
CommunicationClosed |
Connection |
8 | INFO |
Node |
The API node or SQL node having node ID
api_node_id is now
communicating with data node
data_node_id. |
CommunicationOpened |
Connection |
8 | INFO |
Node |
The API node having node ID api_node_id has
connected to management node
mgm_node_id using
NDB API version
version (generally the same as
the MySQL version number). |
ConnectedApiVersion |
Connection |
8 | INFO |
Node |
A global checkpoint with the ID gci has been
started; node node_id is the
master responsible for this global checkpoint. |
GlobalCheckpointStarted |
Checkpoint |
9 | INFO |
Node |
The global checkpoint having the ID gci has
been completed; node node_id
was the master responsible for this global checkpoint. |
GlobalCheckpointCompleted |
Checkpoint |
10 | INFO |
Node |
The local checkpoint having sequence ID lcp
has been started on node
node_id. The most recent GCI
that can be used has the index
current_gci, and the oldest GCI
from which the cluster can be restored has the index
old_gci. |
LocalCheckpointStarted |
Checkpoint |
7 | INFO |
Node |
The local checkpoint having sequence ID lcp
on node node_id has been
completed. |
LocalCheckpointCompleted |
Checkpoint |
8 | INFO |
Node |
The node was unable to determine the most recent usable GCI. | LCPStoppedInCalcKeepGci |
Checkpoint |
0 | ALERT |
Node |
A table fragment has been checkpointed to disk on node
node_id. The GCI in progress
has the index started_gci, and
the most recent GCI to have been completed has the index
completed_gci. |
LCPFragmentCompleted |
Checkpoint |
11 | INFO |
Node |
Undo logging is blocked because the log buffer is close to overflowing. | UndoLogBlocked |
Checkpoint |
7 | INFO |
Node |
Data node node_id, running
NDB version
version, is beginning its
startup process. |
NDBStartStarted |
StartUp |
1 | INFO |
Node |
Data node node_id, running
NDB version
version, has started
successfully. |
NDBStartCompleted |
StartUp |
1 | INFO |
Node |
The node has received a signal indicating that a cluster restart has completed. | STTORRYRecieved |
StartUp |
15 | INFO |
Node |
The node has completed start phase phase of a
type start. For a listing of
start phases, see
Section 22.5.4, “Summary of NDB Cluster Start Phases”.
(type is one of
initial, system,
node, initial node,
or <Unknown>.) |
StartPhaseCompleted |
StartUp |
4 | INFO |
Node |
Node president_id has been selected as
“president”.
own_id and
dynamic_id should always be the
same as the ID (node_id) of the
reporting node. |
CM_REGCONF |
StartUp |
3 | INFO |
Node |
The reporting node (ID node_id) was unable to
accept node president_id as
president. The cause of the
problem is given as one of Busy,
Election with wait = false,
Not president, Election
without selecting new candidate, or No
such cause. |
CM_REGREF |
StartUp |
8 | INFO |
Node |
The node has discovered its neighboring nodes in the cluster (node
id_1 and node
id_2).
node_id,
own_id, and
dynamic_id should always be the
same; if they are not, this indicates a serious
misconfiguration of the cluster nodes. |
FIND_NEIGHBOURS |
StartUp |
8 | INFO |
Node |
The node has received a shutdown signal. The
type of shutdown is either
Cluster or Node. |
NDBStopStarted |
StartUp |
1 | INFO |
Node [,
]
[Initiated by signal
] |
The node has been shut down. This report may include an
action, which if present is one
of restarting, no
start, or initial. The report
may also include a reference to an
NDB Protocol
signal; for possible signals,
refer to
Operations and Signals. |
NDBStopCompleted |
StartUp |
1 | INFO |
Node [,
action]. [Occurred
during startphase
]
[ Initiated by
]
[Caused by error
[(extra info
]] |
The node has been forcibly shut down. The
action (one of
restarting, no
start, or initial)
subsequently being taken, if any, is also reported. If the
shutdown occurred while the node was starting, the report
includes the start_phase during
which the node failed. If this was a result of a
signal sent to the node, this
information is also provided (see
Operations and Signals,
for more information). If the error causing the failure is
known, this is also included; for more information about
NDB error messages and
classifications, see NDB Cluster API Errors. |
NDBStopForced |
StartUp |
1 | ALERT |
Node |
The node shutdown process was aborted by the user. | NDBStopAborted |
StartUp |
1 | INFO |
Node |
This reports global checkpoints referenced during a node start. The redo
log prior to keep_pos is
dropped. last_pos is the last
global checkpoint in which data node the participated;
restore_pos is the global
checkpoint which is actually used to restore all data
nodes. |
StartREDOLog |
StartUp |
4 | INFO |
startup_message [Listed separately;
see below.] |
There are a number of possible startup messages that can be logged under different circumstances. These are listed separately; see Section 22.5.2.2, “NDB Cluster Log Startup Messages”. | StartReport |
StartUp |
4 | INFO |
Node |
Copying of data dictionary information to the restarted node has been completed. | NR_CopyDict |
NodeRestart |
8 | INFO |
Node |
Copying of data distribution information to the restarted node has been completed. | NR_CopyDistr |
NodeRestart |
8 | INFO |
Node |
Copy of fragments to starting data node
node_id has begun |
NR_CopyFragsStarted |
NodeRestart |
8 | INFO |
Node |
Fragment fragment_id from table
table_id has been copied to
data node node_id |
NR_CopyFragDone |
NodeRestart |
10 | INFO |
Node |
Copying of all table fragments to restarting data node
node_id has been completed |
NR_CopyFragsCompleted |
NodeRestart |
8 | INFO |
Node |
Data node node1_id has detected the failure
of data node node2_id |
NodeFailCompleted |
NodeRestart |
8 | ALERT |
All nodes completed failure of Node
|
All (remaining) data nodes have detected the failure of data node
node_id |
NodeFailCompleted |
NodeRestart |
8 | ALERT |
Node failure of
|
The failure of data node node_id has been
detected in the
blockNDB
kernel block, where block is 1 of
DBTC,
DBDICT,
DBDIH, or
DBLQH; for more
information, see
NDB Kernel Blocks |
NodeFailCompleted |
NodeRestart |
8 | ALERT |
Node |
A data node has failed. Its state at the time of failure is described by
an arbitration state code
state_code: possible state code
values can be found in the file
include/kernel/signaldata/ArbitSignalData.hpp. |
NODE_FAILREP |
NodeRestart |
8 | ALERT |
President restarts arbitration thread
[state= or
Prepare arbitrator node
or
Receive arbitrator node
or
Started arbitrator node
or
Lost arbitrator node
or
Lost arbitrator node
or
Lost arbitrator node
|
This is a report on the current state and progress of arbitration in the
cluster. node_id is the node ID
of the management node or SQL node selected as the
arbitrator. state_code is an
arbitration state code, as found in
include/kernel/signaldata/ArbitSignalData.hpp.
When an error has occurred, an
error_message, also defined in
ArbitSignalData.hpp, is provided.
ticket_id is a unique
identifier handed out by the arbitrator when it is
selected to all the nodes that participated in its
selection; this is used to ensure that each node
requesting arbitration was one of the nodes that took part
in the selection process. |
ArbitState |
NodeRestart |
6 | INFO |
Arbitration check lost - less than 1/2 nodes left or
Arbitration check won - all node groups and more
than 1/2 nodes left or Arbitration
check won - node group majority or
Arbitration check lost - missing node
group or Network partitioning -
arbitration required or Arbitration won
- positive reply from node
or
Arbitration lost - negative reply from node
or
Network partitioning - no arbitrator
available or Network partitioning - no
arbitrator configured or Arbitration
failure - |
This message reports on the result of arbitration. In the event of
arbitration failure, an
error_message and an
arbitration state_code are
provided; definitions for both of these are found in
include/kernel/signaldata/ArbitSignalData.hpp. |
ArbitResult |
NodeRestart |
2 | ALERT |
Node |
This node is attempting to assume responsibility for the next global checkpoint (that is, it is becoming the master node) | GCP_TakeoverStarted |
NodeRestart |
7 | INFO |
Node |
This node has become the master, and has assumed responsibility for the next global checkpoint | GCP_TakeoverCompleted |
NodeRestart |
7 | INFO |
Node |
This node is attempting to assume responsibility for the next set of local checkpoints (that is, it is becoming the master node) | LCP_TakeoverStarted |
NodeRestart |
7 | INFO |
Node |
This node has become the master, and has assumed responsibility for the next set of local checkpoints | LCP_TakeoverCompleted |
NodeRestart |
7 | INFO |
Node |
This report of transaction activity is given approximately once every 10 seconds | TransReportCounters |
Statistic |
8 | INFO |
Node |
Number of operations performed by this node, provided approximately once every 10 seconds | OperationReportCounters |
Statistic |
8 | INFO |
Node |
A table having the table ID shown has been created | TableCreated |
Statistic |
7 | INFO |
Node |
JobStatistic |
Statistic |
9 | INFO |
|
Mean send size to Node = |
This node is sending an average of bytes
bytes per send to node node_id |
SendBytesStatistic |
Statistic |
9 | INFO |
Mean receive size to Node = |
This node is receiving an average of bytes of
data each time it receives data from node
node_id |
ReceiveBytesStatistic |
Statistic |
9 | INFO |
Node /
Node |
This report is generated when a DUMP
1000 command is issued in the cluster management
client |
MemoryUsage |
Statistic |
5 | INFO |
Node |
A transporter error occurred while communicating with node
node2_id; for a listing of
transporter error codes and messages, see
NDB Transporter Errors, in
MySQL NDB Cluster Internals Manual |
TransporterError |
Error |
2 | ERROR |
Node |
A warning of a potential transporter problem while communicating with
node node2_id; for a listing of
transporter error codes and messages, see
NDB Transporter Errors, for more
information |
TransporterWarning |
Error |
8 | WARNING |
Node |
This node missed a heartbeat from node
node2_id |
MissedHeartbeat |
Error |
8 | WARNING |
Node |
This node has missed at least 3 heartbeats from node
node2_id, and so has declared
that node “dead” |
DeadDueToHeartbeat |
Error |
8 | ALERT |
Node |
This node has sent a heartbeat to node
node2_id |
SentHeartbeat |
Info |
12 | INFO |
Node |
This report is seen during heavy event buffer usage, for example, when many updates are being applied in a relatively short period of time; the report shows the number of bytes and the percentage of event buffer memory used, the bytes allocated and percentage still available, and the latest buffered and consumed epochs; for more information, see Section 22.5.2.3, “Event Buffer Reporting in the Cluster Log” | EventBufferStatus2 |
Info |
7 | INFO |
Node , Node
, Node
|
These reports are written to the cluster log when entering and exiting
single user mode; API_node_id
is the node ID of the API or SQL having exclusive access
to the cluster (for more information, see
Section 22.5.6, “NDB Cluster Single User Mode”); the
message Unknown single user report
indicates
an error has taken place and should never be seen in
normal operation |
SingleUser |
Info |
7 | INFO |
Node |
A backup has been started using the management node having
mgm_node_id; this message is
also displayed in the cluster management client when the
START BACKUP command
is issued; for more information, see
Section 22.5.8.2, “Using The NDB Cluster Management Client to Create a Backup” |
BackupStarted |
Backup |
7 | INFO |
Node |
The backup having the ID backup_id has been
completed; for more information, see
Section 22.5.8.2, “Using The NDB Cluster Management Client to Create a Backup” |
BackupCompleted |
Backup |
7 | INFO |
Node |
The backup failed to start; for error codes, see MGM API Errors | BackupFailedToStart |
Backup |
7 | ALERT |
Node |
The backup was terminated after starting, possibly due to user intervention | BackupAborted |
Backup |
7 | ALERT |
Possible startup messages with descriptions are provided in the following list:
Initial start, waiting for %s to connect, nodes [ all: %s connected: %s no-wait: %s ]Waiting until nodes: %s connects, nodes [ all: %s connected: %s no-wait: %s ]Waiting %u sec for nodes %s to connect, nodes [ all: %s connected: %s no-wait: %s ]Waiting for non partitioned start, nodes [ all: %s connected: %s missing: %s no-wait: %s ]Waiting %u sec for non partitioned start, nodes [ all: %s connected: %s missing: %s no-wait: %s ]Initial start with nodes %s [ missing: %s no-wait: %s ]Start with all nodes %sStart with nodes %s [ missing: %s no-wait: %s ]Start potentially partitioned with nodes %s [ missing: %s no-wait: %s ]Unknown startreport: 0x%x [ %s %s %s %s ]
NDB uses one or more memory buffers for
events received from the data nodes. There is one such buffer
for each Ndb object subscribing
to table events, which means that there are usually two buffers
for each mysqld performing binary logging
(one buffer for schema events, and one for data events). Each
buffer contains epochs made up of events. These events consist
of operation types (insert, update, delete) and row data (before
and after images plus metadata).
NDB generates messages in the cluster log to
describe the state of these buffers. Although these reports
appear in the cluster log, they refer to buffers on API nodes
(unlike most other cluster log messages, which are generated by
data nodes).
Event buffer logging reports in the cluster log use the format shown here:
Nodenode_id: Event buffer status (object_id): used=bytes_used(percent_used% of alloc) alloc=bytes_allocated(percent_alloc% of max) max=bytes_availablelatest_consumed_epoch=latest_consumed_epochlatest_buffered_epoch=latest_buffered_epochreport_reason=report_reason
The fields making up this report are listed here, with descriptions:
node_id: ID of the node where the report originated.object_id: ID of theNdbobject where the report originated.bytes_used: Number of bytes used by the buffer.percent_used: Percentage of allocated bytes used.bytes_allocated: Number of bytes allocated to this buffer.percent_alloc: Percentage of available bytes used; not printed ifndb_eventbuffer_max_allocis equal to 0 (unlimited).bytes_available: Number of bytes available; this is 0 ifndb_eventbuffer_max_allocis 0 (unlimited).latest_consumed_epoch: The epoch most recently consumed to completion. (In NDB API applications, this is done by callingnextEvent().)latest_buffered_epoch: The epoch most recently buffered (completely) in the event buffer.report_reason: The reason for making the report. Possible reasons are shown later in this section.
Possible reasons for reporting are described in the following list:
ENOUGH_FREE_EVENTBUFFER: The event buffer has sufficient space.LOW_FREE_EVENTBUFFER: The event buffer is running low on free space.The threshold free percentage level triggering these reports can be adjusted by setting the
ndb_report_thresh_binlog_mem_usageserver variable.BUFFERED_EPOCHS_OVER_THRESHOLD: Whether the number of buffered epochs has exceeded the configured threshold. This number is the difference between the latest epoch that has been received in its entirety and the epoch that has most recently been consumed (in NDB API applications, this is done by callingnextEvent()ornextEvent2()). The report is generated every second until the number of buffered epochs goes below the threshold, which can be adjusted by setting thendb_report_thresh_binlog_epoch_slipserver variable. You can also adjust the threshold in NDB API applications by callingsetEventBufferQueueEmptyEpoch().PARTIALLY_DISCARDING: Event buffer memory is exhausted—that is, 100% ofndb_eventbuffer_max_allochas been used. Any partially buffered epoch is buffered to completion even is usage exceeds 100%, but any new epochs received are discarded. This means that a gap has occurred in the event stream.COMPLETELY_DISCARDING: No epochs are buffered.PARTIALLY_BUFFERING: The buffer free percentage following the gap has risen to the threshold, which can be set in the mysql client using thendb_eventbuffer_free_percentserver system variable or in NDB API applications by callingset_eventbuffer_free_percent(). New epochs are buffered. Epochs that could not be completed due to the gap are discarded.COMPLETELY_BUFFERING: All epochs received are being buffered, which means that there is sufficient event buffer memory. The gap in the event stream has been closed.
This section lists error codes, names, and messages that are written to the cluster log in the event of transporter errors.
- 0x00
TE_NO_ERROR
No error
- 0x01
TE_ERROR_CLOSING_SOCKET
Error found during closing of socket
- 0x02
TE_ERROR_IN_SELECT_BEFORE_ACCEPT
Error found before accept. The transporter will retry
- 0x03
TE_INVALID_MESSAGE_LENGTH
Error found in message (invalid message length)
- 0x04
TE_INVALID_CHECKSUM
Error found in message (checksum)
- 0x05
TE_COULD_NOT_CREATE_SOCKET
Error found while creating socket(can't create socket)
- 0x06
TE_COULD_NOT_BIND_SOCKET
Error found while binding server socket
- 0x07
TE_LISTEN_FAILED
Error found while listening to server socket
- 0x08
TE_ACCEPT_RETURN_ERROR
Error found during accept(accept return error)
- 0x0b
TE_SHM_DISCONNECT
The remote node has disconnected
- 0x0c
TE_SHM_IPC_STAT
Unable to check shm segment
- 0x0d
TE_SHM_UNABLE_TO_CREATE_SEGMENT
Unable to create shm segment
- 0x0e
TE_SHM_UNABLE_TO_ATTACH_SEGMENT
Unable to attach shm segment
- 0x0f
TE_SHM_UNABLE_TO_REMOVE_SEGMENT
Unable to remove shm segment
- 0x10
TE_TOO_SMALL_SIGID
Sig ID too small
- 0x11
TE_TOO_LARGE_SIGID
Sig ID too large
- 0x12
TE_WAIT_STACK_FULL
Wait stack was full
- 0x13
TE_RECEIVE_BUFFER_FULL
Receive buffer was full
- 0x14
TE_SIGNAL_LOST_SEND_BUFFER_FULL
Send buffer was full,and trying to force send fails
- 0x15
TE_SIGNAL_LOST
Send failed for unknown reason(signal lost)
- 0x16
TE_SEND_BUFFER_FULL
The send buffer was full, but sleeping for a while solved
- 0x21
TE_SHM_IPC_PERMANENT
Shm ipc Permanent error
Transporter error codes 0x17 through 0x20 and 0x22 are reserved for SCI connections, which are not supported in this version of NDB Cluster, and so are not included here.
In this section, we discuss the types of event logs provided by NDB Cluster, and the types of events that are logged.
NDB Cluster provides two types of event log:
The cluster log, which includes events generated by all cluster nodes. The cluster log is the log recommended for most uses because it provides logging information for an entire cluster in a single location.
By default, the cluster log is saved to a file named
ndb_, (wherenode_id_cluster.lognode_idis the node ID of the management server) in the management server'sDataDir.Cluster logging information can also be sent to
stdoutor asyslogfacility in addition to or instead of being saved to a file, as determined by the values set for theDataDirandLogDestinationconfiguration parameters. See Section 22.3.3.5, “Defining an NDB Cluster Management Server”, for more information about these parameters.Node logs are local to each node.
Output generated by node event logging is written to the file
ndb_(wherenode_id_out.lognode_idis the node's node ID) in the node'sDataDir. Node event logs are generated for both management nodes and data nodes.Node logs are intended to be used only during application development, or for debugging application code.
Both types of event logs can be set to log different subsets of events.
Each reportable event can be distinguished according to three different criteria:
Category: This can be any one of the following values:
STARTUP,SHUTDOWN,STATISTICS,CHECKPOINT,NODERESTART,CONNECTION,ERROR, orINFO.Priority: This is represented by one of the numbers from 0 to 15 inclusive, where 0 indicates “most important” and 15 “least important.”
Severity Level: This can be any one of the following values:
ALERT,CRITICAL,ERROR,WARNING,INFO, orDEBUG.
Both the cluster log and the node log can be filtered on these properties.
The format used in the cluster log is as shown here:
2007-01-26 19:35:55 [MgmSrvr] INFO -- Node 1: Data usage is 2%(60 32K pages of total 2560) 2007-01-26 19:35:55 [MgmSrvr] INFO -- Node 1: Index usage is 1%(24 8K pages of total 2336) 2007-01-26 19:35:55 [MgmSrvr] INFO -- Node 1: Resource 0 min: 0 max: 639 curr: 0 2007-01-26 19:35:55 [MgmSrvr] INFO -- Node 2: Data usage is 2%(76 32K pages of total 2560) 2007-01-26 19:35:55 [MgmSrvr] INFO -- Node 2: Index usage is 1%(24 8K pages of total 2336) 2007-01-26 19:35:55 [MgmSrvr] INFO -- Node 2: Resource 0 min: 0 max: 639 curr: 0 2007-01-26 19:35:55 [MgmSrvr] INFO -- Node 3: Data usage is 2%(58 32K pages of total 2560) 2007-01-26 19:35:55 [MgmSrvr] INFO -- Node 3: Index usage is 1%(25 8K pages of total 2336) 2007-01-26 19:35:55 [MgmSrvr] INFO -- Node 3: Resource 0 min: 0 max: 639 curr: 0 2007-01-26 19:35:55 [MgmSrvr] INFO -- Node 4: Data usage is 2%(74 32K pages of total 2560) 2007-01-26 19:35:55 [MgmSrvr] INFO -- Node 4: Index usage is 1%(25 8K pages of total 2336) 2007-01-26 19:35:55 [MgmSrvr] INFO -- Node 4: Resource 0 min: 0 max: 639 curr: 0 2007-01-26 19:39:42 [MgmSrvr] INFO -- Node 4: Node 9 Connected 2007-01-26 19:39:42 [MgmSrvr] INFO -- Node 1: Node 9 Connected 2007-01-26 19:39:42 [MgmSrvr] INFO -- Node 1: Node 9: API 8.0.21-ndb-8.0.21 2007-01-26 19:39:42 [MgmSrvr] INFO -- Node 2: Node 9 Connected 2007-01-26 19:39:42 [MgmSrvr] INFO -- Node 2: Node 9: API 8.0.21-ndb-8.0.21 2007-01-26 19:39:42 [MgmSrvr] INFO -- Node 3: Node 9 Connected 2007-01-26 19:39:42 [MgmSrvr] INFO -- Node 3: Node 9: API 8.0.21-ndb-8.0.21 2007-01-26 19:39:42 [MgmSrvr] INFO -- Node 4: Node 9: API 8.0.21-ndb-8.0.21 2007-01-26 19:59:22 [MgmSrvr] ALERT -- Node 2: Node 7 Disconnected 2007-01-26 19:59:22 [MgmSrvr] ALERT -- Node 2: Node 7 Disconnected
Each line in the cluster log contains the following information:
A timestamp in
YYYY-MM-DDHH:MM:SSThe type of node which is performing the logging. In the cluster log, this is always
[MgmSrvr].The severity of the event.
The ID of the node reporting the event.
A description of the event. The most common types of events to appear in the log are connections and disconnections between different nodes in the cluster, and when checkpoints occur. In some cases, the description may contain status information.
ndb_mgm supports a number of management
commands related to the cluster log and node logs. In the
listing that follows, node_id denotes
either a storage node ID or the keyword ALL,
which indicates that the command should be applied to all of the
cluster's data nodes.
CLUSTERLOG ONTurns the cluster log on.
CLUSTERLOG OFFTurns the cluster log off.
CLUSTERLOG INFOProvides information about cluster log settings.
node_idCLUSTERLOGcategory=thresholdLogs
categoryevents with priority less than or equal tothresholdin the cluster log.CLUSTERLOG FILTERseverity_levelToggles cluster logging of events of the specified
severity_level.
The following table describes the default setting (for all data nodes) of the cluster log category threshold. If an event has a priority with a value lower than or equal to the priority threshold, it is reported in the cluster log.
Events are reported per data node, and that the threshold can be set to different values on different nodes.
Table 22.280 Cluster log categories, with default threshold setting
| Category | Default threshold (All data nodes) |
|---|---|
STARTUP |
7 |
SHUTDOWN |
7 |
STATISTICS |
7 |
CHECKPOINT |
7 |
NODERESTART |
7 |
CONNECTION |
7 |
ERROR |
15 |
INFO |
7 |
The STATISTICS category can provide a great
deal of useful data. See
Section 22.5.3.3, “Using CLUSTERLOG STATISTICS in the NDB Cluster Management Client”, for more
information.
Thresholds are used to filter events within each category. For
example, a STARTUP event with a priority of 3
is not logged unless the threshold for
STARTUP is set to 3 or higher. Only events
with priority 3 or lower are sent if the threshold is 3.
The following table shows the event severity levels.
These correspond to Unix syslog levels,
except for LOG_EMERG and
LOG_NOTICE, which are not used or mapped.
Table 22.281 Event severity levels
| Severity Level Value | Severity | Description |
|---|---|---|
| 1 | ALERT |
A condition that should be corrected immediately, such as a corrupted system database |
| 2 | CRITICAL |
Critical conditions, such as device errors or insufficient resources |
| 3 | ERROR |
Conditions that should be corrected, such as configuration errors |
| 4 | WARNING |
Conditions that are not errors, but that might require special handling |
| 5 | INFO |
Informational messages |
| 6 | DEBUG |
Debugging messages used for NDBCLUSTER
development |
Event severity levels can be turned on or off (using
CLUSTERLOG FILTER—see above). If a
severity level is turned on, then all events with a priority
less than or equal to the category thresholds are logged. If the
severity level is turned off then no events belonging to that
severity level are logged.
Cluster log levels are set on a per
ndb_mgmd, per subscriber basis. This means
that, in an NDB Cluster with multiple management servers,
using a CLUSTERLOG command in an instance
of ndb_mgm connected to one management
server affects only logs generated by that management server
but not by any of the others. This also means that, should one
of the management servers be restarted, only logs generated by
that management server are affected by the resetting of log
levels caused by the restart.
An event report reported in the event logs has the following format:
datetime[string]severity--message
For example:
09:19:30 2005-07-24 [NDB] INFO -- Node 4 Start phase 4 completed
This section discusses all reportable events, ordered by category and severity level within each category.
In the event descriptions, GCP and LCP mean “Global Checkpoint” and “Local Checkpoint”, respectively.
CONNECTION Events
These events are associated with connections between Cluster nodes.
Table 22.282 Events associated with connections between cluster nodes
| Event | Priority | Severity Level | Description |
|---|---|---|---|
Connected |
8 | INFO |
Data nodes connected |
Disconnected |
8 | ALERT |
Data nodes disconnected |
CommunicationClosed |
8 | INFO |
SQL node or data node connection closed |
CommunicationOpened |
8 | INFO |
SQL node or data node connection open |
ConnectedApiVersion |
8 | INFO |
Connection using API version |
CHECKPOINT Events
The logging messages shown here are associated with checkpoints.
Table 22.283 Events associated with checkpoints
| Event | Priority | Severity Level | Description |
|---|---|---|---|
GlobalCheckpointStarted |
9 | INFO |
Start of GCP: REDO log is written to disk |
GlobalCheckpointCompleted |
10 | INFO |
GCP finished |
LocalCheckpointStarted |
7 | INFO |
Start of LCP: data written to disk |
LocalCheckpointCompleted |
7 | INFO |
LCP completed normally |
LCPStoppedInCalcKeepGci |
0 | ALERT |
LCP stopped |
LCPFragmentCompleted |
11 | INFO |
LCP on a fragment has been completed |
UndoLogBlocked |
7 | INFO |
UNDO logging blocked; buffer near overflow |
RedoStatus |
7 | INFO |
Redo status |
STARTUP Events
The following events are generated in response to the startup of a node or of the cluster and of its success or failure. They also provide information relating to the progress of the startup process, including information concerning logging activities.
Table 22.284 Events relating to the startup of a node or cluster
| Event | Priority | Severity Level | Description |
|---|---|---|---|
NDBStartStarted |
1 | INFO |
Data node start phases initiated (all nodes starting) |
NDBStartCompleted |
1 | INFO |
Start phases completed, all data nodes |
STTORRYRecieved |
15 | INFO |
Blocks received after completion of restart |
StartPhaseCompleted |
4 | INFO |
Data node start phase X completed |
CM_REGCONF |
3 | INFO |
Node has been successfully included into the cluster; shows the node, managing node, and dynamic ID |
CM_REGREF |
8 | INFO |
Node has been refused for inclusion in the cluster; cannot be included in cluster due to misconfiguration, inability to establish communication, or other problem |
FIND_NEIGHBOURS |
8 | INFO |
Shows neighboring data nodes |
NDBStopStarted |
1 | INFO |
Data node shutdown initiated |
NDBStopCompleted |
1 | INFO |
Data node shutdown complete |
NDBStopForced |
1 | ALERT |
Forced shutdown of data node |
NDBStopAborted |
1 | INFO |
Unable to shut down data node normally |
StartREDOLog |
4 | INFO |
New redo log started; GCI keep X, newest
restorable GCI Y |
StartLog |
10 | INFO |
New log started; log part X, start MB
Y, stop MB
Z |
UNDORecordsExecuted |
15 | INFO |
Undo records executed |
StartReport |
4 | INFO |
Report started |
LogFileInitStatus |
7 | INFO |
Log file initialization status |
LogFileInitCompStatus |
7 | INFO |
Log file completion status |
StartReadLCP |
10 | INFO |
Start read for local checkpoint |
ReadLCPComplete |
10 | INFO |
Read for local checkpoint completed |
RunRedo |
8 | INFO |
Running the redo log |
RebuildIndex |
10 | INFO |
Rebuilding indexes |
NODERESTART Events
The following events are generated when restarting a node and relate to the success or failure of the node restart process.
Table 22.285 Events relating to restarting a node
| Event | Priority | Severity Level | Description |
|---|---|---|---|
NR_CopyDict |
7 | INFO |
Completed copying of dictionary information |
NR_CopyDistr |
7 | INFO |
Completed copying distribution information |
NR_CopyFragsStarted |
7 | INFO |
Starting to copy fragments |
NR_CopyFragDone |
10 | INFO |
Completed copying a fragment |
NR_CopyFragsCompleted |
7 | INFO |
Completed copying all fragments |
NodeFailCompleted |
8 | ALERT |
Node failure phase completed |
NODE_FAILREP |
8 | ALERT |
Reports that a node has failed |
ArbitState |
6 | INFO |
Report whether an arbitrator is found or not; there are seven different
possible outcomes when seeking an arbitrator, listed here:
|
ArbitResult |
2 | ALERT |
Report arbitrator results; there are eight different possible results
for arbitration attempts, listed here:
|
GCP_TakeoverStarted |
7 | INFO |
GCP takeover started |
GCP_TakeoverCompleted |
7 | INFO |
GCP takeover complete |
LCP_TakeoverStarted |
7 | INFO |
LCP takeover started |
LCP_TakeoverCompleted |
7 | INFO |
LCP takeover complete (state = X) |
ConnectCheckStarted |
6 | INFO |
Connection check started |
ConnectCheckCompleted |
6 | INFO |
Connection check completed |
NodeFailRejected |
6 | ALERT |
Node failure phase failed |
STATISTICS Events
The following events are of a statistical nature. They provide information such as numbers of transactions and other operations, amount of data sent or received by individual nodes, and memory usage.
Table 22.286 Events of a statistical nature
| Event | Priority | Severity Level | Description |
|---|---|---|---|
TransReportCounters |
8 | INFO |
Report transaction statistics, including numbers of transactions, commits, reads, simple reads, writes, concurrent operations, attribute information, and aborts |
OperationReportCounters |
8 | INFO |
Number of operations |
TableCreated |
7 | INFO |
Report number of tables created |
JobStatistic |
9 | INFO |
Mean internal job scheduling statistics |
ThreadConfigLoop |
9 | INFO |
Number of thread configuration loops |
SendBytesStatistic |
9 | INFO |
Mean number of bytes sent to node X |
ReceiveBytesStatistic |
9 | INFO |
Mean number of bytes received from node X |
MemoryUsage |
5 | INFO |
Data and index memory usage (80%, 90%, and 100%) |
MTSignalStatistics |
9 | INFO |
Multithreaded signals |
SCHEMA Events
These events relate to NDB Cluster schema operations.
Table 22.287 Events relating to NDB Cluster schema operations
| Event | Priority | Severity Level | Description |
|---|---|---|---|
CreateSchemaObject |
8 | INFO |
Schema objected created |
AlterSchemaObject |
8 | INFO |
Schema object updated |
DropSchemaObject |
8 | INFO |
Schema object dropped |
ERROR Events
These events relate to Cluster errors and warnings. The presence of one or more of these generally indicates that a major malfunction or failure has occurred.
Table 22.288 Events relating to cluster errors and warnings
| Event | Priority | Severity Level | Description |
|---|---|---|---|
TransporterError |
2 | ERROR |
Transporter error |
TransporterWarning |
8 | WARNING |
Transporter warning |
MissedHeartbeat |
8 | WARNING |
Node X missed heartbeat number
Y |
DeadDueToHeartbeat |
8 | ALERT |
Node X declared “dead” due to
missed heartbeat |
WarningEvent |
2 | WARNING |
General warning event |
SubscriptionStatus |
4 | WARNING |
Change in subscription status |
INFO Events
These events provide general information about the state of the cluster and activities associated with Cluster maintenance, such as logging and heartbeat transmission.
Table 22.289 Information events
| Event | Priority | Severity Level | Description |
|---|---|---|---|
SentHeartbeat |
12 | INFO |
Sent heartbeat |
CreateLogBytes |
11 | INFO |
Create log: Log part, log file, size in MB |
InfoEvent |
2 | INFO |
General informational event |
EventBufferStatus |
7 | INFO |
Event buffer status |
EventBufferStatus2 |
7 | INFO |
Improved event buffer status information |
SentHeartbeat events are available only if
NDB Cluster was compiled with VM_TRACE
enabled.
SINGLEUSER Events
These events are associated with entering and exiting single user mode.
Table 22.290 Events relating to single user mode
| Event | Priority | Severity Level | Description |
|---|---|---|---|
SingleUser |
7 | INFO |
Entering or exiting single user mode |
BACKUP Events
These events provide information about backups being created or restored.
Table 22.291 Backup events
| Event | Priority | Severity Level | Description |
|---|---|---|---|
BackupStarted |
7 | INFO |
Backup started |
BackupStatus |
7 | INFO |
Backup status |
BackupCompleted |
7 | INFO |
Backup completed |
BackupFailedToStart |
7 | ALERT |
Backup failed to start |
BackupAborted |
7 | ALERT |
Backup aborted by user |
RestoreStarted |
7 | INFO |
Started restoring from backup |
RestoreMetaData |
7 | INFO |
Restoring metadata |
RestoreData |
7 | INFO |
Restoring data |
RestoreLog |
7 | INFO |
Restoring log files |
RestoreCompleted |
7 | INFO |
Completed restoring from backup |
SavedEvent |
7 | INFO |
Event saved |
The NDB management client's
CLUSTERLOG STATISTICS
command can provide a number of useful statistics in its output.
Counters providing information about the state of the cluster
are updated at 5-second reporting intervals by the transaction
coordinator (TC) and the local query handler (LQH), and written
to the cluster log.
Transaction coordinator statistics. Each transaction has one transaction coordinator, which is chosen by one of the following methods:
In a round-robin fashion
By communication proximity
By supplying a data placement hint when the transaction is started
You can determine which TC selection method is used for
transactions started from a given SQL node using the
ndb_optimized_node_selection
system variable.
All operations within the same transaction use the same transaction coordinator, which reports the following statistics:
Trans count. This is the number transactions started in the last interval using this TC as the transaction coordinator. Any of these transactions may have committed, have been aborted, or remain uncommitted at the end of the reporting interval.
NoteTransactions do not migrate between TCs.
Commit count. This is the number of transactions using this TC as the transaction coordinator that were committed in the last reporting interval. Because some transactions committed in this reporting interval may have started in a previous reporting interval, it is possible for
Commit countto be greater thanTrans count.Read count. This is the number of primary key read operations using this TC as the transaction coordinator that were started in the last reporting interval, including simple reads. This count also includes reads performed as part of unique index operations. A unique index read operation generates 2 primary key read operations—1 for the hidden unique index table, and 1 for the table on which the read takes place.
Simple read count. This is the number of simple read operations using this TC as the transaction coordinator that were started in the last reporting interval.
Write count. This is the number of primary key write operations using this TC as the transaction coordinator that were started in the last reporting interval. This includes all inserts, updates, writes and deletes, as well as writes performed as part of unique index operations.
NoteA unique index update operation can generate multiple PK read and write operations on the index table and on the base table.
AttrInfoCount. This is the number of 32-bit data words received in the last reporting interval for primary key operations using this TC as the transaction coordinator. For reads, this is proportional to the number of columns requested. For inserts and updates, this is proportional to the number of columns written, and the size of their data. For delete operations, this is usually zero.
Unique index operations generate multiple PK operations and so increase this count. However, data words sent to describe the PK operation itself, and the key information sent, are not counted here. Attribute information sent to describe columns to read for scans, or to describe ScanFilters, is also not counted in
AttrInfoCount.Concurrent Operations. This is the number of primary key or scan operations using this TC as the transaction coordinator that were started during the last reporting interval but that were not completed. Operations increment this counter when they are started and decrement it when they are completed; this occurs after the transaction commits. Dirty reads and writes—as well as failed operations—decrement this counter.
The maximum value that
Concurrent Operationscan have is the maximum number of operations that a TC block can support; currently, this is(2 * MaxNoOfConcurrentOperations) + 16 + MaxNoOfConcurrentTransactions. (For more information about these configuration parameters, see the Transaction Parameters section of Section 22.3.3.6, “Defining NDB Cluster Data Nodes”.)Abort count. This is the number of transactions using this TC as the transaction coordinator that were aborted during the last reporting interval. Because some transactions that were aborted in the last reporting interval may have started in a previous reporting interval,
Abort countcan sometimes be greater thanTrans count.Scans. This is the number of table scans using this TC as the transaction coordinator that were started during the last reporting interval. This does not include range scans (that is, ordered index scans).
Range scans. This is the number of ordered index scans using this TC as the transaction coordinator that were started in the last reporting interval.
Local reads. This is the number of primary-key read operations performed using a transaction coordinator on a node that also holds the primary replica of the record. This count can also be obtained from the
LOCAL_READScounter in thendbinfo.counterstable.Local writes. This contains the number of primary-key read operations that were performed using a transaction coordinator on a node that also holds the primary replica of the record. This count can also be obtained from the
LOCAL_WRITEScounter in thendbinfo.counterstable.
Local query handler statistics (Operations). There is 1 cluster event per local query handler block (that is, 1 per data node process). Operations are recorded in the LQH where the data they are operating on resides.
A single transaction may operate on data stored in multiple LQH blocks.
The Operations statistic provides the number
of local operations performed by this LQH block in the last
reporting interval, and includes all types of read and write
operations (insert, update, write, and delete operations). This
also includes operations used to replicate writes. For example,
in a 2-replica cluster, the write to the primary replica is
recorded in the primary LQH, and the write to the backup will be
recorded in the backup LQH. Unique key operations may result in
multiple local operations; however, this does
not include local operations generated as a
result of a table scan or ordered index scan, which are not
counted.
Process scheduler statistics. In addition to the statistics reported by the transaction coordinator and local query handler, each ndbd process has a scheduler which also provides useful metrics relating to the performance of an NDB Cluster. This scheduler runs in an infinite loop; during each loop the scheduler performs the following tasks:
Read any incoming messages from sockets into a job buffer.
Check whether there are any timed messages to be executed; if so, put these into the job buffer as well.
Execute (in a loop) any messages in the job buffer.
Send any distributed messages that were generated by executing the messages in the job buffer.
Wait for any new incoming messages.
Process scheduler statistics include the following:
Mean Loop Counter. This is the number of loops executed in the third step from the preceding list. This statistic increases in size as the utilization of the TCP/IP buffer improves. You can use this to monitor changes in performance as you add new data node processes.
Mean send size and Mean receive size. These statistics enable you to gauge the efficiency of, respectively writes and reads between nodes. The values are given in bytes. Higher values mean a lower cost per byte sent or received; the maximum value is 64K.
To cause all cluster log statistics to be logged, you can use
the following command in the NDB
management client:
ndb_mgm> ALL CLUSTERLOG STATISTICS=15
Setting the threshold for STATISTICS to 15
causes the cluster log to become very verbose, and to grow
quite rapidly in size, in direct proportion to the number of
cluster nodes and the amount of activity in the NDB Cluster.
For more information about NDB Cluster management client commands relating to logging and reporting, see Section 22.5.3.1, “NDB Cluster Logging Management Commands”.
This section provides a simplified outline of the steps involved
when NDB Cluster data nodes are started. More complete information
can be found in NDB Cluster Start Phases, in
the NDB Internals Guide.
These phases are the same as those reported in the output from the
node_id
STATUSstart_phase
column of the ndbinfo.nodes
table.
Start types. There are several different startup types and modes, as shown in the following list:
Initial start. The cluster starts with a clean file system on all data nodes. This occurs either when the cluster started for the very first time, or when all data nodes are restarted using the
--initialoption.NoteDisk Data files are not removed when restarting a node using
--initial.System restart. The cluster starts and reads data stored in the data nodes. This occurs when the cluster has been shut down after having been in use, when it is desired for the cluster to resume operations from the point where it left off.
Node restart. This is the online restart of a cluster node while the cluster itself is running.
Initial node restart. This is the same as a node restart, except that the node is reinitialized and started with a clean file system.
Setup and initialization (phase -1). Prior to startup, each data node (ndbd process) must be initialized. Initialization consists of the following steps:
Obtain a node ID
Fetch configuration data
Allocate ports to be used for inter-node communications
Allocate memory according to settings obtained from the configuration file
When a data node or SQL node first connects to the management node, it reserves a cluster node ID. To make sure that no other node allocates the same node ID, this ID is retained until the node has managed to connect to the cluster and at least one ndbd reports that this node is connected. This retention of the node ID is guarded by the connection between the node in question and ndb_mgmd.
After each data node has been initialized, the cluster startup process can proceed. The stages which the cluster goes through during this process are listed here:
Phase 0. The
NDBFSandNDBCNTRblocks start (see NDB Kernel Blocks). Data node file systems are cleared on those data nodes that were started with--initialoption.Phase 1. In this stage, all remaining
NDBkernel blocks are started. NDB Cluster connections are set up, inter-block communications are established, and heartbeats are started. In the case of a node restart, API node connections are also checked.NoteWhen one or more nodes hang in Phase 1 while the remaining node or nodes hang in Phase 2, this often indicates network problems. One possible cause of such issues is one or more cluster hosts having multiple network interfaces. Another common source of problems causing this condition is the blocking of TCP/IP ports needed for communications between cluster nodes. In the latter case, this is often due to a misconfigured firewall.
Phase 2. The
NDBCNTRkernel block checks the states of all existing nodes. The master node is chosen, and the cluster schema file is initialized.Phase 3. The
DBLQHandDBTCkernel blocks set up communications between them. The startup type is determined; if this is a restart, theDBDIHblock obtains permission to perform the restart.Phase 4. For an initial start or initial node restart, the redo log files are created. The number of these files is equal to
NoOfFragmentLogFiles.For a system restart:
Read schema or schemas.
Read data from the local checkpoint.
Apply all redo information until the latest restorable global checkpoint has been reached.
For a node restart, find the tail of the redo log.
Phase 5. Most of the database-related portion of a data node start is performed during this phase. For an initial start or system restart, a local checkpoint is executed, followed by a global checkpoint. Periodic checks of memory usage begin during this phase, and any required node takeovers are performed.
Phase 6. In this phase, node groups are defined and set up.
Phase 7. The arbitrator node is selected and begins to function. The next backup ID is set, as is the backup disk write speed. Nodes reaching this start phase are marked as
Started. It is now possible for API nodes (including SQL nodes) to connect to the cluster.Phase 8. If this is a system restart, all indexes are rebuilt (by
DBDIH).Phase 9. The node internal startup variables are reset.
Phase 100 (OBSOLETE). Formerly, it was at this point during a node restart or initial node restart that API nodes could connect to the node and begin to receive events. Currently, this phase is empty.
Phase 101. At this point in a node restart or initial node restart, event delivery is handed over to the node joining the cluster. The newly-joined node takes over responsibility for delivering its primary data to subscribers. This phase is also referred to as
SUMAhandover phase.
After this process is completed for an initial start or system restart, transaction handling is enabled. For a node restart or initial node restart, completion of the startup process means that the node may now act as a transaction coordinator.
This section discusses how to perform a rolling restart of an NDB Cluster installation, so called because it involves stopping and starting (or restarting) each node in turn, so that the cluster itself remains operational. This is often done as part of a rolling upgrade or rolling downgrade, where high availability of the cluster is mandatory and no downtime of the cluster as a whole is permissible. Where we refer to upgrades, the information provided here also generally applies to downgrades as well.
There are a number of reasons why a rolling restart might be desirable. These are described in the next few paragraphs.
Configuration change. To make a change in the cluster's configuration, such as adding an SQL node to the cluster, or setting a configuration parameter to a new value.
NDB Cluster software upgrade or downgrade. To upgrade the cluster to a newer version of the NDB Cluster software (or to downgrade it to an older version). This is usually referred to as a “rolling upgrade” (or “rolling downgrade”, when reverting to an older version of NDB Cluster).
Change on node host. To make changes in the hardware or operating system on which one or more NDB Cluster node processes are running.
System reset (cluster reset). To reset the cluster because it has reached an undesirable state. In such cases it is often desirable to reload the data and metadata of one or more data nodes. This can be done in any of three ways:
Start each data node process (ndbd or possibly ndbmtd) with the
--initialoption, which forces the data node to clear its file system and to reload all NDB Cluster data and metadata from the other data nodes.Beginning with NDB 8.0.21, this also forces the removal of all Disk Data objects and files associated with those objects.
Create a backup using the ndb_mgm client
START BACKUPcommand prior to performing the restart. Following the upgrade, restore the node or nodes using ndb_restore.See Section 22.5.8, “Online Backup of NDB Cluster”, and Section 22.4.23, “ndb_restore — Restore an NDB Cluster Backup”, for more information.
Use mysqldump to create a backup prior to the upgrade; afterward, restore the dump using
LOAD DATA.
Resource Recovery.
To free memory previously allocated to a table by successive
INSERT and
DELETE operations, for re-use by
other NDB Cluster tables.
The process for performing a rolling restart may be generalized as follows:
Stop all cluster management nodes (ndb_mgmd processes), reconfigure them, then restart them. (See Rolling restarts with multiple management servers.)
Stop, reconfigure, then restart each cluster data node (ndbd process) in turn.
Some node configuration parameters can be updated by issuing
RESTARTfor each of the data nodes in the ndb_mgm client following the previous step. Other parameters require that the data node be stopped completely using the management clientSTOPcommand, then started again from a system shell by invoking the ndbd or ndbmtd executable as appropriate. (A shell command such as kill can also be used on most Unix systems to stop a data node process, but theSTOPcommand is preferred and usually simpler.)NoteOn Windows, you can also use SC STOP and SC START commands,
NET STOPandNET STARTcommands, or the Windows Service Manager to stop and start nodes which have been installed as Windows services (see Section 22.2.3.4, “Installing NDB Cluster Processes as Windows Services”).The type of restart required is indicated in the documentation for each node configuration parameter. See Section 22.3.3, “NDB Cluster Configuration Files”.
Stop, reconfigure, then restart each cluster SQL node (mysqld process) in turn.
NDB Cluster supports a somewhat flexible order for upgrading nodes. When upgrading an NDB Cluster, you may upgrade API nodes (including SQL nodes) before upgrading the management nodes, data nodes, or both. In other words, you are permitted to upgrade the API and SQL nodes in any order. This is subject to the following provisions:
This functionality is intended for use as part of an online upgrade only. A mix of node binaries from different NDB Cluster releases is neither intended nor supported for continuous, long-term use in a production setting.
All management nodes must be upgraded before any data nodes are upgraded. This remains true regardless of the order in which you upgrade the cluster's API and SQL nodes.
Features specific to the “new” version must not be used until all management nodes and data nodes have been upgraded.
This also applies to any MySQL Server version change that may apply, in addition to the NDB engine version change, so do not forget to take this into account when planning the upgrade. (This is true for online upgrades of NDB Cluster in general.)
It is not possible for any API node to perform schema operations (such as data definition statements) during a node restart. Due in part to this limitation, schema operations are also not supported during an online upgrade or downgrade.
Rolling restarts with multiple management servers. When performing a rolling restart of an NDB Cluster with multiple management nodes, you should keep in mind that ndb_mgmd checks to see if any other management node is running, and, if so, tries to use that node's configuration data. To keep this from occurring, and to force ndb_mgmd to reread its configuration file, perform the following steps:
Stop all NDB Cluster ndb_mgmd processes.
Update all
config.inifiles.Start a single ndb_mgmd with
--reload,--initial, or both options as desired.If you started the first ndb_mgmd with the
--initialoption, you must also start any remaining ndb_mgmd processes using--initial.Regardless of any other options used when starting the first ndb_mgmd, you should not start any remaining ndb_mgmd processes after the first one using
--reload.Complete the rolling restarts of the data nodes and API nodes as normal.
When performing a rolling restart to update the cluster's
configuration, you can use the
config_generation column of the
ndbinfo.nodes table to keep
track of which data nodes have been successfully restarted with
the new configuration. See
Section 22.5.14.30, “The ndbinfo nodes Table”.
Single user mode enables the database administrator to restrict access to the database system to a single API node, such as a MySQL server (SQL node) or an instance of ndb_restore. When entering single user mode, connections to all other API nodes are closed gracefully and all running transactions are aborted. No new transactions are permitted to start.
Once the cluster has entered single user mode, only the designated API node is granted access to the database.
You can use the ALL STATUS command in the
ndb_mgm client to see when the cluster has
entered single user mode. You can also check the
status column of the
ndbinfo.nodes table (see
Section 22.5.14.30, “The ndbinfo nodes Table”, for more
information).
Example:
ndb_mgm> ENTER SINGLE USER MODE 5
After this command has executed and the cluster has entered single
user mode, the API node whose node ID is 5
becomes the cluster's only permitted user.
The node specified in the preceding command must be an API node; attempting to specify any other type of node will be rejected.
When the preceding command is invoked, all transactions running on the designated node are aborted, the connection is closed, and the server must be restarted.
The command EXIT SINGLE USER MODE changes the
state of the cluster's data nodes from single user mode to
normal mode. API nodes—such as MySQL Servers—waiting
for a connection (that is, waiting for the cluster to become ready
and available), are again permitted to connect. The API node
denoted as the single-user node continues to run (if still
connected) during and after the state change.
Example:
ndb_mgm> EXIT SINGLE USER MODE
There are two recommended ways to handle a node failure when running in single user mode:
Method 1:
Finish all single user mode transactions
Issue the
EXIT SINGLE USER MODEcommandRestart the cluster's data nodes
Method 2:
Restart storage nodes prior to entering single user mode.
This section describes how to add NDB Cluster data nodes “online”—that is, without needing to shut down the cluster completely and restart it as part of the process.
Currently, you must add new data nodes to an NDB Cluster as part of a new node group. In addition, it is not possible to change the number of replicas (or the number of nodes per node group) online.
This section provides general information about the behavior of and current limitations in adding NDB Cluster nodes online.
Redistribution of Data.
The ability to add new nodes online includes a means to
reorganize NDBCLUSTER table data
and indexes so that they are distributed across all data
nodes, including the new ones, by means of the
ALTER
TABLE ... REORGANIZE PARTITION statement. Table
reorganization of both in-memory and Disk Data tables is
supported. This redistribution does not currently include
unique indexes (only ordered indexes are redistributed).
The redistribution for NDBCLUSTER
tables already existing before the new data nodes were added is
not automatic, but can be accomplished using simple SQL
statements in mysql or another MySQL client
application. However, all data and indexes added to tables
created after a new node group has been added are distributed
automatically among all cluster data nodes, including those
added as part of the new node group.
Partial starts. It is possible to add a new node group without all of the new data nodes being started. It is also possible to add a new node group to a degraded cluster—that is, a cluster that is only partially started, or where one or more data nodes are not running. In the latter case, the cluster must have enough nodes running to be viable before the new node group can be added.
Effects on ongoing operations.
Normal DML operations using NDB Cluster data are not prevented
by the creation or addition of a new node group, or by table
reorganization. However, it is not possible to perform DDL
concurrently with table reorganization—that is, no other
DDL statements can be issued while an
ALTER TABLE ...
REORGANIZE PARTITION statement is executing. In
addition, during the execution of ALTER TABLE ...
REORGANIZE PARTITION (or the execution of any other
DDL statement), it is not possible to restart cluster data
nodes.
Failure handling. Failures of data nodes during node group creation and table reorganization are handled as shown in the following table:
Table 22.292 Data node failure handling during node group creation and table reorganization
| Failure during | Failure in “Old” data node | Failure in “New” data node | System Failure |
|---|---|---|---|
| Node group creation |
|
|
|
| Table reorganization |
|
|
|
Dropping node groups.
The ndb_mgm client supports a
DROP NODEGROUP command,
but it is possible to drop a node group only when no data
nodes in the node group contain any data. Since there is
currently no way to “empty” a specific data node
or node group, this command works only the following two
cases:
After issuing
CREATE NODEGROUPin the ndb_mgm client, but before issuing anyALTER TABLE ... REORGANIZE PARTITIONstatements in the mysql client.After dropping all
NDBCLUSTERtables usingDROP TABLE.TRUNCATE TABLEdoes not work for this purpose because the data nodes continue to store the table definitions.
In this section, we list the basic steps required to add new data nodes to an NDB Cluster. This procedure applies whether you are using ndbd or ndbmtd binaries for the data node processes. For a more detailed example, see Section 22.5.7.3, “Adding NDB Cluster Data Nodes Online: Detailed Example”.
Assuming that you already have a running NDB Cluster, adding data nodes online requires the following steps:
Edit the cluster configuration
config.inifile, adding new[ndbd]sections corresponding to the nodes to be added. In the case where the cluster uses multiple management servers, these changes need to be made to allconfig.inifiles used by the management servers.You must be careful that node IDs for any new data nodes added in the
config.inifile do not overlap node IDs used by existing nodes. In the event that you have API nodes using dynamically allocated node IDs and these IDs match node IDs that you want to use for new data nodes, it is possible to force any such API nodes to “migrate”, as described later in this procedure.Perform a rolling restart of all NDB Cluster management servers.
Perform a rolling restart of all existing NDB Cluster data nodes. It is not necessary (or usually even desirable) to use
--initialwhen restarting the existing data nodes.If you are using API nodes with dynamically allocated IDs matching any node IDs that you wish to assign to new data nodes, you must restart all API nodes (including SQL nodes) before restarting any of the data nodes processes in this step. This causes any API nodes with node IDs that were previously not explicitly assigned to relinquish those node IDs and acquire new ones.
Perform a rolling restart of any SQL or API nodes connected to the NDB Cluster.
Start the new data nodes.
The new data nodes may be started in any order. They can also be started concurrently, as long as they are started after the rolling restarts of all existing data nodes have been completed, and before proceeding to the next step.
Execute one or more
CREATE NODEGROUPcommands in the NDB Cluster management client to create the new node group or node groups to which the new data nodes will belong.Redistribute the cluster's data among all data nodes, including the new ones. Normally this is done by issuing an
ALTER TABLE ... ALGORITHM=INPLACE, REORGANIZE PARTITIONstatement in the mysql client for eachNDBCLUSTERtable.Exception: For tables created using the
MAX_ROWSoption, this statement does not work; instead, useALTER TABLE ... ALGORITHM=INPLACE MAX_ROWS=...to reorganize such tables. You should also bear in mind that usingMAX_ROWSto set the number of partitions in this fashion is deprecated, and you should usePARTITION_BALANCEinstead; see Section 13.1.20.10, “Setting NDB_TABLE Options”, for more information.NoteThis needs to be done only for tables already existing at the time the new node group is added. Data in tables created after the new node group is added is distributed automatically; however, data added to any given table
tblthat existed before the new nodes were added is not distributed using the new nodes until that table has been reorganized.ALTER TABLE ... REORGANIZE PARTITION ALGORITHM=INPLACEreorganizes partitions but does not reclaim the space freed on the “old” nodes. You can do this by issuing, for eachNDBCLUSTERtable, anOPTIMIZE TABLEstatement in the mysql client.This works for space used by variable-width columns of in-memory
NDBtables.OPTIMIZE TABLEis not supported for fixed-width columns of in-memory tables; it is also not supported for Disk Data tables.
You can add all the nodes desired, then issue several
CREATE NODEGROUP commands in
succession to add the new node groups to the cluster.
In this section we provide a detailed example illustrating how to add new NDB Cluster data nodes online, starting with an NDB Cluster having 2 data nodes in a single node group and concluding with a cluster having 4 data nodes in 2 node groups.
Starting configuration.
For purposes of illustration, we assume a minimal
configuration, and that the cluster uses a
config.ini file containing only the
following information:
[ndbd default] DataMemory = 100M IndexMemory = 100M NoOfReplicas = 2 DataDir = /usr/local/mysql/var/mysql-cluster [ndbd] Id = 1 HostName = 198.51.100.1 [ndbd] Id = 2 HostName = 198.51.100.2 [mgm] HostName = 198.51.100.10 Id = 10 [api] Id=20 HostName = 198.51.100.20 [api] Id=21 HostName = 198.51.100.21
We have left a gap in the sequence between data node IDs and other nodes. This make it easier later to assign node IDs that are not already in use to data nodes which are newly added.
We also assume that you have already started the cluster using
the appropriate command line or my.cnf
options, and that running
SHOW in the management
client produces output similar to what is shown here:
-- NDB Cluster -- Management Client --
ndb_mgm> SHOW
Connected to Management Server at: 198.51.100.10:1186
Cluster Configuration
---------------------
[ndbd(NDB)] 2 node(s)
id=1 @198.51.100.1 (8.0.21-ndb-8.0.21, Nodegroup: 0, *)
id=2 @198.51.100.2 (8.0.21-ndb-8.0.21, Nodegroup: 0)
[ndb_mgmd(MGM)] 1 node(s)
id=10 @198.51.100.10 (8.0.21-ndb-8.0.21)
[mysqld(API)] 2 node(s)
id=20 @198.51.100.20 (8.0.21-ndb-8.0.21)
id=21 @198.51.100.21 (8.0.21-ndb-8.0.21)
Finally, we assume that the cluster contains a single
NDBCLUSTER table created as shown
here:
USE n;
CREATE TABLE ips (
id BIGINT NOT NULL AUTO_INCREMENT PRIMARY KEY,
country_code CHAR(2) NOT NULL,
type CHAR(4) NOT NULL,
ip_address VARCHAR(15) NOT NULL,
addresses BIGINT UNSIGNED DEFAULT NULL,
date BIGINT UNSIGNED DEFAULT NULL
) ENGINE NDBCLUSTER;The memory usage and related information shown later in this section was generated after inserting approximately 50000 rows into this table.
In this example, we show the single-threaded ndbd being used for the data node processes. You can also apply this example, if you are using the multithreaded ndbmtd by substituting ndbmtd for ndbd wherever it appears in the steps that follow.
Step 1: Update configuration file.
Open the cluster global configuration file in a text editor
and add [ndbd] sections corresponding to
the 2 new data nodes. (We give these data nodes IDs 3 and 4,
and assume that they are to be run on host machines at
addresses 198.51.100.3 and 198.51.100.4, respectively.) After
you have added the new sections, the contents of the
config.ini file should look like what is
shown here, where the additions to the file are shown in bold
type:
[ndbd
        default]
DataMemory = 100M
IndexMemory = 100M
NoOfReplicas = 2
DataDir = /usr/local/mysql/var/mysql-cluster
[ndbd]
Id = 1
HostName = 198.51.100.1
[ndbd]
Id = 2
HostName = 198.51.100.2
[ndbd]
Id = 3
HostName = 198.51.100.3
[ndbd]
Id = 4
HostName = 198.51.100.4
[mgm]
HostName = 198.51.100.10
Id = 10
[api]
Id=20
HostName = 198.51.100.20
[api]
Id=21
HostName = 198.51.100.21
Once you have made the necessary changes, save the file.
Step 2: Restart the management server. Restarting the cluster management server requires that you issue separate commands to stop the management server and then to start it again, as follows:
Stop the management server using the management client
STOPcommand, as shown here:ndb_mgm>
10 STOPNode 10 has shut down. Disconnecting to allow Management Server to shutdown shell>Because shutting down the management server causes the management client to terminate, you must start the management server from the system shell. For simplicity, we assume that
config.iniis in the same directory as the management server binary, but in practice, you must supply the correct path to the configuration file. You must also supply the--reloador--initialoption so that the management server reads the new configuration from the file rather than its configuration cache. If your shell's current directory is also the same as the directory where the management server binary is located, then you can invoke the management server as shown here:shell>
ndb_mgmd -f config.ini --reload2008-12-08 17:29:23 [MgmSrvr] INFO -- NDB Cluster Management Server. 8.0.21-ndb-8.0.21 2008-12-08 17:29:23 [MgmSrvr] INFO -- Reading cluster configuration from 'config.ini'
If you check the output of
SHOW in the management
client after restarting the ndb_mgm process,
you should now see something like this:
-- NDB Cluster -- Management Client --
ndb_mgm> SHOW
Connected to Management Server at: 198.51.100.10:1186
Cluster Configuration
---------------------
[ndbd(NDB)] 2 node(s)
id=1 @198.51.100.1 (8.0.21-ndb-8.0.21, Nodegroup: 0, *)
id=2 @198.51.100.2 (8.0.21-ndb-8.0.21, Nodegroup: 0)
id=3 (not connected, accepting connect from 198.51.100.3)
id=4 (not connected, accepting connect from 198.51.100.4)
[ndb_mgmd(MGM)] 1 node(s)
id=10 @198.51.100.10 (8.0.21-ndb-8.0.21)
[mysqld(API)] 2 node(s)
id=20 @198.51.100.20 (8.0.21-ndb-8.0.21)
id=21 @198.51.100.21 (8.0.21-ndb-8.0.21)
Step 3: Perform a rolling restart of the existing data nodes.
This step can be accomplished entirely within the cluster
management client using the
RESTART command, as shown
here:
ndb_mgm>1 RESTARTNode 1: Node shutdown initiated Node 1: Node shutdown completed, restarting, no start. Node 1 is being restarted ndb_mgm> Node 1: Start initiated (version 8.0.21) Node 1: Started (version 8.0.21) ndb_mgm>2 RESTARTNode 2: Node shutdown initiated Node 2: Node shutdown completed, restarting, no start. Node 2 is being restarted ndb_mgm> Node 2: Start initiated (version 8.0.21) ndb_mgm> Node 2: Started (version 8.0.21)
After issuing each X
RESTARTNode before proceeding
any further.
X: Started
(version ...)
You can verify that all existing data nodes were restarted using
the updated configuration by checking the
ndbinfo.nodes table in the
mysql client.
Step 4: Perform a rolling restart of all cluster API nodes.
Shut down and restart each MySQL server acting as an SQL node
in the cluster using mysqladmin shutdown
followed by mysqld_safe (or another startup
script). This should be similar to what is shown here, where
password is the MySQL
root password for a given MySQL server
instance:
shell>mysqladmin -uroot -p081208 20:19:56 mysqld_safe mysqld from pid file /usr/local/mysql/var/tonfisk.pid ended shell>passwordshutdownmysqld_safe --ndbcluster --ndb-connectstring=198.51.100.10 &081208 20:20:06 mysqld_safe Logging to '/usr/local/mysql/var/tonfisk.err'. 081208 20:20:06 mysqld_safe Starting mysqld daemon with databases from /usr/local/mysql/var
Of course, the exact input and output depend on how and where
MySQL is installed on the system, as well as which options you
choose to start it (and whether or not some or all of these
options are specified in a my.cnf file).
Step 5: Perform an initial start of the new data nodes.
From a system shell on each of the hosts for the new data
nodes, start the data nodes as shown here, using the
--initial option:
shell> ndbd -c 198.51.100.10 --initial
Unlike the case with restarting the existing data nodes, you can start the new data nodes concurrently; you do not need to wait for one to finish starting before starting the other.
Wait until both of the new data nodes have started
before proceeding with the next step. Once the new
data nodes have started, you can see in the output of the
management client SHOW
command that they do not yet belong to any node group (as
indicated with bold type here):
ndb_mgm> SHOW
Connected to Management Server at: 198.51.100.10:1186
Cluster Configuration
---------------------
[ndbd(NDB)] 2 node(s)
id=1 @198.51.100.1 (8.0.21-ndb-8.0.21, Nodegroup: 0, *)
id=2 @198.51.100.2 (8.0.21-ndb-8.0.21, Nodegroup: 0)
id=3 @198.51.100.3 (8.0.21-ndb-8.0.21, no nodegroup)
id=4 @198.51.100.4 (8.0.21-ndb-8.0.21, no nodegroup)
[ndb_mgmd(MGM)] 1 node(s)
id=10 @198.51.100.10 (8.0.21-ndb-8.0.21)
[mysqld(API)] 2 node(s)
id=20 @198.51.100.20 (8.0.21-ndb-8.0.21)
id=21 @198.51.100.21 (8.0.21-ndb-8.0.21)
Step 6: Create a new node group.
You can do this by issuing a CREATE
NODEGROUP command in the cluster management client.
This command takes as its argument a comma-separated list of
the node IDs of the data nodes to be included in the new node
group, as shown here:
ndb_mgm> CREATE NODEGROUP 3,4
Nodegroup 1 created
By issuing SHOW again, you
can verify that data nodes 3 and 4 have joined the new node
group (again indicated in bold type):
ndb_mgm> SHOW
Connected to Management Server at: 198.51.100.10:1186
Cluster Configuration
---------------------
[ndbd(NDB)] 2 node(s)
id=1 @198.51.100.1 (8.0.21-ndb-8.0.21, Nodegroup: 0, *)
id=2 @198.51.100.2 (8.0.21-ndb-8.0.21, Nodegroup: 0)
id=3 @198.51.100.3 (8.0.21-ndb-8.0.21, Nodegroup: 1)
id=4 @198.51.100.4 (8.0.21-ndb-8.0.21, Nodegroup: 1)
[ndb_mgmd(MGM)] 1 node(s)
id=10 @198.51.100.10 (8.0.21-ndb-8.0.21)
[mysqld(API)] 2 node(s)
id=20 @198.51.100.20 (8.0.21-ndb-8.0.21)
id=21 @198.51.100.21 (8.0.21-ndb-8.0.21)
Step 7: Redistribute cluster data.
When a node group is created, existing data and indexes are
not automatically distributed to the new node group's
data nodes, as you can see by issuing the appropriate
REPORT command in the
management client:
ndb_mgm> ALL REPORT MEMORY
Node 1: Data usage is 5%(177 32K pages of total 3200)
Node 1: Index usage is 0%(108 8K pages of total 12832)
Node 2: Data usage is 5%(177 32K pages of total 3200)
Node 2: Index usage is 0%(108 8K pages of total 12832)
Node 3: Data usage is 0%(0 32K pages of total 3200)
Node 3: Index usage is 0%(0 8K pages of total 12832)
Node 4: Data usage is 0%(0 32K pages of total 3200)
Node 4: Index usage is 0%(0 8K pages of total 12832)
By using ndb_desc with the
-p option, which causes the output to include
partitioning information, you can see that the table still uses
only 2 partitions (in the Per partition info
section of the output, shown here in bold text):
shell> ndb_desc -c 198.51.100.10 -d n ips -p
-- ips --
Version: 1
Fragment type: 9
K Value: 6
Min load factor: 78
Max load factor: 80
Temporary table: no
Number of attributes: 6
Number of primary keys: 1
Length of frm data: 340
Row Checksum: 1
Row GCI: 1
SingleUserMode: 0
ForceVarPart: 1
FragmentCount: 2
TableStatus: Retrieved
-- Attributes --
id Bigint PRIMARY KEY DISTRIBUTION KEY AT=FIXED ST=MEMORY AUTO_INCR
country_code Char(2;latin1_swedish_ci) NOT NULL AT=FIXED ST=MEMORY
type Char(4;latin1_swedish_ci) NOT NULL AT=FIXED ST=MEMORY
ip_address Varchar(15;latin1_swedish_ci) NOT NULL AT=SHORT_VAR ST=MEMORY
addresses Bigunsigned NULL AT=FIXED ST=MEMORY
date Bigunsigned NULL AT=FIXED ST=MEMORY
-- Indexes --
PRIMARY KEY(id) - UniqueHashIndex
PRIMARY(id) - OrderedIndex
-- Per partition info --
Partition Row count Commit count Frag fixed memory Frag varsized memory
0 26086 26086 1572864 557056
1 26329 26329 1605632 557056
NDBT_ProgramExit: 0 - OK
You can cause the data to be redistributed among all of the data
nodes by performing, for each NDB
table, an ALTER
TABLE ... ALGORITHM=INPLACE, REORGANIZE PARTITION
statement in the mysql client.
ALTER TABLE ... ALGORITHM=INPLACE, REORGANIZE
PARTITION does not work on tables that were created
with the MAX_ROWS option. Instead, use
ALTER TABLE ... ALGORITHM=INPLACE,
MAX_ROWS=... to reorganize such tables.
Keep in mind that using MAX_ROWS to set the
number of partitions per table is deprecated, and you should
use PARTITION_BALANCE instead; see
Section 13.1.20.10, “Setting NDB_TABLE Options”, for
more information.
After issuing the statement ALTER TABLE ips
ALGORITHM=INPLACE, REORGANIZE PARTITION, you can see
using ndb_desc that the data for this table
is now stored using 4 partitions, as shown here (with the
relevant portions of the output in bold type):
shell> ndb_desc -c 198.51.100.10 -d n ips -p
-- ips --
Version: 16777217
Fragment type: 9
K Value: 6
Min load factor: 78
Max load factor: 80
Temporary table: no
Number of attributes: 6
Number of primary keys: 1
Length of frm data: 341
Row Checksum: 1
Row GCI: 1
SingleUserMode: 0
ForceVarPart: 1
FragmentCount: 4
TableStatus: Retrieved
-- Attributes --
id Bigint PRIMARY KEY DISTRIBUTION KEY AT=FIXED ST=MEMORY AUTO_INCR
country_code Char(2;latin1_swedish_ci) NOT NULL AT=FIXED ST=MEMORY
type Char(4;latin1_swedish_ci) NOT NULL AT=FIXED ST=MEMORY
ip_address Varchar(15;latin1_swedish_ci) NOT NULL AT=SHORT_VAR ST=MEMORY
addresses Bigunsigned NULL AT=FIXED ST=MEMORY
date Bigunsigned NULL AT=FIXED ST=MEMORY
-- Indexes --
PRIMARY KEY(id) - UniqueHashIndex
PRIMARY(id) - OrderedIndex
-- Per partition info --
Partition Row count Commit count Frag fixed memory Frag varsized memory
0 12981 52296 1572864 557056
1 13236 52515 1605632 557056
2 13105 13105 819200 294912
3 13093 13093 819200 294912
NDBT_ProgramExit: 0 - OK
Normally, ALTER
TABLE is used
with a list of partition identifiers and a set of partition
definitions to create a new partitioning scheme for a table
that has already been explicitly partitioned. Its use here to
redistribute data onto a new NDB Cluster node group is an
exception in this regard; when used in this way, no other
keywords or identifiers follow table_name
[ALGORITHM=INPLACE,] REORGANIZE PARTITIONREORGANIZE
PARTITION.
For more information, see Section 13.1.9, “ALTER TABLE Statement”.
In addition, for each table, the
ALTER
TABLE statement should be followed by an
OPTIMIZE TABLE to reclaim wasted
space. You can obtain a list of all
NDBCLUSTER tables using the
following query against the
INFORMATION_SCHEMA.TABLES table:
SELECT TABLE_SCHEMA, TABLE_NAME
FROM INFORMATION_SCHEMA.TABLES
WHERE ENGINE = 'NDBCLUSTER';
The INFORMATION_SCHEMA.TABLES.ENGINE value
for an NDB Cluster table is always
NDBCLUSTER, regardless of whether
the CREATE TABLE statement used to create
the table (or ALTER TABLE
statement used to convert an existing table from a different
storage engine) used NDB or
NDBCLUSTER in its
ENGINE option.
You can see after performing these statements in the output of
ALL REPORT MEMORY that the
data and indexes are now redistributed between all cluster data
nodes, as shown here:
ndb_mgm> ALL REPORT MEMORY
Node 1: Data usage is 5%(176 32K pages of total 3200)
Node 1: Index usage is 0%(76 8K pages of total 12832)
Node 2: Data usage is 5%(176 32K pages of total 3200)
Node 2: Index usage is 0%(76 8K pages of total 12832)
Node 3: Data usage is 2%(80 32K pages of total 3200)
Node 3: Index usage is 0%(51 8K pages of total 12832)
Node 4: Data usage is 2%(80 32K pages of total 3200)
Node 4: Index usage is 0%(50 8K pages of total 12832)
Since only one DDL operation on
NDBCLUSTER tables can be executed
at a time, you must wait for each
ALTER TABLE ...
REORGANIZE PARTITION statement to finish before
issuing the next one.
It is not necessary to issue
ALTER TABLE ...
REORGANIZE PARTITION statements for
NDBCLUSTER tables created
after the new data nodes have been added;
data added to such tables is distributed among all data nodes
automatically. However, in
NDBCLUSTER tables that existed
prior to the addition of the new nodes,
neither existing nor new data is distributed using the new nodes
until these tables have been reorganized using
ALTER TABLE ...
REORGANIZE PARTITION.
Alternative procedure, without rolling restart. It is possible to avoid the need for a rolling restart by configuring the extra data nodes, but not starting them, when first starting the cluster. We assume, as before, that you wish to start with two data nodes—nodes 1 and 2—in one node group and later to expand the cluster to four data nodes, by adding a second node group consisting of nodes 3 and 4:
[ndbd default] DataMemory = 100M IndexMemory = 100M NoOfReplicas = 2 DataDir = /usr/local/mysql/var/mysql-cluster [ndbd] Id = 1 HostName = 198.51.100.1 [ndbd] Id = 2 HostName = 198.51.100.2 [ndbd] Id = 3 HostName = 198.51.100.3 Nodegroup = 65536 [ndbd] Id = 4 HostName = 198.51.100.4 Nodegroup = 65536 [mgm] HostName = 198.51.100.10 Id = 10 [api] Id=20 HostName = 198.51.100.20 [api] Id=21 HostName = 198.51.100.21
The data nodes to be brought online at a later time (nodes 3 and
4) can be configured with
NodeGroup = 65536, in
which case nodes 1 and 2 can each be started as shown here:
shell> ndbd -c 198.51.100.10 --initial
The data nodes configured with
NodeGroup = 65536 are
treated by the management server as though you had started nodes
1 and 2 using --nowait-nodes=3,4
after waiting for a period of time determined by the setting for
the
StartNoNodeGroupTimeout
data node configuration parameter. By default, this is 15
seconds (15000 milliseconds).
StartNoNodegroupTimeout
must be the same for all data nodes in the cluster; for this
reason, you should always set it in the [ndbd
default] section of the
config.ini file, rather than for
individual data nodes.
When you are ready to add the second node group, you need only perform the following additional steps:
Start data nodes 3 and 4, invoking the data node process once for each new node:
shell>
ndbd -c 198.51.100.10 --initialIssue the appropriate
CREATE NODEGROUPcommand in the management client:ndb_mgm>
CREATE NODEGROUP 3,4In the mysql client, issue
ALTER TABLE ... REORGANIZE PARTITIONandOPTIMIZE TABLEstatements for each existingNDBCLUSTERtable. (As noted elsewhere in this section, existing NDB Cluster tables cannot use the new nodes for data distribution until this has been done.)
The next few sections describe how to prepare for and then to create an NDB Cluster backup using the functionality for this purpose found in the ndb_mgm management client. To distinguish this type of backup from a backup made using mysqldump, we sometimes refer to it as a “native” NDB Cluster backup. (For information about the creation of backups with mysqldump, see Section 4.5.4, “mysqldump — A Database Backup Program”.) Restoration of NDB Cluster backups is done using the ndb_restore utility provided with the NDB Cluster distribution; for information about ndb_restore and its use in restoring NDB Cluster backups, see Section 22.4.23, “ndb_restore — Restore an NDB Cluster Backup”.
Starting with NDB 8.0.16, it is possible to create backups using multiple LDMs to achieve parallelism on the data nodes. See Section 22.5.8.5, “Taking an NDB Backup with Parallel Data Nodes”.
A backup is a snapshot of the database at a given time. The backup consists of three main parts:
Metadata. The names and definitions of all database tables
Table records. The data actually stored in the database tables at the time that the backup was made
Transaction log. A sequential record telling how and when data was stored in the database
Each of these parts is saved on all nodes participating in the backup. During backup, each node saves these three parts into three files on disk:
BACKUP-backup_id.node_id.ctlA control file containing control information and metadata. Each node saves the same table definitions (for all tables in the cluster) to its own version of this file.
BACKUP-backup_id-0.node_id.dataA data file containing the table records, which are saved on a per-fragment basis. That is, different nodes save different fragments during the backup. The file saved by each node starts with a header that states the tables to which the records belong. Following the list of records there is a footer containing a checksum for all records.
BACKUP-backup_id.node_id.logA log file containing records of committed transactions. Only transactions on tables stored in the backup are stored in the log. Nodes involved in the backup save different records because different nodes host different database fragments.
In the listing just shown, backup_id
stands for the backup identifier and
node_id is the unique identifier for
the node creating the file.
The location of the backup files is determined by the
BackupDataDir parameter.
Before starting a backup, make sure that the cluster is properly configured for performing one. (See Section 22.5.8.3, “Configuration for NDB Cluster Backups”.)
The START BACKUP command is used to create a
backup:
START BACKUP [backup_id] [wait_option] [snapshot_option]wait_option: WAIT {STARTED | COMPLETED} | NOWAITsnapshot_option: SNAPSHOTSTART | SNAPSHOTEND
Successive backups are automatically identified sequentially, so
the backup_id, an integer greater
than or equal to 1, is optional; if it is omitted, the next
available value is used. If an existing
backup_id value is used, the backup
fails with the error Backup failed: file already
exists. If used, the
backup_id must follow START
BACKUP immediately, before any other options are used.
The wait_option can be used to
determine when control is returned to the management client
after a START BACKUP command is issued, as
shown in the following list:
If
NOWAITis specified, the management client displays a prompt immediately, as seen here:ndb_mgm>
START BACKUP NOWAITndb_mgm>In this case, the management client can be used even while it prints progress information from the backup process.
With
WAIT STARTEDthe management client waits until the backup has started before returning control to the user, as shown here:ndb_mgm>
START BACKUP WAIT STARTEDWaiting for started, this may take several minutes Node 2: Backup 3 started from node 1 ndb_mgm>WAIT COMPLETEDcauses the management client to wait until the backup process is complete before returning control to the user.
WAIT COMPLETED is the default.
A snapshot_option can be used to
determine whether the backup matches the state of the cluster
when START BACKUP was issued, or when it was
completed. SNAPSHOTSTART causes the backup to
match the state of the cluster when the backup began;
SNAPSHOTEND causes the backup to reflect the
state of the cluster when the backup was finished.
SNAPSHOTEND is the default, and matches the
behavior found in previous NDB Cluster releases.
If you use the SNAPSHOTSTART option with
START BACKUP, and the
CompressedBackup
parameter is enabled, only the data and control files are
compressed—the log file is not compressed.
If both a wait_option and a
snapshot_option are used, they may be
specified in either order. For example, all of the following
commands are valid, assuming that there is no existing backup
having 4 as its ID:
START BACKUP WAIT STARTED SNAPSHOTSTART START BACKUP SNAPSHOTSTART WAIT STARTED START BACKUP 4 WAIT COMPLETED SNAPSHOTSTART START BACKUP SNAPSHOTEND WAIT COMPLETED START BACKUP 4 NOWAIT SNAPSHOTSTART
The procedure for creating a backup consists of the following steps:
Start the management client (ndb_mgm), if it not running already.
Execute the
START BACKUPcommand. This produces several lines of output indicating the progress of the backup, as shown here:ndb_mgm>
START BACKUPWaiting for completed, this may take several minutes Node 2: Backup 1 started from node 1 Node 2: Backup 1 started from node 1 completed StartGCP: 177 StopGCP: 180 #Records: 7362 #LogRecords: 0 Data: 453648 bytes Log: 0 bytes ndb_mgm>When the backup has started the management client displays this message:
Backup
backup_idstarted from nodenode_idbackup_idis the unique identifier for this particular backup. This identifier is saved in the cluster log, if it has not been configured otherwise.node_idis the identifier of the management server that is coordinating the backup with the data nodes. At this point in the backup process the cluster has received and processed the backup request. It does not mean that the backup has finished. An example of this statement is shown here:Node 2: Backup 1 started from node 1
The management client indicates with a message like this one that the backup has started:
Backup
backup_idstarted from nodenode_idcompletedAs is the case for the notification that the backup has started,
backup_idis the unique identifier for this particular backup, andnode_idis the node ID of the management server that is coordinating the backup with the data nodes. This output is accompanied by additional information including relevant global checkpoints, the number of records backed up, and the size of the data, as shown here:Node 2: Backup 1 started from node 1 completed StartGCP: 177 StopGCP: 180 #Records: 7362 #LogRecords: 0 Data: 453648 bytes Log: 0 bytes
It is also possible to perform a backup from the system shell by
invoking ndb_mgm with the -e
or --execute option, as shown in
this example:
shell> ndb_mgm -e "START BACKUP 6 WAIT COMPLETED SNAPSHOTSTART"
When using START BACKUP in this way, you must
specify the backup ID.
Cluster backups are created by default in the
BACKUP subdirectory of the
DataDir on each data
node. This can be overridden for one or more data nodes
individually, or for all cluster data nodes in the
config.ini file using the
BackupDataDir
configuration parameter. The backup files created for a backup
with a given backup_id are stored in
a subdirectory named
BACKUP-
in the backup directory.
backup_id
Cancelling backups. To cancel or abort a backup that is already in progress, perform the following steps:
Start the management client.
Execute this command:
ndb_mgm>
ABORT BACKUPbackup_idThe number
backup_idis the identifier of the backup that was included in the response of the management client when the backup was started (in the messageBackup).backup_idstarted from nodemanagement_node_idThe management client will acknowledge the abort request with
Abort of backup.backup_idorderedNoteAt this point, the management client has not yet received a response from the cluster data nodes to this request, and the backup has not yet actually been aborted.
After the backup has been aborted, the management client will report this fact in a manner similar to what is shown here:
Node 1: Backup 3 started from 5 has been aborted. Error: 1321 - Backup aborted by user request: Permanent error: User defined error Node 3: Backup 3 started from 5 has been aborted. Error: 1323 - 1323: Permanent error: Internal error Node 2: Backup 3 started from 5 has been aborted. Error: 1323 - 1323: Permanent error: Internal error Node 4: Backup 3 started from 5 has been aborted. Error: 1323 - 1323: Permanent error: Internal error
In this example, we have shown sample output for a cluster with 4 data nodes, where the sequence number of the backup to be aborted is
3, and the management node to which the cluster management client is connected has the node ID5. The first node to complete its part in aborting the backup reports that the reason for the abort was due to a request by the user. (The remaining nodes report that the backup was aborted due to an unspecified internal error.)NoteThere is no guarantee that the cluster nodes respond to an
ABORT BACKUPcommand in any particular order.The
Backupmessages mean that the backup has been terminated and that all files relating to this backup have been removed from the cluster file system.backup_idstarted from nodemanagement_node_idhas been aborted
It is also possible to abort a backup in progress from a system shell using this command:
shell> ndb_mgm -e "ABORT BACKUP backup_id"
If there is no backup having the ID
backup_id running when an
ABORT BACKUP is issued, the management
client makes no response, nor is it indicated in the cluster
log that an invalid abort command was sent.
Five configuration parameters are essential for backup:
The amount of memory used to buffer data before it is written to disk.
The amount of memory used to buffer log records before these are written to disk.
The total memory allocated in a data node for backups. This should be the sum of the memory allocated for the backup data buffer and the backup log buffer.
The default size of blocks written to disk. This applies for both the backup data buffer and the backup log buffer.
The maximum size of blocks written to disk. This applies for both the backup data buffer and the backup log buffer.
More detailed information about these parameters can be found in Backup Parameters.
You can also set a location for the backup files using the
BackupDataDir
configuration parameter. The default is
FileSystemPath/BACKUP/BACKUP-.
backup_id
If an error code is returned when issuing a backup request, the most likely cause is insufficient memory or disk space. You should check that there is enough memory allocated for the backup.
If you have set
BackupDataBufferSize
and
BackupLogBufferSize
and their sum is greater than 4MB, then you must also set
BackupMemory as well.
You should also make sure that there is sufficient space on the hard drive partition of the backup target.
NDB does not support repeatable
reads, which can cause problems with the restoration process.
Although the backup process is “hot”, restoring an
NDB Cluster from backup is not a 100% “hot”
process. This is due to the fact that, for the duration of the
restore process, running transactions get nonrepeatable reads
from the restored data. This means that the state of the data is
inconsistent while the restore is in progress.
Beginning with NDB 8.0.16, it is possible to take a backup with
multiple local data managers (LDMs) acting in parallel on the
data nodes. For this to work, all data nodes in the cluster must
use multiple LDMs, and each data node must use the same number
of LDMs. This means that all data nodes must run
ndbmtd (ndbd is
single-threaded and thus always has only one LDM) and they must
be configured to use multiple LDMs before taking the backup;
ndbmtd by default runs in single-threaded mode. You can cause
them to use multiple LDMs this by choosing an appropriate
setting for one of the multi-threaded data node configuration
parameters
MaxNoOfExecutionThreads
or ThreadConfig. Keep
in mind that changing these parameters requires a restart of the
cluster; this can be a rolling restart.
Depending on the number of LDMs and other factors, you may also
need to increase
NoOfFragmentLogParts.
If you are using large Disk Data tables, you may also need to
increase
DiskPageBufferMemory. As
with single-threaded backups, you also want or need to make
adjustments to settings for
BackupDataBufferSize,
BackupMemory, and other
configuration parameters relating to backups (see
Backup parameters).
Once all data nodes are using multiple LDMs, you can take the
parallel backup using the START
BACKUP command in the NDB management client just as
you would if the data nodes were running ndbd
(or ndbmtd in single-threaded mode); no
additional or special syntax is required, and you can specify a
backup ID, wait option, or snapshot option in any combination as
needed or desired.
Backups using multiple LDMs create subdirectories, one per LDM,
under the directory
BACKUP/BACKUP-
(which in turn resides under the
backup_id/BackupDataDir) on each
data node; these subdirectories are named
BACKUP-,
backup_id-PART-1-OF-N/BACKUP-,
and so on, up to
backup_id-PART-2-OF-N/BACKUP-,
where backup_id-PART-N-OF-N/backup_id is the backup ID used
for this backup and N is the number
of LDMs per data node. Each of these subdirectories contains the
usual backup files
BACKUP-,
backup_id-0.node_id.DataBACKUP-,
and backup_id.node_id.ctlBACKUP-backup_id.node_id.log, where
node_id is the node ID of this data
node.
In NDB 8.0.16 and later, ndb_restore automatically checks for the presence of the subdirectories just described; if it finds them, it attempts to restore the backup in parallel. For information about restoring backups taken with multiple LDMs, see Section 22.4.23.2, “Restoring from a backup taken in parallel”.
mysqld is the traditional MySQL server process.
To be used with NDB Cluster, mysqld needs to be
built with support for the NDB
storage engine, as it is in the precompiled binaries available
from https://dev.mysql.com/downloads/. If you build MySQL from
source, you must invoke CMake with the
-DWITH_NDBCLUSTER=1 option to
include support for NDB.
For more information about compiling NDB Cluster from source, see Section 22.2.2.4, “Building NDB Cluster from Source on Linux”, and Section 22.2.3.2, “Compiling and Installing NDB Cluster from Source on Windows”.
(For information about mysqld options and variables, in addition to those discussed in this section, which are relevant to NDB Cluster, see Section 22.3.3.9, “MySQL Server Options and Variables for NDB Cluster”.)
If the mysqld binary has been built with
Cluster support, the NDBCLUSTER
storage engine is still disabled by default. You can use either of
two possible options to enable this engine:
Use
--ndbclusteras a startup option on the command line when starting mysqld.Insert a line containing
ndbclusterin the[mysqld]section of yourmy.cnffile.
An easy way to verify that your server is running with the
NDBCLUSTER storage engine enabled is
to issue the SHOW ENGINES statement
in the MySQL Monitor (mysql). You should see
the value YES as the Support
value in the row for NDBCLUSTER. If
you see NO in this row or if there is no such
row displayed in the output, you are not running an
NDB-enabled version of MySQL. If you
see DISABLED in this row, you need to enable it
in either one of the two ways just described.
To read cluster configuration data, the MySQL server requires at a minimum three pieces of information:
The MySQL server's own cluster node ID
The host name or IP address for the management server (MGM node)
The number of the TCP/IP port on which it can connect to the management server
Node IDs can be allocated dynamically, so it is not strictly necessary to specify them explicitly.
The mysqld parameter
ndb-connectstring is used to specify the
connection string either on the command line when starting
mysqld or in my.cnf. The
connection string contains the host name or IP address where the
management server can be found, as well as the TCP/IP port it
uses.
In the following example, ndb_mgmd.mysql.com is
the host where the management server resides, and the management
server listens for cluster messages on port 1186:
shell> mysqld --ndbcluster --ndb-connectstring=ndb_mgmd.mysql.com:1186
See Section 22.3.3.3, “NDB Cluster Connection Strings”, for more information on connection strings.
Given this information, the MySQL server will be a full participant in the cluster. (We often refer to a mysqld process running in this manner as an SQL node.) It will be fully aware of all cluster data nodes as well as their status, and will establish connections to all data nodes. In this case, it is able to use any data node as a transaction coordinator and to read and update node data.
You can see in the mysql client whether a MySQL
server is connected to the cluster using SHOW
PROCESSLIST. If the MySQL server is connected to the
cluster, and you have the PROCESS
privilege, then the first row of the output is as shown here:
mysql> SHOW PROCESSLIST \G
*************************** 1. row ***************************
Id: 1
User: system user
Host:
db:
Command: Daemon
Time: 1
State: Waiting for event from ndbcluster
Info: NULL
To participate in an NDB Cluster, the mysqld
process must be started with both the
options --ndbcluster and
--ndb-connectstring (or their
equivalents in my.cnf). If
mysqld is started with only the
--ndbcluster option, or if it is
unable to contact the cluster, it is not possible to work with
NDB tables, nor is it
possible to create any new tables regardless of storage
engine. The latter restriction is a safety measure
intended to prevent the creation of tables having the same names
as NDB tables while the SQL node is
not connected to the cluster. If you wish to create tables using
a different storage engine while the mysqld
process is not participating in an NDB Cluster, you must restart
the server without the
--ndbcluster option.
NDB Cluster supports storing nonindexed columns of
NDB tables on disk, rather than in
RAM. Column data and logging metadata are kept in data files and
undo log files, conceptualized as tablespaces and log file groups,
as described in the next section—see
Section 22.5.10.1, “NDB Cluster Disk Data Objects”.
NDB Cluster Disk Data performance can be influenced by a number of configuration parameters. For information about these parameters and their effects, see Disk Data Configuration Parameters, and Disk Data and GCP Stop errors.
Beginning with NDB 8.0.19, you should also set the
DiskDataUsingSameDisk data
node configuration parameter to false when
using separate disks for Disk Data files.
See also Disk Data file system parameters.
NDB 8.0.19 (and later) provides improved support when using Disk Data tables with solid-state drives, in particular those using NVMe. See the following documentation for more information:
NDB Cluster Disk Data storage is implemented using the following objects:
Tablespace: Acts as containers for other Disk Data objects. A tablespace contains one or more data files and one or more undo log file groups.
Data file: Stores column data. A data file is assigned directly to a tablespace.
Undo log file: Contains undo information required for rolling back transactions. Assigned to an undo log file group.
log file group: Contains one or more undo log files. Assigned to a tablespace.
Undo log files and data files are actual files in the file
system of each data node; by default they are placed in
ndb_ in
the node_id_fsDataDir specified in the NDB
Cluster config.ini file, and where
node_id is the data node's node
ID. It is possible to place these elsewhere by specifying either
an absolute or relative path as part of the filename when
creating the undo log or data file. Statements that create these
files are shown later in this section.
Undo log files are used only by Disk Data tables, and are not
needed or used by NDB tables that are stored
in memory only.
NDB Cluster tablespaces and log file groups are not implemented as files.
Although not all Disk Data objects are implemented as files,
they all share the same namespace. This means that
each Disk Data object must be uniquely
named (and not merely each Disk Data object of a given type).
For example, you cannot have a tablespace and a log file group
both named dd1.
Assuming that you have already set up an NDB Cluster with all nodes (including management and SQL nodes), the basic steps for creating an NDB Cluster table on disk are as follows:
Create a log file group, and assign one or more undo log files to it (an undo log file is also sometimes referred to as an undofile).
Create a tablespace; assign the log file group, as well as one or more data files, to the tablespace.
Create a Disk Data table that uses this tablespace for data storage.
Each of these tasks can be accomplished using SQL statements in the mysql client or other MySQL client application, as shown in the example that follows.
We create a log file group named
lg_1usingCREATE LOGFILE GROUP. This log file group is to be made up of two undo log files, which we nameundo_1.logandundo_2.log, whose initial sizes are 16 MB and 12 MB, respectively. (The default initial size for an undo log file is 128 MB.) Optionally, you can also specify a size for the log file group's undo buffer, or permit it to assume the default value of 8 MB. In this example, we set the UNDO buffer's size at 2 MB. A log file group must be created with an undo log file; so we addundo_1.logtolg_1in thisCREATE LOGFILE GROUPstatement:CREATE LOGFILE GROUP lg_1 ADD UNDOFILE 'undo_1.log' INITIAL_SIZE 16M UNDO_BUFFER_SIZE 2M ENGINE NDBCLUSTER;To add
undo_2.logto the log file group, use the followingALTER LOGFILE GROUPstatement:ALTER LOGFILE GROUP lg_1 ADD UNDOFILE 'undo_2.log' INITIAL_SIZE 12M ENGINE NDBCLUSTER;Some items of note:
The
.logfile extension used here is not required. We employ it merely to make the log files easily recognizable.Every
CREATE LOGFILE GROUPandALTER LOGFILE GROUPstatement must include anENGINEoption. The only permitted values for this option areNDBCLUSTERandNDB.ImportantThere can exist at most one log file group in the same NDB Cluster at any given time.
When you add an undo log file to a log file group using
ADD UNDOFILE ', a file with the namefilename'filenameis created in thendb_directory within thenode_id_fsDataDirof each data node in the cluster, wherenode_idis the node ID of the data node. Each undo log file is of the size specified in the SQL statement. For example, if an NDB Cluster has 4 data nodes, then theALTER LOGFILE GROUPstatement just shown creates 4 undo log files, 1 each on in the data directory of each of the 4 data nodes; each of these files is namedundo_2.logand each file is 12 MB in size.UNDO_BUFFER_SIZEis limited by the amount of system memory available.See Section 13.1.16, “CREATE LOGFILE GROUP Statement”, and Section 13.1.6, “ALTER LOGFILE GROUP Statement”, for more information about these statements.
Now we can create a tablespace—an abstract container for files used by Disk Data tables to store data. A tablespace is associated with a particular log file group; when creating a new tablespace, you must specify the log file group it uses for undo logging. You must also specify at least one data file; you can add more data files to the tablespace after the tablespace is created. It is also possible to drop data files from a tablespace (see example later in this section).
Assume that we wish to create a tablespace named
ts_1which useslg_1as its log file group. We want the tablespace to contain two data files, nameddata_1.datanddata_2.dat, whose initial sizes are 32 MB and 48 MB, respectively. (The default value forINITIAL_SIZEis 128 MB.) We can do this using two SQL statements, as shown here:CREATE TABLESPACE ts_1 ADD DATAFILE 'data_1.dat' USE LOGFILE GROUP lg_1 INITIAL_SIZE 32M ENGINE NDBCLUSTER; ALTER TABLESPACE ts_1 ADD DATAFILE 'data_2.dat' INITIAL_SIZE 48M;The
CREATE TABLESPACEstatement creates a tablespacets_1with the data filedata_1.dat, and associatests_1with log file grouplg_1. TheALTER TABLESPACEadds the second data file (data_2.dat).Some items of note:
As is the case with the
.logfile extension used in this example for undo log files, there is no special significance for the.datfile extension; it is used merely for easy recognition.When you add a data file to a tablespace using
ADD DATAFILE ', a file with the namefilename'filenameis created in thendb_directory within thenode_id_fsDataDirof each data node in the cluster, wherenode_idis the node ID of the data node. Each data file is of the size specified in the SQL statement. For example, if an NDB Cluster has 4 data nodes, then theALTER TABLESPACEstatement just shown creates 4 data files, 1 each in the data directory of each of the 4 data nodes; each of these files is nameddata_2.datand each file is 48 MB in size.NDBreserves 4% of each tablespace for use during data node restarts. This space is not available for storing data.CREATE TABLESPACEstatements must contain anENGINEclause; only tables using the same storage engine as the tablespace can be created in the tablespace. ForALTER TABLESPACE, anENGINEclause is accepted but is deprecated and subject to removal in a future release. ForNDBtablespaces, the only permitted values for this option areNDBCLUSTERandNDB.In NDB 8.0.20 and later, allocation of extents is performed in round-robin fashion among all data files used by a given tablespace.
For more information about the
CREATE TABLESPACEandALTER TABLESPACEstatements, see Section 13.1.21, “CREATE TABLESPACE Statement”, and Section 13.1.10, “ALTER TABLESPACE Statement”.
Now it is possible to create a table whose unindexed columns are stored on disk using files in tablespace
ts_1:CREATE TABLE dt_1 ( member_id INT UNSIGNED NOT NULL AUTO_INCREMENT PRIMARY KEY, last_name VARCHAR(50) NOT NULL, first_name VARCHAR(50) NOT NULL, dob DATE NOT NULL, joined DATE NOT NULL, INDEX(last_name, first_name) ) TABLESPACE ts_1 STORAGE DISK ENGINE NDBCLUSTER;TABLESPACE ts_1 STORAGE DISKtells theNDBstorage engine to use tablespacets_1for data storage on disk.Once table
ts_1has been created as shown, you can performINSERT,SELECT,UPDATE, andDELETEstatements on it just as you would with any other MySQL table.It is also possible to specify whether an individual column is stored on disk or in memory by using a
STORAGEclause as part of the column's definition in aCREATE TABLEorALTER TABLEstatement.STORAGE DISKcauses the column to be stored on disk, andSTORAGE MEMORYcauses in-memory storage to be used. See Section 13.1.20, “CREATE TABLE Statement”, for more information.
You can obtain information about the NDB disk
data files and undo log files just created by querying the
FILES table in the
INFORMATION_SCHEMA database, as shown here:
mysql>SELECTFILE_NAME AS File, FILE_TYPE AS Type,TABLESPACE_NAME AS Tablespace, TABLE_NAME AS Name,LOGFILE_GROUP_NAME AS 'File group',FREE_EXTENTS AS Free, TOTAL_EXTENTS AS TotalFROM INFORMATION_SCHEMA.FILESWHERE ENGINE='ndbcluster';+--------------+----------+------------+------+------------+------+---------+ | File | Type | Tablespace | Name | File group | Free | Total | +--------------+----------+------------+------+------------+------+---------+ | ./undo_1.log | UNDO LOG | lg_1 | NULL | lg_1 | 0 | 4194304 | | ./undo_2.log | UNDO LOG | lg_1 | NULL | lg_1 | 0 | 3145728 | | ./data_1.dat | DATAFILE | ts_1 | NULL | lg_1 | 32 | 32 | | ./data_2.dat | DATAFILE | ts_1 | NULL | lg_1 | 48 | 48 | +--------------+----------+------------+------+------------+------+---------+ 4 rows in set (0.00 sec)
For more information and examples, see Section 25.14, “The INFORMATION_SCHEMA FILES Table”.
Indexing of columns implicitly stored on disk.
For table dt_1 as defined in the example
just shown, only the dob and
joined columns are stored on disk. This is
because there are indexes on the id,
last_name, and
first_name columns, and so data belonging
to these columns is stored in RAM. Only nonindexed columns can
be held on disk; indexes and indexed column data continue to
be stored in memory. This tradeoff between the use of indexes
and conservation of RAM is something you must keep in mind as
you design Disk Data tables.
You cannot add an index to a column that has been explicitly
declared STORAGE DISK, without first changing
its storage type to MEMORY; any attempt to do
so fails with an error. A column which
implicitly uses disk storage can be
indexed; when this is done, the column's storage type is
changed to MEMORY automatically. By
“implicitly”, we mean a column whose storage type
is not declared, but which is which inherited from the parent
table. In the following CREATE TABLE statement (using the
tablespace ts_1 defined previously), columns
c2 and c3 use disk storage
implicitly:
mysql>CREATE TABLE ti (->c1 INT PRIMARY KEY,->c2 INT,->c3 INT,->c4 INT->)->STORAGE DISK->TABLESPACE ts_1->ENGINE NDBCLUSTER;Query OK, 0 rows affected (1.31 sec)
Because c2, c3, and
c4 are themselves not declared with
STORAGE DISK, it is possible to index them.
Here, we add indexes to c2 and
c3, using, respectively, CREATE
INDEX and ALTER TABLE:
mysql>CREATE INDEX i1 ON ti(c2);Query OK, 0 rows affected (2.72 sec) Records: 0 Duplicates: 0 Warnings: 0 mysql>ALTER TABLE ti ADD INDEX i2(c3);Query OK, 0 rows affected (0.92 sec) Records: 0 Duplicates: 0 Warnings: 0
SHOW CREATE TABLE confirms that
the indexes were added.
mysql> SHOW CREATE TABLE ti\G
*************************** 1. row ***************************
Table: ti
Create Table: CREATE TABLE `ti` (
`c1` int(11) NOT NULL,
`c2` int(11) DEFAULT NULL,
`c3` int(11) DEFAULT NULL,
`c4` int(11) DEFAULT NULL,
PRIMARY KEY (`c1`),
KEY `i1` (`c2`),
KEY `i2` (`c3`)
) /*!50100 TABLESPACE `ts_1` STORAGE DISK */ ENGINE=ndbcluster DEFAULT CHARSET=latin1
1 row in set (0.00 sec)
You can see using ndb_desc that the indexed columns (emphasized text) now use in-memory rather than on-disk storage:
shell> ./ndb_desc -d test t1
-- t1 --
Version: 33554433
Fragment type: HashMapPartition
K Value: 6
Min load factor: 78
Max load factor: 80
Temporary table: no
Number of attributes: 4
Number of primary keys: 1
Length of frm data: 317
Max Rows: 0
Row Checksum: 1
Row GCI: 1
SingleUserMode: 0
ForceVarPart: 1
PartitionCount: 4
FragmentCount: 4
PartitionBalance: FOR_RP_BY_LDM
ExtraRowGciBits: 0
ExtraRowAuthorBits: 0
TableStatus: Retrieved
Table options:
HashMap: DEFAULT-HASHMAP-3840-4
-- Attributes --
c1 Int PRIMARY KEY DISTRIBUTION KEY AT=FIXED ST=MEMORY
c2 Int NULL AT=FIXED ST=MEMORY
c3 Int NULL AT=FIXED ST=MEMORY
c4 Int NULL AT=FIXED ST=DISK
-- Indexes --
PRIMARY KEY(c1) - UniqueHashIndex
i2(c3) - OrderedIndex
PRIMARY(c1) - OrderedIndex
i1(c2) - OrderedIndex
NDBT_ProgramExit: 0 - OK
Performance note. The performance of a cluster using Disk Data storage is greatly improved if Disk Data files are kept on a separate physical disk from the data node file system. This must be done for each data node in the cluster to derive any noticeable benefit.
You can use absolute and relative file system paths with
ADD UNDOFILE and ADD
DATAFILE; relative paths are calculated with respect
to the data node's data directory.
A log file group, a tablespace, and any Disk Data tables using these must be created in a particular order. This is also true for dropping these objects, sibject to the following constraints:
A log file group cannot be dropped as long as any tablespaces use it.
A tablespace cannot be dropped as long as it contains any data files.
You cannot drop any data files from a tablespace as long as there remain any tables which are using the tablespace.
It is not possible to drop files created in association with a different tablespace other than the one with which the files were created.
For example, to drop all the objects created so far in this section, you can use the following statements:
mysql>DROP TABLE dt_1;mysql>ALTER TABLESPACE ts_1->DROP DATAFILE 'data_2.dat'->ENGINE NDBCLUSTER;mysql>ALTER TABLESPACE ts_1->DROP DATAFILE 'data_1.dat'->ENGINE NDBCLUSTER;mysql>DROP TABLESPACE ts_1->ENGINE NDBCLUSTER;mysql>DROP LOGFILE GROUP lg_1->ENGINE NDBCLUSTER;
These statements must be performed in the order shown, except
that the two ALTER TABLESPACE ... DROP
DATAFILE statements may be executed in either order.
The following items apply to Disk Data storage requirements:
Variable-length columns of Disk Data tables take up a fixed amount of space. For each row, this is equal to the space required to store the largest possible value for that column.
For general information about calculating these values, see Section 11.7, “Data Type Storage Requirements”.
You can obtain an estimate the amount of space available in data files and undo log files by querying the
INFORMATION_SCHEMA.FILEStable. For more information and examples, see Section 25.14, “The INFORMATION_SCHEMA FILES Table”.NoteThe
OPTIMIZE TABLEstatement does not have any effect on Disk Data tables.In a Disk Data table, the first 256 bytes of a
TEXTorBLOBcolumn are stored in memory; only the remainder is stored on disk.Each row in a Disk Data table uses 8 bytes in memory to point to the data stored on disk. This means that, in some cases, converting an in-memory column to the disk-based format can actually result in greater memory usage. For example, converting a
CHAR(4)column from memory-based to disk-based format increases the amount ofDataMemoryused per row from 4 to 8 bytes.
Starting the cluster with the --initial
option does not remove Disk Data files.
You must remove these manually prior to performing an initial
restart of the cluster.
Performance of Disk Data tables can be improved by minimizing
the number of disk seeks by making sure that
DiskPageBufferMemory is
of sufficient size. You can query the
diskpagebuffer table to help
determine whether the value for this parameter needs to be
increased.
MySQL NDB Cluster 8.0 supports online table schema changes using
the standard ALTER TABLE syntax
employed by the MySQL Server
(ALGORITHM=DEFAULT|INPLACE|COPY), and described
elsewhere.
Some older releases of NDB Cluster used a syntax specific to
NDB for online ALTER
TABLE operations. That syntax has since been removed.
Operations that add and drop indexes on variable-width columns of
NDB tables occur online. Online
operations are noncopying; that is, they do not require that
indexes be re-created. They do not lock the table being altered
from access by other API nodes in an NDB Cluster (but see
Limitations of NDB online operations, later in this
section). Such operations do not require single user mode for
NDB table alterations made in an NDB
cluster with multiple API nodes; transactions can continue
uninterrupted during online DDL operations.
ALGORITHM=INPLACE can be used to perform online
ADD COLUMN, ADD INDEX
(including CREATE INDEX statements), and
DROP INDEX operations on
NDB tables. Online renaming of
NDB tables is also supported.
Previously, columns of NDB tables could not be
renamed online; this limitation is removed in NDB 8.0.18.
Currently you cannot add disk-based columns to
NDB tables online. This means that,
if you wish to add an in-memory column to an
NDB table that uses a table-level
STORAGE DISK option, you must declare the new
column as using memory-based storage explicitly. For
example—assuming that you have already created tablespace
ts1—suppose that you create table
t1 as follows:
mysql>CREATE TABLE t1 (>c1 INT NOT NULL PRIMARY KEY,>c2 VARCHAR(30)>)>TABLESPACE ts1 STORAGE DISK>ENGINE NDB;Query OK, 0 rows affected (1.73 sec) Records: 0 Duplicates: 0 Warnings: 0
You can add a new in-memory column to this table online as shown here:
mysql>ALTER TABLE t1>ADD COLUMN c3 INT COLUMN_FORMAT DYNAMIC STORAGE MEMORY,>ALGORITHM=INPLACE;Query OK, 0 rows affected (1.25 sec) Records: 0 Duplicates: 0 Warnings: 0
This statement fails if the STORAGE MEMORY
option is omitted:
mysql>ALTER TABLE t1>ADD COLUMN c4 INT COLUMN_FORMAT DYNAMIC,>ALGORITHM=INPLACE;ERROR 1846 (0A000): ALGORITHM=INPLACE is not supported. Reason: Adding column(s) or add/reorganize partition not supported online. Try ALGORITHM=COPY.
If you omit the COLUMN_FORMAT DYNAMIC option,
the dynamic column format is employed automatically, but a warning
is issued, as shown here:
mysql>ALTER ONLINE TABLE t1 ADD COLUMN c4 INT STORAGE MEMORY;Query OK, 0 rows affected, 1 warning (1.17 sec) Records: 0 Duplicates: 0 Warnings: 0 mysql>SHOW WARNINGS\G*************************** 1. row *************************** Level: Warning Code: 1478 Message: DYNAMIC column c4 with STORAGE DISK is not supported, column will become FIXED mysql>SHOW CREATE TABLE t1\G*************************** 1. row *************************** Table: t1 Create Table: CREATE TABLE `t1` ( `c1` int(11) NOT NULL, `c2` varchar(30) DEFAULT NULL, `c3` int(11) /*!50606 STORAGE MEMORY */ /*!50606 COLUMN_FORMAT DYNAMIC */ DEFAULT NULL, `c4` int(11) /*!50606 STORAGE MEMORY */ DEFAULT NULL, PRIMARY KEY (`c1`) ) /*!50606 TABLESPACE ts_1 STORAGE DISK */ ENGINE=ndbcluster DEFAULT CHARSET=latin1 1 row in set (0.03 sec)
The STORAGE and
COLUMN_FORMAT keywords are supported only in
NDB Cluster; in any other version of MySQL, attempting to use
either of these keywords in a CREATE
TABLE or ALTER TABLE
statement results in an error.
It is also possible to use the statement ALTER TABLE ...
REORGANIZE PARTITION, ALGORITHM=INPLACE with no
partition_names INTO
(partition_definitions)NDB tables. This can be
used to redistribute NDB Cluster data among new data nodes that
have been added to the cluster online. This does
not perform any defragmentation, which
requires an OPTIMIZE TABLE or null
ALTER TABLE statement. For more
information, see Section 22.5.7, “Adding NDB Cluster Data Nodes Online”.
Limitations of NDB online operations
Online DROP COLUMN operations are not
supported.
Online ALTER TABLE,
CREATE INDEX, or
DROP INDEX statements that add
columns or add or drop indexes are subject to the following
limitations:
A given online
ALTER TABLEcan use only one ofADD COLUMN,ADD INDEX, orDROP INDEX. One or more columns can be added online in a single statement; only one index may be created or dropped online in a single statement.The table being altered is not locked with respect to API nodes other than the one on which an online
ALTER TABLEADD COLUMN,ADD INDEX, orDROP INDEXoperation (orCREATE INDEXorDROP INDEXstatement) is run. However, the table is locked against any other operations originating on the same API node while the online operation is being executed.The table to be altered must have an explicit primary key; the hidden primary key created by the
NDBstorage engine is not sufficient for this purpose.The storage engine used by the table cannot be changed online.
The tablespace used by the table cannot be changed online. Beginning with NDB 8.0.21, a statement such as
ALTER TABLEis specifically disallowed. (Bug #99269, Bug #31180526)ndb_table... ALGORITHM=INPLACE, TABLESPACE=new_tablespaceWhen used with NDB Cluster Disk Data tables, it is not possible to change the storage type (
DISKorMEMORY) of a column online. This means, that when you add or drop an index in such a way that the operation would be performed online, and you want the storage type of the column or columns to be changed, you must useALGORITHM=COPYin the statement that adds or drops the index.
Columns to be added online cannot use the
BLOB or
TEXT type, and must meet the
following criteria:
The columns must be dynamic; that is, it must be possible to create them using
COLUMN_FORMAT DYNAMIC. If you omit theCOLUMN_FORMAT DYNAMICoption, the dynamic column format is employed automatically.The columns must permit
NULLvalues and not have any explicit default value other thanNULL. Columns added online are automatically created asDEFAULT NULL, as can be seen here:mysql>
CREATE TABLE t2 (>c1 INT NOT NULL AUTO_INCREMENT PRIMARY KEY>) ENGINE=NDB;Query OK, 0 rows affected (1.44 sec) mysql>ALTER TABLE t2>ADD COLUMN c2 INT,>ADD COLUMN c3 INT,>ALGORITHM=INPLACE;Query OK, 0 rows affected, 2 warnings (0.93 sec) mysql>SHOW CREATE TABLE t1\G*************************** 1. row *************************** Table: t1 Create Table: CREATE TABLE `t2` ( `c1` int(11) NOT NULL AUTO_INCREMENT, `c2` int(11) DEFAULT NULL, `c3` int(11) DEFAULT NULL, PRIMARY KEY (`c1`) ) ENGINE=ndbcluster DEFAULT CHARSET=latin1 1 row in set (0.00 sec)The columns must be added following any existing columns. If you attempt to add a column online before any existing columns or using the
FIRSTkeyword, the statement fails with an error.Existing table columns cannot be reordered online.
For online ALTER TABLE operations
on NDB tables, fixed-format columns
are converted to dynamic when they are added online, or when
indexes are created or dropped online, as shown here (repeating
the CREATE TABLE and ALTER
TABLE statements just shown for the sake of clarity):
mysql>CREATE TABLE t2 (>c1 INT NOT NULL AUTO_INCREMENT PRIMARY KEY>) ENGINE=NDB;Query OK, 0 rows affected (1.44 sec) mysql>ALTER TABLE t2>ADD COLUMN c2 INT,>ADD COLUMN c3 INT,>ALGORITHM=INPLACE;Query OK, 0 rows affected, 2 warnings (0.93 sec) mysql>SHOW WARNINGS;*************************** 1. row *************************** Level: Warning Code: 1478 Message: Converted FIXED field 'c2' to DYNAMIC to enable online ADD COLUMN *************************** 2. row *************************** Level: Warning Code: 1478 Message: Converted FIXED field 'c3' to DYNAMIC to enable online ADD COLUMN 2 rows in set (0.00 sec)
Only the column or columns to be added online must be dynamic.
Existing columns need not be; this includes the table's
primary key, which may also be FIXED, as shown
here:
mysql>CREATE TABLE t3 (>c1 INT NOT NULL AUTO_INCREMENT PRIMARY KEY COLUMN_FORMAT FIXED>) ENGINE=NDB;Query OK, 0 rows affected (2.10 sec) mysql>ALTER TABLE t3 ADD COLUMN c2 INT, ALGORITHM=INPLACE;Query OK, 0 rows affected, 1 warning (0.78 sec) Records: 0 Duplicates: 0 Warnings: 0 mysql>SHOW WARNINGS;*************************** 1. row *************************** Level: Warning Code: 1478 Message: Converted FIXED field 'c2' to DYNAMIC to enable online ADD COLUMN 1 row in set (0.00 sec)
Columns are not converted from FIXED to
DYNAMIC column format by renaming operations.
For more information about COLUMN_FORMAT, see
Section 13.1.20, “CREATE TABLE Statement”.
The KEY, CONSTRAINT, and
IGNORE keywords are supported in
ALTER TABLE statements using
ALGORITHM=INPLACE.
Setting MAX_ROWS to 0 using an online
ALTER TABLE statement is disallowed. You must
use a copying ALTER TABLE to perform this
operation. (Bug #21960004)
NDB 8.0.18 introduces a new mechanism for sharing and
synchronizing users, roles, and privileges between SQL nodes
connected to an NDB Cluster. This can be enabled by granting the
NDB_STORED_USER privilege. See the
description of the privilege for usage information.
NDB_STORED_USER is printed in the output of
SHOW GRANTS as with any other
privilege. To verify that privileges are shared, use the
ndb_select_all utility supplied with the NDB
Cluster distribution, as shown here (some output wrapped to
preserve formatting):
shell> ndb_select_all -d mysql ndb_sql_metadata
type name seq note sql_ddl_text
11 "'jon'@'localhost'" 0 4 "CREATE USER 'jon'@'localhost'
IDENTIFIED WITH 'caching_sha2_password' AS
'$A$005${B];3!?tI\".EFy\ZA5K5DQHrWiBvuRNYTIMeO0YeBlPpZotFRPjVTYzTA5b0' REQUIRE
NONE PASSWORD EXPIRE DEFAULT ACCOUNT UNLOCK PASSWORD HISTORY DEFAULT PASSWORD
REUSE INTERVAL DEFAULT PASSWORD REQUIRE CURRENT DEFAULT"
12 "'jon'@'localhost'" 0 [NULL] "GRANT USAGE ON *.* TO `jon`@`localhost`"
12 "'jon'@'localhost'" 3 [NULL] "GRANT ALL PRIVILEGES ON `test`.* TO `jon`@`localhost`"
12 "'jon'@'localhost'" 2 [NULL] "GRANT ALL PRIVILEGES ON `mydb`.* TO `jon`@`localhost`"
12 "'jon'@'localhost'" 1 [NULL] "GRANT NDB_STORED_USER ON *.* TO `jon`@`localhost`"
5 rows returned
ndb_sql_metadata is a special
NDB table that is not visible using the
mysql or other MySQL client.
A statement granting the
NDB_STORED_USER privilege, such as
GRANT NDB_STORED_USER ON *.* TO
'cluster_app_user'@'localhost', works by directing
NDB to create a snapshot using the queries
SHOW CREATE USER cluster_app_user@localhost and
SHOW GRANTS FOR cluster_app_user@localhost,
then storing the results in ndb_sql_metadata.
Any other SQL nodes are then requested to read and apply the
snapshot. Whenever a MySQL server starts up and joins the cluster
as an SQL node it executes these stored
CREATE USER and
GRANT statements as part of the
cluster schema synchronization process.
Whenever an SQL statement is executed on an SQL node other than
the one where it originated, the statement is run in a utility
thread of the NDBCLUSTER storage engine; this
is done within a security environment equivalent to that of the
MySQL replication slave applier thread.
You should be aware that changes to users with
NDB_STORED_USER are distributed
asynchronously. Because distributed schema change operations are
performed synchronously, the next distributed schema change
following a change to any distributed user or users serves as a
synchronization point. Any pending user changes run to completion
before the schema change distribution can begin; after this the
schema change itself runs synchronously. For example, if a
DROP DATABASE statement follows a
DROP USER of a distributed user,
the drop of the database cannot take place until the drop of the
user has completed on all SQL nodes.
In the event that multiple GRANT,
REVOKE, or other user
administration statements from multiple SQL nodes cause privileges
for a given user to diverge on different SQL nodes, you can fix
this problem by issuing GRANT NDB_STORED_USER
for this user on an SQL node where the privileges are known to be
correct; this causes a new snapshot of the privileges to be taken
and synchronized to the other SQL nodes.
NDB Cluster 8.0 does not support distribution of MySQL users and
privileges across SQL nodes in an NDB Cluster by converting the
MySQL privilege tables to use the NDB storage
engine, as implemented in NDB 7.6 and earlier releases (see
Distributed Privileges Using Shared Grant Tables).
For information about the impact of this change on upgrades to NDB
8.0 from a previous release, see
Section 22.2.8, “Upgrading and Downgrading NDB Cluster”.
A number of types of statistical counters relating to actions
performed by or affecting Ndb
objects are available. Such actions include starting and closing
(or aborting) transactions; primary key and unique key operations;
table, range, and pruned scans; threads blocked while waiting for
the completion of various operations; and data and events sent and
received by NDBCLUSTER. The counters are
incremented inside the NDB kernel whenever NDB API calls are made
or data is sent to or received by the data nodes.
mysqld exposes these counters as system status
variables; their values can be read in the output of
SHOW STATUS, or by querying the
Performance Schema session_status or
global_status table. By comparing the
values before and after statements operating on
NDB tables, you can observe the
corresponding actions taken on the API level, and thus the cost of
performing the statement.
You can list all of these status variables using the following
SHOW STATUS statement:
mysql> SHOW STATUS LIKE 'ndb_api%';
+--------------------------------------------+----------+
| Variable_name | Value |
+--------------------------------------------+----------+
| Ndb_api_wait_exec_complete_count_session | 0 |
| Ndb_api_wait_scan_result_count_session | 0 |
| Ndb_api_wait_meta_request_count_session | 0 |
| Ndb_api_wait_nanos_count_session | 0 |
| Ndb_api_bytes_sent_count_session | 0 |
| Ndb_api_bytes_received_count_session | 0 |
| Ndb_api_trans_start_count_session | 0 |
| Ndb_api_trans_commit_count_session | 0 |
| Ndb_api_trans_abort_count_session | 0 |
| Ndb_api_trans_close_count_session | 0 |
| Ndb_api_pk_op_count_session | 0 |
| Ndb_api_uk_op_count_session | 0 |
| Ndb_api_table_scan_count_session | 0 |
| Ndb_api_range_scan_count_session | 0 |
| Ndb_api_pruned_scan_count_session | 0 |
| Ndb_api_scan_batch_count_session | 0 |
| Ndb_api_read_row_count_session | 0 |
| Ndb_api_trans_local_read_row_count_session | 0 |
| Ndb_api_event_data_count_injector | 0 |
| Ndb_api_event_nondata_count_injector | 0 |
| Ndb_api_event_bytes_count_injector | 0 |
| Ndb_api_wait_exec_complete_count_slave | 0 |
| Ndb_api_wait_scan_result_count_slave | 0 |
| Ndb_api_wait_meta_request_count_slave | 0 |
| Ndb_api_wait_nanos_count_slave | 0 |
| Ndb_api_bytes_sent_count_slave | 0 |
| Ndb_api_bytes_received_count_slave | 0 |
| Ndb_api_trans_start_count_slave | 0 |
| Ndb_api_trans_commit_count_slave | 0 |
| Ndb_api_trans_abort_count_slave | 0 |
| Ndb_api_trans_close_count_slave | 0 |
| Ndb_api_pk_op_count_slave | 0 |
| Ndb_api_uk_op_count_slave | 0 |
| Ndb_api_table_scan_count_slave | 0 |
| Ndb_api_range_scan_count_slave | 0 |
| Ndb_api_pruned_scan_count_slave | 0 |
| Ndb_api_scan_batch_count_slave | 0 |
| Ndb_api_read_row_count_slave | 0 |
| Ndb_api_trans_local_read_row_count_slave | 0 |
| Ndb_api_wait_exec_complete_count | 2 |
| Ndb_api_wait_scan_result_count | 3 |
| Ndb_api_wait_meta_request_count | 27 |
| Ndb_api_wait_nanos_count | 45612023 |
| Ndb_api_bytes_sent_count | 992 |
| Ndb_api_bytes_received_count | 9640 |
| Ndb_api_trans_start_count | 2 |
| Ndb_api_trans_commit_count | 1 |
| Ndb_api_trans_abort_count | 0 |
| Ndb_api_trans_close_count | 2 |
| Ndb_api_pk_op_count | 1 |
| Ndb_api_uk_op_count | 0 |
| Ndb_api_table_scan_count | 1 |
| Ndb_api_range_scan_count | 0 |
| Ndb_api_pruned_scan_count | 0 |
| Ndb_api_scan_batch_count | 0 |
| Ndb_api_read_row_count | 1 |
| Ndb_api_trans_local_read_row_count | 1 |
| Ndb_api_event_data_count | 0 |
| Ndb_api_event_nondata_count | 0 |
| Ndb_api_event_bytes_count | 0 |
+--------------------------------------------+----------+
60 rows in set (0.02 sec)
These status variables are also available from the Performance
Schema session_status and
global_status tables, as shown here:
mysql>SELECT * FROM performance_schema.session_status->WHERE VARIABLE_NAME LIKE 'ndb_api%';+--------------------------------------------+----------------+ | VARIABLE_NAME | VARIABLE_VALUE | +--------------------------------------------+----------------+ | NDB_API_WAIT_EXEC_COMPLETE_COUNT_SESSION | 2 | | NDB_API_WAIT_SCAN_RESULT_COUNT_SESSION | 0 | | NDB_API_WAIT_META_REQUEST_COUNT_SESSION | 1 | | NDB_API_WAIT_NANOS_COUNT_SESSION | 8144375 | | NDB_API_BYTES_SENT_COUNT_SESSION | 68 | | NDB_API_BYTES_RECEIVED_COUNT_SESSION | 84 | | NDB_API_TRANS_START_COUNT_SESSION | 1 | | NDB_API_TRANS_COMMIT_COUNT_SESSION | 1 | | NDB_API_TRANS_ABORT_COUNT_SESSION | 0 | | NDB_API_TRANS_CLOSE_COUNT_SESSION | 1 | | NDB_API_PK_OP_COUNT_SESSION | 1 | | NDB_API_UK_OP_COUNT_SESSION | 0 | | NDB_API_TABLE_SCAN_COUNT_SESSION | 0 | | NDB_API_RANGE_SCAN_COUNT_SESSION | 0 | | NDB_API_PRUNED_SCAN_COUNT_SESSION | 0 | | NDB_API_SCAN_BATCH_COUNT_SESSION | 0 | | NDB_API_READ_ROW_COUNT_SESSION | 1 | | NDB_API_TRANS_LOCAL_READ_ROW_COUNT_SESSION | 1 | | NDB_API_EVENT_DATA_COUNT_INJECTOR | 0 | | NDB_API_EVENT_NONDATA_COUNT_INJECTOR | 0 | | NDB_API_EVENT_BYTES_COUNT_INJECTOR | 0 | | NDB_API_WAIT_EXEC_COMPLETE_COUNT_SLAVE | 0 | | NDB_API_WAIT_SCAN_RESULT_COUNT_SLAVE | 0 | | NDB_API_WAIT_META_REQUEST_COUNT_SLAVE | 0 | | NDB_API_WAIT_NANOS_COUNT_SLAVE | 0 | | NDB_API_BYTES_SENT_COUNT_SLAVE | 0 | | NDB_API_BYTES_RECEIVED_COUNT_SLAVE | 0 | | NDB_API_TRANS_START_COUNT_SLAVE | 0 | | NDB_API_TRANS_COMMIT_COUNT_SLAVE | 0 | | NDB_API_TRANS_ABORT_COUNT_SLAVE | 0 | | NDB_API_TRANS_CLOSE_COUNT_SLAVE | 0 | | NDB_API_PK_OP_COUNT_SLAVE | 0 | | NDB_API_UK_OP_COUNT_SLAVE | 0 | | NDB_API_TABLE_SCAN_COUNT_SLAVE | 0 | | NDB_API_RANGE_SCAN_COUNT_SLAVE | 0 | | NDB_API_PRUNED_SCAN_COUNT_SLAVE | 0 | | NDB_API_SCAN_BATCH_COUNT_SLAVE | 0 | | NDB_API_READ_ROW_COUNT_SLAVE | 0 | | NDB_API_TRANS_LOCAL_READ_ROW_COUNT_SLAVE | 0 | | NDB_API_WAIT_EXEC_COMPLETE_COUNT | 4 | | NDB_API_WAIT_SCAN_RESULT_COUNT | 3 | | NDB_API_WAIT_META_REQUEST_COUNT | 28 | | NDB_API_WAIT_NANOS_COUNT | 53756398 | | NDB_API_BYTES_SENT_COUNT | 1060 | | NDB_API_BYTES_RECEIVED_COUNT | 9724 | | NDB_API_TRANS_START_COUNT | 3 | | NDB_API_TRANS_COMMIT_COUNT | 2 | | NDB_API_TRANS_ABORT_COUNT | 0 | | NDB_API_TRANS_CLOSE_COUNT | 3 | | NDB_API_PK_OP_COUNT | 2 | | NDB_API_UK_OP_COUNT | 0 | | NDB_API_TABLE_SCAN_COUNT | 1 | | NDB_API_RANGE_SCAN_COUNT | 0 | | NDB_API_PRUNED_SCAN_COUNT | 0 | | NDB_API_SCAN_BATCH_COUNT | 0 | | NDB_API_READ_ROW_COUNT | 2 | | NDB_API_TRANS_LOCAL_READ_ROW_COUNT | 2 | | NDB_API_EVENT_DATA_COUNT | 0 | | NDB_API_EVENT_NONDATA_COUNT | 0 | | NDB_API_EVENT_BYTES_COUNT | 0 | +--------------------------------------------+----------------+ 60 rows in set (0.00 sec) mysql>SELECT * FROM performance_schema.global_status->WHERE VARIABLE_NAME LIKE 'ndb_api%';+--------------------------------------------+----------------+ | VARIABLE_NAME | VARIABLE_VALUE | +--------------------------------------------+----------------+ | NDB_API_WAIT_EXEC_COMPLETE_COUNT_SESSION | 2 | | NDB_API_WAIT_SCAN_RESULT_COUNT_SESSION | 0 | | NDB_API_WAIT_META_REQUEST_COUNT_SESSION | 1 | | NDB_API_WAIT_NANOS_COUNT_SESSION | 8144375 | | NDB_API_BYTES_SENT_COUNT_SESSION | 68 | | NDB_API_BYTES_RECEIVED_COUNT_SESSION | 84 | | NDB_API_TRANS_START_COUNT_SESSION | 1 | | NDB_API_TRANS_COMMIT_COUNT_SESSION | 1 | | NDB_API_TRANS_ABORT_COUNT_SESSION | 0 | | NDB_API_TRANS_CLOSE_COUNT_SESSION | 1 | | NDB_API_PK_OP_COUNT_SESSION | 1 | | NDB_API_UK_OP_COUNT_SESSION | 0 | | NDB_API_TABLE_SCAN_COUNT_SESSION | 0 | | NDB_API_RANGE_SCAN_COUNT_SESSION | 0 | | NDB_API_PRUNED_SCAN_COUNT_SESSION | 0 | | NDB_API_SCAN_BATCH_COUNT_SESSION | 0 | | NDB_API_READ_ROW_COUNT_SESSION | 1 | | NDB_API_TRANS_LOCAL_READ_ROW_COUNT_SESSION | 1 | | NDB_API_EVENT_DATA_COUNT_INJECTOR | 0 | | NDB_API_EVENT_NONDATA_COUNT_INJECTOR | 0 | | NDB_API_EVENT_BYTES_COUNT_INJECTOR | 0 | | NDB_API_WAIT_EXEC_COMPLETE_COUNT_SLAVE | 0 | | NDB_API_WAIT_SCAN_RESULT_COUNT_SLAVE | 0 | | NDB_API_WAIT_META_REQUEST_COUNT_SLAVE | 0 | | NDB_API_WAIT_NANOS_COUNT_SLAVE | 0 | | NDB_API_BYTES_SENT_COUNT_SLAVE | 0 | | NDB_API_BYTES_RECEIVED_COUNT_SLAVE | 0 | | NDB_API_TRANS_START_COUNT_SLAVE | 0 | | NDB_API_TRANS_COMMIT_COUNT_SLAVE | 0 | | NDB_API_TRANS_ABORT_COUNT_SLAVE | 0 | | NDB_API_TRANS_CLOSE_COUNT_SLAVE | 0 | | NDB_API_PK_OP_COUNT_SLAVE | 0 | | NDB_API_UK_OP_COUNT_SLAVE | 0 | | NDB_API_TABLE_SCAN_COUNT_SLAVE | 0 | | NDB_API_RANGE_SCAN_COUNT_SLAVE | 0 | | NDB_API_PRUNED_SCAN_COUNT_SLAVE | 0 | | NDB_API_SCAN_BATCH_COUNT_SLAVE | 0 | | NDB_API_READ_ROW_COUNT_SLAVE | 0 | | NDB_API_TRANS_LOCAL_READ_ROW_COUNT_SLAVE | 0 | | NDB_API_WAIT_EXEC_COMPLETE_COUNT | 4 | | NDB_API_WAIT_SCAN_RESULT_COUNT | 3 | | NDB_API_WAIT_META_REQUEST_COUNT | 28 | | NDB_API_WAIT_NANOS_COUNT | 53756398 | | NDB_API_BYTES_SENT_COUNT | 1060 | | NDB_API_BYTES_RECEIVED_COUNT | 9724 | | NDB_API_TRANS_START_COUNT | 3 | | NDB_API_TRANS_COMMIT_COUNT | 2 | | NDB_API_TRANS_ABORT_COUNT | 0 | | NDB_API_TRANS_CLOSE_COUNT | 3 | | NDB_API_PK_OP_COUNT | 2 | | NDB_API_UK_OP_COUNT | 0 | | NDB_API_TABLE_SCAN_COUNT | 1 | | NDB_API_RANGE_SCAN_COUNT | 0 | | NDB_API_PRUNED_SCAN_COUNT | 0 | | NDB_API_SCAN_BATCH_COUNT | 0 | | NDB_API_READ_ROW_COUNT | 2 | | NDB_API_TRANS_LOCAL_READ_ROW_COUNT | 2 | | NDB_API_EVENT_DATA_COUNT | 0 | | NDB_API_EVENT_NONDATA_COUNT | 0 | | NDB_API_EVENT_BYTES_COUNT | 0 | +--------------------------------------------+----------------+ 60 rows in set (0.00 sec)
Each Ndb object has its own
counters. NDB API applications can read the values of the counters
for use in optimization or monitoring. For multithreaded clients
which use more than one Ndb
object concurrently, it is also possible to obtain a summed view
of counters from all Ndb objects
belonging to a given
Ndb_cluster_connection.
Four sets of these counters are exposed. One set applies to the
current session only; the other 3 are global. This is in
spite of the fact that their values can be obtained as either
session or global status variables in the mysql
client. This means that specifying the
SESSION or GLOBAL keyword
with SHOW STATUS has no effect on
the values reported for NDB API statistics status variables, and
the value for each of these variables is the same whether the
value is obtained from the equivalent column of the
session_status or the
global_status table.
Session counters (session specific)
Session counters relate to the
Ndbobjects in use by (only) the current session. Use of such objects by other MySQL clients does not influence these counts.In order to minimize confusion with standard MySQL session variables, we refer to the variables that correspond to these NDB API session counters as “
_sessionvariables”, with a leading underscore.Slave counters (global)
This set of counters relates to the
Ndbobjects used by the replication slave SQL thread, if any. If this mysqld does not act as a replication slave, or does not useNDBtables, then all of these counts are 0.We refer to the related status variables as “
_slavevariables” (with a leading underscore).Injector counters (global)
Injector counters relate to the
Ndbobject used to listen to cluster events by the binary log injector thread. Even when not writing a binary log, mysqld processes attached to an NDB Cluster continue to listen for some events, such as schema changes.We refer to the status variables that correspond to NDB API injector counters as “
_injectorvariables” (with a leading underscore).Server (Global) counters (global)
This set of counters relates to all
Ndbobjects currently used by this mysqld. This includes all MySQL client applications, the slave SQL thread (if any), the binlog injector, and theNDButility thread.We refer to the status variables that correspond to these counters as “global variables” or “mysqld-level variables”.
You can obtain values for a particular set of variables by
additionally filtering for the substring
session, slave, or
injector in the variable name (along with the
common prefix Ndb_api). For
_session variables, this can be done as shown
here:
mysql> SHOW STATUS LIKE 'ndb_api%session';
+--------------------------------------------+---------+
| Variable_name | Value |
+--------------------------------------------+---------+
| Ndb_api_wait_exec_complete_count_session | 2 |
| Ndb_api_wait_scan_result_count_session | 0 |
| Ndb_api_wait_meta_request_count_session | 1 |
| Ndb_api_wait_nanos_count_session | 8144375 |
| Ndb_api_bytes_sent_count_session | 68 |
| Ndb_api_bytes_received_count_session | 84 |
| Ndb_api_trans_start_count_session | 1 |
| Ndb_api_trans_commit_count_session | 1 |
| Ndb_api_trans_abort_count_session | 0 |
| Ndb_api_trans_close_count_session | 1 |
| Ndb_api_pk_op_count_session | 1 |
| Ndb_api_uk_op_count_session | 0 |
| Ndb_api_table_scan_count_session | 0 |
| Ndb_api_range_scan_count_session | 0 |
| Ndb_api_pruned_scan_count_session | 0 |
| Ndb_api_scan_batch_count_session | 0 |
| Ndb_api_read_row_count_session | 1 |
| Ndb_api_trans_local_read_row_count_session | 1 |
+--------------------------------------------+---------+
18 rows in set (0.50 sec)
To obtain a listing of the NDB API mysqld-level
status variables, filter for variable names beginning with
ndb_api and ending in
_count, like this:
mysql>SELECT * FROM performance_schema.session_status->WHERE VARIABLE_NAME LIKE 'ndb_api%count';+------------------------------------+----------------+ | VARIABLE_NAME | VARIABLE_VALUE | +------------------------------------+----------------+ | NDB_API_WAIT_EXEC_COMPLETE_COUNT | 4 | | NDB_API_WAIT_SCAN_RESULT_COUNT | 3 | | NDB_API_WAIT_META_REQUEST_COUNT | 28 | | NDB_API_WAIT_NANOS_COUNT | 53756398 | | NDB_API_BYTES_SENT_COUNT | 1060 | | NDB_API_BYTES_RECEIVED_COUNT | 9724 | | NDB_API_TRANS_START_COUNT | 3 | | NDB_API_TRANS_COMMIT_COUNT | 2 | | NDB_API_TRANS_ABORT_COUNT | 0 | | NDB_API_TRANS_CLOSE_COUNT | 3 | | NDB_API_PK_OP_COUNT | 2 | | NDB_API_UK_OP_COUNT | 0 | | NDB_API_TABLE_SCAN_COUNT | 1 | | NDB_API_RANGE_SCAN_COUNT | 0 | | NDB_API_PRUNED_SCAN_COUNT | 0 | | NDB_API_SCAN_BATCH_COUNT | 0 | | NDB_API_READ_ROW_COUNT | 2 | | NDB_API_TRANS_LOCAL_READ_ROW_COUNT | 2 | | NDB_API_EVENT_DATA_COUNT | 0 | | NDB_API_EVENT_NONDATA_COUNT | 0 | | NDB_API_EVENT_BYTES_COUNT | 0 | +------------------------------------+----------------+ 21 rows in set (0.09 sec)
Not all counters are reflected in all 4 sets of status variables.
For the event counters DataEventsRecvdCount,
NondataEventsRecvdCount, and
EventBytesRecvdCount, only
_injector and mysqld-level
NDB API status variables are available:
mysql> SHOW STATUS LIKE 'ndb_api%event%';
+--------------------------------------+-------+
| Variable_name | Value |
+--------------------------------------+-------+
| Ndb_api_event_data_count_injector | 0 |
| Ndb_api_event_nondata_count_injector | 0 |
| Ndb_api_event_bytes_count_injector | 0 |
| Ndb_api_event_data_count | 0 |
| Ndb_api_event_nondata_count | 0 |
| Ndb_api_event_bytes_count | 0 |
+--------------------------------------+-------+
6 rows in set (0.00 sec)
_injector status variables are not implemented
for any other NDB API counters, as shown here:
mysql> SHOW STATUS LIKE 'ndb_api%injector%';
+--------------------------------------+-------+
| Variable_name | Value |
+--------------------------------------+-------+
| Ndb_api_event_data_count_injector | 0 |
| Ndb_api_event_nondata_count_injector | 0 |
| Ndb_api_event_bytes_count_injector | 0 |
+--------------------------------------+-------+
3 rows in set (0.00 sec)
The names of the status variables can easily be associated with the names of the corresponding counters. Each NDB API statistics counter is listed in the following table with a description as well as the names of any MySQL server status variables corresponding to this counter.
Table 22.293 NDB API statistics counters
| Counter Name | Description | Status Variables (by statistic type):
|
|---|---|---|
WaitExecCompleteCount |
Number of times thread has been blocked while waiting for execution of
an operation to complete. Includes all
execute()
calls as well as implicit executes for blob operations and
auto-increment not visible to clients. |
|
WaitScanResultCount |
Number of times thread has been blocked while waiting for a scan-based signal, such waiting for additional results, or for a scan to close. | |
WaitMetaRequestCount |
Number of times thread has been blocked waiting for a metadata-based signal; this can occur when waiting for a DDL operation or for an epoch to be started (or ended). | |
WaitNanosCount |
Total time (in nanoseconds) spent waiting for some type of signal from the data nodes. | |
BytesSentCount |
Amount of data (in bytes) sent to the data nodes | |
BytesRecvdCount |
Amount of data (in bytes) received from the data nodes | |
TransStartCount |
Number of transactions started. | |
TransCommitCount |
Number of transactions committed. | |
TransAbortCount |
Number of transactions aborted. | |
TransCloseCount |
Number of transactions aborted. (This value may be greater than the sum
of TransCommitCount and
TransAbortCount.) |
|
PkOpCount |
Number of operations based on or using primary keys. This count includes blob-part table operations, implicit unlocking operations, and auto-increment operations, as well as primary key operations normally visible to MySQL clients. | |
UkOpCount |
Number of operations based on or using unique keys. | |
TableScanCount |
Number of table scans that have been started. This includes scans of internal tables. | |
RangeScanCount |
Number of range scans that have been started. | |
PrunedScanCount |
Number of scans that have been pruned to a single partition. | |
ScanBatchCount |
Number of batches of rows received. (A batch in this context is a set of scan results from a single fragment.) | |
ReadRowCount |
Total number of rows that have been read. Includes rows read using primary key, unique key, and scan operations. | |
TransLocalReadRowCount |
Number of rows read from the data same node on which the transaction was being run. | |
DataEventsRecvdCount |
Number of row change events received. |
|
NondataEventsRecvdCount |
Number of events received, other than row change events. | |
EventBytesRecvdCount |
Number of bytes of events received. |
|
To see all counts of committed transactions—that is, all
TransCommitCount counter status
variables—you can filter the results of
SHOW STATUS for the substring
trans_commit_count, like this:
mysql> SHOW STATUS LIKE '%trans_commit_count%';
+------------------------------------+-------+
| Variable_name | Value |
+------------------------------------+-------+
| Ndb_api_trans_commit_count_session | 1 |
| Ndb_api_trans_commit_count_slave | 0 |
| Ndb_api_trans_commit_count | 2 |
+------------------------------------+-------+
3 rows in set (0.00 sec)
From this you can determine that 1 transaction has been committed in the current mysql client session, and 2 transactions have been committed on this mysqld since it was last restarted.
You can see how various NDB API counters are incremented by a
given SQL statement by comparing the values of the corresponding
_session status variables immediately before
and after performing the statement. In this example, after getting
the initial values from SHOW
STATUS, we create in the test
database an NDB table, named
t, that has a single column:
mysql>SHOW STATUS LIKE 'ndb_api%session%';+--------------------------------------------+--------+ | Variable_name | Value | +--------------------------------------------+--------+ | Ndb_api_wait_exec_complete_count_session | 2 | | Ndb_api_wait_scan_result_count_session | 0 | | Ndb_api_wait_meta_request_count_session | 3 | | Ndb_api_wait_nanos_count_session | 820705 | | Ndb_api_bytes_sent_count_session | 132 | | Ndb_api_bytes_received_count_session | 372 | | Ndb_api_trans_start_count_session | 1 | | Ndb_api_trans_commit_count_session | 1 | | Ndb_api_trans_abort_count_session | 0 | | Ndb_api_trans_close_count_session | 1 | | Ndb_api_pk_op_count_session | 1 | | Ndb_api_uk_op_count_session | 0 | | Ndb_api_table_scan_count_session | 0 | | Ndb_api_range_scan_count_session | 0 | | Ndb_api_pruned_scan_count_session | 0 | | Ndb_api_scan_batch_count_session | 0 | | Ndb_api_read_row_count_session | 1 | | Ndb_api_trans_local_read_row_count_session | 1 | +--------------------------------------------+--------+ 18 rows in set (0.00 sec) mysql>USE test;Database changed mysql>CREATE TABLE t (c INT) ENGINE NDBCLUSTER;Query OK, 0 rows affected (0.85 sec)
Now you can execute a new SHOW
STATUS statement and observe the changes, as shown here
(with the changed rows highlighted in the output):
mysql> SHOW STATUS LIKE 'ndb_api%session%';
+--------------------------------------------+-----------+
| Variable_name | Value |
+--------------------------------------------+-----------+
| Ndb_api_wait_exec_complete_count_session | 8 |
| Ndb_api_wait_scan_result_count_session | 0 |
| Ndb_api_wait_meta_request_count_session | 17 |
| Ndb_api_wait_nanos_count_session | 706871709 |
| Ndb_api_bytes_sent_count_session | 2376 |
| Ndb_api_bytes_received_count_session | 3844 |
| Ndb_api_trans_start_count_session | 4 |
| Ndb_api_trans_commit_count_session | 4 |
| Ndb_api_trans_abort_count_session | 0 |
| Ndb_api_trans_close_count_session | 4 |
| Ndb_api_pk_op_count_session | 6 |
| Ndb_api_uk_op_count_session | 0 |
| Ndb_api_table_scan_count_session | 0 |
| Ndb_api_range_scan_count_session | 0 |
| Ndb_api_pruned_scan_count_session | 0 |
| Ndb_api_scan_batch_count_session | 0 |
| Ndb_api_read_row_count_session | 2 |
| Ndb_api_trans_local_read_row_count_session | 1 |
+--------------------------------------------+-----------+
18 rows in set (0.00 sec)
Similarly, you can see the changes in the NDB API statistics
counters caused by inserting a row into t:
Insert the row, then run the same SHOW
STATUS statement used in the previous example, as shown
here:
mysql>INSERT INTO t VALUES (100);Query OK, 1 row affected (0.00 sec) mysql>SHOW STATUS LIKE 'ndb_api%session%';+--------------------------------------------+-----------+ | Variable_name | Value | +--------------------------------------------+-----------+ | Ndb_api_wait_exec_complete_count_session | 11 | | Ndb_api_wait_scan_result_count_session | 6 | | Ndb_api_wait_meta_request_count_session | 20 | | Ndb_api_wait_nanos_count_session | 707370418 | | Ndb_api_bytes_sent_count_session | 2724 | | Ndb_api_bytes_received_count_session | 4116 | | Ndb_api_trans_start_count_session | 7 | | Ndb_api_trans_commit_count_session | 6 | | Ndb_api_trans_abort_count_session | 0 | | Ndb_api_trans_close_count_session | 7 | | Ndb_api_pk_op_count_session | 8 | | Ndb_api_uk_op_count_session | 0 | | Ndb_api_table_scan_count_session | 1 | | Ndb_api_range_scan_count_session | 0 | | Ndb_api_pruned_scan_count_session | 0 | | Ndb_api_scan_batch_count_session | 0 | | Ndb_api_read_row_count_session | 3 | | Ndb_api_trans_local_read_row_count_session | 2 | +--------------------------------------------+-----------+ 18 rows in set (0.00 sec)
We can make a number of observations from these results:
Although we created
twith no explicit primary key, 5 primary key operations were performed in doing so (the difference in the “before” and “after” values ofNdb_api_pk_op_count_session, or 6 minus 1). This reflects the creation of the hidden primary key that is a feature of all tables using theNDBstorage engine.By comparing successive values for
Ndb_api_wait_nanos_count_session, we can see that the NDB API operations implementing theCREATE TABLEstatement waited much longer (706871709 - 820705 = 706051004 nanoseconds, or approximately 0.7 second) for responses from the data nodes than those executed by theINSERT(707370418 - 706871709 = 498709 ns or roughly .0005 second). The execution times reported for these statements in the mysql client correlate roughly with these figures.On platforms without sufficient (nanosecond) time resolution, small changes in the value of the
WaitNanosCountNDB API counter due to SQL statements that execute very quickly may not always be visible in the values ofNdb_api_wait_nanos_count_session,Ndb_api_wait_nanos_count_slave, orNdb_api_wait_nanos_count.The
INSERTstatement incremented both theReadRowCountandTransLocalReadRowCountNDB API statistics counters, as reflected by the increased values ofNdb_api_read_row_count_sessionandNdb_api_trans_local_read_row_count_session.
- 22.5.14.1 The ndbinfo arbitrator_validity_detail Table
- 22.5.14.2 The ndbinfo arbitrator_validity_summary Table
- 22.5.14.3 The ndbinfo blocks Table
- 22.5.14.4 The ndbinfo cluster_locks Table
- 22.5.14.5 The ndbinfo cluster_operations Table
- 22.5.14.6 The ndbinfo cluster_transactions Table
- 22.5.14.7 The ndbinfo config_nodes Table
- 22.5.14.8 The ndbinfo config_params Table
- 22.5.14.9 The ndbinfo config_values Table
- 22.5.14.10 The ndbinfo counters Table
- 22.5.14.11 The ndbinfo cpustat Table
- 22.5.14.12 The ndbinfo cpustat_50ms Table
- 22.5.14.13 The ndbinfo cpustat_1sec Table
- 22.5.14.14 The ndbinfo cpustat_20sec Table
- 22.5.14.15 The ndbinfo dict_obj_info Table
- 22.5.14.16 The ndbinfo dict_obj_types Table
- 22.5.14.17 The ndbinfo disk_write_speed_base Table
- 22.5.14.18 The ndbinfo disk_write_speed_aggregate Table
- 22.5.14.19 The ndbinfo disk_write_speed_aggregate_node Table
- 22.5.14.20 The ndbinfo diskpagebuffer Table
- 22.5.14.21 The ndbinfo diskstat Table
- 22.5.14.22 The ndbinfo diskstats_1sec Table
- 22.5.14.23 The ndbinfo error_messages Table
- 22.5.14.24 The ndbinfo locks_per_fragment Table
- 22.5.14.25 The ndbinfo logbuffers Table
- 22.5.14.26 The ndbinfo logspaces Table
- 22.5.14.27 The ndbinfo membership Table
- 22.5.14.28 The ndbinfo memoryusage Table
- 22.5.14.29 The ndbinfo memory_per_fragment Table
- 22.5.14.30 The ndbinfo nodes Table
- 22.5.14.31 The ndbinfo operations_per_fragment Table
- 22.5.14.32 The ndbinfo pgman_time_track_stats Table
- 22.5.14.33 The ndbinfo processes Table
- 22.5.14.34 The ndbinfo resources Table
- 22.5.14.35 The ndbinfo restart_info Table
- 22.5.14.36 The ndbinfo server_locks Table
- 22.5.14.37 The ndbinfo server_operations Table
- 22.5.14.38 The ndbinfo server_transactions Table
- 22.5.14.39 The ndbinfo table_distribution_status Table
- 22.5.14.40 The ndbinfo table_fragments Table
- 22.5.14.41 The ndbinfo table_info Table
- 22.5.14.42 The ndbinfo table_replicas Table
- 22.5.14.43 The ndbinfo tc_time_track_stats Table
- 22.5.14.44 The ndbinfo threadblocks Table
- 22.5.14.45 The ndbinfo threads Table
- 22.5.14.46 The ndbinfo threadstat Table
- 22.5.14.47 The ndbinfo transporters Table
ndbinfo is a database containing information
specific to NDB Cluster.
This database contains a number of tables, each providing a different sort of data about NDB Cluster node status, resource usage, and operations. You can find more detailed information about each of these tables in the next several sections.
ndbinfo is included with NDB Cluster support in
the MySQL Server; no special compilation or configuration steps
are required; the tables are created by the MySQL Server when it
connects to the cluster. You can verify that
ndbinfo support is active in a given MySQL
Server instance using SHOW PLUGINS;
if ndbinfo support is enabled, you should see a
row containing ndbinfo in the
Name column and ACTIVE in
the Status column, as shown here (emphasized
text):
mysql> SHOW PLUGINS;
+----------------------------------+--------+--------------------+---------+---------+
| Name | Status | Type | Library | License |
+----------------------------------+--------+--------------------+---------+---------+
| binlog | ACTIVE | STORAGE ENGINE | NULL | GPL |
| mysql_native_password | ACTIVE | AUTHENTICATION | NULL | GPL |
| sha256_password | ACTIVE | AUTHENTICATION | NULL | GPL |
| MRG_MYISAM | ACTIVE | STORAGE ENGINE | NULL | GPL |
| MEMORY | ACTIVE | STORAGE ENGINE | NULL | GPL |
| CSV | ACTIVE | STORAGE ENGINE | NULL | GPL |
| MyISAM | ACTIVE | STORAGE ENGINE | NULL | GPL |
| InnoDB | ACTIVE | STORAGE ENGINE | NULL | GPL |
| INNODB_TRX | ACTIVE | INFORMATION SCHEMA | NULL | GPL |
| INNODB_LOCKS | ACTIVE | INFORMATION SCHEMA | NULL | GPL |
| INNODB_LOCK_WAITS | ACTIVE | INFORMATION SCHEMA | NULL | GPL |
| INNODB_CMP | ACTIVE | INFORMATION SCHEMA | NULL | GPL |
| INNODB_CMP_RESET | ACTIVE | INFORMATION SCHEMA | NULL | GPL |
| INNODB_CMPMEM | ACTIVE | INFORMATION SCHEMA | NULL | GPL |
| INNODB_CMPMEM_RESET | ACTIVE | INFORMATION SCHEMA | NULL | GPL |
| INNODB_CMP_PER_INDEX | ACTIVE | INFORMATION SCHEMA | NULL | GPL |
| INNODB_CMP_PER_INDEX_RESET | ACTIVE | INFORMATION SCHEMA | NULL | GPL |
| INNODB_BUFFER_PAGE | ACTIVE | INFORMATION SCHEMA | NULL | GPL |
| INNODB_BUFFER_PAGE_LRU | ACTIVE | INFORMATION SCHEMA | NULL | GPL |
| INNODB_BUFFER_POOL_STATS | ACTIVE | INFORMATION SCHEMA | NULL | GPL |
| INNODB_TEMP_TABLE_INFO | ACTIVE | INFORMATION SCHEMA | NULL | GPL |
| INNODB_METRICS | ACTIVE | INFORMATION SCHEMA | NULL | GPL |
| INNODB_FT_DEFAULT_STOPWORD | ACTIVE | INFORMATION SCHEMA | NULL | GPL |
| INNODB_FT_DELETED | ACTIVE | INFORMATION SCHEMA | NULL | GPL |
| INNODB_FT_BEING_DELETED | ACTIVE | INFORMATION SCHEMA | NULL | GPL |
| INNODB_FT_CONFIG | ACTIVE | INFORMATION SCHEMA | NULL | GPL |
| INNODB_FT_INDEX_CACHE | ACTIVE | INFORMATION SCHEMA | NULL | GPL |
| INNODB_FT_INDEX_TABLE | ACTIVE | INFORMATION SCHEMA | NULL | GPL |
| INNODB_SYS_TABLES | ACTIVE | INFORMATION SCHEMA | NULL | GPL |
| INNODB_SYS_TABLESTATS | ACTIVE | INFORMATION SCHEMA | NULL | GPL |
| INNODB_SYS_INDEXES | ACTIVE | INFORMATION SCHEMA | NULL | GPL |
| INNODB_SYS_COLUMNS | ACTIVE | INFORMATION SCHEMA | NULL | GPL |
| INNODB_SYS_FIELDS | ACTIVE | INFORMATION SCHEMA | NULL | GPL |
| INNODB_SYS_FOREIGN | ACTIVE | INFORMATION SCHEMA | NULL | GPL |
| INNODB_SYS_FOREIGN_COLS | ACTIVE | INFORMATION SCHEMA | NULL | GPL |
| INNODB_SYS_TABLESPACES | ACTIVE | INFORMATION SCHEMA | NULL | GPL |
| INNODB_SYS_DATAFILES | ACTIVE | INFORMATION SCHEMA | NULL | GPL |
| INNODB_SYS_VIRTUAL | ACTIVE | INFORMATION SCHEMA | NULL | GPL |
| PERFORMANCE_SCHEMA | ACTIVE | STORAGE ENGINE | NULL | GPL |
| ndbCluster | ACTIVE | STORAGE ENGINE | NULL | GPL |
| ndbinfo | ACTIVE | STORAGE ENGINE | NULL | GPL |
| ndb_transid_mysql_connection_map | ACTIVE | INFORMATION SCHEMA | NULL | GPL |
| BLACKHOLE | ACTIVE | STORAGE ENGINE | NULL | GPL |
| ARCHIVE | ACTIVE | STORAGE ENGINE | NULL | GPL |
| partition | ACTIVE | STORAGE ENGINE | NULL | GPL |
| ngram | ACTIVE | FTPARSER | NULL | GPL |
+----------------------------------+--------+--------------------+---------+---------+
46 rows in set (0.00 sec)
You can also do this by checking the output of
SHOW ENGINES for a line including
ndbinfo in the Engine column
and YES in the Support
column, as shown here (emphasized text):
mysql> SHOW ENGINES\G
*************************** 1. row ***************************
Engine: ndbcluster
Support: YES
Comment: Clustered, fault-tolerant tables
Transactions: YES
XA: NO
Savepoints: NO
*************************** 2. row ***************************
Engine: CSV
Support: YES
Comment: CSV storage engine
Transactions: NO
XA: NO
Savepoints: NO
*************************** 3. row ***************************
Engine: InnoDB
Support: DEFAULT
Comment: Supports transactions, row-level locking, and foreign keys
Transactions: YES
XA: YES
Savepoints: YES
*************************** 4. row ***************************
Engine: BLACKHOLE
Support: YES
Comment: /dev/null storage engine (anything you write to it disappears)
Transactions: NO
XA: NO
Savepoints: NO
*************************** 5. row ***************************
Engine: MyISAM
Support: YES
Comment: MyISAM storage engine
Transactions: NO
XA: NO
Savepoints: NO
*************************** 6. row ***************************
Engine: MRG_MYISAM
Support: YES
Comment: Collection of identical MyISAM tables
Transactions: NO
XA: NO
Savepoints: NO
*************************** 7. row ***************************
Engine: ARCHIVE
Support: YES
Comment: Archive storage engine
Transactions: NO
XA: NO
Savepoints: NO
*************************** 8. row ***************************
Engine: ndbinfo
Support: YES
Comment: NDB Cluster system information storage engine
Transactions: NO
XA: NO
Savepoints: NO
*************************** 9. row ***************************
Engine: PERFORMANCE_SCHEMA
Support: YES
Comment: Performance Schema
Transactions: NO
XA: NO
Savepoints: NO
*************************** 10. row ***************************
Engine: MEMORY
Support: YES
Comment: Hash based, stored in memory, useful for temporary tables
Transactions: NO
XA: NO
Savepoints: NO
10 rows in set (0.00 sec)
If ndbinfo support is enabled, then you can
access ndbinfo using SQL statements in
mysql or another MySQL client. For example, you
can see ndbinfo listed in the output of
SHOW DATABASES, as shown here
(emphasized text):
mysql> SHOW DATABASES;
+--------------------+
| Database |
+--------------------+
| information_schema |
| mysql |
| ndbinfo |
| performance_schema |
| sys |
+--------------------+
5 rows in set (0.04 sec)
If the mysqld process was not started with the
--ndbcluster option,
ndbinfo is not available and is not displayed
by SHOW DATABASES. If
mysqld was formerly connected to an NDB Cluster
but the cluster becomes unavailable (due to events such as cluster
shutdown, loss of network connectivity, and so forth),
ndbinfo and its tables remain visible, but an
attempt to access any tables (other than blocks
or config_params) fails with Got
error 157 'Connection to NDB failed' from NDBINFO.
With the exception of the blocks and
config_params tables, what we refer to as
ndbinfo “tables” are actually
views generated from internal NDB
tables not normally visible to the MySQL Server.
All ndbinfo tables are read-only, and are
generated on demand when queried. Because many of them are
generated in parallel by the data nodes while other are specific
to a given SQL node, they are not guaranteed to provide a
consistent snapshot.
In addition, pushing down of joins is not supported on
ndbinfo tables; so joining large
ndbinfo tables can require transfer of a large
amount of data to the requesting API node, even when the query
makes use of a WHERE clause.
ndbinfo tables are not included in the query
cache. (Bug #59831)
You can select the ndbinfo database with a
USE statement, and then issue a
SHOW TABLES statement to obtain a
list of tables, just as for any other database, like this:
mysql>USE ndbinfo;Database changed mysql>SHOW TABLES;+---------------------------------+ | Tables_in_ndbinfo | +---------------------------------+ | arbitrator_validity_detail | | arbitrator_validity_summary | | blocks | | cluster_locks | | cluster_operations | | cluster_transactions | | config_nodes | | config_params | | config_values | | counters | | cpustat | | cpustat_1sec | | cpustat_20sec | | cpustat_50ms | | dict_obj_info | | dict_obj_types | | disk_write_speed_aggregate | | disk_write_speed_aggregate_node | | disk_write_speed_base | | diskpagebuffer | | error_messages | | locks_per_fragment | | logbuffers | | logspaces | | membership | | memory_per_fragment | | memoryusage | | nodes | | operations_per_fragment | | processes | | resources | | restart_info | | server_locks | | server_operations | | server_transactions | | table_distribution_status | | table_fragments | | table_info | | table_replicas | | tc_time_track_stats | | threadblocks | | threads | | threadstat | | transporters | +---------------------------------+ 44 rows in set (0.00 sec)
In NDB 8.0, all ndbinfo tables use the
NDB storage engine; however, an
ndbinfo entry still appears in the output of
SHOW ENGINES and
SHOW PLUGINS as described
previously.
You can execute SELECT statements
against these tables, just as you would normally expect:
mysql> SELECT * FROM memoryusage;
+---------+---------------------+--------+------------+------------+-------------+
| node_id | memory_type | used | used_pages | total | total_pages |
+---------+---------------------+--------+------------+------------+-------------+
| 5 | Data memory | 753664 | 23 | 1073741824 | 32768 |
| 5 | Index memory | 163840 | 20 | 1074003968 | 131104 |
| 5 | Long message buffer | 2304 | 9 | 67108864 | 262144 |
| 6 | Data memory | 753664 | 23 | 1073741824 | 32768 |
| 6 | Index memory | 163840 | 20 | 1074003968 | 131104 |
| 6 | Long message buffer | 2304 | 9 | 67108864 | 262144 |
+---------+---------------------+--------+------------+------------+-------------+
6 rows in set (0.02 sec)
More complex queries, such as the two following
SELECT statements using the
memoryusage table, are possible:
mysql>SELECT SUM(used) as 'Data Memory Used, All Nodes'>FROM memoryusage>WHERE memory_type = 'Data memory';+-----------------------------+ | Data Memory Used, All Nodes | +-----------------------------+ | 6460 | +-----------------------------+ 1 row in set (0.37 sec) mysql>SELECT SUM(max) as 'Total IndexMemory Available'>FROM memoryusage>WHERE memory_type = 'Index memory';+-----------------------------+ | Total IndexMemory Available | +-----------------------------+ | 25664 | +-----------------------------+ 1 row in set (0.33 sec)
ndbinfo table and column names are case
sensitive (as is the name of the ndbinfo
database itself). These identifiers are in lowercase. Trying to
use the wrong lettercase results in an error, as shown in this
example:
mysql>SELECT * FROM nodes;+---------+--------+---------+-------------+ | node_id | uptime | status | start_phase | +---------+--------+---------+-------------+ | 1 | 13602 | STARTED | 0 | | 2 | 16 | STARTED | 0 | +---------+--------+---------+-------------+ 2 rows in set (0.04 sec) mysql>SELECT * FROM Nodes;ERROR 1146 (42S02): Table 'ndbinfo.Nodes' doesn't exist
mysqldump ignores the
ndbinfo database entirely, and excludes it from
any output. This is true even when using the
--databases or
--all-databases option.
NDB Cluster also maintains tables in the
INFORMATION_SCHEMA information database,
including the FILES table which
contains information about files used for NDB Cluster Disk Data
storage, and the
ndb_transid_mysql_connection_map
table, which shows the relationships between transactions,
transaction coordinators, and NDB Cluster API nodes. For more
information, see the descriptions of the tables or
Section 22.5.15, “INFORMATION_SCHEMA Tables for NDB Cluster”.
The arbitrator_validity_detail table shows
the view that each data node in the cluster has of the
arbitrator. It is a subset of the
membership table.
The arbitrator_validity_detail table contains
the following columns:
node_idThis node's node ID
arbitratorNode ID of arbitrator
arb_ticketInternal identifier used to track arbitration
arb_connectedWhether this node is connected to the arbitrator; either of
YesorNoarb_stateArbitration state
Notes
The node ID is the same as that reported by ndb_mgm -e "SHOW".
All nodes should show the same arbitrator and
arb_ticket values as well as the same
arb_state value. Possible
arb_state values are
ARBIT_NULL, ARBIT_INIT,
ARBIT_FIND, ARBIT_PREP1,
ARBIT_PREP2, ARBIT_START,
ARBIT_RUN, ARBIT_CHOOSE,
ARBIT_CRASH, and UNKNOWN.
arb_connected shows whether the current node
is connected to the arbitrator.
The arbitrator_validity_summary table
provides a composite view of the arbitrator with regard to the
cluster's data nodes.
The arbitrator_validity_summary table
contains the following columns:
arbitratorNode ID of arbitrator
arb_ticketInternal identifier used to track arbitration
arb_connectedWhether this arbitrator is connected to the cluster
consensus_countNumber of data nodes that see this node as arbitrator; either of
YesorNo
Notes
In normal operations, this table should have only 1 row for any appreciable length of time. If it has more than 1 row for longer than a few moments, then either not all nodes are connected to the arbitrator, or all nodes are connected, but do not agree on the same arbitrator.
The arbitrator column shows the
arbitrator's node ID.
arb_ticket is the internal identifier used by
this arbitrator.
arb_connected shows whether this node is
connected to the cluster as an arbitrator.
The blocks table is a static table which
simply contains the names and internal IDs of all NDB kernel
blocks (see NDB Kernel Blocks). It
is for use by the other
ndbinfo tables (most of which
are actually views) in mapping block numbers to block names for
producing human-readable output.
The blocks table contains the following
columns:
block_numberBlock number
block_nameBlock name
Notes
To obtain a list of all block names, simply execute
SELECT block_name FROM ndbinfo.blocks.
Although this is a static table, its content can vary between
different NDB Cluster releases.
The cluster_locks table provides information
about current lock requests holding and waiting for locks on
NDB tables in an NDB Cluster, and is intended
as a companion table to
cluster_operations.
Information obtain from the cluster_locks
table may be useful in investigating stalls and deadlocks.
The cluster_locks table contains the
following columns:
node_idID of reporting node
block_instanceID of reporting LDM instance
tableidID of table containing this row
fragmentidID of fragment containing locked row
rowidID of locked row
transidTransaction ID
modeLock request mode
stateLock state
detailWhether this is first holding lock in row lock queue
opOperation type
duration_millisMilliseconds spent waiting or holding lock
lock_numID of lock object
waiting_forWaiting for lock with this ID
Notes
The table ID (tableid column) is assigned
internally, and is the same as that used in other
ndbinfo tables. It is also shown in the
output of ndb_show_tables.
The transaction ID (transid column) is the
identifier generated by the NDB API for the transaction
requesting or holding the current lock.
The mode column shows the lock mode; this is
always one of S (indicating a shared lock) or
X (an exclusive lock). If a transaction holds
an exclusive lock on a given row, all other locks on that row
have the same transaction ID.
The state column shows the lock state. Its
value is always one of H (holding) or
W (waiting). A waiting lock request waits for
a lock held by a different transaction.
When the detail column contains a
* (asterisk character), this means that this
lock is the first holding lock in the affected row's lock
queue; otherwise, this column is empty. This information can be
used to help identify the unique entries in a list of lock
requests.
The op column shows the type of operation
requesting the lock. This is always one of the values
READ, INSERT,
UPDATE, DELETE,
SCAN, or REFRESH.
The duration_millis column shows the number
of milliseconds for which this lock request has been waiting or
holding the lock. This is reset to 0 when a lock is granted for
a waiting request.
The lock ID (lockid column) is unique to this
node and block instance.
The lock state is shown in the lock_state
column; if this is W, the lock is waiting to
be granted, and the waiting_for column shows
the lock ID of the lock object this request is waiting for.
Otherwise, the waiting_for column is empty.
waiting_for can refer only to locks on the
same row, as identified by node_id,
block_instance, tableid,
fragmentid, and rowid.
The cluster_operations table provides a
per-operation (stateful primary key op) view of all activity in
the NDB Cluster from the point of view of the local data
management (LQH) blocks (see
The DBLQH Block).
The cluster_operations table contains the
following columns:
node_idNode ID of reporting LQH block
block_instanceLQH block instance
transidTransaction ID
operation_typeOperation type (see text for possible values)
stateOperation state (see text for possible values)
tableidTable ID
fragmentidFragment ID
client_node_idClient node ID
client_block_refClient block reference
tc_node_idTransaction coordinator node ID
tc_block_noTransaction coordinator block number
tc_block_instanceTransaction coordinator block instance
Notes
The transaction ID is a unique 64-bit number which can be
obtained using the NDB API's
getTransactionId()
method. (Currently, the MySQL Server does not expose the NDB API
transaction ID of an ongoing transaction.)
The operation_type column can take any one of
the values READ, READ-SH,
READ-EX, INSERT,
UPDATE, DELETE,
WRITE, UNLOCK,
REFRESH, SCAN,
SCAN-SH, SCAN-EX, or
<unknown>.
The state column can have any one of the
values ABORT_QUEUED,
ABORT_STOPPED, COMMITTED,
COMMIT_QUEUED,
COMMIT_STOPPED,
COPY_CLOSE_STOPPED,
COPY_FIRST_STOPPED,
COPY_STOPPED, COPY_TUPKEY,
IDLE, LOG_ABORT_QUEUED,
LOG_COMMIT_QUEUED,
LOG_COMMIT_QUEUED_WAIT_SIGNAL,
LOG_COMMIT_WRITTEN,
LOG_COMMIT_WRITTEN_WAIT_SIGNAL,
LOG_QUEUED, PREPARED,
PREPARED_RECEIVED_COMMIT,
SCAN_CHECK_STOPPED,
SCAN_CLOSE_STOPPED,
SCAN_FIRST_STOPPED,
SCAN_RELEASE_STOPPED,
SCAN_STATE_USED,
SCAN_STOPPED, SCAN_TUPKEY,
STOPPED, TC_NOT_CONNECTED,
WAIT_ACC, WAIT_ACC_ABORT,
WAIT_AI_AFTER_ABORT,
WAIT_ATTR, WAIT_SCAN_AI,
WAIT_TUP, WAIT_TUPKEYINFO,
WAIT_TUP_COMMIT, or
WAIT_TUP_TO_ABORT. (If the MySQL Server is
running with
ndbinfo_show_hidden enabled,
you can view this list of states by selecting from the
ndb$dblqh_tcconnect_state table, which is
normally hidden.)
You can obtain the name of an NDB table from
its table ID by checking the output of
ndb_show_tables.
The fragid is the same as the partition
number seen in the output of ndb_desc
--extra-partition-info (short
form -p).
In client_node_id and
client_block_ref, client
refers to an NDB Cluster API or SQL node (that is, an NDB API
client or a MySQL Server attached to the cluster).
The block_instance and
tc_block_instance column provide,
respectively, the DBLQH and
DBTC block instance numbers.
You can use these along with the block names to obtain
information about specific threads from the
threadblocks table.
The cluster_transactions table shows
information about all ongoing transactions in an NDB Cluster.
The cluster_transactions table contains the
following columns:
node_idNode ID of transaction coordinator
block_instanceTC block instance
transidTransaction ID
stateOperation state (see text for possible values)
count_operationsNumber of stateful primary key operations in transaction (includes reads with locks, as well as DML operations)
outstanding_operationsOperations still being executed in local data management blocks
inactive_secondsTime spent waiting for API
client_node_idClient node ID
client_block_refClient block reference
Notes
The transaction ID is a unique 64-bit number which can be
obtained using the NDB API's
getTransactionId()
method. (Currently, the MySQL Server does not expose the NDB API
transaction ID of an ongoing transaction.)
block_instance refers to an instance of a
kernel block. Together with the block name, this number can be
used to look up a given instance in the
threadblocks table.
The state column can have any one of the
values CS_ABORTING,
CS_COMMITTING,
CS_COMMIT_SENT,
CS_COMPLETE_SENT,
CS_COMPLETING,
CS_CONNECTED,
CS_DISCONNECTED,
CS_FAIL_ABORTED,
CS_FAIL_ABORTING,
CS_FAIL_COMMITTED,
CS_FAIL_COMMITTING,
CS_FAIL_COMPLETED,
CS_FAIL_PREPARED,
CS_PREPARE_TO_COMMIT,
CS_RECEIVING,
CS_REC_COMMITTING,
CS_RESTART,
CS_SEND_FIRE_TRIG_REQ,
CS_STARTED,
CS_START_COMMITTING,
CS_START_SCAN,
CS_WAIT_ABORT_CONF,
CS_WAIT_COMMIT_CONF,
CS_WAIT_COMPLETE_CONF,
CS_WAIT_FIRE_TRIG_REQ. (If the MySQL Server
is running with
ndbinfo_show_hidden enabled,
you can view this list of states by selecting from the
ndb$dbtc_apiconnect_state table, which is
normally hidden.)
In client_node_id and
client_block_ref, client
refers to an NDB Cluster API or SQL node (that is, an NDB API
client or a MySQL Server attached to the cluster).
The tc_block_instance column provides the
DBTC block instance number.
You can use this along with the block name to obtain information
about specific threads from the
threadblocks table.
The config_nodes table shows nodes configured
in an NDB Cluster config.ini file. For each
node, the table displays a row containing the node ID, the type
of node (management node, data node, or API node), and the name
or IP address of the host on which the node is configured to
run.
This table does not indicate whether a given node is actually
running, or whether it is currently connected to the cluster.
Information about nodes connected to an NDB Cluster can be
obtained from the nodes and
processes table.
The config_nodes table contains the following
columns:
node_idThe node's ID
node_typeThe type of node
node_hostnameThe name or IP address of the host on which the node resides
Notes
The node_id column shows the node ID used in
the config.ini file for this node; if none
is specified, the node ID that would be assigned automatically
to this node is displayed.
The node_type column displays one of the
following three values:
MGM: Management node.NDB: Data node.API: API node; this includes SQL nodes.
The node_hostname column shows the node host
as specified in the config.ini file. This
can be empty for an API node, if
HostName has not been set
in the cluster configuration file. If
HostName has not been
set for a data node in the configuration file,
localhost is used here.
localhost is also used if
HostName has not been
specified for a management node.
The config_params table is a static table
which provides the names and internal ID numbers of and other
information about NDB Cluster configuration parameters. This
table can also be used in conjunction with the
config_values table for
obtaining realtime information about node configuration
parameters.
The config_params table contains the
following columns:
param_numberThe parameter's internal ID number
param_nameThe name of the parameter
param_descriptionA brief description of the parameter
param_typeThe parameter's data type
param_defaultThe parameter's default value, if any
param_minThe parameter's maximum value, if any
param_maxThe parameter's minimum value, if any
param_mandatoryThis is 1 if the parameter is required, otherwise 0
param_statusCurrently unused
Notes
This table is read-only.
Although this is a static table, its content can vary between NDB Cluster installations, since supported parameters can vary due to differences between software releases, cluster hardware configurations, and other factors.
The config_values table provides information
about the current state of node configuration parameter values.
Each row in the table corresponds to the current value of a
parameter on a given node.
The config_values table contains the
following columns:
node_idID of the node in the cluster
config_paramThe parameter's internal ID number
config_valueCurrent value of the parameter
Notes
This table's config_param column and the
config_params table's
param_number column use the same parameter
identifiers. By joining the two tables on these columns, you can
obtain detailed information about desired node configuration
parameters. The query shown here provides the current values for
all parameters on each data node in the cluster, ordered by node
ID and parameter name:
SELECT v.node_id AS 'Node Id',
p.param_name AS 'Parameter',
v.config_value AS 'Value'
FROM config_values v
JOIN config_params p
ON v.config_param=p.param_number
WHERE p.param_name NOT LIKE '\_\_%'
ORDER BY v.node_id, p.param_name;Partial output from the previous query when run on a small example cluster used for simple testing:
+---------+------------------------------------------+----------------+ | Node Id | Parameter | Value | +---------+------------------------------------------+----------------+ | 2 | Arbitration | 1 | | 2 | ArbitrationTimeout | 7500 | | 2 | BackupDataBufferSize | 16777216 | | 2 | BackupDataDir | /home/jon/data | | 2 | BackupDiskWriteSpeedPct | 50 | | 2 | BackupLogBufferSize | 16777216 | ... | 3 | TotalSendBufferMemory | 0 | | 3 | TransactionBufferMemory | 1048576 | | 3 | TransactionDeadlockDetectionTimeout | 1200 | | 3 | TransactionInactiveTimeout | 4294967039 | | 3 | TwoPassInitialNodeRestartCopy | 0 | | 3 | UndoDataBuffer | 16777216 | | 3 | UndoIndexBuffer | 2097152 | +---------+------------------------------------------+----------------+ 248 rows in set (0.02 sec)
The WHERE clause filters out parameters whose
names begin with a double underscore (__);
these parameters are reserved for testing and other internal
uses by the NDB developers, and are not intended for use in a
production NDB Cluster.
You can obtain output that is more specific, more detailed, or
both by issuing the proper queries. This example provides all
types of available information about the
NodeId,
NoOfReplicas,
HostName,
DataMemory,
IndexMemory, and
TotalSendBufferMemory
parameters as currently set for all data nodes in the cluster:
SELECT p.param_name AS Name,
v.node_id AS Node,
p.param_type AS Type,
p.param_default AS 'Default',
p.param_min AS Minimum,
p.param_max AS Maximum,
CASE p.param_mandatory WHEN 1 THEN 'Y' ELSE 'N' END AS 'Required',
v.config_value AS Current
FROM config_params p
JOIN config_values v
ON p.param_number = v.config_param
WHERE p. param_name
IN ('NodeId', 'NoOfReplicas', 'HostName',
'DataMemory', 'IndexMemory', 'TotalSendBufferMemory')\GThe output from this query when run on a small NDB Cluster with 2 data nodes used for simple testing is shown here (NDB 8.0.18 and later):
*************************** 1. row ***************************
Name: NodeId
Node: 2
Type: unsigned
Default:
Minimum: 1
Maximum: 144
Required: Y
Current: 2
*************************** 2. row ***************************
Name: HostName
Node: 2
Type: string
Default: localhost
Minimum:
Maximum:
Required: N
Current: 127.0.0.1
*************************** 3. row ***************************
Name: TotalSendBufferMemory
Node: 2
Type: unsigned
Default: 0
Minimum: 262144
Maximum: 4294967039
Required: N
Current: 0
*************************** 4. row ***************************
Name: NoOfReplicas
Node: 2
Type: unsigned
Default: 2
Minimum: 1
Maximum: 4
Required: N
Current: 2
*************************** 5. row ***************************
Name: DataMemory
Node: 2
Type: unsigned
Default: 102760448
Minimum: 1048576
Maximum: 1099511627776
Required: N
Current: 524288000
*************************** 6. row ***************************
Name: NodeId
Node: 3
Type: unsigned
Default:
Minimum: 1
Maximum: 144
Required: Y
Current: 3
*************************** 7. row ***************************
Name: HostName
Node: 3
Type: string
Default: localhost
Minimum:
Maximum:
Required: N
Current: 127.0.0.1
*************************** 8. row ***************************
Name: TotalSendBufferMemory
Node: 3
Type: unsigned
Default: 0
Minimum: 262144
Maximum: 4294967039
Required: N
Current: 0
*************************** 9. row ***************************
Name: NoOfReplicas
Node: 3
Type: unsigned
Default: 2
Minimum: 1
Maximum: 4
Required: N
Current: 2
*************************** 10. row ***************************
Name: DataMemory
Node: 3
Type: unsigned
Default: 102760448
Minimum: 1048576
Maximum: 1099511627776
Required: N
Current: 524288000
10 rows in set (0.01 sec)
The counters table provides running totals of
events such as reads and writes for specific kernel blocks and
data nodes. Counts are kept from the most recent node start or
restart; a node start or restart resets all counters on that
node. Not all kernel blocks have all types of counters.
The counters table contains the following
columns:
node_idThe data node ID
block_nameName of the associated NDB kernel block (see NDB Kernel Blocks).
block_instanceBlock instance
counter_idThe counter's internal ID number; normally an integer between 1 and 10, inclusive.
counter_nameThe name of the counter. See text for names of individual counters and the NDB kernel block with which each counter is associated.
valThe counter's value
Notes
Each counter is associated with a particular NDB kernel block.
The OPERATIONS counter is associated with the
DBLQH (local query handler)
kernel block. A primary-key read counts as one operation, as
does a primary-key update. For reads, there is one operation in
DBLQH per operation in
DBTC. For writes, there is
one operation counted per replica.
The ATTRINFO,
TRANSACTIONS, COMMITS,
READS, LOCAL_READS,
SIMPLE_READS, WRITES,
LOCAL_WRITES, ABORTS,
TABLE_SCANS, and
RANGE_SCANS counters are associated with the
DBTC (transaction
co-ordinator) kernel block.
LOCAL_WRITES and
LOCAL_READS are primary-key operations using
a transaction coordinator in a node that also holds the primary
replica of the record.
The READS counter includes all reads.
LOCAL_READS includes only those reads of the
primary replica on the same node as this transaction
coordinator. SIMPLE_READS includes only those
reads in which the read operation is the beginning and ending
operation for a given transaction. Simple reads do not hold
locks but are part of a transaction, in that they observe
uncommitted changes made by the transaction containing them but
not of any other uncommitted transactions. Such reads are
“simple” from the point of view of the TC block;
since they hold no locks they are not durable, and once
DBTC has routed them to the
relevant LQH block, it holds no state for them.
ATTRINFO keeps a count of the number of times
an interpreted program is sent to the data node. See
NDB Protocol Messages, for more
information about ATTRINFO messages in the
NDB kernel.
The LOCAL_TABLE_SCANS_SENT,
READS_RECEIVED,
PRUNED_RANGE_SCANS_RECEIVED,
RANGE_SCANS_RECEIVED,
LOCAL_READS_SENT,
CONST_PRUNED_RANGE_SCANS_RECEIVED,
LOCAL_RANGE_SCANS_SENT,
REMOTE_READS_SENT,
REMOTE_RANGE_SCANS_SENT,
READS_NOT_FOUND,
SCAN_BATCHES_RETURNED,
TABLE_SCANS_RECEIVED, and
SCAN_ROWS_RETURNED counters are associated
with the DBSPJ (select
push-down join) kernel block.
The block_name and
block_instance columns provide, respectively,
the applicable NDB kernel block name and instance number. You
can use these to obtain information about specific threads from
the threadblocks table.
A number of counters provide information about transporter overload and send buffer sizing when troubleshooting such issues. For each LQH instance, there is one instance of each counter in the following list:
LQHKEY_OVERLOAD: Number of primary key requests rejected at the LQH block instance due to transporter overloadLQHKEY_OVERLOAD_TC: Count of instances ofLQHKEY_OVERLOADwhere the TC node transporter was overloadedLQHKEY_OVERLOAD_READER: Count of instances ofLQHKEY_OVERLOADwhere the API reader (reads only) node was overloaded.LQHKEY_OVERLOAD_NODE_PEER: Count of instances ofLQHKEY_OVERLOADwhere the next backup data node (writes only) was overloadedLQHKEY_OVERLOAD_SUBSCRIBER: Count of instances ofLQHKEY_OVERLOADwhere a event subscriber (writes only) was overloaded.LQHSCAN_SLOWDOWNS: Count of instances where a fragment scan batch size was reduced due to scanning API transporter overload.
The cpustat table provides per-thread CPU
statistics gathered each second, for each thread running in the
NDB kernel.
The cpustat table contains the following
columns:
node_idID of the node where the thread is running
thr_noThread ID (specific to this node)
OS_userOS user time
OS_systemOS system time
OS_idleOS idle time
thread_execThread execution time
thread_sleepingThread sleep time
thread_spinningThread spin time
thread_sendThread send time
thread_buffer_fullThread buffer full time
elapsed_timeElapsed time
The cpustat_50ms table provides raw,
per-thread CPU data obtained each 50 milliseconds for each
thread running in the NDB kernel.
Like cpustat_1sec and
cpustat_20sec, this table
shows 20 measurement sets per thread, each referencing a period
of the named duration. Thus, cpsustat_50ms
provides 1 second of history.
The cpustat_50ms table contains the following
columns:
node_idID of the node where the thread is running
thr_noThread ID (specific to this node)
OS_user_timeOS user time
OS_system_timeOS system time
OS_idle_timeOS idle time
exec_timeThread execution time
sleep_timeThread sleep time
spin_timeThread spin time
send_timeThread send time
buffer_full_timeThread buffer full time
elapsed_timeElapsed time
The cpustat-1sec table provides raw,
per-thread CPU data obtained each second for each thread running
in the NDB kernel.
Like cpustat_50ms and
cpustat_20sec, this table
shows 20 measurement sets per thread, each referencing a period
of the named duration. Thus, cpsustat_1sec
provides 20 seconds of history.
The cpustat_1sec table contains the following
columns:
node_idID of the node where the thread is running
thr_noThread ID (specific to this node)
OS_user_timeOS user time
OS_system_timeOS system time
OS_idle_timeOS idle time
exec_timeThread execution time
sleep_timeThread sleep time
spin_timeThread spin time
send_timeThread send time
buffer_full_timeThread buffer full time
elapsed_timeElapsed time
The cpustat_20sec table provides raw,
per-thread CPU data obtained each 20 seconds, for each thread
running in the NDB kernel.
Like cpustat_50ms and
cpustat_1sec, this table shows
20 measurement sets per thread, each referencing a period of the
named duration. Thus, cpsustat_20sec provides
400 seconds of history.
The cpustat_20sec table contains the
following columns:
node_idID of the node where the thread is running
thr_noThread ID (specific to this node)
OS_user_timeOS user time
OS_system_timeOS system time
OS_idle_timeOS idle time
exec_timeThread execution time
sleep_timeThread sleep time
spin_timeThread spin time
send_timeThread send time
buffer_full_timeThread buffer full time
elapsed_timeElapsed time
The dict_obj_info table provides information
about NDB data dictionary
(DICT) objects such as tables and indexes.
(The dict_obj_types table can
be queried for a list of all the types.) This information
includes the object's type, state, parent object (if any),
and fully qualified name.
The dict_obj_info table contains the
following columns:
typeType of
DICTobject; join ondict_obj_typesto obtain the nameidObject identifier; for Disk Data undo log files and data files, this is the same as the value shown in the
LOGFILE_GROUP_NUMBERcolumn of theINFORMATION_SCHEMA.FILEStable; for undo log files, it also the same as the value shown for thelog_idcolumn in thendbinfologbuffersandlogspacestablesversionObject version
stateObject state
parent_obj_typeParent object's type (a
dict_obj_typestype ID); 0 indicates that the object has no parentparent_obj_idParent object ID (such as a base table); 0 indicates that the object has no parent
fq_nameFully qualified object name; for a table, this has the form
database_name/def/table_namesys/def/, and for a unique key it istable_id/PRIMARYsys/def/table_id/uk_name$unique
The dict_obj_types table is a static table
listing possible dictionary object types used in the NDB kernel.
These are the same types defined by
Object::Type in the NDB API.
The dict_obj_types table contains the
following columns:
type_idThe type ID for this type
type_nameThe name of this type
The disk_write_speed_base table provides base
information about the speed of disk writes during LCP, backup,
and restore operations.
The disk_write_speed_base table contains the
following columns:
node_idNode ID of this node
thr_noThread ID of this LDM thread
millis_agoMilliseconds since this reporting period ended
millis_passedMilliseconds elapsed in this reporting period
backup_lcp_bytes_writtenNumber of bytes written to disk by local checkpoints and backup processes during this period
redo_bytes_writtenNumber of bytes written to REDO log during this period
target_disk_write_speedActual speed of disk writes per LDM thread (base data)
The disk_write_speed_aggregate table provides
aggregated information about the speed of disk writes during
LCP, backup, and restore operations.
The disk_write_speed_aggregate table contains
the following columns:
node_idNode ID of this node
thr_noThread ID of this LDM thread
backup_lcp_speed_last_secNumber of bytes written to disk by backup and LCP processes in the last second
redo_speed_last_secNumber of bytes written to REDO log in the last second
backup_lcp_speed_last_10secNumber of bytes written to disk by backup and LCP processes per second, averaged over the last 10 seconds
redo_speed_last_10secNumber of bytes written to REDO log per second, averaged over the last 10 seconds
std_dev_backup_lcp_speed_last_10secStandard deviation in number of bytes written to disk by backup and LCP processes per second, averaged over the last 10 seconds
std_dev_redo_speed_last_10secStandard deviation in number of bytes written to REDO log per second, averaged over the last 10 seconds
backup_lcp_speed_last_60secNumber of bytes written to disk by backup and LCP processes per second, averaged over the last 60 seconds
redo_speed_last_60secNumber of bytes written to REDO log per second, averaged over the last 10 seconds
std_dev_backup_lcp_speed_last_60secStandard deviation in number of bytes written to disk by backup and LCP processes per second, averaged over the last 60 seconds
std_dev_redo_speed_last_60secStandard deviation in number of bytes written to REDO log per second, averaged over the last 60 seconds
slowdowns_due_to_io_lagNumber of seconds since last node start that disk writes were slowed due to REDO log I/O lag
slowdowns_due_to_high_cpuNumber of seconds since last node start that disk writes were slowed due to high CPU usage
disk_write_speed_set_to_minNumber of seconds since last node start that disk write speed was set to minimum
current_target_disk_write_speedActual speed of disk writes per LDM thread (aggregated)
The disk_write_speed_aggregate_node table
provides aggregated information per node about the speed of disk
writes during LCP, backup, and restore operations.
The disk_write_speed_aggregate_node table
contains the following columns:
node_idNode ID of this node
backup_lcp_speed_last_secNumber of bytes written to disk by backup and LCP processes in the last second
redo_speed_last_secNumber of bytes written to REDO log in the last second
backup_lcp_speed_last_10secNumber of bytes written to disk by backup and LCP processes per second, averaged over the last 10 seconds
redo_speed_last_10secNumber of bytes written to REDO log per second, averaged over the last 10 seconds
backup_lcp_speed_last_60secNumber of bytes written to disk by backup and LCP processes per second, averaged over the last 60 seconds
redo_speed_last_60secNumber of bytes written to disk by backup and LCP processes per second, averaged over the last 60 seconds
The diskpagebuffer table provides statistics
about disk page buffer usage by NDB Cluster Disk Data tables.
The diskpagebuffer table contains the
following columns:
node_idThe data node ID
block_instanceBlock instance
pages_writtenNumber of pages written to disk.
pages_written_lcpNumber of pages written by local checkpoints.
pages_readNumber of pages read from disk
log_waitsNumber of page writes waiting for log to be written to disk
page_requests_direct_returnNumber of requests for pages that were available in buffer
page_requests_wait_queueNumber of requests that had to wait for pages to become available in buffer
page_requests_wait_ioNumber of requests that had to be read from pages on disk (pages were unavailable in buffer)
Notes
You can use this table with NDB Cluster Disk Data tables to
determine whether
DiskPageBufferMemory is
sufficiently large to allow data to be read from the buffer
rather from disk; minimizing disk seeks can help improve
performance of such tables.
You can determine the proportion of reads from
DiskPageBufferMemory to
the total number of reads using a query such as this one, which
obtains this ratio as a percentage:
SELECT
node_id,
100 * page_requests_direct_return /
(page_requests_direct_return + page_requests_wait_io)
AS hit_ratio
FROM ndbinfo.diskpagebuffer;The result from this query should be similar to what is shown here, with one row for each data node in the cluster (in this example, the cluster has 4 data nodes):
+---------+-----------+ | node_id | hit_ratio | +---------+-----------+ | 5 | 97.6744 | | 6 | 97.6879 | | 7 | 98.1776 | | 8 | 98.1343 | +---------+-----------+ 4 rows in set (0.00 sec)
hit_ratio values approaching 100% indicate
that only a very small number of reads are being made from disk
rather than from the buffer, which means that Disk Data read
performance is approaching an optimum level. If any of these
values are less than 95%, this is a strong indicator that the
setting for
DiskPageBufferMemory
needs to be increased in the config.ini
file.
A change in
DiskPageBufferMemory
requires a rolling restart of all of the cluster's data
nodes before it takes effect.
block_instance refers to an instance of a
kernel block. Together with the block name, this number can be
used to look up a given instance in the
threadblocks table. Using this
information, you can obtain information about disk page buffer
metrics relating to individual threads; an example query using
LIMIT 1 to limit the output to a single
thread is shown here:
mysql>SELECT>node_id, thr_no, block_name, thread_name, pages_written,>pages_written_lcp, pages_read, log_waits,>page_requests_direct_return, page_requests_wait_queue,>page_requests_wait_io>FROM ndbinfo.diskpagebuffer>INNER JOIN ndbinfo.threadblocks USING (node_id, block_instance)>INNER JOIN ndbinfo.threads USING (node_id, thr_no)>WHERE block_name = 'PGMAN' LIMIT 1\G*************************** 1. row *************************** node_id: 1 thr_no: 1 block_name: PGMAN thread_name: rep pages_written: 0 pages_written_lcp: 0 pages_read: 1 log_waits: 0 page_requests_direct_return: 4 page_requests_wait_queue: 0 page_requests_wait_io: 1 1 row in set (0.01 sec)
The diskstat table provides information about
writes to Disk Data tablespaces during the past 1 second.
The diskstat table contains the following
columns:
node_idNode ID of this node
block_instanceID of reporting instance of
PGMANpages_made_dirtyNumber of pages made dirty during the past second
reads_issuedReads issued during the past second
reads_completedReads completed during the past second
writes_issuedWrites issued during the past second
writes_completedWrites completed during the past second
log_writes_issuedNumber of times a page write has required a log write during the past second
log_writes_completedNumber of log writes completed during the last second
get_page_calls_issuedNumber of
get_page()calls issued during the past secondget_page_reqs_issuedNumber of times that a
get_page()call has resulted in a wait for I/O or completion of I/O already begun during the past secondget_page_reqs_completedNumber of
get_page()calls waiting for I/O or I/O completion that have completed during the past second
Notes
Each row in this table corresponds to an instance of
PGMAN; there is one such
instance per LDM thread plus an additional instance for each
data node.
The diskstat table was added in NDB 8.0.19.
The diskstats_1sec table provides information
about writes to Disk Data tablespaces over the past 20 seconds.
The diskstat table contains the following
columns:
node_idNode ID of this node
block_instanceID of reporting instance of
PGMANpages_made_dirtyPages made dirty during the designated 1-second interval
reads_issuedReads issued during the designated 1-second interval
reads_completedReads completed during the designated 1-second interval
writes_issuedWrites issued during the designated 1-second interval
writes_completedWrites completed during the designated 1-second interval
log_writes_issuedNumber of times a page write has required a log write during the designated 1-second interval
log_writes_completedNumber of log writes completed during the designated 1-second interval
get_page_calls_issuedNumber of
get_page()calls issued during the designated 1-second intervalget_page_reqs_issuedNumber of times that a
get_page()call has resulted in a wait for I/O or completion of I/O already begun during the designated 1-second intervalget_page_reqs_completedNumber of
get_page()calls waiting for I/O or I/O completion that have completed during the designated 1-second intervalseconds_agoNumber of 1-second intervals in the past of the interval to which this row applies
Notes
Each row in this table corresponds to an instance of
PGMAN during a 1-second
interval occurring from 0 to 19 seconds ago; there is one such
instance per LDM thread plus an additional instance for each
data node.
The diskstats_1sec table was added in NDB
8.0.19.
The error_messages table provides information
about
The error_messages table contains the
following columns:
error_codeNumeric error code
error_descriptionDescription of error
error_statusError status code
error_classificationError classification code
Notes
error_code is a numeric NDB error code. This
is the same error code that can be supplied to
ndb_perror (or, prior to NDB 8.0.13, to
perror --ndb).
error_description provides a basic
description of the condition causing the error.
The error_status column provides status
information relating to the error. Possible values for this
column are listed here:
No errorIllegal connect stringIllegal server handleIllegal reply from serverIllegal number of nodesIllegal node statusOut of memoryManagement server not connectedCould not connect to socketStart failedStop failedRestart failedCould not start backupCould not abort backupCould not enter single user modeCould not exit single user modeFailed to complete configuration changeFailed to get configurationUsage errorSuccessPermanent errorTemporary errorUnknown resultTemporary error, restart nodePermanent error, external action neededNdbd file system error, restart node initialUnknown
The error_classification column shows the error classification. See NDB Error Classifications, for information about classification codes and their meanings.
The locks_per_fragment table provides
information about counts of lock claim requests, and the
outcomes of these requests on a per-fragment basis, serving as a
companion table to
operations_per_fragment and
memory_per_fragment. This
table also shows the total time spent waiting for locks
successfully and unsuccessfully since fragment or table
creation, or since the most recent restart.
The locks_per_fragment table contains the
following columns:
fq_nameFully qualified table name
parent_fq_nameFully qualified name of parent object
typeTable type; see text for possible values
table_idTable ID
node_idReporting node ID
block_instanceLDM instance ID
fragment_numFragment identifier
ex_reqExclusive lock requests started
ex_imm_okExclusive lock requests immediately granted
ex_wait_okExclusive lock requests granted following wait
ex_wait_failExclusive lock requests not granted
sh_reqShared lock requests started
sh_imm_okShared lock requests immediately granted
sh_wait_okShared lock requests granted following wait
sh_wait_failShared lock requests not granted
wait_ok_millisTime spent waiting for lock requests that were granted, in milliseconds
wait_fail_millisTime spent waiting for lock requests that failed, in milliseconds
Notes
block_instance refers to an instance of a
kernel block. Together with the block name, this number can be
used to look up a given instance in the
threadblocks table.
fq_name is a fully qualified database object
name in
database/schema/name
format, such as test/def/t1 or
sys/def/10/b$unique.
parent_fq_name is the fully qualified name of
this object's parent object (table).
table_id is the table's internal ID
generated by NDB. This is the same internal
table ID shown in other ndbinfo tables; it is
also visible in the output of
ndb_show_tables.
The type column shows the type of table. This
is always one of System table, User
table, Unique hash index,
Hash index, Unique ordered
index, Ordered index, Hash
index trigger, Subscription
trigger, Read only constraint,
Index trigger, Reorganize
trigger, Tablespace, Log
file group, Data file,
Undo file, Hash map,
Foreign key definition, Foreign key
parent trigger, Foreign key child
trigger, or Schema transaction.
The values shown in all of the columns
ex_req, ex_req_imm_ok,
ex_wait_ok, ex_wait_fail,
sh_req, sh_req_imm_ok,
sh_wait_ok, and
sh_wait_fail represent cumulative numbers of
requests since the table or fragment was created, or since the
last restart of this node, whichever of these occurred later.
This is also true for the time values shown in the
wait_ok_millis and
wait_fail_millis columns.
Every lock request is considered either to be in progress, or to have completed in some way (that is, to have succeeded or failed). This means that the following relationships are true:
ex_req >= (ex_req_imm_ok + ex_wait_ok + ex_wait_fail) sh_req >= (sh_req_imm_ok + sh_wait_ok + sh_wait_fail)
The number of requests currently in progress is the current number of incomplete requests, which can be found as shown here:
[exclusive lock requests in progress] =
ex_req - (ex_req_imm_ok + ex_wait_ok + ex_wait_fail)
[shared lock requests in progress] =
sh_req - (sh_req_imm_ok + sh_wait_ok + sh_wait_fail)A failed wait indicates an aborted transaction, but the abort may or may not be caused by a lock wait timeout. You can obtain the total number of aborts while waiting for locks as shown here:
[aborts while waiting for locks] = ex_wait_fail + sh_wait_fail
The logbuffer table provides information on
NDB Cluster log buffer usage.
The logbuffers table contains the following
columns:
node_idThe ID of this data node.
log_typeType of log. One of:
REDO,DD-UNDO,BACKUP-DATA, orBACKUP-LOG.log_idThe log ID; for Disk Data undo log files, this is the same as the value shown in the
LOGFILE_GROUP_NUMBERcolumn of theINFORMATION_SCHEMA.FILEStableas well as the value shown for thelog_idcolumn of thendbinfologspacestablelog_partThe log part number
totalTotal space available for this log
usedSpace used by this log
Notes
logbuffers table rows reflecting two
additional log types are available when performing an NDB
backup. One of these rows has the log type
BACKUP-DATA, which shows the amount of data
buffer used during backup to copy fragments to backup files. The
other row has the log type BACKUP-LOG, which
displays the amount of log buffer used during the backup to
record changes made after the backup has started. One each of
these log_type rows is shown in the
logbuffers table for each data node in the
cluster. These rows are not present unless an NDB backup is
currently being performed.
This table provides information about NDB Cluster log space usage.
The logspaces table contains the following
columns:
node_idThe ID of this data node.
log_typeType of log; one of:
REDOorDD-UNDO.node_idThe log ID; for Disk Data undo log files, this is the same as the value shown in the
LOGFILE_GROUP_NUMBERcolumn of theINFORMATION_SCHEMA.FILEStable, as well as the value shown for thelog_idcolumn of thendbinfologbufferstablelog_partThe log part number.
totalTotal space available for this log.
usedSpace used by this log.
The membership table describes the view that
each data node has of all the others in the cluster, including
node group membership, president node, arbitrator, arbitrator
successor, arbitrator connection states, and other information.
The membership table contains the following
columns:
node_idThis node's node ID
group_idNode group to which this node belongs
left nodeNode ID of the previous node
right_nodeNode ID of the next node
presidentPresident's node ID
successorNode ID of successor to president
succession_orderOrder in which this node succeeds to presidency
Conf_HB_order-
arbitratorNode ID of arbitrator
arb_ticketInternal identifier used to track arbitration
arb_stateArbitration state
arb_connectedWhether this node is connected to the arbitrator; either of
YesorNoconnected_rank1_arbsConnected arbitrators of rank 1
connected_rank2_arbsConnected arbitrators of rank 1
Notes
The node ID and node group ID are the same as reported by ndb_mgm -e "SHOW".
left_node and right_node
are defined in terms of a model that connects all data nodes in
a circle, in order of their node IDs, similar to the ordering of
the numbers on a clock dial, as shown here:
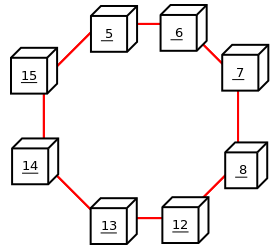
In this example, we have 8 data nodes, numbered 5, 6, 7, 8, 12, 13, 14, and 15, ordered clockwise in a circle. We determine “left” and “right” from the interior of the circle. The node to the left of node 5 is node 15, and the node to the right of node 5 is node 6. You can see all these relationships by running the following query and observing the output:
mysql>SELECT node_id,left_node,right_node->FROM ndbinfo.membership;+---------+-----------+------------+ | node_id | left_node | right_node | +---------+-----------+------------+ | 5 | 15 | 6 | | 6 | 5 | 7 | | 7 | 6 | 8 | | 8 | 7 | 12 | | 12 | 8 | 13 | | 13 | 12 | 14 | | 14 | 13 | 15 | | 15 | 14 | 5 | +---------+-----------+------------+ 8 rows in set (0.00 sec)
The designations “left” and “right” are used in the event log in the same way.
The president node is the node viewed by the
current node as responsible for setting an arbitrator (see
NDB Cluster Start Phases). If the president
fails or becomes disconnected, the current node expects the node
whose ID is shown in the successor column to
become the new president. The
succession_order column shows the place in
the succession queue that the current node views itself as
having.
In a normal NDB Cluster, all data nodes should see the same node
as president, and the same node (other than
the president) as its successor. In addition,
the current president should see itself as 1
in the order of succession, the successor
node should see itself as 2, and so on.
All nodes should show the same arb_ticket
values as well as the same arb_state values.
Possible arb_state values are
ARBIT_NULL, ARBIT_INIT,
ARBIT_FIND, ARBIT_PREP1,
ARBIT_PREP2, ARBIT_START,
ARBIT_RUN, ARBIT_CHOOSE,
ARBIT_CRASH, and UNKNOWN.
arb_connected shows whether this node is
connected to the node shown as this node's
arbitrator.
The connected_rank1_arbs and
connected_rank2_arbs columns each display a
list of 0 or more arbitrators having an
ArbitrationRank equal to
1, or to 2, respectively.
Both management nodes and API nodes are eligible to become arbitrators.
Querying this table provides information similar to that
provided by the ALL REPORT
MemoryUsage command in the ndb_mgm
client, or logged by ALL DUMP
1000.
The memoryusage table contains the following
columns:
node_idThe node ID of this data node.
memory_typeOne of
Data memory,Index memory, orLong message buffer.usedNumber of bytes currently used for data memory or index memory by this data node.
used_pagesNumber of pages currently used for data memory or index memory by this data node; see text.
totalTotal number of bytes of data memory or index memory available for this data node; see text.
total_pagesTotal number of memory pages available for data memory or index memory on this data node; see text.
Notes
The total column represents the total amount
of memory in bytes available for the given resource (data memory
or index memory) on a particular data node. This number should
be approximately equal to the setting of the corresponding
configuration parameter in the config.ini
file.
Suppose that the cluster has 2 data nodes having node IDs
5 and 6, and the
config.ini file contains the following:
[ndbd default] DataMemory = 1G IndexMemory = 1G
Suppose also that the value of the
LongMessageBuffer
configuration parameter is allowed to assume its default (64
MB).
The following query shows approximately the same values:
mysql> SELECT node_id, memory_type, total
> FROM ndbinfo.memoryusage;
+---------+---------------------+------------+
| node_id | memory_type | total |
+---------+---------------------+------------+
| 5 | Data memory | 1073741824 |
| 5 | Index memory | 1074003968 |
| 5 | Long message buffer | 67108864 |
| 6 | Data memory | 1073741824 |
| 6 | Index memory | 1074003968 |
| 6 | Long message buffer | 67108864 |
+---------+---------------------+------------+
6 rows in set (0.00 sec)
In this case, the total column values for
index memory are slightly higher than the value set of
IndexMemory due to
internal rounding.
For the used_pages and
total_pages columns, resources are measured
in pages, which are 32K in size for
DataMemory and 8K for
IndexMemory. For long
message buffer memory, the page size is 256 bytes.
The memory_per_fragment table provides
information about the usage of memory by individual fragments.
The memory_per_fragment table contains the
following columns:
fq_nameName of this fragment
parent_fq_nameName of this fragment's parent
typeType of object; see text for possible values
table_idTable ID for this table
node_idNode ID for this node
block_instanceKernel block instance ID
fragment_numFragment ID (number)
fixed_elem_alloc_bytesNumber of bytes allocated for fixed-sized elements
fixed_elem_free_bytesFree bytes remaining in pages allocated to fixed-size elements
fixed_elem_size_bytesLength of each fixed-size element in bytes
fixed_elem_countNumber of fixed-size elements
fixed_elem_free_countNumber of free rows for fixed-size elements
var_elem_alloc_bytesNumber of bytes allocated for variable-size elements
var_elem_free_bytesFree bytes remaining in pages allocated to variable-size elements
var_elem_countNumber of variable-size elements
hash_index_alloc_bytesNumber of bytes allocated to hash indexes
Notes
The type column from this table shows the
dictionary object type used for this fragment
(Object::Type, in the NDB API),
and can take any one of the values shown in the following list:
System table
User table
Unique hash index
Hash index
Unique ordered index
Ordered index
Hash index trigger
Subscription trigger
Read only constraint
Index trigger
Reorganize trigger
Tablespace
Log file group
Data file
Undo file
Hash map
Foreign key definition
Foreign key parent trigger
Foreign key child trigger
Schema transaction
You can also obtain this list by executing
SELECT * FROM
ndbinfo.dict_obj_types in the
mysql client.
The block_instance column provides the NDB
kernel block instance number. You can use this to obtain
information about specific threads from the
threadblocks table.
This table contains information on the status of data nodes. For each data node that is running in the cluster, a corresponding row in this table provides the node's node ID, status, and uptime. For nodes that are starting, it also shows the current start phase.
The nodes table contains the following
columns:
node_idThe data node's unique node ID in the cluster.
uptimeTime since the node was last started, in seconds.
statusCurrent status of the data node; see text for possible values.
start_phaseIf the data node is starting, the current start phase.
config_generationThe version of the cluster configuration file in use on this data node.
Notes
The uptime column shows the time in seconds
that this node has been running since it was last started or
restarted. This is a BIGINT
value. This figure includes the time actually needed to start
the node; in other words, this counter starts running the moment
that ndbd or ndbmtd is
first invoked; thus, even for a node that has not yet finished
starting, uptime may show a nonzero value.
The status column shows the node's
current status. This is one of: NOTHING,
CMVMI, STARTING,
STARTED, SINGLEUSER,
STOPPING_1, STOPPING_2,
STOPPING_3, or STOPPING_4.
When the status is STARTING, you can see the
current start phase in the start_phase column
(see later in this section). SINGLEUSER is
displayed in the status column for all data
nodes when the cluster is in single user mode (see
Section 22.5.6, “NDB Cluster Single User Mode”). Seeing one of
the STOPPING states does not necessarily mean
that the node is shutting down but can mean rather that it is
entering a new state. For example, if you put the cluster in
single user mode, you can sometimes see data nodes report their
state briefly as STOPPING_2 before the status
changes to SINGLEUSER.
The start_phase column uses the same range of
values as those used in the output of the
ndb_mgm client
node_id
STATUS0. For a listing of NDB Cluster start phases
with descriptions, see
Section 22.5.4, “Summary of NDB Cluster Start Phases”.
The config_generation column shows which
version of the cluster configuration is in effect on each data
node. This can be useful when performing a rolling restart of
the cluster in order to make changes in configuration
parameters. For example, from the output of the following
SELECT statement, you can see
that node 3 is not yet using the latest version of the cluster
configuration (6) although nodes 1, 2, and 4
are doing so:
mysql>USE ndbinfo;Database changed mysql>SELECT * FROM nodes;+---------+--------+---------+-------------+-------------------+ | node_id | uptime | status | start_phase | config_generation | +---------+--------+---------+-------------+-------------------+ | 1 | 10462 | STARTED | 0 | 6 | | 2 | 10460 | STARTED | 0 | 6 | | 3 | 10457 | STARTED | 0 | 5 | | 4 | 10455 | STARTED | 0 | 6 | +---------+--------+---------+-------------+-------------------+ 2 rows in set (0.04 sec)
Therefore, for the case just shown, you should restart node 3 to complete the rolling restart of the cluster.
Nodes that are stopped are not accounted for in this table. Suppose that you have an NDB Cluster with 4 data nodes (node IDs 1, 2, 3 and 4), and all nodes are running normally, then this table contains 4 rows, 1 for each data node:
mysql>USE ndbinfo;Database changed mysql>SELECT * FROM nodes;+---------+--------+---------+-------------+-------------------+ | node_id | uptime | status | start_phase | config_generation | +---------+--------+---------+-------------+-------------------+ | 1 | 11776 | STARTED | 0 | 6 | | 2 | 11774 | STARTED | 0 | 6 | | 3 | 11771 | STARTED | 0 | 6 | | 4 | 11769 | STARTED | 0 | 6 | +---------+--------+---------+-------------+-------------------+ 4 rows in set (0.04 sec)
If you shut down one of the nodes, only the nodes that are still
running are represented in the output of this
SELECT statement, as shown here:
ndb_mgm> 2 STOP
Node 2: Node shutdown initiated
Node 2: Node shutdown completed.
Node 2 has shutdown.
mysql> SELECT * FROM nodes;
+---------+--------+---------+-------------+-------------------+
| node_id | uptime | status | start_phase | config_generation |
+---------+--------+---------+-------------+-------------------+
| 1 | 11807 | STARTED | 0 | 6 |
| 3 | 11802 | STARTED | 0 | 6 |
| 4 | 11800 | STARTED | 0 | 6 |
+---------+--------+---------+-------------+-------------------+
3 rows in set (0.02 sec)
The operations_per_fragment table provides
information about the operations performed on individual
fragments and fragment replicas, as well as about some of the
results from these operations.
The operations_per_fragment table contains
the following columns:
fq_nameName of this fragment
parent_fq_nameName of this fragment's parent
typeType of object; see text for possible values
table_idTable ID for this table
node_idNode ID for this node
block_instanceKernel block instance ID
fragment_numFragment ID (number)
tot_key_readsTotal number of key reads for this fragment replica
tot_key_insertsTotal number of key inserts for this fragment replica
tot_key_updatestotal number of key updates for this fragment replica
tot_key_writesTotal number of key writes for this fragment replica
tot_key_deletesTotal number of key deletes for this fragment replica
tot_key_refsNumber of key operations refused
tot_key_attrinfo_bytesTotal size of all
attrinfoattributestot_key_keyinfo_bytesTotal size of all
keyinfoattributestot_key_prog_bytesTotal size of all interpreted programs carried by
attrinfoattributestot_key_inst_execTotal number of instructions executed by interpreted programs for key operations
tot_key_bytes_returnedTotal size of all data and metadata returned from key read operations
tot_frag_scansTotal number of scans performed on this fragment replica
tot_scan_rows_examinedTotal number of rows examined by scans
tot_scan_rows_returnedTotal number of rows returned to client
tot_scan_bytes_returnedTotal size of data and metadata returned to the client
tot_scan_prog_bytesTotal size of interpreted programs for scan operations
tot_scan_bound_bytesTotal size of all bounds used in ordered index scans
tot_scan_inst_execTotal number of instructions executed for scans
tot_qd_frag_scansNumber of times that scans of this fragment replica have been queued
conc_frag_scansNumber of scans currently active on this fragment replica (excluding queued scans)
conc_qd_frag_scansNumber of scans currently queued for this fragment replica
tot_commits
Total number of row changes committed to this fragment replica
Notes
The fq_name contains the fully qualified name
of the schema object to which this fragment replica belongs.
This currently has the following formats:
Base table:
DbName/def/TblNameBLOBtable:DbName/def/NDB$BLOB_BaseTblId_ColNoOrdered index:
sys/def/BaseTblId/IndexNameUnique index:
sys/def/BaseTblId/IndexName$unique
The $unique suffix shown for unique indexes
is added by mysqld; for an index created by a
different NDB API client application, this may differ, or not be
present.
The syntax just shown for fully qualified object names is an internal interface which is subject to change in future releases.
Consider a table t1 created and modified by
the following SQL statements:
CREATE DATABASE mydb; USE mydb; CREATE TABLE t1 ( a INT NOT NULL, b INT NOT NULL, t TEXT NOT NULL, PRIMARY KEY (b) ) ENGINE=ndbcluster; CREATE UNIQUE INDEX ix1 ON t1(b) USING HASH;
If t1 is assigned table ID 11, this yields
the fq_name values shown here:
Base table:
mydb/def/t1BLOBtable:mydb/def/NDB$BLOB_11_2Ordered index (primary key):
sys/def/11/PRIMARYUnique index:
sys/def/11/ix1$unique
For indexes or BLOB tables, the
parent_fq_name column contains the
fq_name of the corresponding base table. For
base tables, this column is always NULL.
The type column shows the schema object type
used for this fragment, which can take any one of the values
System table, User table,
Unique hash index, or Ordered
index. BLOB tables are shown as
User table.
The table_id column value is unique at any
given time, but can be reused if the corresponding object has
been deleted. The same ID can be seen using the
ndb_show_tables utility.
The block_instance column shows which LDM
instance this fragment replica belongs to. You can use this to
obtain information about specific threads from the
threadblocks table. The first
such instance is always numbered 0.
Since there are typically two replicas, and assuming that this
is so, each fragment_num value should appear
twice in the table, on two different data nodes from the same
node group.
Since NDB does not use single-key access for
ordered indexes, the counts for
tot_key_reads,
tot_key_inserts,
tot_key_updates,
tot_key_writes, and
tot_key_deletes are not incremented by
ordered index operations.
When using tot_key_writes, you should keep
in mind that a write operation in this context updates the row
if the key exists, and inserts a new row otherwise. (One use
of this is in the NDB implementation of the
REPLACE SQL statement.)
The tot_key_refs column shows the number of
key operations refused by the LDM. Generally, such a refusal is
due to duplicate keys (inserts), Key not
found errors (updates, deletes, and reads), or the
operation was rejected by an interpreted program used as a
predicate on the row matching the key.
The attrinfo and keyinfo
attributes counted by the
tot_key_attrinfo_bytes and
tot_key_keyinfo_bytes columns are attributes
of an LQHKEYREQ signal (see
The NDB Communication Protocol) used to initiate a
key operation by the LDM. An attrinfo
typically contains tuple field values (inserts and updates) or
projection specifications (for reads);
keyinfo contains the primary or unique key
needed to locate a given tuple in this schema object.
The value shown by tot_frag_scans includes
both full scans (that examine every row) and scans of subsets.
Unique indexes and BLOB tables are never
scanned, so this value, like other scan-related counts, is 0 for
fragment replicas of these.
tot_scan_rows_examined may display less than
the total number of rows in a given fragment replica, since
ordered index scans can limited by bounds. In addition, a client
may choose to end a scan before all potentially matching rows
have been examined; this occurs when using an SQL statement
containing a LIMIT or
EXISTS clause, for example.
tot_scan_rows_returned is always less than or
equal to tot_scan_rows_examined.
tot_scan_bytes_returned includes, in the case
of pushed joins, projections returned to the
DBSPJ block in the NDB
kernel.
tot_qd_frag_scans can be effected by the
setting for the
MaxParallelScansPerFragment
data node configuration parameter, which limits the number of
scans that may execute concurrently on a single fragment
replica.
This table provides information regarding the latency of disk operations for NDB Cluster Disk Data tablespaces.
The pgman_time_track_stats table contains the
following columns:
node_idUnique node ID of this node in the cluster
block_numberBlock number (from
blockstable)block_instanceBlock instance number
upper_boundUpper bound
page_readsPage read latency (ms)
page_writesPage write latency (ms)
log_waitsLog wait latency (ms)
get_pageLatency of
get_page()calls (ms)
Notes
The read latency (page_reads column) measures
the time from when the read request is sent to the file system
thread until the read is complete and has been reported back to
the execution thread. The write latency
(page_writes) is calculated in a similar
fashion. The size of the page read to or written from a Disk
Data tablespace is always 32 KB.
Log wait latency (log_waits column) is the
length of time a page write must wait for the undo log to be
flushed, which must be done prior to each page write.
The pgman_time_track_stats table was added in
NDB 8.0.19.
This table contains information about NDB Cluster node
processes; each node is represented by the row in the table.
Only nodes that are connected to the cluster are shown in this
table. You can obtain information about nodes that are
configured but not connected to the cluster from the
nodes and
config_nodes tables.
The processes table contains the following
columns:
node_idThe node's unique node ID in the cluster
node_typeType of node (management, data, or API node; see text)
node_versionVersion of the
NDBsoftware program running on this node.process_idThis node's process ID
angel_process_idProcess ID of this node's angel process
process_nameName of the executable
service_URIService URI of this node (see text)
Notes
node_id is the ID assigned to this node in
the cluster.
The node_type column displays one of the
following three values:
MGM: Management node.NDB: Data node.API: API or SQL node.
For an executable shipped with the NDB Cluster distribution,
node_version shows the software Cluster
version string, such as
8.0.21-ndb-8.0.21.
process_id is the node executable's
process ID as shown by the host operating system using a process
display application such as top on Linux, or
the Task Manager on Windows platforms.
angel_process_id is the system process ID for
the node's angel process, which ensures that a data node or
SQL is automatically restarted in cases of failures. For
management nodes and API nodes other than SQL nodes, the value
of this column is NULL.
The process_name column shows the name of the
running executable. For management nodes, this is
ndb_mgmd. For data nodes, this is
ndbd (single-threaded) or
ndbmtd (multithreaded). For SQL nodes, this
is mysqld. For other types of API nodes, it
is the name of the executable program connected to the cluster;
NDB API applications can set a custom value for this using
Ndb_cluster_connection::set_name().
service_URI shows the service network
address. For management nodes and data nodes, the scheme used is
ndb://. For SQL nodes, this is
mysql://. By default, API nodes other than
SQL nodes use ndb:// for the scheme; NDB API
applications can set this to a custom value using
Ndb_cluster_connection::set_service_uri().
regardless of the node type, the scheme is followed by the IP
address used by the NDB transporter for the node in question.
For management nodes and SQL nodes, this address includes the
port number (usually 1186 for management nodes and 3306 for SQL
nodes). If the SQL node was started with the
bind_address system variable
set, this address is used instead of the transporter address,
unless the bind address is set to *,
0.0.0.0, or ::.
Additional path information may be included in the
service_URI value for an SQL node reflecting
various configuration options. For example,
mysql://198.51.100.3/tmp/mysql.sock indicates
that the SQL node was started with the
skip_networking system variable
enabled, and
mysql://198.51.100.3:3306/?server-id=1 shows
that replication is enabled for this SQL node.
This table provides information about data node resource availability and usage.
These resources are sometimes known as super-pools.
The resources table contains the following
columns:
node_idThe unique node ID of this data node.
resource_nameName of the resource; see text.
reservedThe amount reserved for this resource.
usedThe amount actually used by this resource.
maxThe maximum amount of this resource used, since the node was last started.
Notes
The resource_name can be any one of the names
shown in the following table:
RESERVED: Reserved by the system; cannot be overridden.DISK_OPERATIONS: If a log file group is allocated, the size of the undo log buffer is used to set the size of this resource. This resource is used only to allocate the undo log buffer for an undo log file group; there can only be one such group. Overallocation occurs as needed byCREATE LOGFILE GROUP.DISK_RECORDS: Records allocated for Disk Data operations.DATA_MEMORY: Used for main memory tuples, indexes, and hash indexes. Sum of DataMemory and IndexMemory, plus 8 pages of 32 KB each if IndexMemory has been set. Cannot be overallocated.JOBBUFFER: Used for allocating job buffers by the NDB scheduler; cannot be overallocated. This is approximately 2 MB per thread plus a 1 MB buffer in both directions for all threads that can communicate. For large configurations this consume several GB.FILE_BUFFERS: Used by the redo log handler in theDBLQHkernel block; cannot be overallocated. Size isNoOfFragmentLogParts*RedoBuffer, plus 1 MB per log file part.TRANSPORTER_BUFFERS: Used for send buffers by ndbmtd; the sum ofTotalSendBufferMemoryandExtraSendBufferMemory. This resource that can be overallocated by up to 25 percent.TotalSendBufferMemoryis calculated by summing the send buffer memory per node, the default value of which is 2 MB. Thus, in a system having four data nodes and eight API nodes, the data nodes have 12 * 2 MB send buffer memory.ExtraSendBufferMemoryis used by ndbmtd and amounts to 2 MB extra memory per thread. Thus, with 4 LDM threads, 2 TC threads, 1 main thread, 1 replication thread, and 2 receive threads,ExtraSendBufferMemoryis 10 * 2 MB. Overallocation of this resource can be performed by setting theSharedGlobalMemorydata node configuration parameter.DISK_PAGE_BUFFER: Used for the disk page buffer; determined by theDiskPageBufferMemoryconfiguration parameter. Cannot be overallocated.QUERY_MEMORY: Used by theDBSPJkernel block.SCHEMA_TRANS_MEMORY: Minimum is 2 MB; can be overallocated to use any remaining available memory.
The restart_info table contains information
about node restart operations. Each entry in the table
corresponds to a node restart status report in real time from a
data node with the given node ID. Only the most recent report
for any given node is shown.
The restart_info table contains the following
columns:
node_idNode ID in the cluster
node_restart_statusNode status; see text for values. Each of these corresponds to a possible value of
node_restart_status_int.node_restart_status_intNode status code; see text for values.
secs_to_complete_node_failureTime in seconds to complete node failure handling
secs_to_allocate_node_idTime in seconds from node failure completion to allocation of node ID
secs_to_include_in_heartbeat_protocolTime in seconds from allocation of node ID to inclusion in heartbeat protocol
secs_until_wait_for_ndbcntr_masterTime in seconds from being included in heartbeat protocol until waiting for
NDBCNTRmaster begansecs_wait_for_ndbcntr_masterTime in seconds spent waiting to be accepted by
NDBCNTRmaster for startingsecs_to_get_start_permittedTime in seconds elapsed from receiving of permission for start from master until all nodes have accepted start of this node
secs_to_wait_for_lcp_for_copy_meta_dataTime in seconds spent waiting for LCP completion before copying meta data
secs_to_copy_meta_dataTime in seconds required to copy metadata from master to newly starting node
secs_to_include_nodeTime in seconds waited for GCP and inclusion of all nodes into protocols
secs_starting_node_to_request_local_recoveryTime in seconds that the node just starting spent waiting to request local recovery
secs_for_local_recoveryTime in seconds required for local recovery by node just starting
secs_restore_fragmentsTime in seconds required to restore fragments from LCP files
secs_undo_disk_dataTime in seconds required to execute undo log on disk data part of records
secs_exec_redo_logTime in seconds required to execute redo log on all restored fragments
secs_index_rebuildTime in seconds required to rebuild indexes on restored fragments
secs_to_synchronize_starting_nodeTime in seconds required to synchronize starting node from live nodes
secs_wait_lcp_for_restartTime in seconds required for LCP start and completion before restart was completed
secs_wait_subscription_handoverTime in seconds spent waiting for handover of replication subscriptions
total_restart_secsTotal number of seconds from node failure until node is started again
Notes
The following list contains values defined for the
node_restart_status_int column with their
internal status names (in parentheses), and the corresponding
messages shown in the node_restart_status
column:
0(ALLOCATED_NODE_ID)Allocated node id1(INCLUDED_IN_HB_PROTOCOL)Included in heartbeat protocol2(NDBCNTR_START_WAIT)Wait for NDBCNTR master to permit us to start3(NDBCNTR_STARTED)NDBCNTR master permitted us to start4(START_PERMITTED)All nodes permitted us to start5(WAIT_LCP_TO_COPY_DICT)Wait for LCP completion to start copying metadata6(COPY_DICT_TO_STARTING_NODE)Copying metadata to starting node7(INCLUDE_NODE_IN_LCP_AND_GCP)Include node in LCP and GCP protocols8(LOCAL_RECOVERY_STARTED)Restore fragments ongoing9(COPY_FRAGMENTS_STARTED)Synchronizing starting node with live nodes10(WAIT_LCP_FOR_RESTART)Wait for LCP to ensure durability11(WAIT_SUMA_HANDOVER)Wait for handover of subscriptions12(RESTART_COMPLETED)Restart completed13(NODE_FAILED)Node failed, failure handling in progress14(NODE_FAILURE_COMPLETED)Node failure handling completed15(NODE_GETTING_PERMIT)All nodes permitted us to start16(NODE_GETTING_INCLUDED)Include node in LCP and GCP protocols17(NODE_GETTING_SYNCHED)Synchronizing starting node with live nodes18(NODE_GETTING_LCP_WAITED)[none]
19(NODE_ACTIVE)Restart completed20(NOT_DEFINED_IN_CLUSTER)[none]
21(NODE_NOT_RESTARTED_YET)Initial state
Status numbers 0 through 12 apply on master nodes only; the remainder of those shown in the table apply to all restarting data nodes. Status numbers 13 and 14 define node failure states; 20 and 21 occur when no information about the restart of a given node is available.
See also Section 22.5.4, “Summary of NDB Cluster Start Phases”.
The server_locks table is similar in
structure to the cluster_locks table, and
provides a subset of the information found in the latter table,
but which is specific to the SQL node (MySQL server) where it
resides. (The cluster_locks table provides
information about all locks in the cluster.) More precisely,
server_locks contains information about locks
requested by threads belonging to the current
mysqld instance, and serves as a companion
table to server_operations.
This may be useful for correlating locking patterns with
specific MySQL user sessions, queries, or use cases.
The server_locks table contains the following
columns:
mysql_connection_idMySQL connection ID
node_idID of reporting node
block_instanceID of reporting LDM instance
tableidID of table containing this row
fragmentidID of fragment containing locked row
rowidID of locked row
transidTransaction ID
modeLock request mode
stateLock state
detailWhether this is first holding lock in row lock queue
opOperation type
duration_millisMilliseconds spent waiting or holding lock
lock_numID of lock object
waiting_forWaiting for lock with this ID
Notes
The mysql_connection_id column shows the
MySQL connection or thread ID as shown by
SHOW PROCESSLIST.
block_instance refers to an instance of a
kernel block. Together with the block name, this number can be
used to look up a given instance in the
threadblocks table.
The tableid is assigned to the table by
NDB; the same ID is used for this table in
other ndbinfo tables, as well as in the
output of ndb_show_tables.
The transaction ID shown in the transid
column is the identifier generated by the NDB API for the
transaction requesting or holding the current lock.
The mode column shows the lock mode, which is
always one of S (shared lock) or
X (exclusive lock). If a transaction has an
exclusive lock on a given row, all other locks on that row have
the same transaction ID.
The state column shows the lock state. Its
value is always one of H (holding) or
W (waiting). A waiting lock request waits for
a lock held by a different transaction.
The detail column indicates whether this lock
is the first holding lock in the affected row's lock queue,
in which case it contains a * (asterisk
character); otherwise, this column is empty. This information
can be used to help identify the unique entries in a list of
lock requests.
The op column shows the type of operation
requesting the lock. This is always one of the values
READ, INSERT,
UPDATE, DELETE,
SCAN, or REFRESH.
The duration_millis column shows the number
of milliseconds for which this lock request has been waiting or
holding the lock. This is reset to 0 when a lock is granted for
a waiting request.
The lock ID (lockid column) is unique to this
node and block instance.
If the lock_state column's value is
W, this lock is waiting to be granted, and
the waiting_for column shows the lock ID of
the lock object this request is waiting for. Otherwise,
waiting_for is empty.
waiting_for can refer only to locks on the
same row (as identified by node_id,
block_instance, tableid,
fragmentid, and rowid).
The server_operations table contains entries
for all ongoing NDB operations that
the current SQL node (MySQL Server) is currently involved in. It
effectively is a subset of the
cluster_operations table, in
which operations for other SQL and API nodes are not shown.
The server_operations table contains the
following columns:
mysql_connection_idMySQL Server connection ID
node_idNode ID
block_instanceBlock instance
transidTransaction ID
operation_typeOperation type (see text for possible values)
stateOperation state (see text for possible values)
tableidTable ID
fragmentidFragment ID
client_node_idClient node ID
client_block_refClient block reference
tc_node_idTransaction coordinator node ID
tc_block_noTransaction coordinator block number
tc_block_instanceTransaction coordinator block instance
Notes
The mysql_connection_id is the same as the
connection or session ID shown in the output of
SHOW PROCESSLIST. It is obtained
from the INFORMATION_SCHEMA table
NDB_TRANSID_MYSQL_CONNECTION_MAP.
block_instance refers to an instance of a
kernel block. Together with the block name, this number can be
used to look up a given instance in the
threadblocks table.
The transaction ID (transid) is a unique
64-bit number which can be obtained using the NDB API's
getTransactionId()
method. (Currently, the MySQL Server does not expose the NDB API
transaction ID of an ongoing transaction.)
The operation_type column can take any one of
the values READ, READ-SH,
READ-EX, INSERT,
UPDATE, DELETE,
WRITE, UNLOCK,
REFRESH, SCAN,
SCAN-SH, SCAN-EX, or
<unknown>.
The state column can have any one of the
values ABORT_QUEUED,
ABORT_STOPPED, COMMITTED,
COMMIT_QUEUED,
COMMIT_STOPPED,
COPY_CLOSE_STOPPED,
COPY_FIRST_STOPPED,
COPY_STOPPED, COPY_TUPKEY,
IDLE, LOG_ABORT_QUEUED,
LOG_COMMIT_QUEUED,
LOG_COMMIT_QUEUED_WAIT_SIGNAL,
LOG_COMMIT_WRITTEN,
LOG_COMMIT_WRITTEN_WAIT_SIGNAL,
LOG_QUEUED, PREPARED,
PREPARED_RECEIVED_COMMIT,
SCAN_CHECK_STOPPED,
SCAN_CLOSE_STOPPED,
SCAN_FIRST_STOPPED,
SCAN_RELEASE_STOPPED,
SCAN_STATE_USED,
SCAN_STOPPED, SCAN_TUPKEY,
STOPPED, TC_NOT_CONNECTED,
WAIT_ACC, WAIT_ACC_ABORT,
WAIT_AI_AFTER_ABORT,
WAIT_ATTR, WAIT_SCAN_AI,
WAIT_TUP, WAIT_TUPKEYINFO,
WAIT_TUP_COMMIT, or
WAIT_TUP_TO_ABORT. (If the MySQL Server is
running with
ndbinfo_show_hidden enabled,
you can view this list of states by selecting from the
ndb$dblqh_tcconnect_state table, which is
normally hidden.)
You can obtain the name of an NDB table from
its table ID by checking the output of
ndb_show_tables.
The fragid is the same as the partition
number seen in the output of ndb_desc
--extra-partition-info (short
form -p).
In client_node_id and
client_block_ref, client
refers to an NDB Cluster API or SQL node (that is, an NDB API
client or a MySQL Server attached to the cluster).
The block_instance and
tc_block_instance column provide NDB kernel
block instance numbers. You can use these to obtain information
about specific threads from the
threadblocks table.
The server_transactions table is subset of
the cluster_transactions
table, but includes only those transactions in which the current
SQL node (MySQL Server) is a participant, while including the
relevant connection IDs.
The server_transactions table contains the
following columns:
mysql_connection_idMySQL Server connection ID
node_idTransaction coordinator node ID
block_instanceTransaction coordinator block instance
transidTransaction ID
stateOperation state (see text for possible values)
count_operationsNumber of stateful operations in the transaction
outstanding_operationsOperations still being executed by local data management layer (LQH blocks)
inactive_secondsTime spent waiting for API
client_node_idClient node ID
client_block_refClient block reference
Notes
The mysql_connection_id is the same as the
connection or session ID shown in the output of
SHOW PROCESSLIST. It is obtained
from the INFORMATION_SCHEMA table
NDB_TRANSID_MYSQL_CONNECTION_MAP.
block_instance refers to an instance of a
kernel block. Together with the block name, this number can be
used to look up a given instance in the
threadblocks table.
The transaction ID (transid) is a unique
64-bit number which can be obtained using the NDB API's
getTransactionId()
method. (Currently, the MySQL Server does not expose the NDB API
transaction ID of an ongoing transaction.)
The state column can have any one of the
values CS_ABORTING,
CS_COMMITTING,
CS_COMMIT_SENT,
CS_COMPLETE_SENT,
CS_COMPLETING,
CS_CONNECTED,
CS_DISCONNECTED,
CS_FAIL_ABORTED,
CS_FAIL_ABORTING,
CS_FAIL_COMMITTED,
CS_FAIL_COMMITTING,
CS_FAIL_COMPLETED,
CS_FAIL_PREPARED,
CS_PREPARE_TO_COMMIT,
CS_RECEIVING,
CS_REC_COMMITTING,
CS_RESTART,
CS_SEND_FIRE_TRIG_REQ,
CS_STARTED,
CS_START_COMMITTING,
CS_START_SCAN,
CS_WAIT_ABORT_CONF,
CS_WAIT_COMMIT_CONF,
CS_WAIT_COMPLETE_CONF,
CS_WAIT_FIRE_TRIG_REQ. (If the MySQL Server
is running with
ndbinfo_show_hidden enabled,
you can view this list of states by selecting from the
ndb$dbtc_apiconnect_state table, which is
normally hidden.)
In client_node_id and
client_block_ref, client
refers to an NDB Cluster API or SQL node (that is, an NDB API
client or a MySQL Server attached to the cluster).
The block_instance column provides the
DBTC kernel block instance
number. You can use this to obtain information about specific
threads from the threadblocks
table.
The table_distribution_status table provides
information about the progress of table distribution for
NDB tables.
The table_distribution_status table contains
the following columns:
node_idNode id
table_idTable ID
tab_copy_statusStatus of copying of table distribution data to disk; one of
IDLE,SR_PHASE1_READ_PAGES,SR_PHASE2_READ_TABLE,SR_PHASE3_COPY_TABLE,REMOVE_NODE,LCP_READ_TABLE,COPY_TAB_REQ,COPY_NODE_STATE,ADD_TABLE_MASTER,ADD_TABLE_SLAVE,INVALIDATE_NODE_LCP,ALTER_TABLE,COPY_TO_SAVE, orGET_TABINFOtab_update_statusStatus of updating of table distribution data; one of
IDLE,LOCAL_CHECKPOINT,LOCAL_CHECKPOINT_QUEUED,REMOVE_NODE,COPY_TAB_REQ,ADD_TABLE_MASTER,ADD_TABLE_SLAVE,INVALIDATE_NODE_LCP, orCALLBACKtab_lcp_statusStatus of table LCP; one of
ACTIVE(waiting for local checkpoint to be performed),WRITING_TO_FILE(checkpoint performed but not yet written to disk), orCOMPLETED(checkpoint performed and persisted to disk)tab_statusTable internal status; one of
ACTIVE(table exists),CREATING(table is being created), orDROPPING(table is being dropped)tab_storageTable recoverability; one of
NORMAL(fully recoverable with redo logging and checkpointing),NOLOGGING(recoverable from node crash, empty following cluster crash), orTEMPORARY(not recoverable)tab_partitionsNumber of partitions in table
tab_fragmentsNumber of fragments in table; normally same as
tab_partitions; for fully replicated tables equal totab_partitions * [number of node groups]current_scan_countCurrent number of active scans
scan_count_waitCurrent number of scans waiting to be performed before
ALTER TABLEcan complete.is_reorg_ongoingWhether the table is currently being reorganized (1 if true)
The table_fragments table provides
information about the fragmentation, partitioning, distribution,
and (internal) replication of NDB tables.
The table_fragments table contains the
following columns:
node_idNode ID (
DIHmaster)table_idTable ID
partition_idPartition ID
fragment_idFragment ID (same as partition ID unless table is fully replicated)
partition_orderOrder of fragment in partition
log_part_idLog part ID of fragment
no_of_replicasNumber of replicas
current_primaryCurrent primary node ID
preferred_primaryPreferred primary node ID
current_first_backupCurrent first backup node ID
current_second_backupCurrent second backup node ID
current_third_backupCurrent third backup node ID
num_alive_replicasCurrent number of live replicas
num_dead_replicasCurrent number of dead replicas
num_lcp_replicasNumber of replicas remaining to be checkpointed
The table_info table provides information
about logging, checkpointing, distribution, and storage options
in effect for individual NDB tables.
The table_info table contains the following
columns:
table_idTable ID
logged_tableWhether table is logged (1) or not (0)
row_contains_gciWhether table rows contain GCI (1 true, 0 false)
row_contains_checksumWhether table rows contain checksum (1 true, 0 false)
read_backupIf backup replicas are read this is 1, otherwise 0
fully_replicatedIf table is fully replicated this is 1, otherwise 0
storage_typeTable storage type; one of
MEMORYorDISKhashmap_idHashmap ID
partition_balancePartition balance (fragment count type) used for table; one of
FOR_RP_BY_NODE,FOR_RA_BY_NODE,FOR_RP_BY_LDM, orFOR_RA_BY_LDMcreate_gciGCI in which table was created
The table_replicas table provides information
about the copying, distribution, and checkpointing of
NDB table fragments and fragment replicas.
The table_replicas table contains the
following columns:
node_idID of the node from which data is fetched (
DIHmaster)table_idTable ID
fragment_idFragment ID
initial_gciInitial GCI for table
replica_node_idID of node where replica is stored
is_lcp_ongoingIs 1 if LCP is ongoing on this fragment, 0 otherwise
num_crashed_replicasNumber of crashed replica instances
last_max_gci_startedHighest GCI started in most recent LCP
last_max_gci_completedHighest GCI completed in most recent LCP
last_lcp_idID of most recent LCP
prev_lcp_idID of previous LCP
prev_max_gci_startedHighest GCI started in previous LCP
prev_max_gci_completedHighest GCI completed in previous LCP
last_create_gciLast Create GCI of last crashed replica instance
last_replica_gciLast GCI of last crashed replica instance
is_replica_alive1 if this replica is alive, 0 otherwise
The tc_time_track_stats table provides
time-tracking information obtained from the
DBTC block (TC) instances in
the data nodes, through API nodes access NDB.
Each TC instance tracks latencies for a set of activities it
undertakes on behalf of API nodes or other data nodes; these
activities include transactions, transaction errors, key reads,
key writes, unique index operations, failed key operations of
any type, scans, failed scans, fragment scans, and failed
fragment scans.
A set of counters is maintained for each activity, each counter
covering a range of latencies less than or equal to an upper
bound. At the conclusion of each activity, its latency is
determined and the appropriate counter incremented.
tc_time_track_stats presents this information
as rows, with a row for each instance of the following:
Data node, using its ID
TC block instance
Other communicating data node or API node, using its ID
Upper bound value
Each row contains a value for each activity type. This is the number of times that this activity occurred with a latency within the range specified by the row (that is, where the latency does not exceed the upper bound).
The tc_time_track_stats table contains the
following columns:
node_idRequesting node ID
block_numberTC block number
block_instanceTC block instance number
comm_node_idNode ID of communicating API or data node
upper_boundUpper bound of interval (in microseconds)
scansBased on duration of successful scans from opening to closing, tracked against the API or data nodes requesting them.
scan_errorsBased on duration of failed scans from opening to closing, tracked against the API or data nodes requesting them.
scan_fragmentsBased on duration of successful fragment scans from opening to closing, tracked against the data nodes executing them
scan_fragment_errorsBased on duration of failed fragment scans from opening to closing, tracked against the data nodes executing them
transactionsBased on duration of successful transactions from beginning until sending of commit
ACK, tracked against the API or data nodes requesting them. Stateless transactions are not included.transaction_errorsBased on duration of failing transactions from start to point of failure, tracked against the API or data nodes requesting them.
read_key_opsBased on duration of successful primary key reads with locks. Tracked against both the API or data node requesting them and the data node executing them.
write_key_opsBased on duration of successful primary key writes, tracked against both the API or data node requesting them and the data node executing them.
index_key_opsBased on duration of successful unique index key operations, tracked against both the API or data node requesting them and the data node executing reads of base tables.
key_op_errorsBased on duration of all unsuccessful key read or write operations, tracked against both the API or data node requesting them and the data node executing them.
Notes
The block_instance column provides the
DBTC kernel block instance
number. You can use this together with the block name to obtain
information about specific threads from the
threadblocks table.
The threadblocks table associates data nodes,
threads, and instances of NDB kernel blocks.
The threadblocks table contains the following
columns:
node_idNode ID
thr_noThread ID
block_nameBlock name
block_instanceBlock instance number
Notes
The value of the block_name in this table is
one of the values found in the block_name
column when selecting from the
ndbinfo.blocks table. Although
the list of possible values is static for a given NDB Cluster
release, the list may vary between releases.
The block_instance column provides the kernel
block instance number.
The threads table provides information about
threads running in the NDB kernel.
The threads table contains the following
columns:
node_idID of the node where the thread is running
thr_noThread ID (specific to this node)
thread_nameThread name (type of thread)
thread_descriptionThread (type) description
Notes
Sample output from a 2-node example cluster, including thread descriptions, is shown here:
mysql> SELECT * FROM threads;
+---------+--------+-------------+------------------------------------------------------------------+
| node_id | thr_no | thread_name | thread_description |
+---------+--------+-------------+------------------------------------------------------------------+
| 5 | 0 | main | main thread, schema and distribution handling |
| 5 | 1 | rep | rep thread, asynch replication and proxy block handling |
| 5 | 2 | ldm | ldm thread, handling a set of data partitions |
| 5 | 3 | recv | receive thread, performing receive and polling for new receives |
| 6 | 0 | main | main thread, schema and distribution handling |
| 6 | 1 | rep | rep thread, asynch replication and proxy block handling |
| 6 | 2 | ldm | ldm thread, handling a set of data partitions |
| 6 | 3 | recv | receive thread, performing receive and polling for new receives |
+---------+--------+-------------+------------------------------------------------------------------+
8 rows in set (0.01 sec)
The threadstat table provides a rough
snapshot of statistics for threads running in the
NDB kernel.
The threadstat table contains the following
columns:
node_idNode ID
thr_noThread ID
thr_nmThread name
c_loopNumber of loops in main loop
c_execNumber of signals executed
c_waitNumber of times waiting for additional input
c_l_sent_prioaNumber of priority A signals sent to own node
c_l_sent_priobNumber of priority B signals sent to own node
c_r_sent_prioaNumber of priority A signals sent to remote node
c_r_sent_priobNumber of priority B signals sent to remote node
os_tidOS thread ID
os_nowOS time (ms)
os_ru_utimeOS user CPU time (µs)
os_ru_stimeOS system CPU time (µs)
os_ru_minfltOS page reclaims (soft page faults)
os_ru_majfltOS page faults (hard page faults)
os_ru_nvcswOS voluntary context switches
os_ru_nivcswOS involuntary context switches
Notes
os_time uses the system
gettimeofday() call.
The values of the os_ru_utime,
os_ru_stime, os_ru_minflt,
os_ru_majflt, os_ru_nvcsw,
and os_ru_nivcsw columns are obtained using
the system getrusage() call, or the
equivalent.
Since this table contains counts taken at a given point in time, for best results it is necessary to query this table periodically and store the results in an intermediate table or tables. The MySQL Server's Event Scheduler can be employed to automate such monitoring. For more information, see Section 24.4, “Using the Event Scheduler”.
This table contains information about NDB transporters.
The transporters table contains the following
columns:
node_idThis data node's unique node ID in the cluster
remote_node_idThe remote data node's node ID
statusStatus of the connection
remote_addressName or IP address of the remote host
bytes_sentNumber of bytes sent using this connection
bytes_receivedNumber of bytes received using this connection
connect_countNumber of times connection established on this transporter
overloaded1 if this transporter is currently overloaded, otherwise 0
overload_countNumber of times this transporter has entered overload state since connecting
slowdown1 if this transporter is in slowdown state, otherwise 0
slowdown_countNumber of times this transporter has entered slowdown state since connecting
Notes
For each running data node in the cluster, the
transporters table displays a row showing the
status of each of that node's connections with all nodes in
the cluster, including itself. This
information is shown in the table's
status column, which can have any one of
the following values: CONNECTING,
CONNECTED, DISCONNECTING,
or DISCONNECTED.
Connections to API and management nodes which are configured but
not currently connected to the cluster are shown with status
DISCONNECTED. Rows where the
node_id is that of a data node which is not
currently connected are not shown in this table. (This is
similar omission of disconnected nodes in the
ndbinfo.nodes table.
The remote_address is the host name or
address for the node whose ID is shown in the
remote_node_id column. The
bytes_sent from this node and
bytes_received by this node are the numbers,
respectively, of bytes sent and received by the node using this
connection since it was established. For nodes whose status is
CONNECTING or
DISCONNECTED, these columns always display
0.
Assume you have a 5-node cluster consisting of 2 data nodes, 2
SQL nodes, and 1 management node, as shown in the output of the
SHOW command in the
ndb_mgm client:
ndb_mgm> SHOW
Connected to Management Server at: localhost:1186
Cluster Configuration
---------------------
[ndbd(NDB)] 2 node(s)
id=1 @10.100.10.1 (8.0.21-ndb-8.0.21, Nodegroup: 0, *)
id=2 @10.100.10.2 (8.0.21-ndb-8.0.21, Nodegroup: 0)
[ndb_mgmd(MGM)] 1 node(s)
id=10 @10.100.10.10 (8.0.21-ndb-8.0.21)
[mysqld(API)] 2 node(s)
id=20 @10.100.10.20 (8.0.21-ndb-8.0.21)
id=21 @10.100.10.21 (8.0.21-ndb-8.0.21)
There are 10 rows in the transporters
table—5 for the first data node, and 5 for the
second—assuming that all data nodes are running, as shown
here:
mysql>SELECT node_id, remote_node_id, status->FROM ndbinfo.transporters;+---------+----------------+---------------+ | node_id | remote_node_id | status | +---------+----------------+---------------+ | 1 | 1 | DISCONNECTED | | 1 | 2 | CONNECTED | | 1 | 10 | CONNECTED | | 1 | 20 | CONNECTED | | 1 | 21 | CONNECTED | | 2 | 1 | CONNECTED | | 2 | 2 | DISCONNECTED | | 2 | 10 | CONNECTED | | 2 | 20 | CONNECTED | | 2 | 21 | CONNECTED | +---------+----------------+---------------+ 10 rows in set (0.04 sec)
If you shut down one of the data nodes in this cluster using the
command 2 STOP in the
ndb_mgm client, then repeat the previous
query (again using the mysql client), this
table now shows only 5 rows—1 row for each connection from
the remaining management node to another node, including both
itself and the data node that is currently offline—and
displays CONNECTING for the status of each
remaining connection to the data node that is currently offline,
as shown here:
mysql>SELECT node_id, remote_node_id, status->FROM ndbinfo.transporters;+---------+----------------+---------------+ | node_id | remote_node_id | status | +---------+----------------+---------------+ | 1 | 1 | DISCONNECTED | | 1 | 2 | CONNECTING | | 1 | 10 | CONNECTED | | 1 | 20 | CONNECTED | | 1 | 21 | CONNECTED | +---------+----------------+---------------+ 5 rows in set (0.02 sec)
The connect_count,
overloaded,
overload_count, slowdown,
and slowdown_count counters are reset on
connection, and retain their values after the remote node
disconnects. The bytes_sent and
bytes_received counters are also reset on
connection, and so retain their values following disconnection
(until the next connection resets them).
The overload state referred to by the
overloaded and
overload_count columns occurs when this
transporter's send buffer contains more than
OVerloadLimit bytes
(default is 80% of
SendBufferMemory, that
is, 0.8 * 2097152 = 1677721 bytes). When a given transporter is
in a state of overload, any new transaction that tries to use
this transporter fails with Error 1218 (Send Buffers
overloaded in NDB kernel). This affects both scans
and primary key operations.
The slowdown state referenced by the
slowdown and
slowdown_count columns of this table occurs
when the transporter's send buffer contains more than 60%
of the overload limit (equal to 0.6 * 2097152 = 1258291 bytes by
default). In this state, any new scan using this transporter has
its batch size reduced to minimize the load on the transporter.
Common causes of send buffer slowdown or overloading include the following:
Data size, in particular the quantity of data stored in
TEXTcolumns orBLOBcolumns (or both types of columns)Having a data node (ndbd or ndbmtd) on the same host as an SQL node that is engaged in binary logging
Large number of rows per transaction or transaction batch
Configuration issues such as insufficient
SendBufferMemoryHardware issues such as insufficient RAM or poor network connectivity
See also Section 22.3.3.14, “Configuring NDB Cluster Send Buffer Parameters”.
Two INFORMATION_SCHEMA tables provide
information that is of particular use when managing an NDB
Cluster. The FILES table provides
information about NDB Cluster Disk Data files (see
Section 22.5.10.1, “NDB Cluster Disk Data Objects”). The
ndb_transid_mysql_connection_map
table provides a mapping between transactions, transaction
coordinators, and API nodes.
Additional statistical and other data about NDB Cluster
transactions, operations, threads, blocks, and other aspects of
performance can be obtained from the tables in the
ndbinfo database. For
information about these tables, see
Section 22.5.14, “ndbinfo: The NDB Cluster Information Database”.
This section discusses several SQL statements that can prove useful in managing and monitoring a MySQL server that is connected to an NDB Cluster, and in some cases provide information about the cluster itself.
SHOW ENGINE NDB STATUS,SHOW ENGINE NDBCLUSTER STATUSThe output of this statement contains information about the server's connection to the cluster, creation and usage of NDB Cluster objects, and binary logging for NDB Cluster replication.
See Section 13.7.7.15, “SHOW ENGINE Statement”, for a usage example and more detailed information.
This statement can be used to determine whether or not clustering support is enabled in the MySQL server, and if so, whether it is active.
See Section 13.7.7.16, “SHOW ENGINES Statement”, for more detailed information.
NoteThis statement does not support a
LIKEclause. However, you can useLIKEto filter queries against theINFORMATION_SCHEMA.ENGINEStable, as discussed in the next item.SELECT * FROM INFORMATION_SCHEMA.ENGINES [WHERE ENGINE LIKE 'NDB%']This is the equivalent of
SHOW ENGINES, but uses theENGINEStable of theINFORMATION_SCHEMAdatabase. Unlike the case with theSHOW ENGINESstatement, it is possible to filter the results using aLIKEclause, and to select specific columns to obtain information that may be of use in scripts. For example, the following query shows whether the server was built withNDBsupport and, if so, whether it is enabled:mysql>
SELECT ENGINE, SUPPORT FROM INFORMATION_SCHEMA.ENGINES->WHERE ENGINE LIKE 'NDB%';+------------+---------+ | ENGINE | SUPPORT | +------------+---------+ | ndbcluster | YES | | ndbinfo | YES | +------------+---------+If
NDBsupport is not enabled, the preceding query returns an empty set. See Section 25.12, “The INFORMATION_SCHEMA ENGINES Table”, for more information.This statement provides a list of most server system variables relating to the
NDBstorage engine, and their values, as shown here:mysql>
SHOW VARIABLES LIKE 'NDB%';+--------------------------------------+---------------------------------------+ | Variable_name | Value | +--------------------------------------+---------------------------------------+ | ndb_allow_copying_alter_table | ON | | ndb_autoincrement_prefetch_sz | 512 | | ndb_batch_size | 32768 | | ndb_blob_read_batch_bytes | 65536 | | ndb_blob_write_batch_bytes | 65536 | | ndb_clear_apply_status | ON | | ndb_cluster_connection_pool | 1 | | ndb_cluster_connection_pool_nodeids | | | ndb_connectstring | 127.0.0.1 | | ndb_data_node_neighbour | 0 | | ndb_default_column_format | FIXED | | ndb_deferred_constraints | 0 | | ndb_distribution | KEYHASH | | ndb_eventbuffer_free_percent | 20 | | ndb_eventbuffer_max_alloc | 0 | | ndb_extra_logging | 1 | | ndb_force_send | ON | | ndb_fully_replicated | OFF | | ndb_index_stat_enable | ON | | ndb_index_stat_option | loop_enable=1000ms,loop_idle=1000ms, loop_busy=100ms,update_batch=1,read_batch=4,idle_batch=32,check_batch=8, check_delay=10m,delete_batch=8,clean_delay=1m,error_batch=4,error_delay=1m, evict_batch=8,evict_delay=1m,cache_limit=32M,cache_lowpct=90,zero_total=0 | | ndb_join_pushdown | ON | | ndb_log_apply_status | OFF | | ndb_log_bin | OFF | | ndb_log_binlog_index | ON | | ndb_log_empty_epochs | OFF | | ndb_log_empty_update | OFF | | ndb_log_exclusive_reads | OFF | | ndb_log_orig | OFF | | ndb_log_transaction_id | OFF | | ndb_log_update_as_write | ON | | ndb_log_update_minimal | OFF | | ndb_log_updated_only | ON | | ndb_metadata_check | ON | | ndb_metadata_check_interval | 60 | | ndb_metadata_sync | OFF | | ndb_mgmd_host | 127.0.0.1 | | ndb_nodeid | 0 | | ndb_optimization_delay | 10 | | ndb_optimized_node_selection | 3 | | ndb_read_backup | ON | | ndb_recv_thread_activation_threshold | 8 | | ndb_recv_thread_cpu_mask | | | ndb_report_thresh_binlog_epoch_slip | 10 | | ndb_report_thresh_binlog_mem_usage | 10 | | ndb_row_checksum | 1 | | ndb_schema_dist_lock_wait_timeout | 30 | | ndb_schema_dist_timeout | 120 | | ndb_schema_dist_upgrade_allowed | ON | | ndb_show_foreign_key_mock_tables | OFF | | ndb_slave_conflict_role | NONE | | ndb_table_no_logging | OFF | | ndb_table_temporary | OFF | | ndb_use_copying_alter_table | OFF | | ndb_use_exact_count | OFF | | ndb_use_transactions | ON | | ndb_version | 524308 | | ndb_version_string | ndb-8.0.20 | | ndb_wait_connected | 30 | | ndb_wait_setup | 30 | | ndbinfo_database | ndbinfo | | ndbinfo_max_bytes | 0 | | ndbinfo_max_rows | 10 | | ndbinfo_offline | OFF | | ndbinfo_show_hidden | OFF | | ndbinfo_table_prefix | ndb$ | | ndbinfo_version | 524308 | +--------------------------------------+---------------------------------------+See Section 5.1.8, “Server System Variables”, for more information.
SELECT * FROM performance_schema.global_variables WHERE VARIABLE_NAME LIKE 'NDB%'This statement is the equivalent of the
SHOW VARIABLESstatement described in the previous item, and provides almost identical output, as shown here:mysql>
SELECT * FROM performance_schema.global_variables->WHERE VARIABLE_NAME LIKE 'NDB%';+--------------------------------------+---------------------------------------+ | VARIABLE_NAME | VARIABLE_VALUE | +--------------------------------------+---------------------------------------+ | ndb_allow_copying_alter_table | ON | | ndb_autoincrement_prefetch_sz | 512 | | ndb_batch_size | 32768 | | ndb_blob_read_batch_bytes | 65536 | | ndb_blob_write_batch_bytes | 65536 | | ndb_clear_apply_status | ON | | ndb_cluster_connection_pool | 1 | | ndb_cluster_connection_pool_nodeids | | | ndb_connectstring | 127.0.0.1 | | ndb_data_node_neighbour | 0 | | ndb_default_column_format | FIXED | | ndb_deferred_constraints | 0 | | ndb_distribution | KEYHASH | | ndb_eventbuffer_free_percent | 20 | | ndb_eventbuffer_max_alloc | 0 | | ndb_extra_logging | 1 | | ndb_force_send | ON | | ndb_fully_replicated | OFF | | ndb_index_stat_enable | ON | | ndb_index_stat_option | loop_enable=1000ms,loop_idle=1000ms, loop_busy=100ms,update_batch=1,read_batch=4,idle_batch=32,check_batch=8, check_delay=10m,delete_batch=8,clean_delay=1m,error_batch=4,error_delay=1m, evict_batch=8,evict_delay=1m,cache_limit=32M,cache_lowpct=90,zero_total=0 | | ndb_join_pushdown | ON | | ndb_log_apply_status | OFF | | ndb_log_bin | OFF | | ndb_log_binlog_index | ON | | ndb_log_empty_epochs | OFF | | ndb_log_empty_update | OFF | | ndb_log_exclusive_reads | OFF | | ndb_log_orig | OFF | | ndb_log_transaction_id | OFF | | ndb_log_update_as_write | ON | | ndb_log_update_minimal | OFF | | ndb_log_updated_only | ON | | ndb_metadata_check | ON | | ndb_metadata_check_interval | 60 | | ndb_metadata_sync | OFF | | ndb_mgmd_host | 127.0.0.1 | | ndb_nodeid | 0 | | ndb_optimization_delay | 10 | | ndb_optimized_node_selection | 3 | | ndb_read_backup | ON | | ndb_recv_thread_activation_threshold | 8 | | ndb_recv_thread_cpu_mask | | | ndb_report_thresh_binlog_epoch_slip | 10 | | ndb_report_thresh_binlog_mem_usage | 10 | | ndb_row_checksum | 1 | | ndb_schema_dist_lock_wait_timeout | 30 | | ndb_schema_dist_timeout | 120 | | ndb_schema_dist_upgrade_allowed | ON | | ndb_show_foreign_key_mock_tables | OFF | | ndb_slave_conflict_role | NONE | | ndb_table_no_logging | OFF | | ndb_table_temporary | OFF | | ndb_use_copying_alter_table | OFF | | ndb_use_exact_count | OFF | | ndb_use_transactions | ON | | ndb_version | 524308 | | ndb_version_string | ndb-8.0.20 | | ndb_wait_connected | 30 | | ndb_wait_setup | 30 | | ndbinfo_database | ndbinfo | | ndbinfo_max_bytes | 0 | | ndbinfo_max_rows | 10 | | ndbinfo_offline | OFF | | ndbinfo_show_hidden | OFF | | ndbinfo_table_prefix | ndb$ | | ndbinfo_version | 524308 | +--------------------------------------+---------------------------------------+Unlike the case with the
SHOW VARIABLESstatement, it is possible to select individual columns. For example:mysql>
SELECT VARIABLE_VALUE->FROM performance_schema.global_variables->WHERE VARIABLE_NAME = 'ndb_force_send';+----------------+ | VARIABLE_VALUE | +----------------+ | ON | +----------------+A more useful query is shown here:
mysql>
SELECT VARIABLE_NAME AS Name, VARIABLE_VALUE AS Value>FROM performance_schema.global_variables>WHERE VARIABLE_NAME>IN ('version', 'ndb_version',>'ndb_version_string', 'ndbinfo_version');+--------------------+----------------+ | Name | Value | +--------------------+----------------+ | ndb_version | 524308 | | ndb_version_string | ndb-8.0.20 | | ndbinfo_version | 524308 | | version | 8.0.20-cluster | +--------------------+----------------+ 4 rows in set (0.00 sec)For more information, see Section 26.12.15, “Performance Schema Status Variable Tables”, and Section 5.1.8, “Server System Variables”.
This statement shows at a glance whether or not the MySQL server is acting as a cluster SQL node, and if so, it provides the MySQL server's cluster node ID, the host name and port for the cluster management server to which it is connected, and the number of data nodes in the cluster, as shown here:
mysql>
SHOW STATUS LIKE 'NDB%';+----------------------------------------------+-------------------------------+ | Variable_name | Value | +----------------------------------------------+-------------------------------+ | Ndb_metadata_detected_count | 0 | | Ndb_cluster_node_id | 100 | | Ndb_config_from_host | 127.0.0.1 | | Ndb_config_from_port | 1186 | | Ndb_number_of_data_nodes | 2 | | Ndb_number_of_ready_data_nodes | 2 | | Ndb_connect_count | 0 | | Ndb_execute_count | 0 | | Ndb_scan_count | 0 | | Ndb_pruned_scan_count | 0 | | Ndb_schema_locks_count | 0 | | Ndb_api_wait_exec_complete_count_session | 0 | | Ndb_api_wait_scan_result_count_session | 0 | | Ndb_api_wait_meta_request_count_session | 1 | | Ndb_api_wait_nanos_count_session | 163446 | | Ndb_api_bytes_sent_count_session | 60 | | Ndb_api_bytes_received_count_session | 28 | | Ndb_api_trans_start_count_session | 0 | | Ndb_api_trans_commit_count_session | 0 | | Ndb_api_trans_abort_count_session | 0 | | Ndb_api_trans_close_count_session | 0 | | Ndb_api_pk_op_count_session | 0 | | Ndb_api_uk_op_count_session | 0 | | Ndb_api_table_scan_count_session | 0 | | Ndb_api_range_scan_count_session | 0 | | Ndb_api_pruned_scan_count_session | 0 | | Ndb_api_scan_batch_count_session | 0 | | Ndb_api_read_row_count_session | 0 | | Ndb_api_trans_local_read_row_count_session | 0 | | Ndb_api_adaptive_send_forced_count_session | 0 | | Ndb_api_adaptive_send_unforced_count_session | 0 | | Ndb_api_adaptive_send_deferred_count_session | 0 | | Ndb_trans_hint_count_session | 0 | | Ndb_sorted_scan_count | 0 | | Ndb_pushed_queries_defined | 0 | | Ndb_pushed_queries_dropped | 0 | | Ndb_pushed_queries_executed | 0 | | Ndb_pushed_reads | 0 | | Ndb_last_commit_epoch_server | 37632503447571 | | Ndb_last_commit_epoch_session | 0 | | Ndb_system_name | MC_20191126162038 | | Ndb_api_event_data_count_injector | 0 | | Ndb_api_event_nondata_count_injector | 0 | | Ndb_api_event_bytes_count_injector | 0 | | Ndb_api_wait_exec_complete_count_slave | 0 | | Ndb_api_wait_scan_result_count_slave | 0 | | Ndb_api_wait_meta_request_count_slave | 0 | | Ndb_api_wait_nanos_count_slave | 0 | | Ndb_api_bytes_sent_count_slave | 0 | | Ndb_api_bytes_received_count_slave | 0 | | Ndb_api_trans_start_count_slave | 0 | | Ndb_api_trans_commit_count_slave | 0 | | Ndb_api_trans_abort_count_slave | 0 | | Ndb_api_trans_close_count_slave | 0 | | Ndb_api_pk_op_count_slave | 0 | | Ndb_api_uk_op_count_slave | 0 | | Ndb_api_table_scan_count_slave | 0 | | Ndb_api_range_scan_count_slave | 0 | | Ndb_api_pruned_scan_count_slave | 0 | | Ndb_api_scan_batch_count_slave | 0 | | Ndb_api_read_row_count_slave | 0 | | Ndb_api_trans_local_read_row_count_slave | 0 | | Ndb_api_adaptive_send_forced_count_slave | 0 | | Ndb_api_adaptive_send_unforced_count_slave | 0 | | Ndb_api_adaptive_send_deferred_count_slave | 0 | | Ndb_slave_max_replicated_epoch | 0 | | Ndb_api_wait_exec_complete_count | 4 | | Ndb_api_wait_scan_result_count | 7 | | Ndb_api_wait_meta_request_count | 172 | | Ndb_api_wait_nanos_count | 1083548094028 | | Ndb_api_bytes_sent_count | 4640 | | Ndb_api_bytes_received_count | 109356 | | Ndb_api_trans_start_count | 4 | | Ndb_api_trans_commit_count | 1 | | Ndb_api_trans_abort_count | 1 | | Ndb_api_trans_close_count | 4 | | Ndb_api_pk_op_count | 2 | | Ndb_api_uk_op_count | 0 | | Ndb_api_table_scan_count | 1 | | Ndb_api_range_scan_count | 1 | | Ndb_api_pruned_scan_count | 0 | | Ndb_api_scan_batch_count | 1 | | Ndb_api_read_row_count | 3 | | Ndb_api_trans_local_read_row_count | 2 | | Ndb_api_adaptive_send_forced_count | 1 | | Ndb_api_adaptive_send_unforced_count | 5 | | Ndb_api_adaptive_send_deferred_count | 0 | | Ndb_api_event_data_count | 0 | | Ndb_api_event_nondata_count | 0 | | Ndb_api_event_bytes_count | 0 | | Ndb_metadata_excluded_count | 0 | | Ndb_metadata_synced_count | 0 | | Ndb_conflict_fn_max | 0 | | Ndb_conflict_fn_old | 0 | | Ndb_conflict_fn_max_del_win | 0 | | Ndb_conflict_fn_epoch | 0 | | Ndb_conflict_fn_epoch_trans | 0 | | Ndb_conflict_fn_epoch2 | 0 | | Ndb_conflict_fn_epoch2_trans | 0 | | Ndb_conflict_trans_row_conflict_count | 0 | | Ndb_conflict_trans_row_reject_count | 0 | | Ndb_conflict_trans_reject_count | 0 | | Ndb_conflict_trans_detect_iter_count | 0 | | Ndb_conflict_trans_conflict_commit_count | 0 | | Ndb_conflict_epoch_delete_delete_count | 0 | | Ndb_conflict_reflected_op_prepare_count | 0 | | Ndb_conflict_reflected_op_discard_count | 0 | | Ndb_conflict_refresh_op_count | 0 | | Ndb_conflict_last_conflict_epoch | 0 | | Ndb_conflict_last_stable_epoch | 0 | | Ndb_index_stat_status | allow:1,enable:1,busy:0, loop:1000,list:(new:0,update:0,read:0,idle:0,check:0,delete:0,error:0,total:0), analyze:(queue:0,wait:0),stats:(nostats:0,wait:0),total:(analyze:(all:0,error:0), query:(all:0,nostats:0,error:0),event:(act:0,skip:0,miss:0),cache:(refresh:0, clean:0,pinned:0,drop:0,evict:0)),cache:(query:0,clean:0,drop:0,evict:0, usedpct:0.00,highpct:0.00) | | Ndb_index_stat_cache_query | 0 | | Ndb_index_stat_cache_clean | 0 | +----------------------------------------------+-------------------------------+If the MySQL server was built with
NDBsupport, but it is not currently connected to a cluster, every row in the output of this statement contains a zero or an empty string for theValuecolumn.SELECT * FROM performance_schema.global_status WHERE VARIABLE_NAME LIKE 'NDB%'This statement provides similar output to the
SHOW STATUSstatement discussed in the previous item. Unlike the case withSHOW STATUS, it is possible usingSELECTstatements to extract values in SQL for use in scripts for monitoring and automation purposes.For more information, see Section 26.12.15, “Performance Schema Status Variable Tables”.
SELECT * FROM INFORMATION_SCHEMA.PLUGINS WHERE PLUGIN_NAME LIKE 'NDB%'This statement displays information from the
INFORMATION_SCHEMA.PLUGINStable about plugins associated with NDB Cluster, such as version, author, and license, as shown here:mysql>
SELECT * FROM INFORMATION_SCHEMA.PLUGINS>WHERE PLUGIN_NAME LIKE 'NDB%'\G*************************** 1. row *************************** PLUGIN_NAME: ndbcluster PLUGIN_VERSION: 1.0 PLUGIN_STATUS: ACTIVE PLUGIN_TYPE: STORAGE ENGINE PLUGIN_TYPE_VERSION: 80020.0 PLUGIN_LIBRARY: NULL PLUGIN_LIBRARY_VERSION: NULL PLUGIN_AUTHOR: Oracle Corporation PLUGIN_DESCRIPTION: Clustered, fault-tolerant tables PLUGIN_LICENSE: GPL LOAD_OPTION: ON *************************** 2. row *************************** PLUGIN_NAME: ndbinfo PLUGIN_VERSION: 0.1 PLUGIN_STATUS: ACTIVE PLUGIN_TYPE: STORAGE ENGINE PLUGIN_TYPE_VERSION: 80020.0 PLUGIN_LIBRARY: NULL PLUGIN_LIBRARY_VERSION: NULL PLUGIN_AUTHOR: Oracle Corporation PLUGIN_DESCRIPTION: MySQL Cluster system information storage engine PLUGIN_LICENSE: GPL LOAD_OPTION: ON *************************** 3. row *************************** PLUGIN_NAME: ndb_transid_mysql_connection_map PLUGIN_VERSION: 0.1 PLUGIN_STATUS: ACTIVE PLUGIN_TYPE: INFORMATION SCHEMA PLUGIN_TYPE_VERSION: 80020.0 PLUGIN_LIBRARY: NULL PLUGIN_LIBRARY_VERSION: NULL PLUGIN_AUTHOR: Oracle Corporation PLUGIN_DESCRIPTION: Map between MySQL connection ID and NDB transaction ID PLUGIN_LICENSE: GPL LOAD_OPTION: ONYou can also use the
SHOW PLUGINSstatement to display this information, but the output from that statement cannot easily be filtered. See also Section 29.2, “The MySQL Plugin API”, which describes where and how the information in thePLUGINStable is obtained.
You can also query the tables in the
ndbinfo information database for
real-time data about many NDB Cluster operations. See
Section 22.5.14, “ndbinfo: The NDB Cluster Information Database”.
This section discusses security considerations to take into account when setting up and running NDB Cluster.
Topics covered in this section include the following:
NDB Cluster and network security issues
Configuration issues relating to running NDB Cluster securely
NDB Cluster and the MySQL privilege system
MySQL standard security procedures as applicable to NDB Cluster
In this section, we discuss basic network security issues as they relate to NDB Cluster. It is extremely important to remember that NDB Cluster “out of the box” is not secure; you or your network administrator must take the proper steps to ensure that your cluster cannot be compromised over the network.
Cluster communication protocols are inherently insecure, and no encryption or similar security measures are used in communications between nodes in the cluster. Because network speed and latency have a direct impact on the cluster's efficiency, it is also not advisable to employ SSL or other encryption to network connections between nodes, as such schemes will effectively slow communications.
It is also true that no authentication is used for controlling API node access to an NDB Cluster. As with encryption, the overhead of imposing authentication requirements would have an adverse impact on Cluster performance.
In addition, there is no checking of the source IP address for either of the following when accessing the cluster:
SQL or API nodes using “free slots” created by empty
[mysqld]or[api]sections in theconfig.inifileThis means that, if there are any empty
[mysqld]or[api]sections in theconfig.inifile, then any API nodes (including SQL nodes) that know the management server's host name (or IP address) and port can connect to the cluster and access its data without restriction. (See Section 22.5.17.2, “NDB Cluster and MySQL Privileges”, for more information about this and related issues.)NoteYou can exercise some control over SQL and API node access to the cluster by specifying a
HostNameparameter for all[mysqld]and[api]sections in theconfig.inifile. However, this also means that, should you wish to connect an API node to the cluster from a previously unused host, you need to add an[api]section containing its host name to theconfig.inifile.More information is available elsewhere in this chapter about the
HostNameparameter. Also see Section 22.3.1, “Quick Test Setup of NDB Cluster”, for configuration examples usingHostNamewith API nodes.Any ndb_mgm client
This means that any cluster management client that is given the management server's host name (or IP address) and port (if not the standard port) can connect to the cluster and execute any management client command. This includes commands such as
ALL STOPandSHUTDOWN.
For these reasons, it is necessary to protect the cluster on the network level. The safest network configuration for Cluster is one which isolates connections between Cluster nodes from any other network communications. This can be accomplished by any of the following methods:
Keeping Cluster nodes on a network that is physically separate from any public networks. This option is the most dependable; however, it is the most expensive to implement.
We show an example of an NDB Cluster setup using such a physically segregated network here:
This setup has two networks, one private (solid box) for the Cluster management servers and data nodes, and one public (dotted box) where the SQL nodes reside. (We show the management and data nodes connected using a gigabit switch since this provides the best performance.) Both networks are protected from the outside by a hardware firewall, sometimes also known as a network-based firewall.
This network setup is safest because no packets can reach the cluster's management or data nodes from outside the network—and none of the cluster's internal communications can reach the outside—without going through the SQL nodes, as long as the SQL nodes do not permit any packets to be forwarded. This means, of course, that all SQL nodes must be secured against hacking attempts.
ImportantWith regard to potential security vulnerabilities, an SQL node is no different from any other MySQL server. See Section 6.1.3, “Making MySQL Secure Against Attackers”, for a description of techniques you can use to secure MySQL servers.
Using one or more software firewalls (also known as host-based firewalls) to control which packets pass through to the cluster from portions of the network that do not require access to it. In this type of setup, a software firewall must be installed on every host in the cluster which might otherwise be accessible from outside the local network.
The host-based option is the least expensive to implement, but relies purely on software to provide protection and so is the most difficult to keep secure.
This type of network setup for NDB Cluster is illustrated here:
Using this type of network setup means that there are two zones of NDB Cluster hosts. Each cluster host must be able to communicate with all of the other machines in the cluster, but only those hosting SQL nodes (dotted box) can be permitted to have any contact with the outside, while those in the zone containing the data nodes and management nodes (solid box) must be isolated from any machines that are not part of the cluster. Applications using the cluster and user of those applications must not be permitted to have direct access to the management and data node hosts.
To accomplish this, you must set up software firewalls that limit the traffic to the type or types shown in the following table, according to the type of node that is running on each cluster host computer:
Table 22.294 Node types in a host-based firewall cluster configuration
Node Type Permitted Traffic SQL or API node It originates from the IP address of a management or data node (using any TCP or UDP port).
It originates from within the network in which the cluster resides and is on the port that your application is using.
Data node or Management node It originates from the IP address of a management or data node (using any TCP or UDP port).
It originates from the IP address of an SQL or API node.
Any traffic other than that shown in the table for a given node type should be denied.
The specifics of configuring a firewall vary from firewall application to firewall application, and are beyond the scope of this Manual. iptables is a very common and reliable firewall application, which is often used with APF as a front end to make configuration easier. You can (and should) consult the documentation for the software firewall that you employ, should you choose to implement an NDB Cluster network setup of this type, or of a “mixed” type as discussed under the next item.
It is also possible to employ a combination of the first two methods, using both hardware and software to secure the cluster—that is, using both network-based and host-based firewalls. This is between the first two schemes in terms of both security level and cost. This type of network setup keeps the cluster behind the hardware firewall, but permits incoming packets to travel beyond the router connecting all cluster hosts to reach the SQL nodes.
One possible network deployment of an NDB Cluster using hardware and software firewalls in combination is shown here:
In this case, you can set the rules in the hardware firewall to deny any external traffic except to SQL nodes and API nodes, and then permit traffic to them only on the ports required by your application.
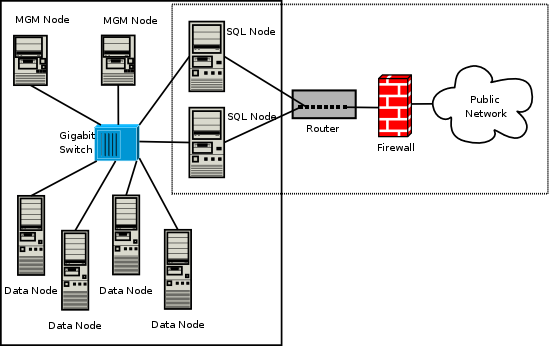
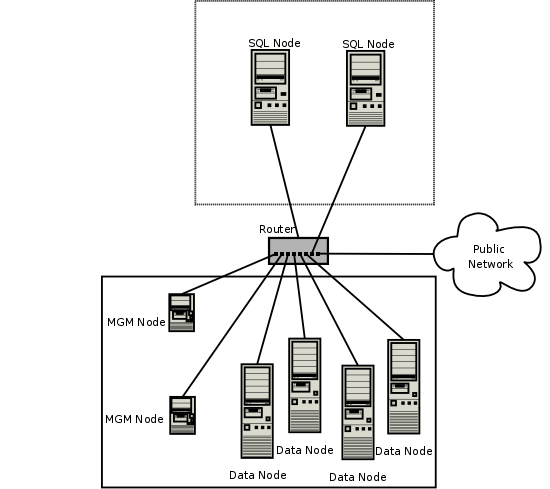
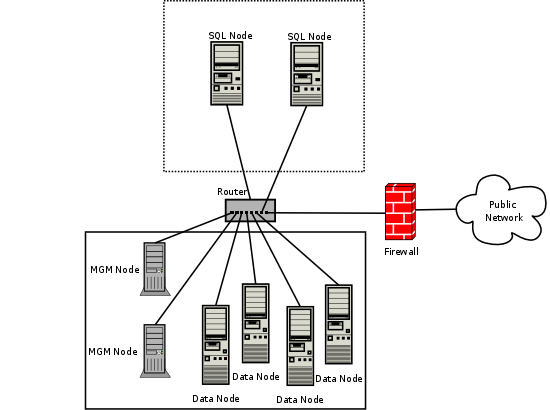
Whatever network configuration you use, remember that your objective from the viewpoint of keeping the cluster secure remains the same—to prevent any unessential traffic from reaching the cluster while ensuring the most efficient communication between the nodes in the cluster.
Because NDB Cluster requires large numbers of ports to be open for communications between nodes, the recommended option is to use a segregated network. This represents the simplest way to prevent unwanted traffic from reaching the cluster.
If you wish to administer an NDB Cluster remotely (that is, from outside the local network), the recommended way to do this is to use ssh or another secure login shell to access an SQL node host. From this host, you can then run the management client to access the management server safely, from within the cluster's own local network.
Even though it is possible to do so in theory, it is not recommended to use ndb_mgm to manage a Cluster directly from outside the local network on which the Cluster is running. Since neither authentication nor encryption takes place between the management client and the management server, this represents an extremely insecure means of managing the cluster, and is almost certain to be compromised sooner or later.
In this section, we discuss how the MySQL privilege system works in relation to NDB Cluster and the implications of this for keeping an NDB Cluster secure.
Standard MySQL privileges apply to NDB Cluster tables. This
includes all MySQL privilege types
(SELECT privilege,
UPDATE privilege,
DELETE privilege, and so on)
granted on the database, table, and column level. As with any
other MySQL Server, user and privilege information is stored in
the mysql system database. The SQL statements
used to grant and revoke privileges on
NDB tables, databases containing
such tables, and columns within such tables are identical in all
respects with the GRANT and
REVOKE statements used in
connection with database objects involving any (other) MySQL
storage engine. The same thing is true with respect to the
CREATE USER and
DROP USER statements.
It is important to keep in mind that, by default, the MySQL
grant tables use the MyISAM storage
engine. Because of this, those tables are not normally
duplicated or shared among MySQL servers acting as SQL nodes in
an NDB Cluster. In other words, changes in users and their
privileges do not automatically propagate between SQL nodes by
default. If you wish, you can enable automatic distribution of
MySQL users and privileges across NDB Cluster SQL nodes; see
Section 22.5.12, “Distributed MySQL Privileges with NDB_STORED_USER”, for
details.
Conversely, because there is no way in MySQL to deny privileges
(privileges can either be revoked or not granted in the first
place, but not denied as such), there is no special protection
for NDB tables on one SQL node from
users that have privileges on another SQL node; (This is true
even if you are not using automatic distribution of user
privileges. The definitive example of this is the MySQL
root account, which can perform any action on
any database object. In combination with empty
[mysqld] or [api] sections
of the config.ini file, this account can be
especially dangerous. To understand why, consider the following
scenario:
The
config.inifile contains at least one empty[mysqld]or[api]section. This means that the NDB Cluster management server performs no checking of the host from which a MySQL Server (or other API node) accesses the NDB Cluster.There is no firewall, or the firewall fails to protect against access to the NDB Cluster from hosts external to the network.
The host name or IP address of the NDB Cluster management server is known or can be determined from outside the network.
If these conditions are true, then anyone, anywhere can start a
MySQL Server with --ndbcluster
--ndb-connectstring=
and access this NDB Cluster. Using the MySQL
management_hostroot account, this person can then perform
the following actions:
Execute metadata statements such as
SHOW DATABASESstatement (to obtain a list of allNDBdatabases on the server) orSHOW TABLES FROMstatement to obtain a list of allsome_ndb_databaseNDBtables in a given databaseRun any legal MySQL statements on any of the discovered tables, such as:
SELECT * FROMto read all the data from any tablesome_tableDELETE FROMto delete all the data from a tablesome_tableDESCRIBEorsome_tableSHOW CREATE TABLEto determine the table schemasome_tableUPDATEto fill a table column with “garbage” data; this could actually cause much greater damage than simply deleting all the datasome_tableSETcolumn1=some_valueMore insidious variations might include statements like these:
UPDATE
some_tableSETan_int_column=an_int_column+ 1or
UPDATE
some_tableSETa_varchar_column= REVERSE(a_varchar_column)Such malicious statements are limited only by the imagination of the attacker.
The only tables that would be safe from this sort of mayhem would be those tables that were created using storage engines other than
NDB, and so not visible to a “rogue” SQL node.A user who can log in as
rootcan also access theINFORMATION_SCHEMAdatabase and its tables, and so obtain information about databases, tables, stored routines, scheduled events, and any other database objects for which metadata is stored inINFORMATION_SCHEMA.It is also a very good idea to use different passwords for the
rootaccounts on different NDB Cluster SQL nodes unless you are using distributed privileges.
In sum, you cannot have a safe NDB Cluster if it is directly accessible from outside your local network.
Never leave the MySQL root account password empty. This is just as true when running MySQL as an NDB Cluster SQL node as it is when running it as a standalone (non-Cluster) MySQL Server, and should be done as part of the MySQL installation process before configuring the MySQL Server as an SQL node in an NDB Cluster.
If you wish to employ NDB Cluster's distributed privilege
capabilities, you should not simply convert the system tables in
the mysql database to use the
NDB storage engine manually. Use
the stored procedure provided for this purpose instead; see
Section 22.5.12, “Distributed MySQL Privileges with NDB_STORED_USER”.
Otherwise, if you need to synchronize mysql
system tables between SQL nodes, you can use standard MySQL
replication to do so, or employ a script to copy table entries
between the MySQL servers.
Summary. The most important points to remember regarding the MySQL privilege system with regard to NDB Cluster are listed here:
Users and privileges established on one SQL node do not automatically exist or take effect on other SQL nodes in the cluster. Conversely, removing a user or privilege on one SQL node in the cluster does not remove the user or privilege from any other SQL nodes.
You can distribute MySQL users and privileges among SQL nodes using the SQL script, and the stored procedures it contains, that are supplied for this purpose in the NDB Cluster distribution.
Once a MySQL user is granted privileges on an
NDBtable from one SQL node in an NDB Cluster, that user can “see” any data in that table regardless of the SQL node from which the data originated, even if you are not using privilege distribution.
In this section, we discuss MySQL standard security procedures as they apply to running NDB Cluster.
In general, any standard procedure for running MySQL securely
also applies to running a MySQL Server as part of an NDB
Cluster. First and foremost, you should always run a MySQL
Server as the mysql operating system user;
this is no different from running MySQL in a standard
(non-Cluster) environment. The mysql system
account should be uniquely and clearly defined. Fortunately,
this is the default behavior for a new MySQL installation. You
can verify that the mysqld process is running
as the mysql operating system user by using
the system command such as the one shown here:
shell> ps aux | grep mysql
root 10467 0.0 0.1 3616 1380 pts/3 S 11:53 0:00 \
/bin/sh ./mysqld_safe --ndbcluster --ndb-connectstring=localhost:1186
mysql 10512 0.2 2.5 58528 26636 pts/3 Sl 11:53 0:00 \
/usr/local/mysql/libexec/mysqld --basedir=/usr/local/mysql \
--datadir=/usr/local/mysql/var --user=mysql --ndbcluster \
--ndb-connectstring=localhost:1186 --pid-file=/usr/local/mysql/var/mothra.pid \
--log-error=/usr/local/mysql/var/mothra.err
jon 10579 0.0 0.0 2736 688 pts/0 S+ 11:54 0:00 grep mysql
If the mysqld process is running as any other
user than mysql, you should immediately shut
it down and restart it as the mysql user. If
this user does not exist on the system, the
mysql user account should be created, and
this user should be part of the mysql user
group; in this case, you should also make sure that the MySQL
data directory on this system (as set using the
--datadir option for
mysqld) is owned by the
mysql user, and that the SQL node's
my.cnf file includes
user=mysql in the [mysqld]
section. Alternatively, you can start the MySQL server process
with --user=mysql on the command
line, but it is preferable to use the
my.cnf option, since you might forget to
use the command-line option and so have
mysqld running as another user
unintentionally. The mysqld_safe startup
script forces MySQL to run as the mysql user.
Never run mysqld as the system root user. Doing so means that potentially any file on the system can be read by MySQL, and thus—should MySQL be compromised—by an attacker.
As mentioned in the previous section (see Section 22.5.17.2, “NDB Cluster and MySQL Privileges”), you should always set a root password for the MySQL Server as soon as you have it running. You should also delete the anonymous user account that is installed by default. You can accomplish these tasks using the following statements:
shell>mysql -u rootmysql>UPDATE mysql.user->SET Password=PASSWORD('->secure_password')WHERE User='root';mysql>DELETE FROM mysql.user->WHERE User='';mysql>FLUSH PRIVILEGES;
Be very careful when executing the
DELETE statement not to omit the
WHERE clause, or you risk deleting
all MySQL users. Be sure to run the
FLUSH PRIVILEGES statement as
soon as you have modified the mysql.user
table, so that the changes take immediate effect. Without
FLUSH PRIVILEGES, the changes do
not take effect until the next time that the server is
restarted.
Many of the NDB Cluster utilities such as
ndb_show_tables,
ndb_desc, and
ndb_select_all also work without
authentication and can reveal table names, schemas, and data.
By default these are installed on Unix-style systems with the
permissions wxr-xr-x (755), which means
they can be executed by any user that can access the
mysql/bin directory.
See Section 22.4, “NDB Cluster Programs”, for more information about these utilities.
- 22.6.1 NDB Cluster Replication: Abbreviations and Symbols
- 22.6.2 General Requirements for NDB Cluster Replication
- 22.6.3 Known Issues in NDB Cluster Replication
- 22.6.4 NDB Cluster Replication Schema and Tables
- 22.6.5 Preparing the NDB Cluster for Replication
- 22.6.6 Starting NDB Cluster Replication (Single Replication Channel)
- 22.6.7 Using Two Replication Channels for NDB Cluster Replication
- 22.6.8 Implementing Failover with NDB Cluster Replication
- 22.6.9 NDB Cluster Backups With NDB Cluster Replication
- 22.6.10 NDB Cluster Replication: Multi-Master and Circular Replication
- 22.6.11 NDB Cluster Replication Conflict Resolution
NDB Cluster supports asynchronous replication, more usually referred to simply as “replication”. This section explains how to set up and manage a configuration in which one group of computers operating as an NDB Cluster replicates to a second computer or group of computers. We assume some familiarity on the part of the reader with standard MySQL replication as discussed elsewhere in this Manual. (See Chapter 17, Replication).
NDB Cluster does not support replication using GTIDs;
semisynchronous replication is also not supported by the
NDB storage engine.
Normal (non-clustered) replication involves a “master”
server and a “slave” server, the master being the
source of the operations and data to be replicated and the slave
being the recipient of these. In NDB Cluster, replication is
conceptually very similar but can be more complex in practice, as it
may be extended to cover a number of different configurations
including replicating between two complete clusters. Although an NDB
Cluster itself depends on the NDB
storage engine for clustering functionality, it is not necessary to
use NDB as the storage engine for the
slave's copies of the replicated tables (see
Replication from NDB to other storage engines).
However, for maximum availability, it is possible (and preferable)
to replicate from one NDB Cluster to another, and it is this
scenario that we discuss, as shown in the following figure:

In this scenario, the replication process is one in which successive
states of a master cluster are logged and saved to a slave cluster.
This process is accomplished by a special thread known as the NDB
binary log injector thread, which runs on each MySQL server and
produces a binary log (binlog). This thread
ensures that all changes in the cluster producing the binary
log—and not just those changes that are effected through the
MySQL Server—are inserted into the binary log with the correct
serialization order. We refer to the MySQL replication master and
replication slave servers as replication servers or replication
nodes, and the data flow or line of communication between them as a
replication channel.
For information about performing point-in-time recovery with NDB Cluster and NDB Cluster Replication, see Section 22.6.9.2, “Point-In-Time Recovery Using NDB Cluster Replication”.
NDB API _slave status variables.
NDB API counters can provide enhanced monitoring capabilities on
NDB Cluster replication slaves. These are implemented as NDB
statistics _slave status variables, as seen in
the output of SHOW STATUS, or in
the results of queries against the Performance Schema
session_status or
global_status table in a
mysql client session connected to a MySQL
Server that is acting as a slave in NDB Cluster Replication. By
comparing the values of these status variables before and after
the execution of statements affecting replicated
NDB tables, you can observe the
corresponding actions taken on the NDB API level by the slave,
which can be useful when monitoring or troubleshooting NDB Cluster
Replication. Section 22.5.13, “NDB API Statistics Counters and Variables”,
provides additional information.
Replication from NDB to non-NDB tables.
It is possible to replicate NDB
tables from an NDB Cluster acting as the master to tables using
other MySQL storage engines such as
InnoDB or
MyISAM on a slave
mysqld. This is subject to a number of
conditions; see
Replication from NDB to other storage engines, and
Replication from NDB to a nontransactional storage engine,
for more information.
Throughout this section, we use the following abbreviations or symbols for referring to the master and slave clusters, and to processes and commands run on the clusters or cluster nodes:
Table 22.295 Abbreviations used throughout this section referring to master and slave clusters, and to processes and commands run on nodes
| Symbol or Abbreviation | Description (Refers to...) |
|---|---|
M |
The cluster serving as the (primary) replication master |
S |
The cluster acting as the (primary) replication slave |
shell |
Shell command to be issued on the master cluster |
mysql |
MySQL client command issued on a single MySQL server running as an SQL node on the master cluster |
mysql |
MySQL client command to be issued on all SQL nodes participating in the replication master cluster |
shell |
Shell command to be issued on the slave cluster |
mysql |
MySQL client command issued on a single MySQL server running as an SQL node on the slave cluster |
mysql |
MySQL client command to be issued on all SQL nodes participating in the replication slave cluster |
C |
Primary replication channel |
C' |
Secondary replication channel |
M' |
Secondary replication master |
S' |
Secondary replication slave |
A replication channel requires two MySQL servers acting as replication servers (one each for the master and slave). For example, this means that in the case of a replication setup with two replication channels (to provide an extra channel for redundancy), there will be a total of four replication nodes, two per cluster.
Replication of an NDB Cluster as described in this section and
those following is dependent on row-based replication. This means
that the replication master MySQL server must be running with
--binlog-format=ROW or
--binlog-format=MIXED, as described
in Section 22.6.6, “Starting NDB Cluster Replication (Single Replication Channel)”. For
general information about row-based replication, see
Section 17.2.1, “Replication Formats”.
If you attempt to use NDB Cluster Replication with
--binlog-format=STATEMENT,
replication fails to work properly because the
ndb_binlog_index table on the master and the
epoch column of the
ndb_apply_status table on the slave are not
updated (see
Section 22.6.4, “NDB Cluster Replication Schema and Tables”). Instead,
only updates on the MySQL server acting as the replication
master propagate to the slave, and no updates from any other SQL
nodes on the master cluster are replicated.
The default value for the
--binlog-format option in NDB 8.0
is MIXED.
Each MySQL server used for replication in either cluster must be
uniquely identified among all the MySQL replication servers
participating in either cluster (you cannot have replication
servers on both the master and slave clusters sharing the same
ID). This can be done by starting each SQL node using the
--server-id= option,
where idid is a unique integer. Although
it is not strictly necessary, we will assume for purposes of this
discussion that all NDB Cluster binaries are of the same release
version.
It is generally true in MySQL Replication that both MySQL servers (mysqld processes) involved must be compatible with one another with respect to both the version of the replication protocol used and the SQL feature sets which they support (see Section 17.5.2, “Replication Compatibility Between MySQL Versions”). It is due to such differences between the binaries in the NDB Cluster and MySQL Server 8.0 distributions that NDB Cluster Replication has the additional requirement that both mysqld binaries come from an NDB Cluster distribution. The simplest and easiest way to assure that the mysqld servers are compatible is to use the same NDB Cluster distribution for all master and slave mysqld binaries.
We assume that the slave server or cluster is dedicated to replication of the master, and that no other data is being stored on it.
All NDB tables being replicated must be created
using a MySQL server and client. Tables and other database objects
created using the NDB API (with, for example,
Dictionary::createTable()) are
not visible to a MySQL server and so are not replicated. Updates
by NDB API applications to existing tables that were created using
a MySQL server can be replicated.
It is possible to replicate an NDB Cluster using statement-based replication. However, in this case, the following restrictions apply:
All updates to data rows on the cluster acting as the master must be directed to a single MySQL server.
It is not possible to replicate a cluster using multiple simultaneous MySQL replication processes.
Only changes made at the SQL level are replicated.
These are in addition to the other limitations of statement-based replication as opposed to row-based replication; see Section 17.2.1.1, “Advantages and Disadvantages of Statement-Based and Row-Based Replication”, for more specific information concerning the differences between the two replication formats.
This section discusses known problems or issues when using replication with NDB Cluster 8.0.
Loss of master-slave connection.
A loss of connection can occur either between the replication
master SQL node and the replication slave SQL node, or between
the replication master SQL node and the data nodes in the master
cluster. In the latter case, this can occur not only as a result
of loss of physical connection (for example, a broken network
cable), but due to the overflow of data node event buffers; if
the SQL node is too slow to respond, it may be dropped by the
cluster (this is controllable to some degree by adjusting the
MaxBufferedEpochs and
TimeBetweenEpochs
configuration parameters). If this occurs, it is
entirely possible for new data to be inserted into the master
cluster without being recorded in the replication master's
binary log. For this reason, to guarantee high
availability, it is extremely important to maintain a backup
replication channel, to monitor the primary channel, and to fail
over to the secondary replication channel when necessary to keep
the slave cluster synchronized with the master. NDB Cluster is
not designed to perform such monitoring on its own; for this, an
external application is required.
The replication master issues a “gap” event when
connecting or reconnecting to the master cluster. (A gap event is
a type of “incident event,” which indicates an
incident that occurs that affects the contents of the database but
that cannot easily be represented as a set of changes. Examples of
incidents are server crashes, database resynchronization, (some)
software updates, and (some) hardware changes.) When the slave
encounters a gap in the replication log, it stops with an error
message. This message is available in the output of
SHOW SLAVE STATUS, and indicates
that the SQL thread has stopped due to an incident registered in
the replication stream, and that manual intervention is required.
See Section 22.6.8, “Implementing Failover with NDB Cluster Replication”, for more
information about what to do in such circumstances.
Because NDB Cluster is not designed on its own to monitor replication status or provide failover, if high availability is a requirement for the slave server or cluster, then you must set up multiple replication lines, monitor the master mysqld on the primary replication line, and be prepared fail over to a secondary line if and as necessary. This must be done manually, or possibly by means of a third-party application. For information about implementing this type of setup, see Section 22.6.7, “Using Two Replication Channels for NDB Cluster Replication”, and Section 22.6.8, “Implementing Failover with NDB Cluster Replication”.
However, if you are replicating from a standalone MySQL server to an NDB Cluster, one channel is usually sufficient.
Circular replication. NDB Cluster Replication supports circular replication, as shown in the next example. The replication setup involves three NDB Clusters numbered 1, 2, and 3, in which Cluster 1 acts as the replication master for Cluster 2, Cluster 2 acts as the master for Cluster 3, and Cluster 3 acts as the master for Cluster 1, thus completing the circle. Each NDB Cluster has two SQL nodes, with SQL nodes A and B belonging to Cluster 1, SQL nodes C and D belonging to Cluster 2, and SQL nodes E and F belonging to Cluster 3.
Circular replication using these clusters is supported as long as the following conditions are met:
The SQL nodes on all masters and slaves are the same.
All SQL nodes acting as replication masters and slaves are started with the
log_slave_updatessystem variable enabled.
This type of circular replication setup is shown in the following diagram:
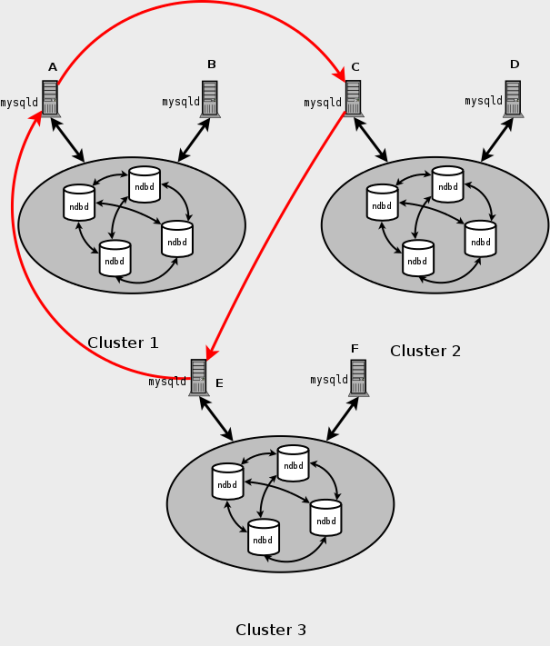
In this scenario, SQL node A in Cluster 1 replicates to SQL node C in Cluster 2; SQL node C replicates to SQL node E in Cluster 3; SQL node E replicates to SQL node A. In other words, the replication line (indicated by the curved arrows in the diagram) directly connects all SQL nodes used as replication masters and slaves.
It should also be possible to set up circular replication in which not all master SQL nodes are also slaves, as shown here:
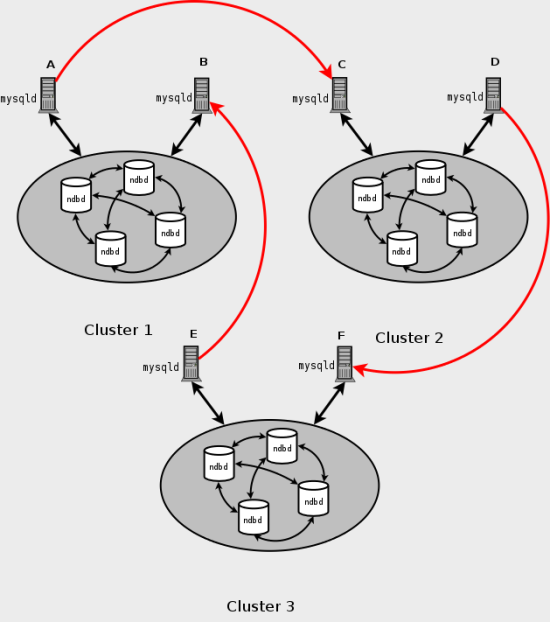
In this case, different SQL nodes in each cluster are used as
replication masters and slaves. However, you must
not start any of the SQL nodes with the
log_slave_updates system variable
enabled. This type of circular replication scheme for NDB Cluster,
in which the line of replication (again indicated by the curved
arrows in the diagram) is discontinuous, should be possible, but
it should be noted that it has not yet been thoroughly tested and
must therefore still be considered experimental.
The NDB storage engine uses
idempotent execution mode,
which suppresses duplicate-key and other errors that otherwise
break circular replication of NDB Cluster. This is equivalent to
setting the global
slave_exec_mode system variable
to IDEMPOTENT, although this is not necessary
in NDB Cluster replication, since NDB Cluster sets this variable
automatically and ignores any attempts to set it explicitly.
NDB Cluster replication and primary keys.
In the event of a node failure, errors in replication of
NDB tables without primary keys can
still occur, due to the possibility of duplicate rows being
inserted in such cases. For this reason, it is highly
recommended that all NDB tables
being replicated have primary keys.
NDB Cluster Replication and Unique Keys.
In older versions of NDB Cluster, operations that updated values
of unique key columns of NDB tables
could result in duplicate-key errors when replicated. This issue
is solved for replication between
NDB tables by deferring unique key
checks until after all table row updates have been performed.
Deferring constraints in this way is currently supported only by
NDB. Thus, updates of unique keys
when replicating from NDB to a
different storage engine such as
MyISAM or
InnoDB are still not supported.
The problem encountered when replicating without deferred checking
of unique key updates can be illustrated using
NDB table such as
t, is created and populated on the master (and
replicated to a slave that does not support deferred unique key
updates) as shown here:
CREATE TABLE t (
p INT PRIMARY KEY,
c INT,
UNIQUE KEY u (c)
) ENGINE NDB;
INSERT INTO t
VALUES (1,1), (2,2), (3,3), (4,4), (5,5);
The following UPDATE statement on
t succeeded on the master, since the rows
affected are processed in the order determined by the
ORDER BY option, performed over the entire
table:
UPDATE t SET c = c - 1 ORDER BY p;
However, the same statement failed with a duplicate key error or other constraint violation on the slave, because the ordering of the row updates was done for one partition at a time, rather than for the table as a whole.
Every NDB table is implicitly
partitioned by key when it is created. See
Section 23.2.5, “KEY Partitioning”, for more information.
GTIDs not supported.
Replication using global transaction IDs is not compatible with
the NDB storage engine, and is not supported.
Enabling GTIDs is likely to cause NDB Cluster Replication to
fail.
Multithreaded slaves not supported.
NDB Cluster does not support multithreaded slaves, and setting
related system variables such as
slave_parallel_workers,
slave_checkpoint_group, and
slave_checkpoint_group (or the
equivalent mysqld startup options) has no
effect.
This is because the slave may not be able to separate transactions
occurring in one database from those in another if they are
written within the same epoch. In addition, every transaction
handled by the NDB storage engine
involves at least two databases—the target database and the
mysql system database—due to the
requirement for updating the
mysql.ndb_apply_status table (see
Section 22.6.4, “NDB Cluster Replication Schema and Tables”). This in turn
breaks the requirement for multithreading that the transaction is
specific to a given database.
Restarting with --initial.
Restarting the cluster with the
--initial option causes the
sequence of GCI and epoch numbers to start over from
0. (This is generally true of NDB Cluster and
not limited to replication scenarios involving Cluster.) The
MySQL servers involved in replication should in this case be
restarted. After this, you should use the
RESET MASTER and
RESET SLAVE statements to clear
the invalid ndb_binlog_index and
ndb_apply_status tables, respectively.
Replication from NDB to other storage engines.
It is possible to replicate an NDB
table on the master to a table using a different storage engine
on the slave, taking into account the restrictions listed here:
Multi-master and circular replication are not supported (tables on both the master and the slave must use the
NDBstorage engine for this to work).Using a storage engine which does not perform binary logging for slave tables requires special handling.
Use of a nontransactional storage engine for slave tables also requires special handling.
The master mysqld must be started with
--ndb-log-update-as-write=0or--ndb-log-update-as-write=OFF.
The next few paragraphs provide additional information about each of the issues just described.
Multiple masters not supported when replicating NDB to other storage
engines.
For replication from NDB to a
different storage engine, the relationship between the two
databases must be a simple master-slave one. This means that
circular or master-master replication is not supported between
NDB Cluster and other storage engines.
In addition, it is not possible to configure more than one
replication channel when replicating between
NDB and a different storage engine.
(However, an NDB Cluster database can
simultaneously replicate to multiple slave NDB Cluster databases.)
If the master uses NDB tables, it is
still possible to have more than one MySQL Server maintain a
binary log of all changes; however, for the slave to change
masters (fail over), the new master-slave relationship must be
explicitly defined on the slave.
Replicating NDB to a slave storage engine that does not perform binary logging. If you attempt to replicate from an NDB Cluster to a slave that uses a storage engine that does not handle its own binary logging, the replication process aborts with the error Binary logging not possible ... Statement cannot be written atomically since more than one engine involved and at least one engine is self-logging (Error 1595). It is possible to work around this issue in one of the following ways:
Turn off binary logging on the slave. This can be accomplished by setting
sql_log_bin = 0.Change the storage engine used for the mysql.ndb_apply_status table. Causing this table to use an engine that does not handle its own binary logging can also eliminate the conflict. This can be done by issuing a statement such as
ALTER TABLE mysql.ndb_apply_status ENGINE=MyISAMon the slave. It is safe to do this when using a non-NDBstorage engine on the slave, since you do not then need to worry about keeping multiple slave SQL nodes synchronized.Filter out changes to the mysql.ndb_apply_status table on the slave. This can be done by starting the slave SQL node with
--replicate-ignore-table=mysql.ndb_apply_status. If you need for other tables to be ignored by replication, you might wish to use an appropriate--replicate-wild-ignore-tableoption instead.
You should not disable replication or
binary logging of mysql.ndb_apply_status or
change the storage engine used for this table when replicating
from one NDB Cluster to another. See
Replication and binary log filtering rules with replication between NDB
Clusters,
for details.
Replication from NDB to a nontransactional storage engine.
When replicating from NDB to a
nontransactional storage engine such as
MyISAM, you may encounter
unnecessary duplicate key errors when replicating
INSERT ...
ON DUPLICATE KEY UPDATE statements. You can suppress
these by using
--ndb-log-update-as-write=0,
which forces updates to be logged as writes (rather than as
updates).
Replication and binary log filtering rules with replication between NDB
Clusters.
If you are using any of the options
--replicate-do-*,
--replicate-ignore-*,
--binlog-do-db, or
--binlog-ignore-db to filter
databases or tables being replicated, care must be taken not to
block replication or binary logging of the
mysql.ndb_apply_status, which is required for
replication between NDB Clusters to operate properly. In
particular, you must keep in mind the following:
Using
--replicate-do-db=(and no otherdb_name--replicate-do-*or--replicate-ignore-*options) means that only tables in databasedb_nameare replicated. In this case, you should also use--replicate-do-db=mysql,--binlog-do-db=mysql, or--replicate-do-table=mysql.ndb_apply_statusto ensure thatmysql.ndb_apply_statusis populated on slaves.Using
--binlog-do-db=(and no otherdb_name--binlog-do-dboptions) means that changes only to tables in databasedb_nameare written to the binary log. In this case, you should also use--replicate-do-db=mysql,--binlog-do-db=mysql, or--replicate-do-table=mysql.ndb_apply_statusto ensure thatmysql.ndb_apply_statusis populated on slaves.Using
--replicate-ignore-db=mysqlmeans that no tables in themysqldatabase are replicated. In this case, you should also use--replicate-do-table=mysql.ndb_apply_statusto ensure thatmysql.ndb_apply_statusis replicated.Using
--binlog-ignore-db=mysqlmeans that no changes to tables in themysqldatabase are written to the binary log. In this case, you should also use--replicate-do-table=mysql.ndb_apply_statusto ensure thatmysql.ndb_apply_statusis replicated.
You should also remember that each replication rule requires the following:
Its own
--replicate-do-*or--replicate-ignore-*option, and that multiple rules cannot be expressed in a single replication filtering option. For information about these rules, see Section 17.1.6, “Replication and Binary Logging Options and Variables”.Its own
--binlog-do-dbor--binlog-ignore-dboption, and that multiple rules cannot be expressed in a single binary log filtering option. For information about these rules, see Section 5.4.4, “The Binary Log”.
If you are replicating an NDB Cluster to a slave that uses a
storage engine other than NDB, the
considerations just given previously may not apply, as discussed
elsewhere in this section.
NDB Cluster Replication and IPv6. Currently, the NDB API and MGM API do not support IPv6. However, MySQL Servers—including those acting as SQL nodes in an NDB Cluster —can use IPv6 to contact other MySQL Servers. This means that you can replicate between NDB Clusters using IPv6 to connect the master and slave SQL nodes as shown by the dotted arrow in the following diagram:
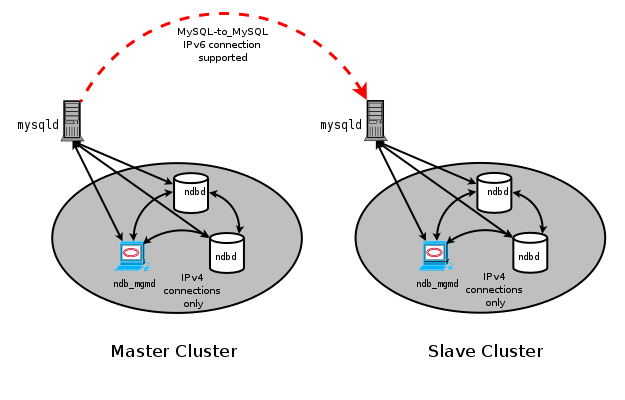
However, all connections originating within the NDB Cluster —represented in the preceding diagram by solid arrows—must use IPv4. In other words, all NDB Cluster data nodes, management servers, and management clients must be accessible from one another using IPv4. In addition, SQL nodes must use IPv4 to communicate with the cluster.
Since there is currently no support in the NDB and MGM APIs for IPv6, any applications written using these APIs must also make all connections using IPv4.
Attribute promotion and demotion.
NDB Cluster Replication includes support for attribute promotion
and demotion. The implementation of the latter distinguishes
between lossy and non-lossy type conversions, and their use on
the slave can be controlled by setting the
slave_type_conversions global
server system variable.
For more information about attribute promotion and demotion in NDB Cluster, see Row-based replication: attribute promotion and demotion.
NDB, unlike InnoDB
or MyISAM, does not write changes to
virtual columns to the binary log; however, this has no
detrimental effects on NDB Cluster Replication or replication
between NDB and other storage engines. Changes
to stored generated columns are logged.
Replication in NDB Cluster makes use of a number of dedicated
tables in the mysql database on each MySQL
Server instance acting as an SQL node in both the cluster being
replicated and the replication slave (whether the slave is a
single server or a cluster). These tables are created during the
MySQL installation process, and include a table for storing the
binary log's indexing data. Since the
ndb_binlog_index table is local to each MySQL
server and does not participate in clustering, it uses the
InnoDB storage engine. This means that it must
be created separately on each mysqld
participating in the master cluster. (However, the binary log
itself contains updates from all MySQL servers in the cluster to
be replicated.) This table is defined as follows:
CREATE TABLE `ndb_binlog_index` (
`Position` BIGINT(20) UNSIGNED NOT NULL,
`File` VARCHAR(255) NOT NULL,
`epoch` BIGINT(20) UNSIGNED NOT NULL,
`inserts` INT(10) UNSIGNED NOT NULL,
`updates` INT(10) UNSIGNED NOT NULL,
`deletes` INT(10) UNSIGNED NOT NULL,
`schemaops` INT(10) UNSIGNED NOT NULL,
`orig_server_id` INT(10) UNSIGNED NOT NULL,
`orig_epoch` BIGINT(20) UNSIGNED NOT NULL,
`gci` INT(10) UNSIGNED NOT NULL,
`next_position` bigint(20) unsigned NOT NULL,
`next_file` varchar(255) NOT NULL,
PRIMARY KEY (`epoch`,`orig_server_id`,`orig_epoch`)
) ENGINE=InnoDB DEFAULT CHARSET=latin1;
If you are upgrading from an old release (prior to NDB 7.5.2),
perform the MySQL upgrade procedure and ensure that the system
tables are upgraded. (As of MySQL 8.0.16, start the server with
the --upgrade=FORCE option. Prior to MySQL
8.0.16, invoke mysql_upgrade with the
--force and
--upgrade-system-tables
options after starting the server.) The system table upgrade
causes an ALTER
TABLE ... ENGINE=INNODB statement to be executed for
this table. Use of the MyISAM storage engine
for this table continues to be supported for backward
compatibility.
ndb_binlog_index may require additional disk
space after being converted to InnoDB. If
this becomes an issue, you may be able to conserve space by
using an InnoDB tablespace for this table,
changing its ROW_FORMAT to
COMPRESSED, or both. For more information,
see Section 13.1.21, “CREATE TABLESPACE Statement”, and
Section 13.1.20, “CREATE TABLE Statement”, as well as
Section 15.6.3, “Tablespaces”.
The size of this table is dependent on the number of epochs per
binary log file and the number of binary log files. The number of
epochs per binary log file normally depends on the amount of
binary log generated per epoch and the size of the binary log
file, with smaller epochs resulting in more epochs per file. You
should be aware that empty epochs produce inserts to the
ndb_binlog_index table, even when the
--ndb-log-empty-epochs option is
OFF, meaning that the number of entries per
file depends on the length of time that the file is in use; that
is,
[number of epochs per file] = [time spent per file] / TimeBetweenEpochs
A busy NDB Cluster writes to the binary log regularly and
presumably rotates binary log files more quickly than a quiet one.
This means that a “quiet” NDB Cluster with
--ndb-log-empty-epochs=ON can
actually have a much higher number of
ndb_binlog_index rows per file than one with a
great deal of activity.
When mysqld is started with the
--ndb-log-orig option, the
orig_server_id and
orig_epoch columns store, respectively, the ID
of the server on which the event originated and the epoch in which
the event took place on the originating server, which is useful in
NDB Cluster replication setups employing multiple masters. The
SELECT statement used to find the
closest binary log position to the highest applied epoch on the
slave in a multi-master setup (see
Section 22.6.10, “NDB Cluster Replication: Multi-Master and Circular Replication”) employs
these two columns, which are not indexed. This can lead to
performance issues when trying to fail over, since the query must
perform a table scan, especially when the master has been running
with --ndb-log-empty-epochs=ON. You
can improve multi-master failover times by adding an index to
these columns, as shown here:
ALTER TABLE mysql.ndb_binlog_index
ADD INDEX orig_lookup USING BTREE (orig_server_id, orig_epoch);
Adding this index provides no benefit when replicating from a
single master to a single slave, since the query used to get the
binary log position in such cases makes no use of
orig_server_id or
orig_epoch.
See Section 22.6.8, “Implementing Failover with NDB Cluster Replication”, for more
information about using the next_position and
next_file columns.
The following figure shows the relationship of the NDB Cluster
replication master server, its binary log injector thread, and the
mysql.ndb_binlog_index table.
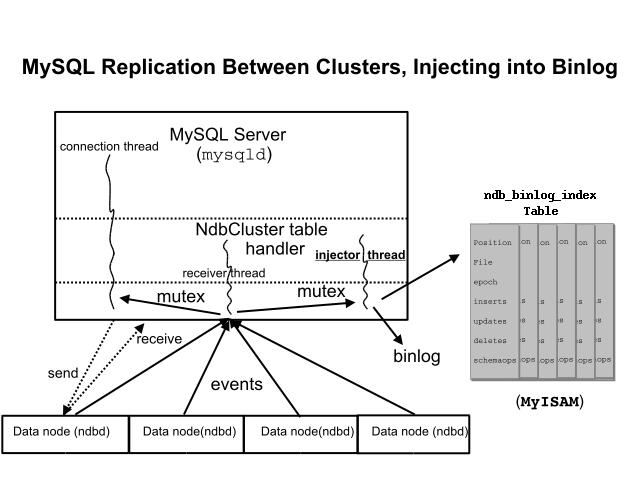
An additional table, named ndb_apply_status, is
used to keep a record of the operations that have been replicated
from the master to the slave. Unlike the case with
ndb_binlog_index, the data in this table is not
specific to any one SQL node in the (slave) cluster, and so
ndb_apply_status can use the
NDBCLUSTER storage engine, as shown here:
CREATE TABLE `ndb_apply_status` (
`server_id` INT(10) UNSIGNED NOT NULL,
`epoch` BIGINT(20) UNSIGNED NOT NULL,
`log_name` VARCHAR(255) CHARACTER SET latin1 COLLATE latin1_bin NOT NULL,
`start_pos` BIGINT(20) UNSIGNED NOT NULL,
`end_pos` BIGINT(20) UNSIGNED NOT NULL,
PRIMARY KEY (`server_id`) USING HASH
) ENGINE=NDBCLUSTER DEFAULT CHARSET=latin1;
The ndb_apply_status table is populated only on
slaves, which means that, on the master, this table never contains
any rows; thus, there is no need to allow for
DataMemory or
IndexMemory to be allotted
to ndb_apply_status there.
Because this table is populated from data originating on the
master, it should be allowed to replicate; any replication
filtering or binary log filtering rules that inadvertently prevent
the slave from updating ndb_apply_status or the
master from writing into the binary log may prevent replication
between clusters from operating properly. For more information
about potential problems arising from such filtering rules, see
Replication and binary log filtering rules with replication between NDB
Clusters.
The ndb_binlog_index and
ndb_apply_status tables are created in the
mysql database because they should not be
explicitly replicated by the user. User intervention is normally
not required to create or maintain either of these tables, since
both ndb_binlog_index and the
ndb_apply_status are maintained by the
NDB binary log (binlog) injector
thread. This keeps the master mysqld process
updated to changes performed by the
NDB storage engine. The
NDB binlog
injector thread receives events directly from the
NDB storage engine. The
NDB injector is responsible for
capturing all the data events within the cluster, and ensures that
all events which change, insert, or delete data are recorded in
the ndb_binlog_index table. The slave I/O
thread transfers the events from the master's binary log to the
slave's relay log.
However, it is advisable to check for the existence and integrity
of these tables as an initial step in preparing an NDB Cluster for
replication. It is possible to view event data recorded in the
binary log by querying the
mysql.ndb_binlog_index table directly on the
master. This can be also be accomplished using the
SHOW BINLOG EVENTS statement on
either the replication master or slave MySQL servers. (See
Section 13.7.7.2, “SHOW BINLOG EVENTS Statement”.)
You can also obtain useful information from the output of
SHOW ENGINE NDB
STATUS.
When performing schema changes on
NDB tables, applications should
wait until the ALTER TABLE
statement has returned in the MySQL client connection that
issued the statement before attempting to use the updated
definition of the table.
If the ndb_apply_status table does not exist on
the slave, ndb_restore re-creates it.
Conflict resolution for NDB Cluster Replication requires the
presence of an additional mysql.ndb_replication
table. Currently, this table must be created manually. For
information about how to do this, see
Section 22.6.11, “NDB Cluster Replication Conflict Resolution”.
Preparing the NDB Cluster for replication consists of the following steps:
Check all MySQL servers for version compatibility (see Section 22.6.2, “General Requirements for NDB Cluster Replication”).
Create a slave account on the master Cluster with the appropriate privileges, using the following two SQL statements:
mysql
M>CREATE USER '->slave_user'@'slave_host'IDENTIFIED BY 'mysqlslave_password';M>GRANT REPLICATION SLAVE ON *.*->TO 'slave_user'@'slave_host';In the previous statement,
slave_useris the slave account user name,slave_hostis the host name or IP address of the replication slave, andslave_passwordis the password to assign to this account.For example, to create a slave user account with the name
myslave, logging in from the host namedrep-slave, and using the password53cr37, use the followingCREATE USERandGRANTstatements:mysql
M>CREATE USER 'myslave'@'rep-slave'->IDENTIFIED BY '53cr37';mysqlM>GRANT REPLICATION SLAVE ON *.*->TO ''myslave'@'rep-slave'';For security reasons, it is preferable to use a unique user account—not employed for any other purpose—for the replication slave account.
Configure the slave to use the master. Using the MySQL Monitor, this can be accomplished with the
CHANGE MASTER TOstatement:mysql
S>CHANGE MASTER TO->MASTER_HOST='->master_host',MASTER_PORT=->master_port,MASTER_USER='->slave_user',MASTER_PASSWORD='slave_password';In the previous statement,
master_hostis the host name or IP address of the replication master,master_portis the port for the slave to use for connecting to the master,slave_useris the user name set up for the slave on the master, andslave_passwordis the password set for that user account in the previous step.For example, to tell the slave to replicate from the MySQL server whose host name is
rep-master, using the replication slave account created in the previous step, use the following statement:mysql
S>CHANGE MASTER TO->MASTER_HOST='rep-master',->MASTER_PORT=3306,->MASTER_USER='myslave',->MASTER_PASSWORD='53cr37';For a complete list of options that can be used with this statement, see Section 13.4.2.1, “CHANGE MASTER TO Statement”.
To provide replication backup capability, you also need to add an
--ndb-connectstringoption to the slave'smy.cnffile prior to starting the replication process. See Section 22.6.9, “NDB Cluster Backups With NDB Cluster Replication”, for details.For additional options that can be set in
my.cnffor replication slaves, see Section 17.1.6, “Replication and Binary Logging Options and Variables”.If the master cluster is already in use, you can create a backup of the master and load this onto the slave to cut down on the amount of time required for the slave to synchronize itself with the master. If the slave is also running NDB Cluster, this can be accomplished using the backup and restore procedure described in Section 22.6.9, “NDB Cluster Backups With NDB Cluster Replication”.
ndb-connectstring=
management_host[:port]In the event that you are not using NDB Cluster on the replication slave, you can create a backup with this command on the replication master:
shell
M>mysqldump --master-data=1Then import the resulting data dump onto the slave by copying the dump file over to the slave. After this, you can use the mysql client to import the data from the dumpfile into the slave database as shown here, where
dump_fileis the name of the file that was generated using mysqldump on the master, anddb_nameis the name of the database to be replicated:shell
S>mysql -u root -pdb_name<dump_fileFor a complete list of options to use with mysqldump, see Section 4.5.4, “mysqldump — A Database Backup Program”.
NoteIf you copy the data to the slave in this fashion, you should make sure that the slave is started with the
--skip-slave-startoption on the command line, or else includeskip-slave-startin the slave'smy.cnffile to keep it from trying to connect to the master to begin replicating before all the data has been loaded. Once the data loading has completed, follow the additional steps outlined in the next two sections.Ensure that each MySQL server acting as a replication master is configured with a unique server ID, and with binary logging enabled, using the row format. (See Section 17.2.1, “Replication Formats”.) These options can be set either in the master server's
my.cnffile, or on the command line when starting the master mysqld process. See Section 22.6.6, “Starting NDB Cluster Replication (Single Replication Channel)”, for information regarding the latter option.
This section outlines the procedure for starting NDB Cluster replication using a single replication channel.
Start the MySQL replication master server by issuing this command:
shell
M>mysqld --ndbcluster --server-id=id\--log-bin --ndb-log-bin &In the previous statement,
idis this server's unique ID (see Section 22.6.2, “General Requirements for NDB Cluster Replication”). This starts the server's mysqld process with binary logging enabled using the proper logging format. It is also necessary to enable logging of updates toNDBtables explicitly, using the--ndb-log-binoption; this is a change from previous versions of NDB Cluster, in which this option was enabled by default.NoteYou can also start the master with
--binlog-format=MIXED, in which case row-based replication is used automatically when replicating between clusters.STATEMENTbased binary logging is not supported for NDB Cluster Replication (see Section 22.6.2, “General Requirements for NDB Cluster Replication”).Start the MySQL replication slave server as shown here:
shell
S>mysqld --ndbcluster --server-id=id&In the command just shown,
idis the slave server's unique ID. It is not necessary to enable logging on the replication slave.NoteYou should use the
--skip-slave-startoption with this command or else you should includeskip-slave-startin the slave server'smy.cnffile, unless you want replication to begin immediately. With the use of this option, the start of replication is delayed until the appropriateSTART SLAVEstatement has been issued, as explained in Step 4 below.It is necessary to synchronize the slave server with the master server's replication binary log. If binary logging has not previously been running on the master, run the following statement on the slave:
mysql
S>CHANGE MASTER TO->MASTER_LOG_FILE='',->MASTER_LOG_POS=4;This instructs the slave to begin reading the master's binary log from the log's starting point. Otherwise—that is, if you are loading data from the master using a backup—see Section 22.6.8, “Implementing Failover with NDB Cluster Replication”, for information on how to obtain the correct values to use for
MASTER_LOG_FILEandMASTER_LOG_POSin such cases.Finally, you must instruct the slave to begin applying replication by issuing this command from the mysql client on the replication slave:
mysql
S>START SLAVE;This also initiates the transmission of replication data from the master to the slave.
It is also possible to use two replication channels, in a manner similar to the procedure described in the next section; the differences between this and using a single replication channel are covered in Section 22.6.7, “Using Two Replication Channels for NDB Cluster Replication”.
It is also possible to improve cluster replication performance by
enabling batched updates.
This can be accomplished by setting the
slave_allow_batching system
variable on the slave mysqld processes.
Normally, updates are applied as soon as they are received.
However, the use of batching causes updates to be applied in 32 KB
batches, which can result in higher throughput and less CPU usage,
particularly where individual updates are relatively small.
Slave batching works on a per-epoch basis; updates belonging to more than one transaction can be sent as part of the same batch.
All outstanding updates are applied when the end of an epoch is reached, even if the updates total less than 32 KB.
Batching can be turned on and off at runtime. To activate it at runtime, you can use either of these two statements:
SET GLOBAL slave_allow_batching = 1; SET GLOBAL slave_allow_batching = ON;
If a particular batch causes problems (such as a statement whose effects do not appear to be replicated correctly), slave batching can be deactivated using either of the following statements:
SET GLOBAL slave_allow_batching = 0; SET GLOBAL slave_allow_batching = OFF;
You can check whether slave batching is currently being used by
means of an appropriate SHOW
VARIABLES statement, like this one:
mysql> SHOW VARIABLES LIKE 'slave%';
+---------------------------+-------+
| Variable_name | Value |
+---------------------------+-------+
| slave_allow_batching | ON |
| slave_compressed_protocol | OFF |
| slave_load_tmpdir | /tmp |
| slave_net_timeout | 3600 |
| slave_skip_errors | OFF |
| slave_transaction_retries | 10 |
+---------------------------+-------+
6 rows in set (0.00 sec)
In a more complete example scenario, we envision two replication channels to provide redundancy and thereby guard against possible failure of a single replication channel. This requires a total of four replication servers, two masters for the master cluster and two slave servers for the slave cluster. For purposes of the discussion that follows, we assume that unique identifiers are assigned as shown here:
Table 22.296 NDB Cluster replication servers described in the text
| Server ID | Description |
|---|---|
| 1 | Master - primary replication channel (M) |
| 2 | Master - secondary replication channel (M') |
| 3 | Slave - primary replication channel (S) |
| 4 | Slave - secondary replication channel (S') |
Setting up replication with two channels is not radically
different from setting up a single replication channel. First, the
mysqld processes for the primary and secondary
replication masters must be started, followed by those for the
primary and secondary slaves. Then the replication processes may
be initiated by issuing the START
SLAVE statement on each of the slaves. The commands and
the order in which they need to be issued are shown here:
Start the primary replication master:
shell
M>mysqld --ndbcluster --server-id=1 \--log-bin &Start the secondary replication master:
shell
M'>mysqld --ndbcluster --server-id=2 \--log-bin &Start the primary replication slave server:
shell
S>mysqld --ndbcluster --server-id=3 \--skip-slave-start &Start the secondary replication slave:
shell
S'>mysqld --ndbcluster --server-id=4 \--skip-slave-start &Finally, initiate replication on the primary channel by executing the
START SLAVEstatement on the primary slave as shown here:mysql
S>START SLAVE;WarningOnly the primary channel is to be started at this point. The secondary replication channel is to be started only in the event that the primary replication channel fails, as described in Section 22.6.8, “Implementing Failover with NDB Cluster Replication”. Running multiple replication channels simultaneously can result in unwanted duplicate records being created on the replication slaves.
As mentioned previously, it is not necessary to enable binary logging on replication slaves.
In the event that the primary Cluster replication process fails, it is possible to switch over to the secondary replication channel. The following procedure describes the steps required to accomplish this.
Obtain the time of the most recent global checkpoint (GCP). That is, you need to determine the most recent epoch from the
ndb_apply_statustable on the slave cluster, which can be found using the following query:mysql
S'>SELECT @latest:=MAX(epoch)->FROM mysql.ndb_apply_status;In a circular replication topology, with a master and a slave running on each host, when you are using
ndb_log_apply_status=1, NDB Cluster epochs are written in the slave binary logs. This means that thendb_apply_statustable contains information for the slave on this host as well as for any other host which acts as a slave of the master running on this host.In this case, you need to determine the latest epoch on this slave to the exclusion of any epochs from any other slaves in this slave's binary log that were not listed in the
IGNORE_SERVER_IDSoptions of theCHANGE MASTER TOstatement used to set up this slave. The reason for excluding such epochs is that rows in themysql.ndb_apply_statustable whose server IDs have a match in theIGNORE_SERVER_IDSlist used with the CHANGE MASTER TO statement used to prepare this slave's master are also considered to be from local servers, in addition to those having the slave's own server ID. You can retrieve this list asReplicate_Ignore_Server_Idsfrom the output ofSHOW SLAVE STATUS. We assume that you have obtained this list and are substituting it forignore_server_idsin the query shown here, which like the previous version of the query, selects the greatest epoch into a variable named@latest:mysql
S'>SELECT @latest:=MAX(epoch)->FROM mysql.ndb_apply_status->WHERE server_id NOT IN (ignore_server_ids);In some cases, it may be simpler or more efficient (or both) to use a list of the server IDs to be included and
server_id INin theserver_id_listWHEREcondition of the preceding query.Using the information obtained from the query shown in Step 1, obtain the corresponding records from the
ndb_binlog_indextable on the master cluster.You can use the following query to obtain the needed records from the master's
ndb_binlog_indextable:mysql
M'>SELECT->@file:=SUBSTRING_INDEX(next_file, '/', -1),->@pos:=next_position->FROM mysql.ndb_binlog_index->WHERE epoch >= @latest->ORDER BY epoch ASC LIMIT 1;These are the records saved on the master since the failure of the primary replication channel. We have employed a user variable
@latesthere to represent the value obtained in Step 1. Of course, it is not possible for one mysqld instance to access user variables set on another server instance directly. These values must be “plugged in” to the second query manually or in application code.ImportantYou must ensure that the slave mysqld is started with
--slave-skip-errors=ddl_exist_errorsbefore executingSTART SLAVE. Otherwise, replication may stop with duplicate DDL errors.Now it is possible to synchronize the secondary channel by running the following query on the secondary slave server:
mysql
S'>CHANGE MASTER TO->MASTER_LOG_FILE='@file',->MASTER_LOG_POS=@pos;Again we have employed user variables (in this case
@fileand@pos) to represent the values obtained in Step 2 and applied in Step 3; in practice these values must be inserted manually or using application code that can access both of the servers involved.Note@fileis a string value such as'/var/log/mysql/replication-master-bin.00001', and so must be quoted when used in SQL or application code. However, the value represented by@posmust not be quoted. Although MySQL normally attempts to convert strings to numbers, this case is an exception.You can now initiate replication on the secondary channel by issuing the appropriate command on the secondary slave mysqld:
mysql
S'>START SLAVE;
Once the secondary replication channel is active, you can investigate the failure of the primary and effect repairs. The precise actions required to do this will depend upon the reasons for which the primary channel failed.
The secondary replication channel is to be started only if and when the primary replication channel has failed. Running multiple replication channels simultaneously can result in unwanted duplicate records being created on the replication slaves.
If the failure is limited to a single server, it should (in
theory) be possible to replicate from M
to S', or from
M' to S;
however, this has not yet been tested.
This section discusses making backups and restoring from them using NDB Cluster replication. We assume that the replication servers have already been configured as covered previously (see Section 22.6.5, “Preparing the NDB Cluster for Replication”, and the sections immediately following). This having been done, the procedure for making a backup and then restoring from it is as follows:
There are two different methods by which the backup may be started.
Method A. This method requires that the cluster backup process was previously enabled on the master server, prior to starting the replication process. This can be done by including the following line in a
[mysql_cluster]section in themy.cnf file, wheremanagement_hostis the IP address or host name of theNDBmanagement server for the master cluster, andportis the management server's port number:ndb-connectstring=
management_host[:port]NoteThe port number needs to be specified only if the default port (1186) is not being used. See Section 22.2.4, “Initial Configuration of NDB Cluster”, for more information about ports and port allocation in NDB Cluster.
In this case, the backup can be started by executing this statement on the replication master:
shell
M>ndb_mgm -e "START BACKUP"Method B. If the
my.cnffile does not specify where to find the management host, you can start the backup process by passing this information to theNDBmanagement client as part of theSTART BACKUPcommand. This can be done as shown here, wheremanagement_hostandportare the host name and port number of the management server:shell
M>ndb_mgmmanagement_host:port-e "START BACKUP"In our scenario as outlined earlier (see Section 22.6.5, “Preparing the NDB Cluster for Replication”), this would be executed as follows:
shell
M>ndb_mgm rep-master:1186 -e "START BACKUP"
Copy the cluster backup files to the slave that is being brought on line. Each system running an ndbd process for the master cluster will have cluster backup files located on it, and all of these files must be copied to the slave to ensure a successful restore. The backup files can be copied into any directory on the computer where the slave management host resides, so long as the MySQL and NDB binaries have read permissions in that directory. In this case, we will assume that these files have been copied into the directory
/var/BACKUPS/BACKUP-1.It is not necessary that the slave cluster have the same number of ndbd processes (data nodes) as the master; however, it is highly recommended this number be the same. It is necessary that the slave be started with the
--skip-slave-startoption, to prevent premature startup of the replication process.Create any databases on the slave cluster that are present on the master cluster that are to be replicated to the slave.
ImportantA
CREATE DATABASE(orCREATE SCHEMA) statement corresponding to each database to be replicated must be executed on each SQL node in the slave cluster.Reset the slave cluster using this statement in the MySQL Monitor:
mysql
S>RESET SLAVE;You can now start the cluster restoration process on the replication slave using the ndb_restore command for each backup file in turn. For the first of these, it is necessary to include the
-moption to restore the cluster metadata:shell
S>ndb_restore -cslave_host:port-nnode-id\-bbackup-id-m -rdirdiris the path to the directory where the backup files have been placed on the replication slave. For the ndb_restore commands corresponding to the remaining backup files, the-moption should not be used.For restoring from a master cluster with four data nodes (as shown in the figure in Section 22.6, “NDB Cluster Replication”) where the backup files have been copied to the directory
/var/BACKUPS/BACKUP-1, the proper sequence of commands to be executed on the slave might look like this:shell
S>ndb_restore -c rep-slave:1186 -n 2 -b 1 -m \-r ./var/BACKUPS/BACKUP-1shellS>ndb_restore -c rep-slave:1186 -n 3 -b 1 \-r ./var/BACKUPS/BACKUP-1shellS>ndb_restore -c rep-slave:1186 -n 4 -b 1 \-r ./var/BACKUPS/BACKUP-1shellS>ndb_restore -c rep-slave:1186 -n 5 -b 1 -e \-r ./var/BACKUPS/BACKUP-1ImportantThe
-e(or--restore-epoch) option in the final invocation of ndb_restore in this example is required in order that the epoch is written to the slavemysql.ndb_apply_status. Without this information, the slave will not be able to synchronize properly with the master. (See Section 22.4.23, “ndb_restore — Restore an NDB Cluster Backup”.)Now you need to obtain the most recent epoch from the
ndb_apply_statustable on the slave (as discussed in Section 22.6.8, “Implementing Failover with NDB Cluster Replication”):mysql
S>SELECT @latest:=MAX(epoch)FROM mysql.ndb_apply_status;Using
@latestas the epoch value obtained in the previous step, you can obtain the correct starting position@posin the correct binary log file@filefrom the master'smysql.ndb_binlog_indextable using the query shown here:mysql
M>SELECT->@file:=SUBSTRING_INDEX(File, '/', -1),->@pos:=Position->FROM mysql.ndb_binlog_index->WHERE epoch >= @latest->ORDER BY epoch ASC LIMIT 1;In the event that there is currently no replication traffic, you can get this information by running
SHOW MASTER STATUSon the master and using the value in thePositioncolumn for the file whose name has the suffix with the greatest value for all files shown in theFilecolumn. However, in this case, you must determine this and supply it in the next step manually or by parsing the output with a script.Using the values obtained in the previous step, you can now issue the appropriate
CHANGE MASTER TOstatement in the slave's mysql client:mysql
S>CHANGE MASTER TO->MASTER_LOG_FILE='@file',->MASTER_LOG_POS=@pos;Now that the slave “knows” from what point in which binary log file to start reading data from the master, you can cause the slave to begin replicating with this standard MySQL statement:
mysql
S>START SLAVE;
To perform a backup and restore on a second replication channel, it is necessary only to repeat these steps, substituting the host names and IDs of the secondary master and slave for those of the primary master and slave replication servers where appropriate, and running the preceding statements on them.
For additional information on performing Cluster backups and restoring Cluster from backups, see Section 22.5.8, “Online Backup of NDB Cluster”.
It is possible to automate much of the process described in the
previous section (see
Section 22.6.9, “NDB Cluster Backups With NDB Cluster Replication”). The
following Perl script reset-slave.pl serves
as an example of how you can do this.
#!/user/bin/perl -w
# file: reset-slave.pl
# Copyright ©2005 MySQL AB
# This program is free software; you can redistribute it and/or modify
# it under the terms of the GNU General Public License as published by
# the Free Software Foundation; either version 2 of the License, or
# (at your option) any later version.
# This program is distributed in the hope that it will be useful,
# but WITHOUT ANY WARRANTY; without even the implied warranty of
# MERCHANTABILITY or FITNESS FOR A PARTICULAR PURPOSE. See the
# GNU General Public License for more details.
# You should have received a copy of the GNU General Public License
# along with this program; if not, write to:
# Free Software Foundation, Inc.
# 59 Temple Place, Suite 330
# Boston, MA 02111-1307 USA
#
# Version 1.1
######################## Includes ###############################
use DBI;
######################## Globals ################################
my $m_host='';
my $m_port='';
my $m_user='';
my $m_pass='';
my $s_host='';
my $s_port='';
my $s_user='';
my $s_pass='';
my $dbhM='';
my $dbhS='';
####################### Sub Prototypes ##########################
sub CollectCommandPromptInfo;
sub ConnectToDatabases;
sub DisconnectFromDatabases;
sub GetSlaveEpoch;
sub GetMasterInfo;
sub UpdateSlave;
######################## Program Main ###########################
CollectCommandPromptInfo;
ConnectToDatabases;
GetSlaveEpoch;
GetMasterInfo;
UpdateSlave;
DisconnectFromDatabases;
################## Collect Command Prompt Info ##################
sub CollectCommandPromptInfo
{
### Check that user has supplied correct number of command line args
die "Usage:\n
reset-slave >master MySQL host< >master MySQL port< \n
>master user< >master pass< >slave MySQL host< \n
>slave MySQL port< >slave user< >slave pass< \n
All 8 arguments must be passed. Use BLANK for NULL passwords\n"
unless @ARGV == 8;
$m_host = $ARGV[0];
$m_port = $ARGV[1];
$m_user = $ARGV[2];
$m_pass = $ARGV[3];
$s_host = $ARGV[4];
$s_port = $ARGV[5];
$s_user = $ARGV[6];
$s_pass = $ARGV[7];
if ($m_pass eq "BLANK") { $m_pass = '';}
if ($s_pass eq "BLANK") { $s_pass = '';}
}
############### Make connections to both databases #############
sub ConnectToDatabases
{
### Connect to both master and slave cluster databases
### Connect to master
$dbhM
= DBI->connect(
"dbi:mysql:database=mysql;host=$m_host;port=$m_port",
"$m_user", "$m_pass")
or die "Can't connect to Master Cluster MySQL process!
Error: $DBI::errstr\n";
### Connect to slave
$dbhS
= DBI->connect(
"dbi:mysql:database=mysql;host=$s_host",
"$s_user", "$s_pass")
or die "Can't connect to Slave Cluster MySQL process!
Error: $DBI::errstr\n";
}
################ Disconnect from both databases ################
sub DisconnectFromDatabases
{
### Disconnect from master
$dbhM->disconnect
or warn " Disconnection failed: $DBI::errstr\n";
### Disconnect from slave
$dbhS->disconnect
or warn " Disconnection failed: $DBI::errstr\n";
}
###################### Find the last good GCI ##################
sub GetSlaveEpoch
{
$sth = $dbhS->prepare("SELECT MAX(epoch)
FROM mysql.ndb_apply_status;")
or die "Error while preparing to select epoch from slave: ",
$dbhS->errstr;
$sth->execute
or die "Selecting epoch from slave error: ", $sth->errstr;
$sth->bind_col (1, \$epoch);
$sth->fetch;
print "\tSlave Epoch = $epoch\n";
$sth->finish;
}
####### Find the position of the last GCI in the binary log ########
sub GetMasterInfo
{
$sth = $dbhM->prepare("SELECT
SUBSTRING_INDEX(File, '/', -1), Position
FROM mysql.ndb_binlog_index
WHERE epoch > $epoch
ORDER BY epoch ASC LIMIT 1;")
or die "Prepare to select from master error: ", $dbhM->errstr;
$sth->execute
or die "Selecting from master error: ", $sth->errstr;
$sth->bind_col (1, \$binlog);
$sth->bind_col (2, \$binpos);
$sth->fetch;
print "\tMaster binary log = $binlog\n";
print "\tMaster binary log position = $binpos\n";
$sth->finish;
}
########## Set the slave to process from that location #########
sub UpdateSlave
{
$sth = $dbhS->prepare("CHANGE MASTER TO
MASTER_LOG_FILE='$binlog',
MASTER_LOG_POS=$binpos;")
or die "Prepare to CHANGE MASTER error: ", $dbhS->errstr;
$sth->execute
or die "CHANGE MASTER on slave error: ", $sth->errstr;
$sth->finish;
print "\tSlave has been updated. You may now start the slave.\n";
}
# end reset-slave.pl
Point-in-time
recovery—that is, recovery of data changes made since a
given point in time—is performed after restoring a full
backup that returns the server to its state when the backup was
made. Performing point-in-time recovery of NDB Cluster tables
with NDB Cluster and NDB Cluster Replication can be accomplished
using a native NDB data backup
(taken by issuing CREATE
BACKUP in the ndb_mgm client) and
restoring the ndb_binlog_index table (from a
dump made using mysqldump).
To perform point-in-time recovery of NDB Cluster, it is necessary to follow the steps shown here:
Back up all
NDBdatabases in the cluster, using theSTART BACKUPcommand in the ndb_mgm client (see Section 22.5.8, “Online Backup of NDB Cluster”).At some later point, prior to restoring the cluster, make a backup of the
mysql.ndb_binlog_indextable. It is probably simplest to use mysqldump for this task. Also back up the binary log files at this time.This backup should be updated regularly—perhaps even hourly—depending on your needs.
(Catastrophic failure or error occurs.)
Locate the last known good backup.
Clear the data node file systems (using ndbd
--initialor ndbmtd--initial).NoteNDB Cluster Disk Data tablespace and log files are not removed by
--initial. You must delete these manually.Use
DROP TABLEorTRUNCATE TABLEwith themysql.ndb_binlog_indextable.Execute ndb_restore, restoring all data. You must include the
--restore-epochoption when you run ndb_restore, so that thendb_apply_statustable is populated correctly. (See Section 22.4.23, “ndb_restore — Restore an NDB Cluster Backup”, for more information.)Restore the
ndb_binlog_indextable from the output of mysqldump and restore the binary log files from backup, if necessary.Find the epoch applied most recently—that is, the maximum
epochcolumn value in thendb_apply_statustable—as the user variable@LATEST_EPOCH(emphasized):SELECT @LATEST_EPOCH:=MAX(epoch) FROM mysql.ndb_apply_status;Find the latest binary log file (
@FIRST_FILE) and position (Positioncolumn value) within this file that correspond to@LATEST_EPOCHin thendb_binlog_indextable:SELECT Position, @FIRST_FILE:=File FROM mysql.ndb_binlog_index WHERE epoch > @LATEST_EPOCH ORDER BY epoch ASC LIMIT 1;
Using mysqlbinlog, replay the binary log events from the given file and position up to the point of the failure. (See Section 4.6.8, “mysqlbinlog — Utility for Processing Binary Log Files”.)
See also Section 7.5, “Point-in-Time (Incremental) Recovery”, for more information about the binary log, replication, and incremental recovery.
It is possible to use NDB Cluster in multi-master replication, including circular replication between a number of NDB Clusters.
Circular replication example. In the next few paragraphs we consider the example of a replication setup involving three NDB Clusters numbered 1, 2, and 3, in which Cluster 1 acts as the replication master for Cluster 2, Cluster 2 acts as the master for Cluster 3, and Cluster 3 acts as the master for Cluster 1. Each cluster has two SQL nodes, with SQL nodes A and B belonging to Cluster 1, SQL nodes C and D belonging to Cluster 2, and SQL nodes E and F belonging to Cluster 3.
Circular replication using these clusters is supported as long as the following conditions are met:
The SQL nodes on all masters and slaves are the same.
All SQL nodes acting as replication masters and slaves are started with the
log_slave_updatessystem variable enabled.
This type of circular replication setup is shown in the following diagram:
In this scenario, SQL node A in Cluster 1 replicates to SQL node C in Cluster 2; SQL node C replicates to SQL node E in Cluster 3; SQL node E replicates to SQL node A. In other words, the replication line (indicated by the curved arrows in the diagram) directly connects all SQL nodes used as replication masters and slaves.
It is also possible to set up circular replication in such a way that not all master SQL nodes are also slaves, as shown here:
In this case, different SQL nodes in each cluster are used as
replication masters and slaves. However, you must
not start any of the SQL nodes with the
log_slave_updates system variable
enabled. This type of circular replication scheme for NDB Cluster,
in which the line of replication (again indicated by the curved
arrows in the diagram) is discontinuous, should be possible, but
it should be noted that it has not yet been thoroughly tested and
must therefore still be considered experimental.
Using NDB-native backup and restore to initialize a slave NDB Cluster.
When setting up circular replication, it is possible to
initialize the slave cluster by using the management client
BACKUP command on one NDB Cluster to create a
backup and then applying this backup on another NDB Cluster
using ndb_restore. However, this does not
automatically create binary logs on the second NDB Cluster
's SQL node acting as the replication slave. In order to
cause the binary logs to be created, you must issue a
SHOW TABLES statement on that SQL
node; this should be done prior to running
START SLAVE.
This is a known issue which we intend to address in a future release.
Multi-master failover example. In this section, we discuss failover in a multi-master NDB Cluster replication setup with three NDB Clusters having server IDs 1, 2, and 3. In this scenario, Cluster 1 replicates to Clusters 2 and 3; Cluster 2 also replicates to Cluster 3. This relationship is shown here:
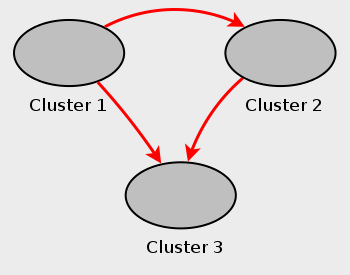
In other words, data replicates from Cluster 1 to Cluster 3 through 2 different routes: directly, and by way of Cluster 2.
Not all MySQL servers taking part in multi-master replication must act as both master and slave, and a given NDB Cluster might use different SQL nodes for different replication channels. Such a case is shown here:
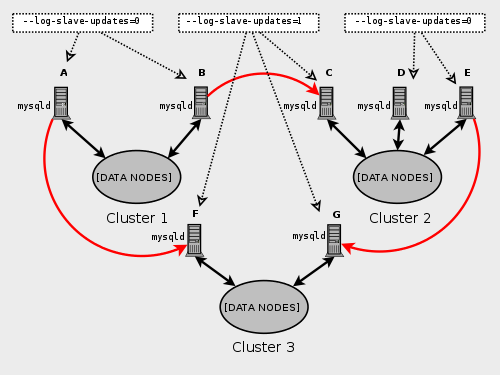
MySQL servers acting as replication slaves must be run with the
log_slave_updates system variable
enabled. Which mysqld processes require this
option is also shown in the preceding diagram.
Using the log_slave_updates
system variable has no effect on servers not being run as
replication slaves.
The need for failover arises when one of the replicating clusters goes down. In this example, we consider the case where Cluster 1 is lost to service, and so Cluster 3 loses 2 sources of updates from Cluster 1. Because replication between NDB Clusters is asynchronous, there is no guarantee that Cluster 3's updates originating directly from Cluster 1 are more recent than those received through Cluster 2. You can handle this by ensuring that Cluster 3 catches up to Cluster 2 with regard to updates from Cluster 1. In terms of MySQL servers, this means that you need to replicate any outstanding updates from MySQL server C to server F.
On server C, perform the following queries:
mysqlC> SELECT @latest:=MAX(epoch)
-> FROM mysql.ndb_apply_status
-> WHERE server_id=1;
mysqlC> SELECT
-> @file:=SUBSTRING_INDEX(File, '/', -1),
-> @pos:=Position
-> FROM mysql.ndb_binlog_index
-> WHERE orig_epoch >= @latest
-> AND orig_server_id = 1
-> ORDER BY epoch ASC LIMIT 1;
You can improve the performance of this query, and thus likely
speed up failover times significantly, by adding the appropriate
index to the ndb_binlog_index table. See
Section 22.6.4, “NDB Cluster Replication Schema and Tables”, for more
information.
Copy over the values for @file and
@pos manually from server C to server F
(or have your application perform the equivalent). Then, on server
F, execute the following CHANGE MASTER
TO statement:
mysqlF> CHANGE MASTER TO
-> MASTER_HOST = 'serverC'
-> MASTER_LOG_FILE='@file',
-> MASTER_LOG_POS=@pos;
Once this has been done, you can issue a
START SLAVE statement on MySQL
server F, and any missing updates originating from server B will
be replicated to server F.
The CHANGE MASTER TO statement also
supports an IGNORE_SERVER_IDS option which
takes a comma-separated list of server IDs and causes events
originating from the corresponding servers to be ignored. For more
information, see Section 13.4.2.1, “CHANGE MASTER TO Statement”, and
Section 13.7.7.34, “SHOW SLAVE STATUS Statement”. For information about how
this option intereacts with the
ndb_log_apply_status variable,
see Section 22.6.8, “Implementing Failover with NDB Cluster Replication”.
When using a replication setup involving multiple masters (including circular replication), it is possible that different masters may try to update the same row on the slave with different data. Conflict resolution in NDB Cluster Replication provides a means of resolving such conflicts by permitting a user-defined resolution column to be used to determine whether or not an update on a given master should be applied on the slave.
Some types of conflict resolution supported by NDB Cluster
(NDB$OLD(), NDB$MAX(),
NDB$MAX_DELETE_WIN()) implement this
user-defined column as a “timestamp” column (although
its type cannot be TIMESTAMP, as
explained later in this section). These types of conflict
resolution are always applied a row-by-row basis rather than a
transactional basis. The epoch-based conflict resolution functions
NDB$EPOCH() and
NDB$EPOCH_TRANS() compare the order in which
epochs are replicated (and thus these functions are
transactional). Different methods can be used to compare
resolution column values on the slave when conflicts occur, as
explained later in this section; the method used can be set on a
per-table basis.
You should also keep in mind that it is the application's responsibility to ensure that the resolution column is correctly populated with relevant values, so that the resolution function can make the appropriate choice when determining whether to apply an update.
Requirements. Preparations for conflict resolution must be made on both the master and the slave. These tasks are described in the following list:
On the master writing the binary logs, you must determine which columns are sent (all columns or only those that have been updated). This is done for the MySQL Server as a whole by applying the mysqld startup option
--ndb-log-updated-only(described later in this section) or on a per-table basis by entries in themysql.ndb_replicationtable (see The ndb_replication system table).NoteIf you are replicating tables with very large columns (such as
TEXTorBLOBcolumns),--ndb-log-updated-onlycan also be useful for reducing the size of the master and slave binary logs and avoiding possible replication failures due to exceedingmax_allowed_packet.See Section 17.5.1.20, “Replication and max_allowed_packet”, for more information about this issue.
On the slave, you must determine which type of conflict resolution to apply (“latest timestamp wins”, “same timestamp wins”, “primary wins”, “primary wins, complete transaction”, or none). This is done using the
mysql.ndb_replicationsystem table, on a per-table basis (see The ndb_replication system table).NDB Cluster also supports read conflict detection, that is, detecting conflicts between reads of a given row in one cluster and updates or deletes of the same row in another cluster. This requires exclusive read locks obtained by setting
ndb_log_exclusive_readsequal to 1 on the slave. All rows read by a conflicting read are logged in the exceptions table. For more information, see Read conflict detection and resolution.
When using the functions NDB$OLD(),
NDB$MAX(), and
NDB$MAX_DELETE_WIN() for timestamp-based
conflict resolution, we often refer to the column used for
determining updates as a “timestamp” column. However,
the data type of this column is never
TIMESTAMP; instead, its data type
should be INT
(INTEGER) or
BIGINT. The
“timestamp” column should also be
UNSIGNED and NOT NULL.
The NDB$EPOCH() and
NDB$EPOCH_TRANS() functions discussed later in
this section work by comparing the relative order of replication
epochs applied on a primary and secondary NDB Cluster, and do not
make use of timestamps.
Master column control.
We can see update operations in terms of “before”
and “after” images—that is, the states of the
table before and after the update is applied. Normally, when
updating a table with a primary key, the “before”
image is not of great interest; however, when we need to
determine on a per-update basis whether or not to use the
updated values on a replication slave, we need to make sure that
both images are written to the master's binary log. This is
done with the
--ndb-log-update-as-write option
for mysqld, as described later in this
section.
Whether logging of complete rows or of updated columns only is done is decided when the MySQL server is started, and cannot be changed online; you must either restart mysqld, or start a new mysqld instance with different logging options.
Logging Full or Partial Rows (--ndb-log-updated-only Option)
| Property | Value |
|---|---|
| Command-Line Format | --ndb-log-updated-only[={OFF|ON}] |
| System Variable | ndb_log_updated_only |
| Scope | Global |
| Dynamic | Yes |
SET_VAR Hint Applies |
No |
| Type | Boolean |
| Default Value | ON |
For purposes of conflict resolution, there are two basic methods
of logging rows, as determined by the setting of the
--ndb-log-updated-only option for
mysqld:
Log complete rows
Log only column data that has been updated—that is, column data whose value has been set, regardless of whether or not this value was actually changed. This is the default behavior.
It is usually sufficient—and more efficient—to log
updated columns only; however, if you need to log full rows, you
can do so by setting
--ndb-log-updated-only to
0 or OFF.
--ndb-log-update-as-write Option: Logging Changed Data as Updates
| Property | Value |
|---|---|
| Command-Line Format | --ndb-log-update-as-write[={OFF|ON}] |
| System Variable | ndb_log_update_as_write |
| Scope | Global |
| Dynamic | Yes |
SET_VAR Hint Applies |
No |
| Type | Boolean |
| Default Value | ON |
The setting of the MySQL Server's
--ndb-log-update-as-write option
determines whether logging is performed with or without the
“before” image. Because conflict resolution is done
in the MySQL Server's update handler, it is necessary to
control logging on the master such that updates are updates and
not writes; that is, such that updates are treated as changes in
existing rows rather than the writing of new rows (even though
these replace existing rows). This option is turned on by default;
in other words, updates are treated as writes. (That is, updates
are by default written as write_row events in
the binary log, rather than as update_row
events.)
To turn off the option, start the master mysqld
with --ndb-log-update-as-write=0 or
--ndb-log-update-as-write=OFF. You must do this
when replicating from NDB tables to tables using a different
storage engine; see
Replication from NDB to other storage engines, and
Replication from NDB to a nontransactional storage engine,
for more information.
Conflict resolution control.
Conflict resolution is usually enabled on the server where
conflicts can occur. Like logging method selection, it is
enabled by entries in the
mysql.ndb_replication table.
The ndb_replication system table.
To enable conflict resolution, it is necessary to create an
ndb_replication table in the
mysql system database on the master, the
slave, or both, depending on the conflict resolution type and
method to be employed. This table is used to control logging and
conflict resolution functions on a per-table basis, and has one
row per table involved in replication.
ndb_replication is created and filled with
control information on the server where the conflict is to be
resolved. In a simple master-slave setup where data can also be
changed locally on the slave this will typically be the slave.
In a more complex master-master (2-way) replication schema this
will usually be all of the masters involved. Each row in
mysql.ndb_replication corresponds to a table
being replicated, and specifies how to log and resolve conflicts
(that is, which conflict resolution function, if any, to use)
for that table. The definition of the
mysql.ndb_replication table is shown here:
CREATE TABLE mysql.ndb_replication (
db VARBINARY(63),
table_name VARBINARY(63),
server_id INT UNSIGNED,
binlog_type INT UNSIGNED,
conflict_fn VARBINARY(128),
PRIMARY KEY USING HASH (db, table_name, server_id)
) ENGINE=NDB
PARTITION BY KEY(db,table_name);The columns in this table are described in the next few paragraphs.
db.
The name of the database containing the table to be replicated.
You may employ either or both of the wildcards
_ and % as part of the
database name. Matching is similar to what is implemented for
the LIKE operator.
table_name.
The name of the table to be replicated. The table name may
include either or both of the wildcards _ and
%. Matching is similar to what is implemented
for the LIKE operator.
server_id. The unique server ID of the MySQL instance (SQL node) where the table resides.
binlog_type. The type of binary logging to be employed. This is determined as shown in the following table:
Table 22.297 binlog_type values, with internal values and descriptions
| Value | Internal Value | Description |
|---|---|---|
| 0 | NBT_DEFAULT |
Use server default |
| 1 | NBT_NO_LOGGING |
Do not log this table in the binary log |
| 2 | NBT_UPDATED_ONLY |
Only updated attributes are logged |
| 3 | NBT_FULL |
Log full row, even if not updated (MySQL server default behavior) |
| 4 | NBT_USE_UPDATE |
(For generating NBT_UPDATED_ONLY_USE_UPDATE and
NBT_FULL_USE_UPDATE values only—not
intended for separate use) |
| 5 | [Not used] | --- |
| 6 | NBT_UPDATED_ONLY_USE_UPDATE (equal to
NBT_UPDATED_ONLY | NBT_USE_UPDATE) |
Use updated attributes, even if values are unchanged |
| 7 | NBT_FULL_USE_UPDATE (equal to NBT_FULL |
NBT_USE_UPDATE) |
Use full row, even if values are unchanged |
conflict_fn. The conflict resolution function to be applied. This function must be specified as one of those shown in the following list:
NULL: Indicates that conflict resolution is not to be used for the corresponding table.
These functions are described in the next few paragraphs.
NDB$OLD(column_name).
If the value of column_name is the
same on both the master and the slave, then the update is
applied; otherwise, the update is not applied on the slave and
an exception is written to the log. This is illustrated by the
following pseudocode:
if (master_old_column_value==slave_current_column_value) apply_update(); else log_exception();
This function can be used for “same value wins” conflict resolution. This type of conflict resolution ensures that updates are not applied on the slave from the wrong master.
The column value from the master's “before” image is used by this function.
NDB$MAX(column_name). If the “timestamp” column value for a given row coming from the master is higher than that on the slave, it is applied; otherwise it is not applied on the slave. This is illustrated by the following pseudocode:
if (master_new_column_value>slave_current_column_value) apply_update();
This function can be used for “greatest timestamp wins” conflict resolution. This type of conflict resolution ensures that, in the event of a conflict, the version of the row that was most recently updated is the version that persists.
The column value from the master's “after” image is used by this function.
NDB$MAX_DELETE_WIN().
This is a variation on NDB$MAX(). Due to the
fact that no timestamp is available for a delete operation, a
delete using NDB$MAX() is in fact processed
as NDB$OLD. However, for some use cases, this
is not optimal. For NDB$MAX_DELETE_WIN(), if
the “timestamp” column value for a given row adding
or updating an existing row coming from the master is higher
than that on the slave, it is applied. However, delete
operations are treated as always having the higher value. This
is illustrated in the following pseudocode:
if ( (master_new_column_value>slave_current_column_value) ||operation.type== "delete") apply_update();
This function can be used for “greatest timestamp, delete wins” conflict resolution. This type of conflict resolution ensures that, in the event of a conflict, the version of the row that was deleted or (otherwise) most recently updated is the version that persists.
As with NDB$MAX(), the column value from the
master's “after” image is the value used by
this function.
NDB$EPOCH() and NDB$EPOCH_TRANS().
The NDB$EPOCH() function tracks the order in
which replicated epochs are applied on a slave NDB Cluster
relative to changes originating on the slave. This relative
ordering is used to determine whether changes originating on the
slave are concurrent with any changes that originate locally,
and are therefore potentially in conflict.
Most of what follows in the description of
NDB$EPOCH() also applies to
NDB$EPOCH_TRANS(). Any exceptions are noted in
the text.
NDB$EPOCH() is asymmetric, operating on one NDB
Cluster in a two-cluster circular replication configuration
(sometimes referred to as “active-active”
replication). We refer here to cluster on which it operates as the
primary, and the other as the secondary. The slave on the primary
is responsible for detecting and handling conflicts, while the
slave on the secondary is not involved in any conflict detection
or handling.
When the slave on the primary detects conflicts, it injects events into its own binary log to compensate for these; this ensures that the secondary NDB Cluster eventually realigns itself with the primary and so keeps the primary and secondary from diverging. This compensation and realignment mechanism requires that the primary NDB Cluster always wins any conflicts with the secondary—that is, that the primary's changes are always used rather than those from the secondary in event of a conflict. This “primary always wins” rule has the following implications:
Operations that change data, once committed on the primary, are fully persistent and will not be undone or rolled back by conflict detection and resolution.
Data read from the primary is fully consistent. Any changes committed on the Primary (locally or from the slave) will not be reverted later.
Operations that change data on the secondary may later be reverted if the primary determines that they are in conflict.
Individual rows read on the secondary are self-consistent at all times, each row always reflecting either a state committed by the secondary, or one committed by the primary.
Sets of rows read on the secondary may not necessarily be consistent at a given single point in time. For
NDB$EPOCH_TRANS(), this is a transient state; forNDB$EPOCH(), it can be a persistent state.Assuming a period of sufficient length without any conflicts, all data on the secondary NDB Cluster (eventually) becomes consistent with the primary's data.
NDB$EPOCH() and
NDB$EPOCH_TRANS() do not require any user
schema modifications, or application changes to provide conflict
detection. However, careful thought must be given to the schema
used, and the access patterns used, to verify that the complete
system behaves within specified limits.
Each of the NDB$EPOCH() and
NDB$EPOCH_TRANS() functions can take an
optional parameter; this is the number of bits to use to represent
the lower 32 bits of the epoch, and should be set to no less than
CEIL( LOG2(TimeBetweenGlobalCheckpoints/TimeBetweenEpochs), 1)
For the default values of these configuration parameters (2000 and
100 milliseconds, respectively), this gives a value of 5 bits, so
the default value (6) should be sufficient, unless other values
are used for
TimeBetweenGlobalCheckpoints,
TimeBetweenEpochs, or
both. A value that is too small can result in false positives,
while one that is too large could lead to excessive wasted space
in the database.
Both NDB$EPOCH() and
NDB$EPOCH_TRANS() insert entries for
conflicting rows into the relevant exceptions tables, provided
that these tables have been defined according to the same
exceptions table schema rules as described elsewhere in this
section (see NDB$OLD(column_name)).
You need to create any exceptions table before creating the table
with which it is to be used.
As with the other conflict detection functions discussed in this
section, NDB$EPOCH() and
NDB$EPOCH_TRANS() are activated by including
relevant entries in the mysql.ndb_replication
table (see The ndb_replication system table).
The roles of the primary and secondary NDB Clusters in this
scenario are fully determined by
mysql.ndb_replication table entries.
Because the conflict detection algorithms employed by
NDB$EPOCH() and
NDB$EPOCH_TRANS() are asymmetric, you must use
different values for the primary slave's and secondary
slave's server_id entries.
A conflict between DELETE operations alone is
not sufficient to trigger a conflict using
NDB$EPOCH() or
NDB$EPOCH_TRANS(), and the relative placement
within epochs does not matter. (Bug #18459944)
Conflict detection status variables.
Several status variables can be used to monitor conflict
detection. You can see how many rows have been found in conflict
by NDB$EPOCH() since this slave was last
restarted from the current value of the
Ndb_conflict_fn_epoch system
status variable.
Ndb_conflict_fn_epoch_trans
provides the number of rows that have been found directly in
conflict by NDB$EPOCH_TRANS().
Ndb_conflict_fn_epoch2 and
Ndb_conflict_fn_epoch2_trans
show the number of rows found in conflict by
NDB$EPOCH2() and
NDB$EPOCH2_TRANS(), respectively. The number of
rows actually realigned, including those affected due to their
membership in or dependency on the same transactions as other
conflicting rows, is given by
Ndb_conflict_trans_row_reject_count.
For more information, see Section 22.3.3.9.3, “NDB Cluster Status Variables”.
Limitations on NDB$EPOCH().
The following limitations currently apply when using
NDB$EPOCH() to perform conflict detection:
Conflicts are detected using NDB Cluster epoch boundaries, with granularity proportional to
TimeBetweenEpochs(default: 100 milliseconds). The minimum conflict window is the minimum time during which concurrent updates to the same data on both clusters always report a conflict. This is always a nonzero length of time, and is roughly proportional to2 * (latency + queueing + TimeBetweenEpochs). This implies that—assuming the default forTimeBetweenEpochsand ignoring any latency between clusters (as well as any queuing delays)—the minimum conflict window size is approximately 200 milliseconds. This minimum window should be considered when looking at expected application “race” patterns.Additional storage is required for tables using the
NDB$EPOCH()andNDB$EPOCH_TRANS()functions; from 1 to 32 bits extra space per row is required, depending on the value passed to the function.Conflicts between delete operations may result in divergence between the primary and secondary. When a row is deleted on both clusters concurrently, the conflict can be detected, but is not recorded, since the row is deleted. This means that further conflicts during the propagation of any subsequent realignment operations will not be detected, which can lead to divergence.
Deletes should be externally serialized, or routed to one cluster only. Alternatively, a separate row should be updated transactionally with such deletes and any inserts that follow them, so that conflicts can be tracked across row deletes. This may require changes in applications.
Only two NDB Clusters in a circular “active-active” configuration are currently supported when using
NDB$EPOCH()orNDB$EPOCH_TRANS()for conflict detection.Tables having
BLOBorTEXTcolumns are not currently supported withNDB$EPOCH()orNDB$EPOCH_TRANS().
NDB$EPOCH_TRANS().
NDB$EPOCH_TRANS() extends the
NDB$EPOCH() function. Conflicts are detected
and handled in the same way using the “primary wins
all” rule (see
NDB$EPOCH() and NDB$EPOCH_TRANS()) but with
the extra condition that any other rows updated in the same
transaction in which the conflict occurred are also regarded as
being in conflict. In other words, where
NDB$EPOCH() realigns individual conflicting
rows on the secondary, NDB$EPOCH_TRANS()
realigns conflicting transactions.
In addition, any transactions which are detectably dependent on a conflicting transaction are also regarded as being in conflict, these dependencies being determined by the contents of the secondary cluster's binary log. Since the binary log contains only data modification operations (inserts, updates, and deletes), only overlapping data modifications are used to determine dependencies between transactions.
NDB$EPOCH_TRANS() is subject to the same
conditions and limitations as NDB$EPOCH(), and
in addition requires that all transaction IDs are recorded in the
secondary's binary log (the
--ndb-log-transaction-id option),
which adds a variable overhead (up to 13 bytes per row). The
deprecated
log_bin_use_v1_row_events system
variable, which defaults to OFF, must not be
set to ON with
NDB$EPOCH_TRANS().
See NDB$EPOCH() and NDB$EPOCH_TRANS().
Status information.
A server status variable
Ndb_conflict_fn_max provides a
count of the number of times that a row was not applied on the
current SQL node due to “greatest timestamp wins”
conflict resolution since the last time that
mysqld was started.
The number of times that a row was not applied as the result of
“same timestamp wins” conflict resolution on a given
mysqld since the last time it was restarted is
given by the global status variable
Ndb_conflict_fn_old. In addition
to incrementing
Ndb_conflict_fn_old, the primary
key of the row that was not used is inserted into an
exceptions table, as
explained later in this section.
NDB$EPOCH2().
The NDB$EPOCH2() function is similar to
NDB$EPOCH(), except that
NDB$EPOCH2() provides for delete-delete
handling with a circular replication
(“master-master”) topology. In this scenario,
primary and secondary roles are assigned to the two masters by
setting the
ndb_slave_conflict_role system
variable to the appropriate value on each master (usually one
each of PRIMARY,
SECONDARY). When this is done, modifications
made by the secondary are reflected by the primary back to the
secondary which then conditionally applies them.
NDB$EPOCH2_TRANS().
NDB$EPOCH2_TRANS() extends the
NDB$EPOCH2() function. Conflicts are detected
and handled in the same way, and assigning primary and secondary
roles to the replicating clusters, but with the extra condition
that any other rows updated in the same transaction in which the
conflict occurred are also regarded as being in conflict. That
is, NDB$EPOCH2() realigns individual
conflicting rows on the secondary, while
NDB$EPOCH_TRANS() realigns conflicting
transactions.
Where NDB$EPOCH() and
NDB$EPOCH_TRANS() use metadata that is
specified per row, per last modified epoch, to determine on the
primary whether an incoming replicated row change from the
secondary is concurrent with a locally committed change;
concurrent changes are regarded as conflicting, with subesequent
exceptions table updates and realignment of the secondary. A
problem arises when a row is deleted on the primary so there is no
longer any last-modified epoch available to determine whether any
replicated operations conflict, which means that conflicting
delete operationss are not detected. This can result in
divergence, an example being a delete on one cluster which is
concurrent with a delete and insert on the other; this why delete
operations can be routed to only one cluster when using
NDB$EPOCH() and
NDB$EPOCH_TRANS().
NDB$EPOCH2() bypasses the issue just
described—storing information about deleted rows on the
PRIMARY—by ignoring any delete-delete conflict, and by
avoiding any potential resultant divergence as well. This is
accomplished by reflecting any operation successfully applied on
and replicated from the secondary back to the secondary. On its
return to the secondary, it can be used to reapply an operation on
the secondary which was deleted by an operation originating from
the primary.
When using NDB$EPOCH2(), you should keep in
mind that the secondary applies the delete from the primary,
removing the new row until it is restored by a reflected
operation. In theory, the subsequent insert or update on the
secondary conflicts with the delete from the primary, but in this
case, we choose to ignore this and allow the secondary to
“win”, in the interest of preventing divergence
between the clusters. In other words, after a delete, the primary
does not detect conflicts, and instead adopts the secondary's
following changes immediately. Because of this, the
secondary's state can revisit multiple previous committed
states as it progresses to a final (stable) state, and some of
these may be visible.
You should also be aware that reflecting all operations from the secondary back to the primary increases the size of the primary's logbinary log, as well as demands on bandwidth, CPU usage, and disk I/O.
Application of reflected operations on the secondary depends on
the state of the target row on the secondary. Whether or not
reflected changes are applied on the secondary can be tracked by
checking the
Ndb_conflict_reflected_op_prepare_count
and
Ndb_conflict_reflected_op_discard_count
status variables. The number of changes applied is simply the
difference between these two values (note that
Ndb_conflict_reflected_op_prepare_count is
always greater than or equal to
Ndb_conflict_reflected_op_discard_count).
Events are applied if and only if both of the following conditions are true:
The existence of the row—that is, whether or not it exists—is in accordance with the type of event. For delete and update operations, the row must already exist. For insert operations, the row must not exist.
The row was last modified by the primary. It is possible that the modification was accomplished through the execution of a reflected operation.
If both of the conditions are not met, the reflected operation is discarded by the secondary.
Conflict resolution exceptions table.
To use the NDB$OLD() conflict resolution
function, it is also necessary to create an exceptions table
corresponding to each NDB table for
which this type of conflict resolution is to be employed. This
is also true when using NDB$EPOCH() or
NDB$EPOCH_TRANS(). The name of this table is
that of the table for which conflict resolution is to be
applied, with the string $EX appended. (For
example, if the name of the original table is
mytable, the name of the corresponding
exceptions table name should be mytable$EX.)
The syntax for creating the exceptions table is as shown here:
CREATE TABLEoriginal_table$EX ( [NDB$]server_id INT UNSIGNED, [NDB$]master_server_id INT UNSIGNED, [NDB$]master_epoch BIGINT UNSIGNED, [NDB$]count INT UNSIGNED, [NDB$OP_TYPE ENUM('WRITE_ROW','UPDATE_ROW', 'DELETE_ROW', 'REFRESH_ROW', 'READ_ROW') NOT NULL,] [NDB$CFT_CAUSE ENUM('ROW_DOES_NOT_EXIST', 'ROW_ALREADY_EXISTS', 'DATA_IN_CONFLICT', 'TRANS_IN_CONFLICT') NOT NULL,] [NDB$ORIG_TRANSID BIGINT UNSIGNED NOT NULL,]original_table_pk_columns, [orig_table_column|orig_table_column$OLD|orig_table_column$NEW,] [additional_columns,] PRIMARY KEY([NDB$]server_id, [NDB$]master_server_id, [NDB$]master_epoch, [NDB$]count) ) ENGINE=NDB;
The first four columns are required. The names of the first four
columns and the columns matching the original table's primary
key columns are not critical; however, we suggest for reasons of
clarity and consistency, that you use the names shown here for the
server_id, master_server_id,
master_epoch, and count
columns, and that you use the same names as in the original table
for the columns matching those in the original table's
primary key.
If the exceptions table uses one or more of the optional columns
NDB$OP_TYPE, NDB$CFT_CAUSE,
or NDB$ORIG_TRANSID discussed later in this
section, then each of the required columns must also be named
using the prefix NDB$. If desired, you can use
the NDB$ prefix to name the required columns
even if you do not define any optional columns, but in this case,
all four of the required columns must be named using the prefix.
Following these columns, the columns making up the original table's primary key should be copied in the order in which they are used to define the primary key of the original table. The data types for the columns duplicating the primary key columns of the original table should be the same as (or larger than) those of the original columns. A subset of the primary key columns may be used.
Regardless of the NDB Cluster version employed, the exceptions
table must use the NDB storage
engine. (An example that uses NDB$OLD() with an
exceptions table is shown later in this section.)
Additional columns may optionally be defined following the copied
primary key columns, but not before any of them; any such extra
columns cannot be NOT NULL. NDB Cluster
supports three additional, predefined optional columns
NDB$OP_TYPE, NDB$CFT_CAUSE,
and NDB$ORIG_TRANSID, which are described in
the next few paragraphs.
NDB$OP_TYPE: This column can be used to obtain
the type of operation causing the conflict. If you use this
column, define it as shown here:
NDB$OP_TYPE ENUM('WRITE_ROW', 'UPDATE_ROW', 'DELETE_ROW',
'REFRESH_ROW', 'READ_ROW') NOT NULL
The WRITE_ROW, UPDATE_ROW,
and DELETE_ROW operation types represent
user-initiated operations. REFRESH_ROW
operations are operations generated by conflict resolution in
compensating transactions sent back to the originating cluster
from the cluster that detected the conflict.
READ_ROW operations are user-initiated read
tracking operations defined with exclusive row locks.
NDB$CFT_CAUSE: You can define an optional
column NDB$CFT_CAUSE which provides the cause
of the registered conflict. This column, if used, is defined as
shown here:
NDB$CFT_CAUSE ENUM('ROW_DOES_NOT_EXIST', 'ROW_ALREADY_EXISTS',
'DATA_IN_CONFLICT', 'TRANS_IN_CONFLICT') NOT NULL
ROW_DOES_NOT_EXIST can be reported as the cause
for UPDATE_ROW and WRITE_ROW
operations; ROW_ALREADY_EXISTS can be reported
for WRITE_ROW events.
DATA_IN_CONFLICT is reported when a row-based
conflict function detects a conflict;
TRANS_IN_CONFLICT is reported when a
transactional conflict function rejects all of the operations
belonging to a complete transaction.
NDB$ORIG_TRANSID: The
NDB$ORIG_TRANSID column, if used, contains the
ID of the originating transaction. This column should be defined
as follows:
NDB$ORIG_TRANSID BIGINT UNSIGNED NOT NULL
NDB$ORIG_TRANSID is a 64-bit value generated by
NDB. This value can be used to correlate
multiple exceptions table entries belonging to the same
conflicting transaction from the same or different exceptions
tables.
Additional reference columns which are not part of the original
table's primary key can be named
colname$OLDcolname$NEWcolname$OLDDELETE_ROW events.
colname$NEWWRITE_ROW events, UPDATE_ROW
events, or both types of events. Where a conflicting operation
does not supply a value for a given non-primary-key reference
column, the exceptions table row contains either
NULL, or a defined default value for that
column.
The mysql.ndb_replication table is read when
a data table is set up for replication, so the row corresponding
to a table to be replicated must be inserted into
mysql.ndb_replication
before the table to be replicated is
created.
Examples
The following examples assume that you have already a working NDB Cluster replication setup, as described in Section 22.6.5, “Preparing the NDB Cluster for Replication”, and Section 22.6.6, “Starting NDB Cluster Replication (Single Replication Channel)”.
NDB$MAX() example.
Suppose you wish to enable “greatest timestamp
wins” conflict resolution on table
test.t1, using column
mycol as the “timestamp”. This
can be done using the following steps:
Make sure that you have started the master mysqld with
--ndb-log-update-as-write=OFF.On the master, perform this
INSERTstatement:INSERT INTO mysql.ndb_replication VALUES ('test', 't1', 0, NULL, 'NDB$MAX(mycol)');Inserting a 0 into the
server_idindicates that all SQL nodes accessing this table should use conflict resolution. If you want to use conflict resolution on a specific mysqld only, use the actual server ID.Inserting
NULLinto thebinlog_typecolumn has the same effect as inserting 0 (NBT_DEFAULT); the server default is used.Create the
test.t1table:CREATE TABLE test.t1 (columnsmycol INT UNSIGNED,columns) ENGINE=NDB;Now, when updates are done on this table, conflict resolution is applied, and the version of the row having the greatest value for
mycolis written to the slave.
Other binlog_type options—such as
NBT_UPDATED_ONLY_USE_UPDATE should be used to
control logging on the master using the
ndb_replication table rather than by using
command-line options.
NDB$OLD() example.
Suppose an NDB table such as the
one defined here is being replicated, and you wish to enable
“same timestamp wins” conflict resolution for
updates to this table:
CREATE TABLE test.t2 (
a INT UNSIGNED NOT NULL,
b CHAR(25) NOT NULL,
columns,
mycol INT UNSIGNED NOT NULL,
columns,
PRIMARY KEY pk (a, b)
) ENGINE=NDB;
The following steps are required, in the order shown:
First—and prior to creating
test.t2—you must insert a row into themysql.ndb_replicationtable, as shown here:INSERT INTO mysql.ndb_replication VALUES ('test', 't2', 0, NULL, 'NDB$OLD(mycol)');Possible values for the
binlog_typecolumn are shown earlier in this section. The value'NDB$OLD(mycol)'should be inserted into theconflict_fncolumn.Create an appropriate exceptions table for
test.t2. The table creation statement shown here includes all required columns; any additional columns must be declared following these columns, and before the definition of the table's primary key.CREATE TABLE test.t2$EX ( server_id INT UNSIGNED, master_server_id INT UNSIGNED, master_epoch BIGINT UNSIGNED, count INT UNSIGNED, a INT UNSIGNED NOT NULL, b CHAR(25) NOT NULL, [additional_columns,] PRIMARY KEY(server_id, master_server_id, master_epoch, count) ) ENGINE=NDB;We can include additional columns for information about the type, cause, and originating transaction ID for a given conflict. We are also not required to supply matching columns for all primary key columns in the original table. This means you can create the exceptions table like this:
CREATE TABLE test.t2$EX ( NDB$server_id INT UNSIGNED, NDB$master_server_id INT UNSIGNED, NDB$master_epoch BIGINT UNSIGNED, NDB$count INT UNSIGNED, a INT UNSIGNED NOT NULL, NDB$OP_TYPE ENUM('WRITE_ROW','UPDATE_ROW', 'DELETE_ROW', 'REFRESH_ROW', 'READ_ROW') NOT NULL, NDB$CFT_CAUSE ENUM('ROW_DOES_NOT_EXIST', 'ROW_ALREADY_EXISTS', 'DATA_IN_CONFLICT', 'TRANS_IN_CONFLICT') NOT NULL, NDB$ORIG_TRANSID BIGINT UNSIGNED NOT NULL, [additional_columns,] PRIMARY KEY(NDB$server_id, NDB$master_server_id, NDB$master_epoch, NDB$count) ) ENGINE=NDB;NoteThe
NDB$prefix is required for the four required columns since we included at least one of the columnsNDB$OP_TYPE,NDB$CFT_CAUSE, orNDB$ORIG_TRANSIDin the table definition.Create the table
test.t2as shown previously.
These steps must be followed for every table for which you wish to
perform conflict resolution using NDB$OLD().
For each such table, there must be a corresponding row in
mysql.ndb_replication, and there must be an
exceptions table in the same database as the table being
replicated.
Read conflict detection and resolution.
NDB Cluster also supports tracking of read operations, which
makes it possible in circular replication setups to manage
conflicts between reads of a given row in one cluster and
updates or deletes of the same row in another. This example uses
employee and department
tables to model a scenario in which an employee is moved from
one department to another on the master cluster (which we refer
to hereafter as cluster A) while the slave
cluster (hereafter B) updates the employee
count of the employee's former department in an interleaved
transaction.
The data tables have been created using the following SQL statements:
# Employee table
CREATE TABLE employee (
id INT PRIMARY KEY,
name VARCHAR(2000),
dept INT NOT NULL
) ENGINE=NDB;
# Department table
CREATE TABLE department (
id INT PRIMARY KEY,
name VARCHAR(2000),
members INT
) ENGINE=NDB;
The contents of the two tables include the rows shown in the
(partial) output of the following
SELECT statements:
mysql>SELECT id, name, dept FROM employee;+---------------+------+ | id | name | dept | +------+--------+------+ ... | 998 | Mike | 3 | | 999 | Joe | 3 | | 1000 | Mary | 3 | ... +------+--------+------+ mysql>SELECT id, name, members FROM department;+-----+-------------+---------+ | id | name | members | +-----+-------------+---------+ ... | 3 | Old project | 24 | ... +-----+-------------+---------+
We assume that we are already using an exceptions table that includes the four required columns (and these are used for this table's primary key), the optional columns for operation type and cause, and the original table's primary key column, created using the SQL statement shown here:
CREATE TABLE employee$EX (
NDB$server_id INT UNSIGNED,
NDB$master_server_id INT UNSIGNED,
NDB$master_epoch BIGINT UNSIGNED,
NDB$count INT UNSIGNED,
NDB$OP_TYPE ENUM( 'WRITE_ROW','UPDATE_ROW', 'DELETE_ROW',
'REFRESH_ROW','READ_ROW') NOT NULL,
NDB$CFT_CAUSE ENUM( 'ROW_DOES_NOT_EXIST',
'ROW_ALREADY_EXISTS',
'DATA_IN_CONFLICT',
'TRANS_IN_CONFLICT') NOT NULL,
id INT NOT NULL,
PRIMARY KEY(NDB$server_id, NDB$master_server_id, NDB$master_epoch, NDB$count)
) ENGINE=NDB;Suppose there occur the two simultaneous transactions on the two clusters. On cluster A, we create a new department, then move employee number 999 into that department, using the following SQL statements:
BEGIN;INSERTINTO department VALUES (4, "New project", 1);UPDATEemployee SET dept = 4 WHERE id = 999; COMMIT;
At the same time, on cluster B, another
transaction reads from employee, as shown here:
BEGIN;
SELECT name FROM employee WHERE id = 999;
UPDATE department SET members = members - 1 WHERE id = 3;
commit;
The conflicting transactions are not normally detected by the
conflict resolution mechanism, since the conflict is between a
read (SELECT) and an update operation. You can
circumvent this issue by executing
SET
ndb_log_exclusive_reads
= 1 on the slave cluster. Acquiring exclusive
read locks in this way causes any rows read on the master to be
flagged as needing conflict resolution on the slave cluster. If we
enable exclusive reads in this way prior to the logging of these
transactions, the read on cluster B is
tracked and sent to cluster A for resolution;
the conflict on the employee row will be detected and the
transaction on cluster B is aborted.
The conflict is registered in the exceptions table (on cluster
A) as a READ_ROW operation
(see Conflict resolution exceptions table,
for a description of operation types), as shown here:
mysql> SELECT id, NDB$OP_TYPE, NDB$CFT_CAUSE FROM employee$EX;
+-------+-------------+-------------------+
| id | NDB$OP_TYPE | NDB$CFT_CAUSE |
+-------+-------------+-------------------+
...
| 999 | READ_ROW | TRANS_IN_CONFLICT |
+-------+-------------+-------------------+
Any existing rows found in the read operation are flagged. This means that multiple rows resulting from the same conflict may be logged in the exception table, as shown by examining the effects a conflict between an update on cluster A and a read of multiple rows on cluster B from the same table in simultaneous transactions. The transaction executed on cluster A is shown here:
BEGIN;
INSERT INTO department VALUES (4, "New project", 0);
UPDATE employee SET dept = 4 WHERE dept = 3;
SELECT COUNT(*) INTO @count FROM employee WHERE dept = 4;
UPDATE department SET members = @count WHERE id = 4;
COMMIT;
Concurrently a transaction containing the statements shown here runs on cluster B:
SET ndb_log_exclusive_reads = 1; # Must be set if not already enabled
...
BEGIN;
SELECT COUNT(*) INTO @count FROM employee WHERE dept = 3 FOR UPDATE;
UPDATE department SET members = @count WHERE id = 3;
COMMIT;
In this case, all three rows matching the WHERE
condition in the second transaction's
SELECT are read, and are thus flagged in the
exceptions table, as shown here:
mysql> SELECT id, NDB$OP_TYPE, NDB$CFT_CAUSE FROM employee$EX;
+-------+-------------+-------------------+
| id | NDB$OP_TYPE | NDB$CFT_CAUSE |
+-------+-------------+-------------------+
...
| 998 | READ_ROW | TRANS_IN_CONFLICT |
| 999 | READ_ROW | TRANS_IN_CONFLICT |
| 1000 | READ_ROW | TRANS_IN_CONFLICT |
...
+-------+-------------+-------------------+
Read tracking is performed on the basis of existing rows only. A read based on a given condition track conflicts only of any rows that are found and not of any rows that are inserted in an interleaved transaction. This is similar to how exclusive row locking is performed in a single instance of NDB Cluster.
Changes in NDB Cluster releases are documented separately from this reference manual; you can find release notes for the changes in each NDB Cluster 8.0 release at NDB 8.0 Release Notes.
You can obtain release notes for older versions of NDB Cluster from NDB Cluster Release Notes.