使用Python和dlib进行人脸检测
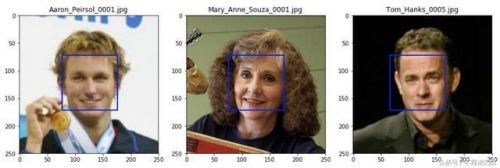
“Dlib是一个现代化的C ++工具包,包含用于创建复杂软件的机器学习算法和工具”。它使您能够直接在Python中运行许多任务,其中一个例子就是人脸检测。
安装dlib并不像只做一个“pip install dlib”那么简单,因为要正确配置和编译dlib,您首先需要安装其他系统依赖项。如果你按照这里描述的步骤,它应该很容易让dlib启动并运行。(在本文中,我将介绍如何在Mac上安装dlib,但如果您使用的是Ubuntu,请务必查看相关资源部分的链接。)
你需要确定的第一件事是你已经安装和更新了Hombrew。如果您需要安装它,请将其粘贴到终端中:
1. $ /usr/bin/ruby -e "$(curl -fsSL https://raw.githubusercontent.com/Homebrew/install/master/install)"
或者,如果您需要更新Hombrew,请输入以下内容:
1. $ brew update
您现在可以使用Homebrew来安装CMake,Boost.Python,以及在您的系统中正确配置和编译dlib所需的两个依赖关系:
1. $ brew install cmake
2. $ brew install boost-python
最后,您需要手动下载并安装XQuartz。
您现在已准备好安装dlib。我们将通过首先为这个项目创建一个孤立的虚拟环境来做到这一点。我将使用virtualenv,但您可以使用任何您熟悉的虚拟环境工具,包括Python的venv模块。需要scikit-image库才能读取我们稍后将传递给dlib的图像文件,因此我们还需要pip安装它:
1. $ virtualenv venv_dlib
2. $ source venv_dlib / bin / activate
3. $ pip install scikit-image
4. $ pip install dlib
就是这样。有了这个,你应该有可用的dlib。
Dlib
Dlib提供了不同的脸部检测算法。我将在这里使用的是基于CNN的人脸检测器。您可以下载预训练模型:https://github.com/davisking/dlib-models。由于使用此模型的计算成本很高,因此最好在GPU上执行以下代码。使用CPU也可以,但速度会更慢。
要在下面的要点中运行人脸检测代码,我建议首先在虚拟环境中再安装两个库。这些库将使与代码交互和可视化结果更容易:
1. $ pip install matplotlib
2. $ pip install jupyterlab
安装完库后,您需要确保:
・ 下载预训练模型(http://dlib.net/files/mmod_human_face_detector.dat.bz2)并将其存储在项目的根目录中
・ 创建一个名为'faces'的新目录,在该目录中存储带有希望检测的脸部的.jpg。
有了这个,你终于准备好开始在图片中检测脸部了!您可以通过在Jupyter Notebook中运行以下代码来完成此操作
1. import dlib
2. import matplotlib.patches as patches
3. import matplotlib.pyplot as plt
4. from pathlib import Path
5. from skimage import io
6. %matplotlib inline
7. # Load trained model
8. cnn_face_detector = dlib.cnn_face_detection_model_v1(
9. 'mmod_human_face_detector.dat')
10. # Function to detect and show faces in images
11. def detect_face_dlib(img_path, ax):
12. # Read image and run algorithm
13. img = io.imread(img_path)
14. dets = cnn_face_detector(img, 1)
15. # If there were faces detected, show them
16. if len(dets) > 0:
17. for d in dets:
18. rect = patches.Rectangle(
19. (d.rect.left(), d.rect.top()),
20. d.rect.width(),
21. d.rect.height(),
22. fill=False,
23. color='b',
24. lw='2')
25. ax.add_patch(rect)
26. ax.imshow(img)
27. ax.set_title(str(img_path).split('/')[-1])
28. # Path to images
29. images = list(Path('faces').glob('*.jpg'))
30. # Show results
31. fig = plt.figure(figsize=(15, 5))
32. for i, img in enumerate(images):
33. ax = fig.add_subplot(1, len(images), i+1)
34. detect_face_dlib(img, ax)
结果
在运行代码之后,您应该看到图像中的脸部周围出现蓝色方块,如果您问我,考虑到我们只写了几行代码,这非常棒!