从零开始配置MySQL8.0.25 InnoDB Cluster高可用集群
架构图:
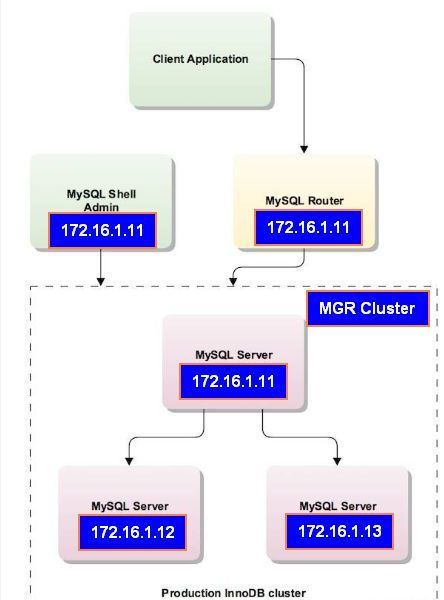
服务规划
服务器 IP 端口 角色
node11 172.16.1.11 6446 master shell router
node12 172.16.1.12 3306 slave
node13 172.16.1.13 3306 Slave
MySQL平台版本:
[root@node11 ~]# rpm -qa | grep mysql
mysql-community-libs-8.0.25-1.el7.x86_64
mysql-community-devel-8.0.25-1.el7.x86_64
mysql-router-community-8.0.25-1.el7.x86_64
mysql-community-common-8.0.25-1.el7.x86_64
mysql-community-client-8.0.25-1.el7.x86_64
mysql-community-libs-compat-8.0.25-1.el7.x86_64
mysql-community-client-plugins-8.0.25-1.el7.x86_64
mysql-community-server-8.0.25-1.el7.x86_64
mysql-community-test-8.0.25-1.el7.x86_64
mysql-community-embedded-compat-8.0.25-1.el7.x86_64
mysql-shell-8.0.25-1.el7.x86_64
操作系统版本:
[root@node11 ~]# cat /etc/redhat-release
CentOS Linux release 7.6.1810 (Core)
[root@node11 ~]# uname -a
Linux node11 4.4.219-1.el7.elrepo.x86_64 #1 SMP Sun Apr 12 16:13:06 EDT 2020 x86_64 x86_64 x86_64 GNU/Linux
在三台centos7主机上搭建mysql8.0.25集群
三台centos7主机已安装mysql8单机,且root用户密码都一样
安装配置8.0.25数据库略
三台主机都设置hosts解析
vim /etc/hosts
172.16.1.11 node11
172.16.1.12 node12
172.16.1.13 node13
三台主机都更改I/O调度模式
echo deadline > /sys/block/sda/queue/scheduler
cat /sys/block/sda/queue/scheduler
三台主机都进行操作系统调优
cat>>/etc/sysctl.conf <<EOF
vm.swappiness = 0
fs.aio-max-nr = 1048576
fs.file-max = 681574400
kernel.shmmax = 137438953472
kernel.shmmni = 4096
kernel.sem = 250 32000 100 200
net.ipv4.ip_local_port_range = 9000 65000
net.core.rmem_default = 262144
net.core.rmem_max = 4194304
net.core.wmem_default = 262144
net.core.wmem_max = 1048586
EOF
cat>>/etc/security/limits.conf <<EOF
mysql soft nproc 65536
mysql hard nproc 65536
mysql soft nofile 65536
mysql hard nofile 65536
EOF
cat>>/etc/profile<<EOF
if [ $USER = "mysql" ]; then
ulimit -u 16384 -n 65536
fi
EOF
三台主机都安装mysql-shell
mysql-shell官方下载 https://dev.mysql.com/downloads/shell/
rpm -ivh mysql-shell-8.0.25-1.el7.x86_64.rpm
三台主机都修改配置文件指定每个mysql_id,UUID,三台机不能重复,例:
vim /etc/my.cnf
server_id=11
修改UUID:
vim /var/lib/mysql/auto.cnf
[auto]
server-uuid=fa6be76d-ef5b-11ec-9145-000c29a14dea
三台主机都重启mysql
systemclt restart mysql
三台主机都要初始化配置:
修改root的源主机为%
mysql> update mysql.user set host='%' where user='root';
mysql> flush privileges;
mysql>GRANT CLONE_ADMIN, CONNECTION_ADMIN, GROUP_REPLICATION_ADMIN, PERSIST_RO_VARIABLES_ADMIN, REPLICATION_APPLIER, REPLICATION_SLAVE_ADMIN, ROLE_ADMIN, SYSTEM_VARIABLES_ADMIN ON *.* TO 'root'@'%' WITH GRANT OPTION;
修改配置文件:
vim /etc/my.cnf
[mysqld]
binlog_transaction_dependency_tracking=WRITESET
enforce_gtid_consistency=ON
gtid_mode=ON
slave_parallel_type=LOGICAL_CLOCK
slave_preserve_commit_order=ON
初始化集群:
[root@node11 mysql]#>mysqlsh
shell.connect('root@172.16.1.11:3306');
dba.configureLocalInstance();
主节点执行(node11)
mysqlsh
# 创建一个 cluster,命名为 'myCluster'
var cluster = dba.createCluster('myCluster');
# 创建成功后,查看cluster状态
cluster.status();
#添加实例
cluster.addInstance('root@node12:3306');
cluster.addInstance('root@node13:3306');
日志如下:
NOTE: The target instance 'node12:3306' has not been pre-provisioned (GTID set is empty). The Shell is unable to decide whether incremental state recovery can correctly provision it.
The safest and most convenient way to provision a new instance is through automatic clone provisioning, which will completely overwrite the state of 'node12:3306' with a physical snapshot from an existing cluster member. To use this method by default, set the 'recoveryMethod' option to 'clone'.
The incremental state recovery may be safely used if you are sure all updates ever executed in the cluster were done with GTIDs enabled, there are no purged transactions and the new instance contains the same GTID set as the cluster or a subset of it. To use this method by default, set the 'recoveryMethod' option to 'incremental'.
Please select a recovery method [C]lone/[I]ncremental recovery/[A]bort (default Clone):
Validating instance configuration at node12:3306...
This instance reports its own address as node12:3306
Instance configuration is suitable.
NOTE: Group Replication will communicate with other members using 'node12:33061'. Use the localAddress option to override.
A new instance will be added to the InnoDB cluster. Depending on the amount of
data on the cluster this might take from a few seconds to several hours.
Adding instance to the cluster...
Monitoring recovery process of the new cluster member. Press ^C to stop monitoring and let it continue in background.
Clone based state recovery is now in progress.
NOTE: A server restart is expected to happen as part of the clone process. If the
server does not support the RESTART command or does not come back after a
while, you may need to manually start it back.
* Waiting for clone to finish...
NOTE: node12:3306 is being cloned from node11:3306
** Stage DROP DATA: Completed
** Clone Transfer
FILE COPY ############################################################ 100% Completed
PAGE COPY ############################################################ 100% Completed
REDO COPY ############################################################ 100% Completed
NOTE: node12:3306 is shutting down...
* Waiting for server restart... ready
* node12:3306 has restarted, waiting for clone to finish...
** Stage RESTART: Completed
* Clone process has finished: 72.20 MB transferred in about 1 second (~72.20 MB/s)
State recovery already finished for 'node12:3306'
The instance 'node12:3306' was successfully added to the cluster.
# 创建成功后,查看cluster状态,节点已加入
cluster.status();
MySQL localhost:3306 ssl JS > cluster.status();
{
"clusterName": "myCluster",
"defaultReplicaSet": {
"name": "default",
"primary": "node11:3306",
"ssl": "REQUIRED",
"status": "OK",
"statusText": "Cluster is ONLINE and can tolerate up to ONE failure.",
"topology": {
"node11:3306": {
"address": "node11:3306",
"memberRole": "PRIMARY",
"mode": "R/W",
"readReplicas": {},
"replicationLag": null,
"role": "HA",
"status": "ONLINE",
"version": "8.0.25"
},
"node12:3306": {
"address": "node12:3306",
"memberRole": "SECONDARY",
"mode": "R/O",
"readReplicas": {},
"replicationLag": null,
"role": "HA",
"status": "ONLINE",
"version": "8.0.25"
},
"node13:3306": {
"address": "node13:3306",
"memberRole": "SECONDARY",
"mode": "R/O",
"readReplicas": {},
"replicationLag": null,
"role": "HA",
"status": "ONLINE",
"version": "8.0.25"
}
},
"topologyMode": "Single-Primary"
},
"groupInformationSourceMember": "node11:3306"
}
配置完成后,默认是MGR单主模式
配置完成后,可以看到node11可读写,但node12,node13为只读模式:
node11:
mysql> show variables like '%read_only%';
+-----------------------+-------+
| Variable_name | Value |
+-----------------------+-------+
| innodb_read_only | OFF |
| read_only | OFF |
| super_read_only | OFF |
| transaction_read_only | OFF |
+-----------------------+-------+
4 rows in set (0.00 sec)
node12:
mysql> show variables like '%read_only%';
+-----------------------+-------+
| Variable_name | Value |
+-----------------------+-------+
| innodb_read_only | OFF |
| read_only | ON |
| super_read_only | ON |
| transaction_read_only | OFF |
+-----------------------+-------+
4 rows in set (0.00 sec)
mysql> show variables like '%read_only%';
+-----------------------+-------+
| Variable_name | Value |
+-----------------------+-------+
| innodb_read_only | OFF |
| read_only | ON |
| super_read_only | ON |
| transaction_read_only | OFF |
+-----------------------+-------+
4 rows in set (0.01 sec)
MGR数据同步验证:
node11:
mysql> create database rsc;
Query OK, 1 row affected (0.01 sec)
mysql> use rsc
Database changed
mysql> create table rsc(id int(10) not null primary key auto_increment,name varchar(100));
Query OK, 0 rows affected, 1 warning (0.03 sec)
mysql> insert into rsc select 1,'rscpass';
Query OK, 1 row affected (0.02 sec)
Records: 1 Duplicates: 0 Warnings: 0
mysql> select * from rsc;
+----+---------+
| id | name |
+----+---------+
| 1 | rscpass |
+----+---------+
1 row in set (0.00 sec)
node12:
mysql> select * from rsc.rsc;
+----+---------+
| id | name |
+----+---------+
| 1 | rscpass |
+----+---------+
1 row in set (0.01 sec)
node13:
mysql> select * from rsc.rsc;
+----+---------+
| id | name |
+----+---------+
| 1 | rscpass |
+----+---------+
1 row in set (0.01 sec)
安装配置MySQL Router
Router作为一个流量转发层,位于应用与MySQL服务器之间,其功能类似于LVS。
MySQL Router的工作流程如下:
1.MySQL客户端连接到MySQL Router。
2.Router检查可用的MySQL服务器。
3.Router打开一个适用MySQL服务器的TCP连接。
4.Router在应用程序和MySQL服务器之间来回转发数据包
5.如果连接的MySQL服务器出现故障, Router将断开连接。当应用程序重试连接到Router时,Router选择另一个可用MySQL服务器。
简单理解,应用不再直连MySQL Servers,而是与Router相连,根据Router的配置,将会把应用程序的读写请求转发给MySQL Servers。当有多个MySQL Servers,无论主、从,Router可以对读写请求进行负载均衡。当某个Server失效时,Router可以将其从Active列表中移除,当其online后再次加入Active列表,即提供了Failover特性。如果使用InnoDB Cluster模式,那么Router还能基于metaCache(metaServers)机制,感知MySQL的主从切换、从库增减等集群拓扑变更,而且基于变更能够实现Master自动切换、Slaves列表自动装配等。
配置 Mysql router
mysql-router 安装
到官方网站上下载:
https://downloads.mysql.com/archives/router/
rpm -ivh mysql-router-community-8.0.25-1.el7.x86_64.rpm
初始化 mysql-router配置
[root@node11 mysql8.0.25]# mysqlrouter --user=root --bootstrap root@172.16.1.11:3306 --user=mysqlrouter
Please enter MySQL password for root:
# Bootstrapping system MySQL Router instance...
- Creating account(s) (only those that are needed, if any)
- Verifying account (using it to run SQL queries that would be run by Router)
- Storing account in keyring
- Adjusting permissions of generated files
- Creating configuration /etc/mysqlrouter/mysqlrouter.conf
Existing configuration backed up to '/etc/mysqlrouter/mysqlrouter.conf.bak'
# MySQL Router configured for the InnoDB Cluster 'myCluster'
After this MySQL Router has been started with the generated configuration
$ /etc/init.d/mysqlrouter restart
or
$ systemctl start mysqlrouter
or
$ mysqlrouter -c /etc/mysqlrouter/mysqlrouter.conf
the cluster 'myCluster' can be reached by connecting to:
## MySQL Classic protocol
- Read/Write Connections: localhost:6446
- Read/Only Connections: localhost:6447
## MySQL X protocol
- Read/Write Connections: localhost:6448
- Read/Only Connections: localhost:6449
mysqlrouter配置文件如下:
[root@node11 lib]# cat /etc/mysqlrouter/mysqlrouter.conf
# File automatically generated during MySQL Router bootstrap
[DEFAULT]
name=system
user=root
keyring_path=/var/lib/mysqlrouter/keyring
master_key_path=/etc/mysqlrouter/mysqlrouter.key
connect_timeout=15
read_timeout=30
dynamic_state=/var/lib/mysqlrouter/state.json
client_ssl_cert=/var/lib/mysqlrouter/router-cert.pem
client_ssl_key=/var/lib/mysqlrouter/router-key.pem
client_ssl_mode=PREFERRED
server_ssl_mode=AS_CLIENT
server_ssl_verify=DISABLED
[logger]
level = INFO
[metadata_cache:myCluster]
cluster_type=gr
router_id=1
user=mysql_router1_zzcfcq4o6ucc
metadata_cluster=myCluster
ttl=0.5
auth_cache_ttl=-1
auth_cache_refresh_interval=2
use_gr_notifications=0
[routing:myCluster_rw]
bind_address=0.0.0.0
bind_port=6446
destinations=metadata-cache://myCluster/?role=PRIMARY
routing_strategy=first-available
protocol=classic
[routing:myCluster_ro]
bind_address=0.0.0.0
bind_port=6447
destinations=metadata-cache://myCluster/?role=SECONDARY
routing_strategy=round-robin-with-fallback
protocol=classic
[routing:myCluster_x_rw]
bind_address=0.0.0.0
bind_port=6448
destinations=metadata-cache://myCluster/?role=PRIMARY
routing_strategy=first-available
protocol=x
[routing:myCluster_x_ro]
bind_address=0.0.0.0
bind_port=6449
destinations=metadata-cache://myCluster/?role=SECONDARY
routing_strategy=round-robin-with-fallback
protocol=x
[http_server]
port=8443
ssl=1
ssl_cert=/var/lib/mysqlrouter/router-cert.pem
ssl_key=/var/lib/mysqlrouter/router-key.pem
[http_auth_realm:default_auth_realm]
backend=default_auth_backend
method=basic
name=default_realm
[rest_router]
require_realm=default_auth_realm
[rest_api]
[http_auth_backend:default_auth_backend]
backend=metadata_cache
[rest_routing]
require_realm=default_auth_realm
[rest_metadata_cache]
require_realm=default_auth_realm
启动mysql-router
修改文件属性:
[root@node11 mysqlrouter]# chown mysqlrouter:mysqlrouter /var/log/mysqlrouter/* -R
[root@node11 mysqlrouter]# chown mysqlrouter:mysqlrouter /etc/mysqlrouter/* -R
[root@node11 mysqlrouter]# chown mysqlrouter:mysqlrouter /var/lib/mysqlrouter/* -R
修改mysqlrouter.service的文件:
[root@node11 lib]# cat /usr/lib/systemd/system/mysqlrouter.service
[Unit]
Description=MySQL Router
After=network.target
After=syslog.target
[Service]
Type=simple
User=mysqlrouter
Group=mysqlrouter
PIDFile=/var/run/mysqlrouter/mysqlrouter.pid
# Start main service
ExecStart=/usr/bin/mysqlrouter -c /etc/mysqlrouter/mysqlrouter.conf --user=mysqlrouter
# Sets open_files_limit
LimitNOFILE = 10000
Restart=on-failure
PrivateTmp=true
[Install]
WantedBy=multi-user.target
通过systemctl启动服务:
systemctl start mysqlrouter
systemctl enable mysqlrouter
端口清单:
通过初始化配置,mysqlrouter开放如下端口,分别对应MGR中的主库和从库:
[root@node11 lib]# netstat -lntup | grep mysqlrouter
tcp 0 0 0.0.0.0:8443 0.0.0.0:* LISTEN 20787/mysqlrouter
tcp 0 0 0.0.0.0:6446 0.0.0.0:* LISTEN 20787/mysqlrouter # master
tcp 0 0 0.0.0.0:6447 0.0.0.0:* LISTEN 20787/mysqlrouter # slave
tcp 0 0 0.0.0.0:6448 0.0.0.0:* LISTEN 20787/mysqlrouter
tcp 0 0 0.0.0.0:6449 0.0.0.0:* LISTEN 20787/mysqlrouter
测试innodb cluster集群:
通过mysqlrouter 的6446端口连接MGR集群:
[root@node11 ~]# mysql -uroot -p'Rscpass123.' -h172.16.1.11 -P6446
mysql: [Warning] Using a password on the command line interface can be insecure.
Welcome to the MySQL monitor. Commands end with ; or \g.
Your MySQL connection id is 1925
Server version: 8.0.25 MySQL Community Server - GPL
Copyright (c) 2000, 2021, Oracle and/or its affiliates.
Oracle is a registered trademark of Oracle Corporation and/or its
affiliates. Other names may be trademarks of their respective
owners.
Type 'help;' or '\h' for help. Type '\c' to clear the current input statement.
mysql> exit
Bye
通过mysqlrouter 的6447端口连接MGR集群:
[root@node11 ~]# mysql -uroot -p'Rscpass123.' -h172.16.1.11 -P6447
mysql: [Warning] Using a password on the command line interface can be insecure.
Welcome to the MySQL monitor. Commands end with ; or \g.
Your MySQL connection id is 25
Server version: 8.0.25 MySQL Community Server - GPL
Copyright (c) 2000, 2021, Oracle and/or its affiliates.
Oracle is a registered trademark of Oracle Corporation and/or its
affiliates. Other names may be trademarks of their respective
owners.
Type 'help;' or '\h' for help. Type '\c' to clear the current input statement.
mysql> exit
Bye
以上就是MySQL InnoDB Cluster集群的配置,总体来说,通过mysql-shell创建MGR集群更简单了,通过MySQL-Router做负载均衡更智能了